
Azure 가상 머신 자동 검색
이 가이드에서는 Azure 가상 머신에 대한 자동 서버 검색을 설정하는 방법을 보여줍니다. Teleport Discovery Service는 Azure에 연결하여 설정된 레이블과 일치하는 가상 머신을 자동으로 검색하고 등록할 수 있습니다.
이 가이드에서는 Azure 가상 머신에 대한 자동 서버 검색을 설정하는 방법을 보여줍니다.
작동 방식#
Teleport Discovery Service는 Azure에 연결하여 설정된 레이블과 일치하는 가상 머신을 자동으로 검색하고 등록할 수 있습니다. 그런 다음 검색된 인스턴스에서 스크립트를 실행하여 Teleport를 설치하고, 시작하고, 클러스터에 조인합니다.
사전 조건#
-
A running Teleport cluster. If you want to get started with Teleport, sign up for a free trial or set up a demo environment.
-
The
tctlandtshclients.Installing `tctl` and `tsh` clients
-
Determine the version of your Teleport cluster. The
tctlandtshclients must be at most one major version behind your Teleport cluster version. Send a GET request to the Proxy Service at/v1/webapi/findand use a JSON query tool to obtain your cluster version. Replace with the web address of your Teleport Proxy Service:$ TELEPORT_DOMAIN= $ TELEPORT_VERSION="$(curl -s https://$TELEPORT_DOMAIN/v1/webapi/find | jq -r '.server_version')" -
Follow the instructions for your platform to install
tctlandtshclients:
-
- 가상 머신과 관리 ID를 생성하고 연결할 권한이 있는 Azure 구독.
- 기본 Teleport 설치 스크립트를 사용하는 경우 Ubuntu/Debian/RHEL을 실행하는 Teleport 클러스터에 조인할 Azure 가상 머신. (다른 Linux 배포판의 경우 Teleport를 수동으로 설치할 수 있습니다.)
To check that you can connect to your Teleport cluster, sign in with tsh login, then
verify that you can run tctl commands using your current credentials.
For example, run the following command, assigning to the domain name of the Teleport Proxy Service in your cluster and to your Teleport username:
$ tsh login --proxy= --user=
$ tctl status
# Cluster  (=teleport.url=)
# Version  (=teleport.version=)
# CA pin   (=presets.ca_pin=)
If you can connect to the cluster and run the tctl status command, you can use your
current credentials to run subsequent tctl commands from your workstation.
If you host your own Teleport cluster, you can also run tctl commands on the computer that
hosts the Teleport Auth Service for full permissions.
1/5 단계. Azure 초대 토큰 생성#
Azure 가상 머신을 검색할 때 Teleport는 조인하는 SSH Service 인스턴스를 인증하기 위해 Azure 초대 토큰을 사용합니다.
token.yaml 파일을 생성합니다:
# token.yaml
kind: token
version: v2
metadata:
  # 토큰 이름은 비밀이 아닙니다. 인스턴스가 이 토큰을 사용하기 위해
  # Azure 구독에서 실행 중임을 증명해야 하기 때문입니다
  name: azure-discovery-token
  # 토큰의 기본 만료 시간은 30분에 불과하므로 긴 만료 시간 설정
  expires: "3000-01-01T00:00:00Z"
spec:
  # 필요한 최소 역할 집합 사용
  roles: [Node]

  # 이 토큰에 허용되는 조인 방법 설정
  join_method: azure

  azure:
    allow:
    # 노드가 조인할 수 있는 Azure 구독 지정
    - subscription: "123456789"
subscription 필드를 Azure 구독 ID로 지정합니다.
다음 명령으로 토큰을 Teleport 클러스터에 추가합니다:
$ tctl create -f token.yaml
2/5 단계. Teleport를 위한 IAM 권한 설정#
Teleport Discovery Service는 Azure 가상 머신을 검색하고 등록하기 위해 Azure IAM 권한이 필요합니다.
Azure 서비스 주체 설정#
Discovery Service가 Azure 리소스에 접근하는 방법에는 몇 가지가 있습니다:
- Discovery Service는 연결된 관리 ID가 있는 Azure VM에서 실행될 수 있습니다. Azure 자격 증명을 관리할 필요가 없으므로 프로덕션 환경에서 Discovery Service를 배포하는 권장 방법입니다.
- Discovery Service를 Microsoft Entra ID 애플리케이션으로 등록하고 자격 증명으로 설정할 수 있습니다. Azure 자격 증명이 Discovery Service 환경에 있어야 하므로 개발 및 테스트 목적으로만 권장됩니다.
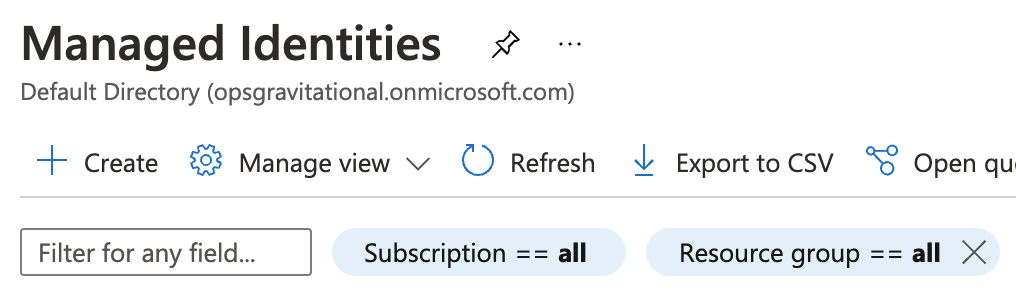
Azure 포털에서 관리 ID 페이지로 이동하여 만들기를 클릭하여 새 사용자 할당 관리 ID를 생성합니다:
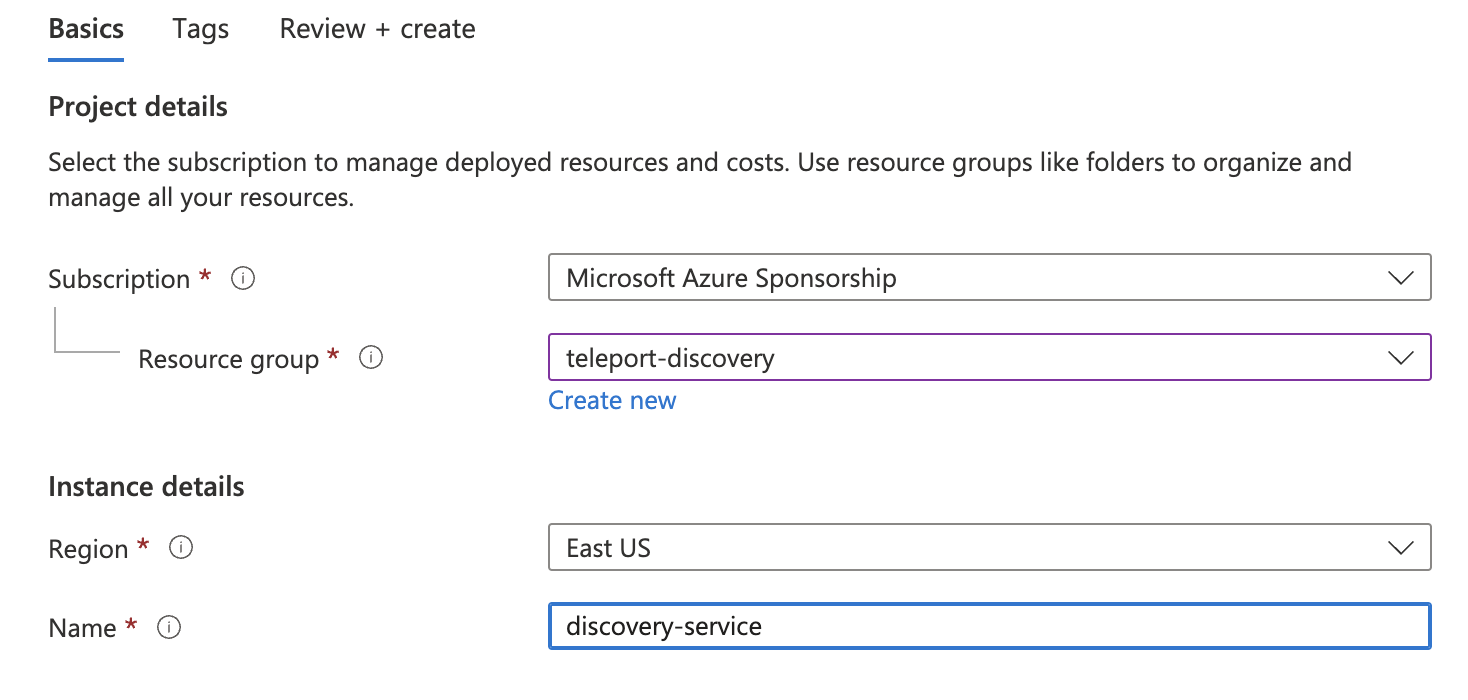
새 ID에 대한 이름과 리소스 그룹을 선택하고 생성합니다:
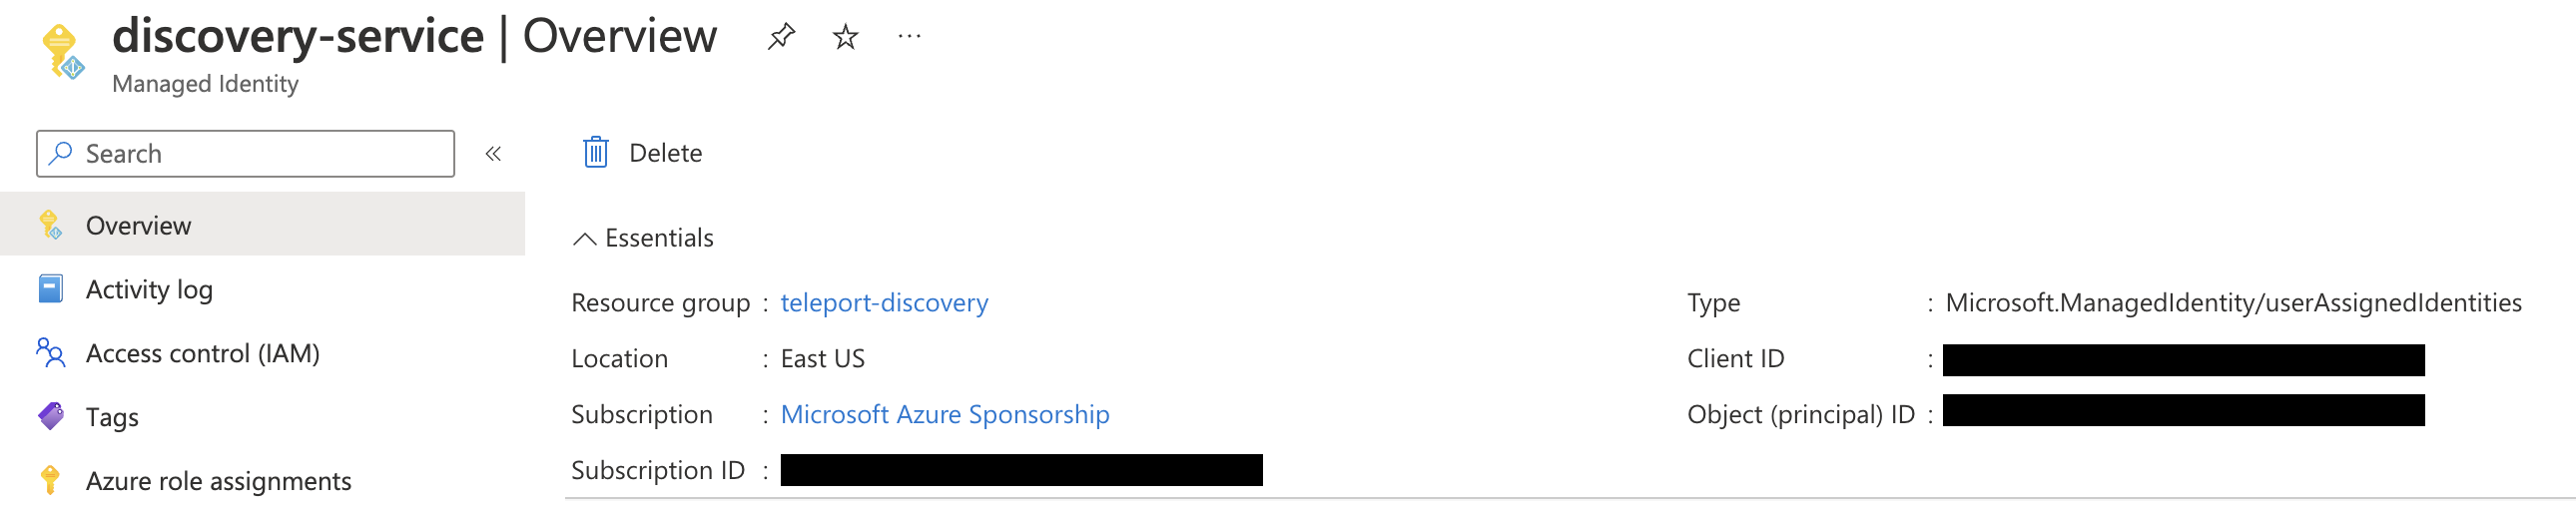
생성된 ID의 클라이언트 ID를 기록합니다:
다음으로 Discovery Service 인스턴스를 실행할 Azure VM으로 이동하여 방금 생성한 ID를 추가합니다:
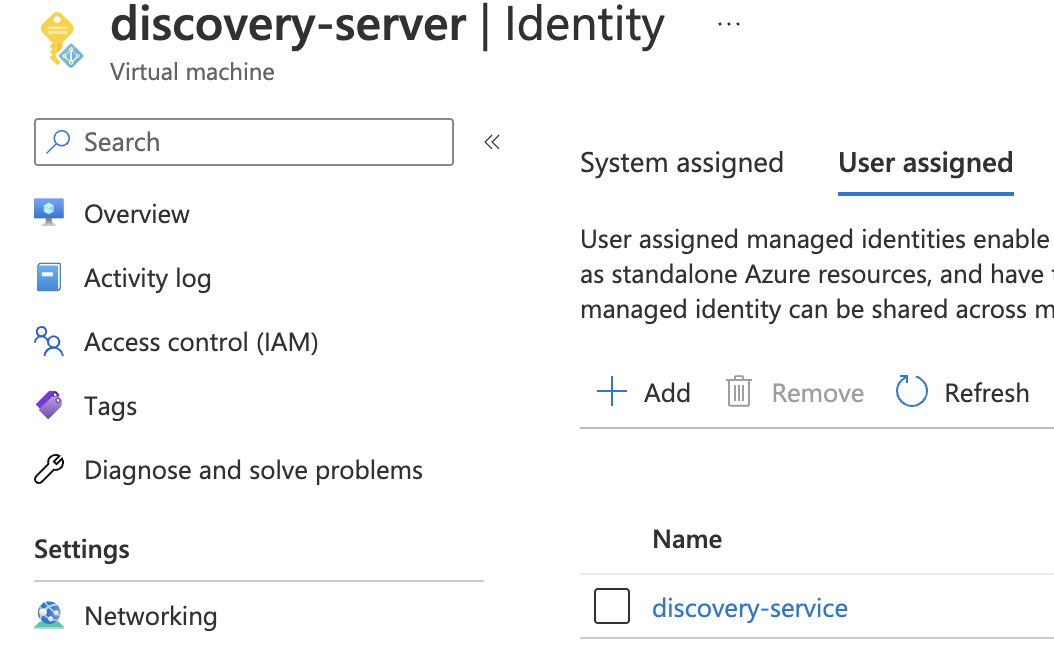
Discovery Service를 실행할 모든 Azure VM에 이 ID를 연결합니다.
Discovery Service를 Microsoft Entra ID 애플리케이션으로 등록하는 것은 테스트 및 개발 시나리오에 적합하거나 Discovery Service가 Azure VM에서 실행되지 않는 경우에 적합합니다. 프로덕션 시나리오의 경우 관리 ID 방법을 사용하는 것이 좋습니다.
Microsoft Entra ID의 앱 등록 페이지로 이동하여 새 등록을 클릭합니다:
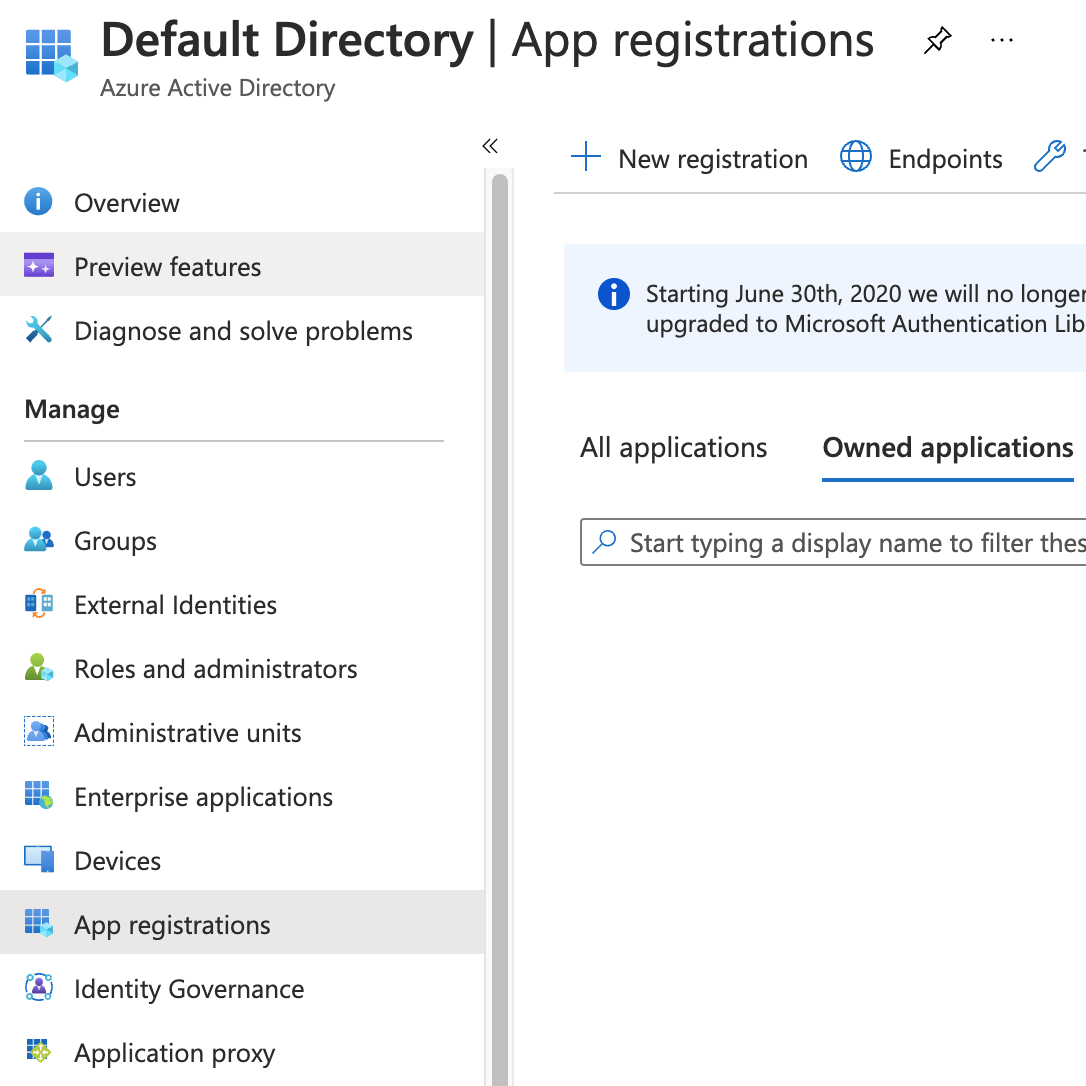
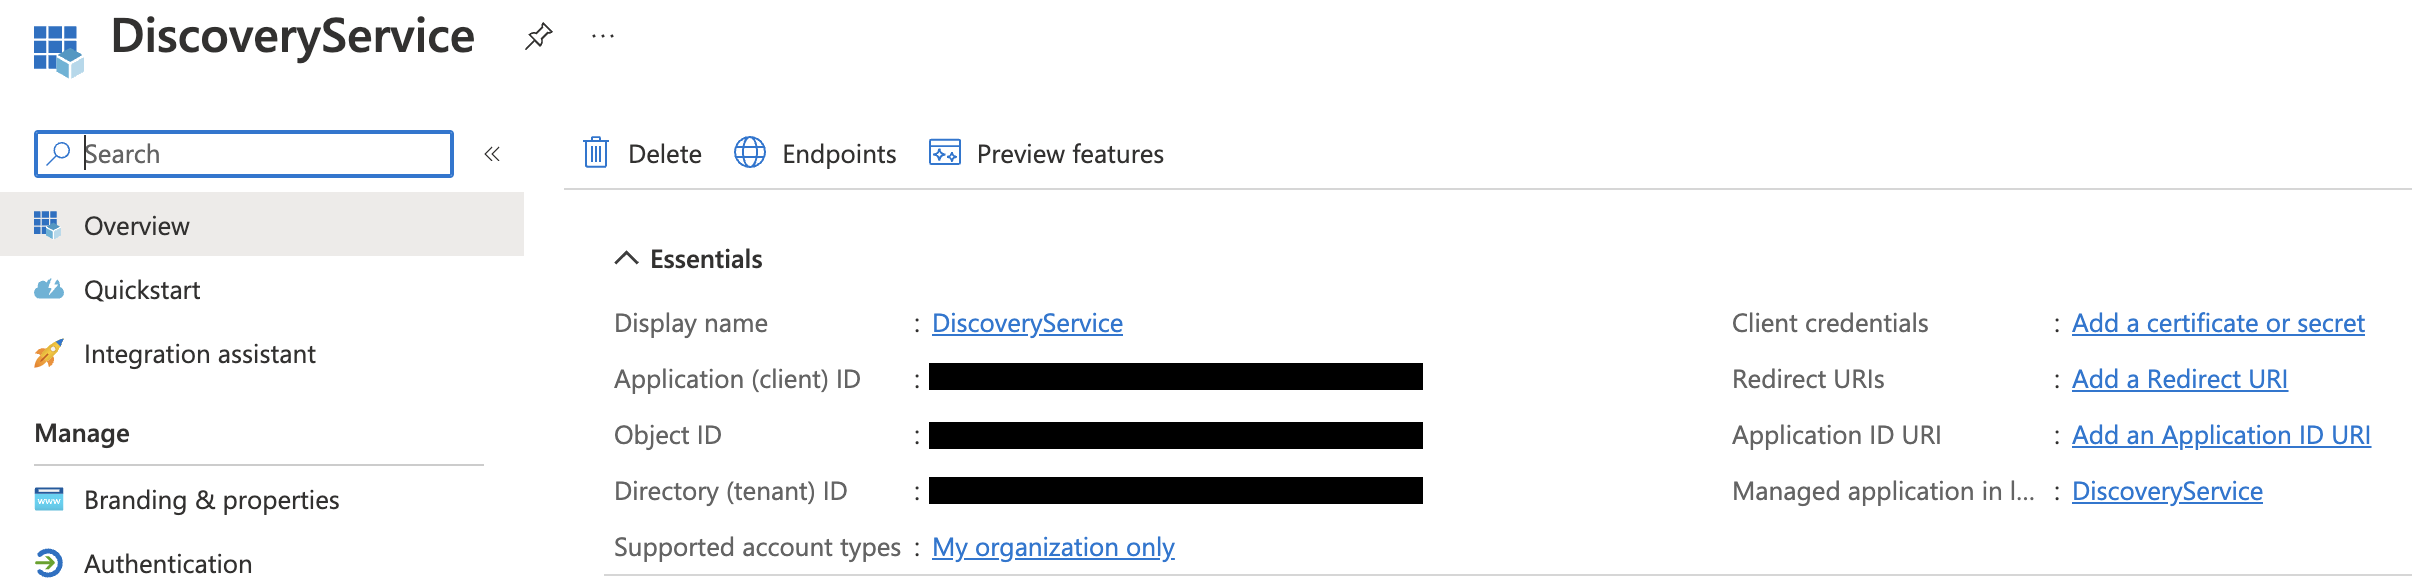
이름(예: DiscoveryService)을 선택하고 새 애플리케이션을 등록합니다. 앱이 생성되면 애플리케이션(클라이언트) ID를 기록하고 인증서 또는 비밀 추가를 클릭합니다:
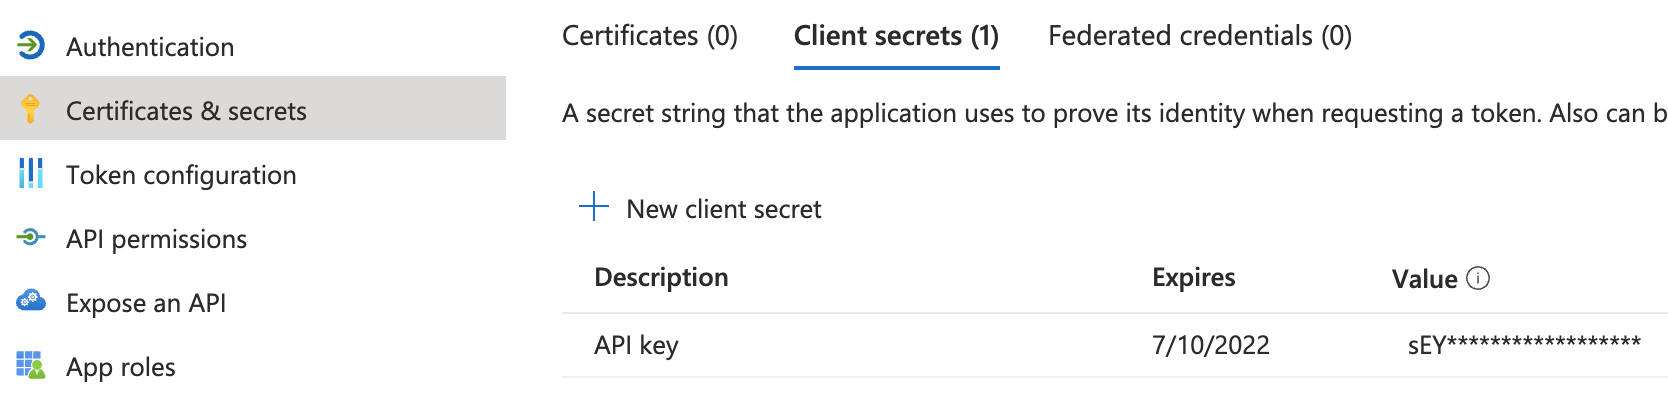
Discovery Service 에이전트가 Azure API로 인증하는 데 사용할 새 클라이언트 비밀을 생성합니다:
Teleport Discovery Service는 Azure SDK의 기본 자격 증명 공급자 체인을 사용하여 자격 증명을 찾습니다. 사용 사례에 맞는 방법을 선택하려면 Azure SDK 인증을 참조하세요. 예를 들어 클라이언트 비밀을 사용한 환경 기반 인증을 사용하려면 Discovery Service에 다음 환경 변수가 설정되어 있어야 합니다:
export AZURE_TENANT_ID=
export AZURE_CLIENT_ID=
export AZURE_CLIENT_SECRET=
사용자 지정 역할 생성#
Teleport는 Azure VM을 검색하고 등록하기 위해 다음 권한이 필요합니다:
Microsoft.Compute/virtualMachines/readMicrosoft.Compute/virtualMachines/runCommand/actionMicrosoft.Compute/virtualMachines/runCommands/writeMicrosoft.Compute/virtualMachines/runCommands/readMicrosoft.Compute/virtualMachines/runCommands/delete
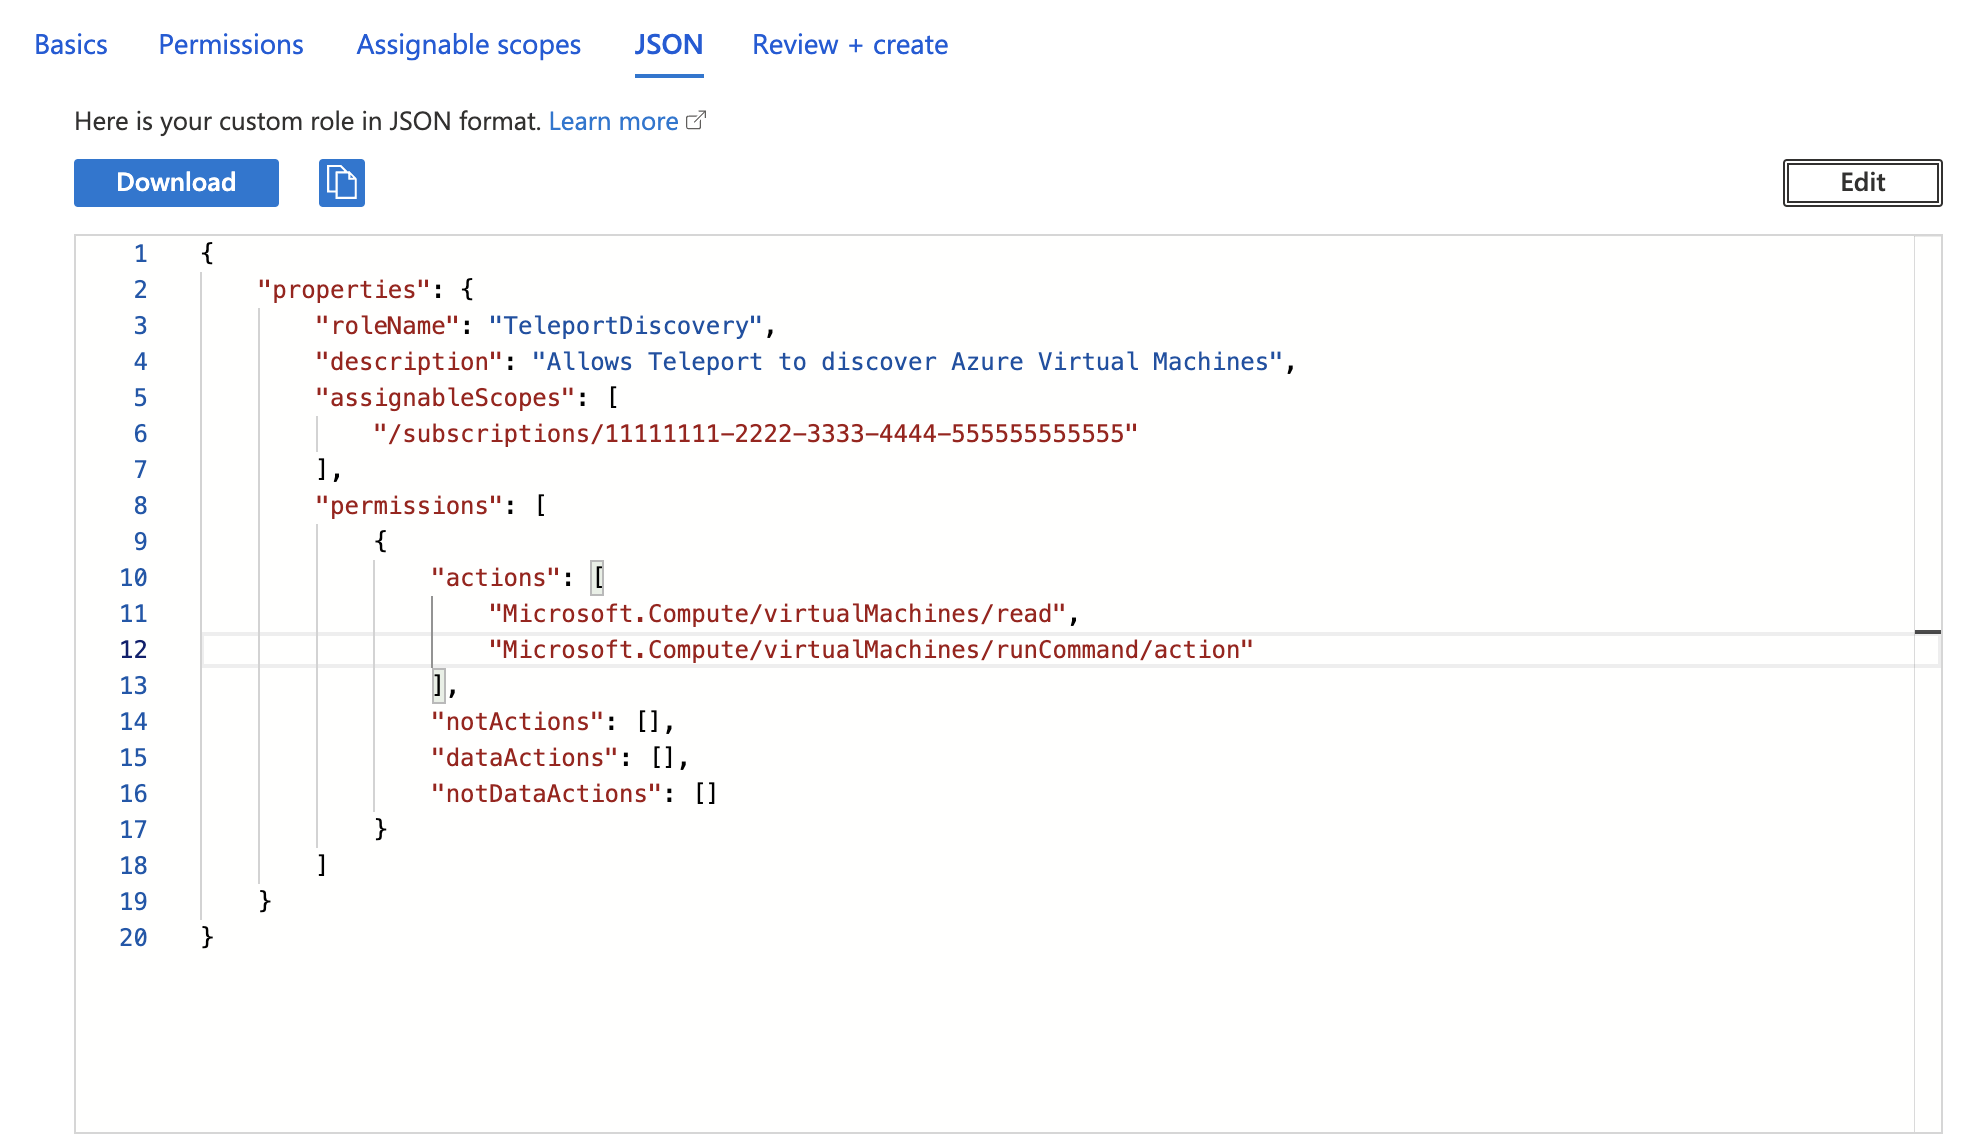
다음은 Teleport가 Azure 가상 머신에서 읽기 및 명령 실행을 허용하는 샘플 역할 정의입니다:
{
    "properties": {
        "roleName": "TeleportDiscovery",
        "description": "Allows Teleport to discover Azure virtual machines",
        "assignableScopes": [
            "/subscriptions/11111111-2222-3333-4444-555555555555"
        ],
        "permissions": [
            {
                "actions": [
                    "Microsoft.Compute/virtualMachines/read",
                    "Microsoft.Compute/virtualMachines/runCommand/action",
                    "Microsoft.Compute/virtualMachines/runCommands/write",
                    "Microsoft.Compute/virtualMachines/runCommands/read",
                    "Microsoft.Compute/virtualMachines/runCommands/delete"
                ],
                "notActions": [],
                "dataActions": [],
                "notDataActions": []
            }
        ]
    }
}
위의 assignableScopes 필드에는 구독 /subscriptions/<subscription>이 포함되어 있으며, 해당 구독 내의 모든 리소스 범위 또는 구독 범위 자체에서 역할을 할당할 수 있습니다. assignableScopes를 더 제한하려면 리소스 그룹 /subscriptions/<subscription>/resourceGroups/<group> 또는 관리 그룹 /providers/Microsoft.Management/managementGroups/<group>을 대신 사용할 수 있습니다.
구독 페이지로 이동하여 구독을 선택합니다.
구독에서 *액세스 제어(IAM)*를 클릭하고 추가 > 사용자 지정 역할 추가를 선택합니다:
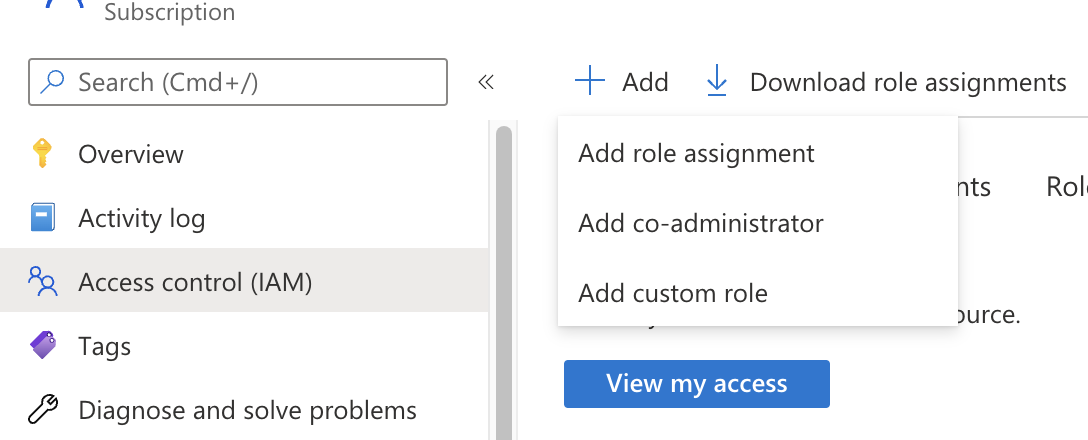
사용자 지정 역할 생성 페이지에서 JSON 탭을 클릭하고 편집을 클릭한 다음 JSON 예시를 붙여넣고 assignableScopes의 구독을 자신의 구독 ID로 변경합니다:
Teleport Discovery Service 주체에 대한 역할 할당 생성#
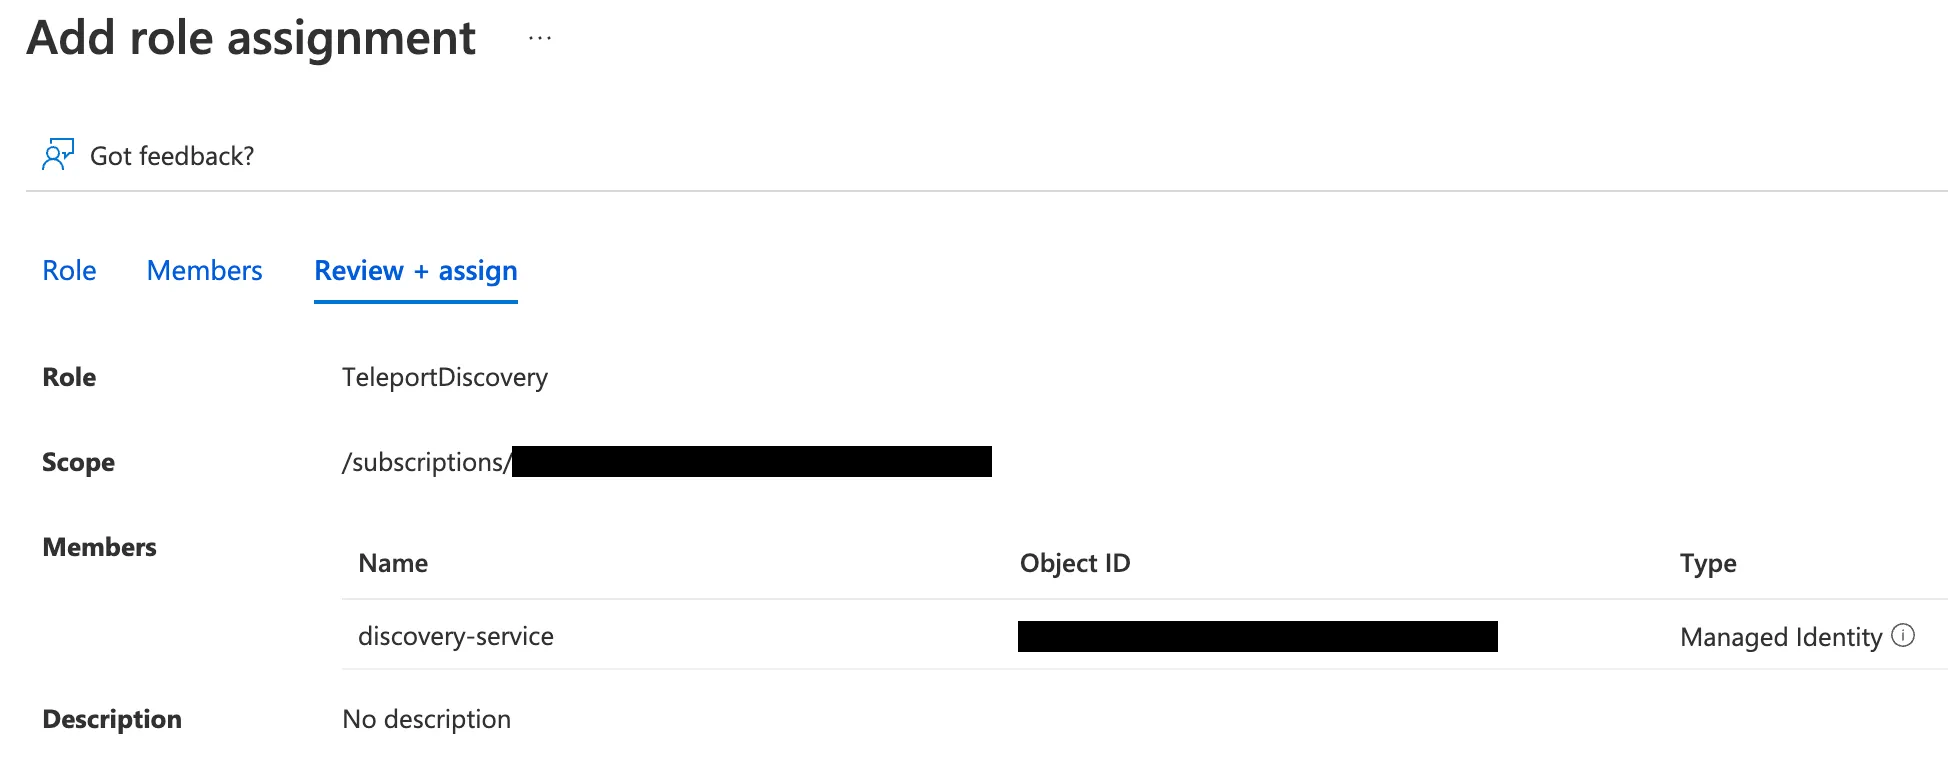
To grant Teleport permissions, the custom role you created must be assigned to the Teleport service principal - either the managed identity or the app registration you created earlier.
Navigate to the resource scope where you want to make the role assignment. Click Access control (IAM) and select Add > Add role assignment. Choose the custom role you created as the role and the Teleport service principal as a member.
3/5 단계. 검색된 노드에 대한 관리 ID 설정#
Discovery Service가 검색할 모든 Azure VM에는 최소 Microsoft.Compute/virtualMachines/read 권한이 있는 관리 ID가 할당되어 있어야 합니다.
검색할 VM에 둘 이상의 관리 ID가 할당된 경우 5단계를 위해 방금 생성한 ID의 클라이언트 ID를 저장합니다.
4/5 단계. Teleport Discovery Service 설치#
이미 다른 Teleport 서비스(예: Auth 또는 Proxy)를 실행 중인 호스트에서 Discovery Service를 실행할 계획이라면 이 단계를 건너뛸 수 있습니다.
Discovery Service를 실행할 가상 머신에 Teleport를 설치합니다:
To install a Teleport Agent on your Linux server:
The recommended installation method is the cluster install script. It will select the correct version, edition, and installation mode for your cluster.
-
Assign to your Teleport cluster hostname and port, but not the scheme (https://).
-
Run your cluster's install script:
$ curl "https:///scripts/install.sh" | sudo bash
5/5 단계. Azure 인스턴스를 검색하도록 Teleport 설정#
Discovery Service를 자체 호스트에서 실행하는 경우 서비스가 클러스터에 연결하기 위한 유효한 초대 토큰이 필요합니다. Teleport Auth Service에 대해 다음 명령을 실행하여 하나를 생성합니다:
$ tctl tokens add --type=discovery
Discovery Service를 실행할 가상 머신의 /tmp/token에 생성된 토큰을 저장합니다.
을 클러스터의 Teleport Proxy Service 호스트 및 포트로, 을 등록할 리소스 그룹을 식별하는 이름으로 지정합니다:
# teleport.yaml
version: v3
teleport:
  join_params:
    token_name: "/tmp/token"
    method: token
  proxy_server: "teleport.example.com:443" />"
auth_service:
  enabled: false
proxy_service:
  enabled: false
ssh_service:
  enabled: false
discovery_service:
  enabled: true
  discovery_group:  name="azure-prod" />
등록하려는 리소스에 대한 매처를 생성합니다.
동적 설정은 Terraform으로 관리할 수 있는 Discovery Config를 사용합니다.
자세한 내용은 Terraform discovery_config 참조를 참조하세요.
정적 설정은 처음에는 더 간단하지만 등록 변경에 teleport.yaml 편집과 Discovery Service 재시작이 필요하므로 유연성이 낮습니다.
Azure VM 검색을 활성화하기 위해 이전에 설정한 동일한 검색 그룹이 있는 Discovery Config 리소스를 생성합니다.
다음 내용으로 discovery-azure-prod.yaml 파일을 생성합니다:
kind: discovery_config
version: v1
metadata:
  name: example-discovery-config
spec:
  discovery_group:  name="azure-prod" />
  azure:
    - types: ["vm"]
      subscriptions: ["<subscription>"]
      resource_groups: ["<resource-group>"]
      regions: ["<region>"]
      tags:
        "env": "prod" # tag:env=prod인 가상 머신 매칭
      install:
        azure:
          # 선택 사항: 검색할 VM에 둘 이상의 관리 ID가 할당된 경우
          # 여기에 3단계에서 생성한 ID의 클라이언트 ID를 설정합니다.
          client_id: "<client-id>"
특히 Discovery Service와 연결할 리소스 그룹, 리전 및 태그에 맞게 spec.azure 아래의 키를 조정합니다.
다음 명령을 실행하여 Discovery Config를 생성합니다:
$ tctl create -f discovery-azure-prod.yaml
일치하는 인스턴스가 Teleport 클러스터에 자동으로 추가됩니다.
언제든지 Discovery Config를 업데이트할 수 있으며, 서비스는 자동으로 변경 사항을 재적용합니다.
Azure VM 검색을 활성화하려면 teleport.yaml의 discovery_service.azure 섹션에 하나 이상의 항목이 있어야 합니다:
# teleport.yaml
# ...
discovery_service:
  enabled: true
  discovery_group:  name="azure-prod" />
  azure:
    - types: ["vm"]
      subscriptions: ["<subscription>"]
      resource_groups: ["<resource-group>"]
      regions: ["<region>"]
      tags:
        "env": "prod" # tag:env=prod인 가상 머신 매칭
      install:
        azure:
          # 선택 사항: 검색할 VM에 둘 이상의 관리 ID가 할당된 경우
          # 여기에 3단계에서 생성한 ID의 클라이언트 ID를 설정합니다.
          client_id: "<client-id>"
특히 Discovery Service와 연결할 리전 및 태그에 맞게 discovery_service.azure 아래의 키를 조정합니다.
자동 검색 레이블#
Teleport applies a set of default labels to resources on AWS, Azure, and Google Cloud that join a cluster via auto-discovery. See the auto-discovery labels reference
고급 설정#
(!docs/pages/includes/auto-discovery/server-advanced-config.mdx matcher="azure"!)
Use a custom installation script#
(!docs/pages/includes/server-access/custom-installer.mdx matcher="azure"!)
If client_id is set in the Discovery Service config, custom installers will
also have the {} templating option.
문제 해결#
자격 증명 공급자 오류 없음#
Discovery Service 로그에 DefaultAzureCredential: failed to acquire a token. 오류가 표시되면 Teleport가 Azure SDK에 연결하는 데 필요한 자격 증명을 감지하지 못한 것입니다. Teleport Discovery Service를 실행하는 머신에 자격 증명이 적용되었는지 확인하고 Teleport Discovery Service를 다시 시작합니다.
자세한 내용은 Azure SDK 인증을 참조하세요.
Teleport에서 오류는 보고되지 않지만 VM이 조인하지 않음#
Discovery Service 설정을 확인하고 검색하려는 VM이 일치하는지 확인합니다. 디버그 모드에서 Teleport는 검색한 VM의 구독 ID와 이름을 기록합니다.
Azure 실행 명령 API는 명령의 출력을 보고하지 않으므로 Teleport는 명령이 성공했는지 실패했는지 알 방법이 없습니다. 실행 명령 로그는 대상 VM의 /var/log/azure/run-command-handler/handler.log에서 찾을 수 있습니다.
다음 단계#
- Azure 토큰에 대한 자세한 내용은 Azure 관리 ID를 통한 노드 조인을 읽어보세요.
- Azure 검색 설정에 대한 전체 문서는 설정 파일 참조 문서에서 확인할 수 있습니다.