



InfoGrab DocsInfoGrab Docs

Azure VM 자동 디스커버리 수동 구성

요약

이 가이드는 Azure 가상 머신에 대한 자동 서버 디스커버리를 설정하는 방법을 설명합니다. Teleport Discovery Service는 Azure에 연결하여 구성된 라벨과 일치하는 가상 머신을 자동으로 탐색하고 등록할 수 있습니다.

이 가이드는 Azure 가상 머신에 대한 자동 서버 디스커버리를 설정하는 방법을 설명합니다.

작동 방식#

Teleport Discovery Service는 Azure에 연결하여 구성된 라벨과 일치하는 가상 머신을 자동으로 탐색하고 등록할 수 있습니다. 이후 탐색된 인스턴스에서 스크립트를 실행하여 Teleport를 설치하고 시작한 뒤 클러스터에 조인시킵니다.

관리 그룹의 여러 구독에 걸쳐 VM을 탐색하려면 관리 그룹 Azure VM 자동 디스커버리를 참조합니다.

사전 요구사항#

  • 실행 중인 Teleport 클러스터. Teleport를 시작하려면 무료 체험판에 가입하거나 데모 환경을 구성하세요.

  • tctl and tsh clients.

    Installing `tctl` and `tsh` clients
    1. Teleport 클러스터의 버전을 확인합니다. tctl and tsh clients는 Teleport 클러스터 버전보다 최대 한 개의 메이저 버전까지만 뒤처질 수 있습니다. Proxy Service의 /v1/webapi/find로 GET 요청을 보내고 JSON 쿼리 도구를 사용하여 클러스터 버전을 확인합니다. teleport.example.com:443를 Teleport Proxy Service의 웹 주소로 바꿉니다:

      $ TELEPORT_DOMAIN=teleport.example.com:443
      $ TELEPORT_VERSION="$(curl -s https://$TELEPORT_DOMAIN/v1/webapi/find | jq -r '.server_version')"
      
    2. 사용 중인 플랫폼에 대한 지침에 따라 tctl and tsh clients를 설치합니다:

Mac

     `tctl` and `tsh` clients가 포함된, 서명된 Teleport macOS .pkg 설치 프로그램을 다운로드합니다:
 
     ```code
     $ curl -O https://cdn.teleport.dev/teleport-${TELEPORT_VERSION?}.pkg
     ```

     Finder에서 `pkg` 파일을 더블 클릭하여 설치를 시작합니다.
 
     
Warning
       Homebrew를 사용하여 Teleport를 설치하는 것은 지원되지 않습니다. Homebrew의
       Teleport 패키지는 Teleport에서 유지 관리하지 않으므로 신뢰성이나 보안을
       보장할 수 없습니다.
     

Windows - Powershell

     ```code
     $ curl.exe -O https://cdn.teleport.dev/teleport-v${TELEPORT_VERSION?}-windows-amd64-bin.zip
     # Unzip the archive and move the `tctl` and `tsh` clients to your %PATH%
     # NOTE: Do not place the `tctl` and `tsh` clients in the System32 directory, as this can cause issues when using WinSCP.
     # Use %SystemRoot% (C:\Windows) or %USERPROFILE% (C:\Users\<username>) instead.
     ```


Linux

     Linux 설치판의 모든 Teleport 바이너리에는 `tctl` and `tsh` clients가 포함되어 있습니다.  RPM/DEB
     패키지 및 i386/ARM/ARM64용 다운로드를 포함한 더 많은 옵션은
     [설치 페이지](../installation/installation.mdx)를 참조하세요.
 
     ```code
     $ curl -O https://cdn.teleport.dev/teleport-v${TELEPORT_VERSION?}-linux-amd64-bin.tar.gz
     $ tar -xzf teleport-v${TELEPORT_VERSION?}-linux-amd64-bin.tar.gz
     $ cd teleport
     $ sudo ./install
     # Teleport binaries have been copied to /usr/local/bin
     ```


  • 가상 머신이 있고, 관리 ID를 생성하여 연결할 수 있는 권한이 있는 Azure 구독.
  • Teleport 클러스터에 조인할 Azure 가상 머신. 기본 Teleport 설치 스크립트를 사용하는 경우 Ubuntu/Debian/RHEL을 실행해야 합니다. (다른 Linux 배포판에서는 Teleport를 수동으로 설치할 수 있습니다.)

Teleport cluster에 연결할 수 있는지 확인하려면 tsh login으로 로그인한 다음, 현재 자격 증명으로 tctl 명령을 실행할 수 있는지 확인합니다.

예를 들어, teleport.example.com에 cluster 내 Teleport Proxy Service의 도메인 이름을, email@example.com에 Teleport 사용자 이름을 지정하여 다음 명령을 실행합니다:

$ tsh login --proxy=teleport.example.com --user=email@example.com
$ tctl status
# Cluster  (=teleport.url=)
# Version  (=teleport.version=)
# CA pin   (=presets.ca_pin=)

cluster에 연결하여 tctl status 명령을 실행할 수 있다면, 현재 자격 증명을 사용하여 워크스테이션에서 이후의 tctl 명령을 실행할 수 있습니다. 자체 Teleport cluster를 호스팅하는 경우, 전체 권한을 얻기 위해 Teleport Auth Service를 호스팅하는 컴퓨터에서 tctl 명령을 실행할 수도 있습니다.

1/5단계. Azure 초대 토큰 생성#

Azure 가상 머신을 탐색할 때 Teleport는 조인하는 SSH Service 인스턴스를 인증하기 위해 Azure 초대 토큰을 사용합니다.

token.yaml 파일을 생성합니다.

# token.yaml
kind: token
version: v2
metadata:
  # the token name is not a secret because instances must prove that they are
  # running in your Azure subscription to use this token
  name: azure-discovery-token
  # set a long expiry time, as the default for tokens is only 30 minutes
  expires: "3000-01-01T00:00:00Z"
spec:
  # use the minimal set of roles required
  roles: [Node]

  # set the join method allowed for this token
  join_method: azure

  azure:
    allow:
    # specify the Azure subscription which Nodes may join from
    - subscription: "11111111-1111-1111-1111-111111111111"

subscription 필드에 사용 중인 Azure 구독 ID를 지정합니다.

다음 명령으로 Teleport 클러스터에 토큰을 추가합니다.

$ tctl create -f token.yaml

2/5단계. Teleport용 IAM 권한 구성#

Teleport Discovery Service가 Azure 가상 머신을 탐색하고 등록하려면 Azure IAM 권한이 필요합니다.

Note

이 섹션의 내용은 원문 문서를 참조하세요. (azure-vm-configure-service-principal.mdx)

사용자 지정 역할 생성#

Teleport가 Azure VM을 탐색하고 등록하려면 다음 권한이 필요합니다.

  • Microsoft.Compute/virtualMachines/read
  • Microsoft.Compute/virtualMachines/runCommands/write
  • Microsoft.Compute/virtualMachines/runCommands/read
  • Microsoft.Compute/virtualMachineScaleSets/read
  • Microsoft.Compute/virtualMachineScaleSets/virtualMachines/read
  • Microsoft.Compute/virtualMachineScaleSets/virtualMachines/runCommands/read
  • Microsoft.Compute/virtualMachineScaleSets/virtualMachines/runCommands/write

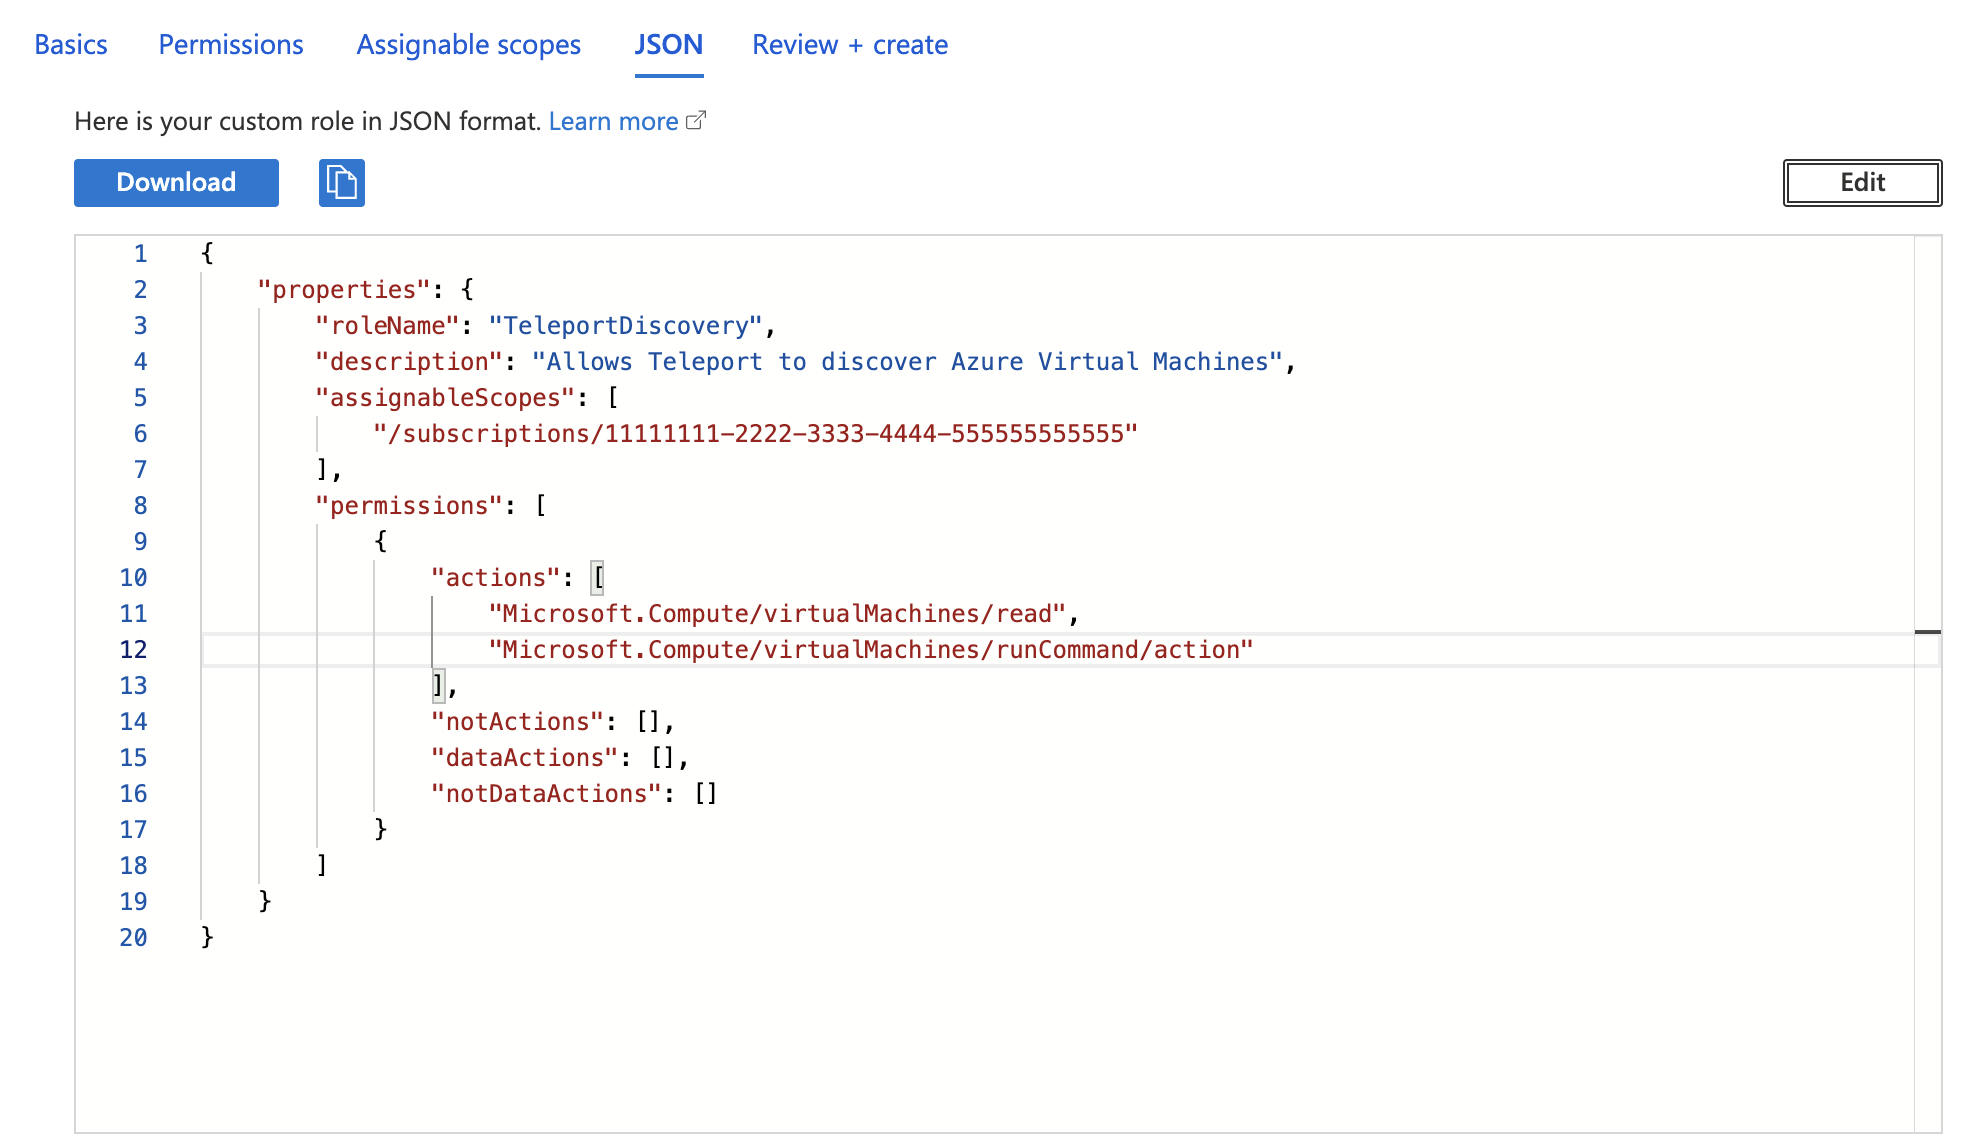
다음은 Teleport가 Azure 가상 머신을 읽고 명령을 실행할 수 있도록 허용하는 역할 정의 예시입니다.

{
    "properties": {
        "roleName": "TeleportDiscovery",
        "description": "Allows Teleport to discover Azure virtual machines",
        "assignableScopes": [
            "/subscriptions/11111111-2222-3333-4444-555555555555"
        ],
        "permissions": [
            {
                "actions": [
                    "Microsoft.Compute/virtualMachines/read",
                    "Microsoft.Compute/virtualMachines/runCommands/write",
                    "Microsoft.Compute/virtualMachines/runCommands/read",
                    "Microsoft.Compute/virtualMachineScaleSets/read",
                    "Microsoft.Compute/virtualMachineScaleSets/virtualMachines/read",
                    "Microsoft.Compute/virtualMachineScaleSets/virtualMachines/runCommands/write",
                    "Microsoft.Compute/virtualMachineScaleSets/virtualMachines/runCommands/read"
                ],
                "notActions": [],
                "dataActions": [],
                "notDataActions": []
            }
        ]
    }
}
Tip

위의 역할 정의를 사용하면 Teleport가 VM과 Virtual Machine Scale Set(VMSS)의 VM을 등록할 수 있습니다.

VMSS에는 Uniform과 권장되는 Flexible의 두 가지 오케스트레이션 모드가 있습니다. Uniform 오케스트레이션 모드의 VMSS를 사용하지 않거나 등록하지 않으려면 Microsoft.Compute/virtualMachineScaleSets/* 권한을 제거하여 Teleport에 부여되는 권한을 더 제한할 수 있습니다.

Azure 포털로 이동하여 Orchestration mode 칼럼에서 VMSS의 오케스트레이션 모드를 확인하고, 그에 맞게 역할 권한을 조정합니다.

위의 assignableScopes 필드에는 구독 /subscriptions/<subscription>이 포함되어 있어, 역할을 해당 구독 안의 모든 리소스 범위 또는 구독 범위 자체에 할당할 수 있습니다. assignableScopes를 더 제한하려면 리소스 그룹 /subscriptions/<subscription>/resourceGroups/<group> 또는 관리 그룹 /providers/Microsoft.Management/managementGroups/<group>을 대신 사용할 수 있습니다.

이제 Subscriptions 페이지로 이동하여 구독을 선택합니다.

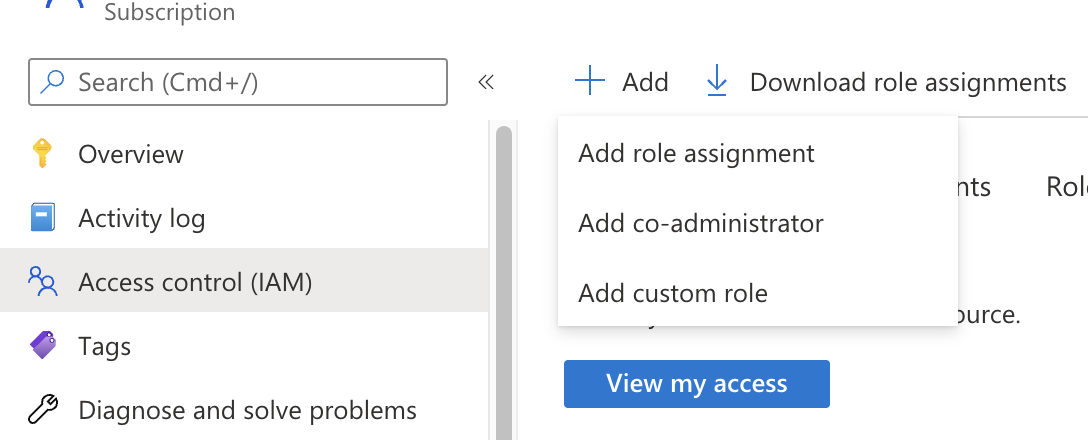
구독에서 *Access control (IAM)*을 클릭하고 Add > Add custom role을 선택합니다. IAM 사용자 지정 역할
사용자 지정 역할 생성 페이지에서 JSON 탭을 클릭한 다음 Edit를 클릭하고, JSON 예시를 붙여넣은 뒤 assignableScopes의 구독을 사용 중인 구독 ID로 바꿉니다. JSON 역할 생성
Teleport Discovery Service 주체에 대한 역할 할당 생성#

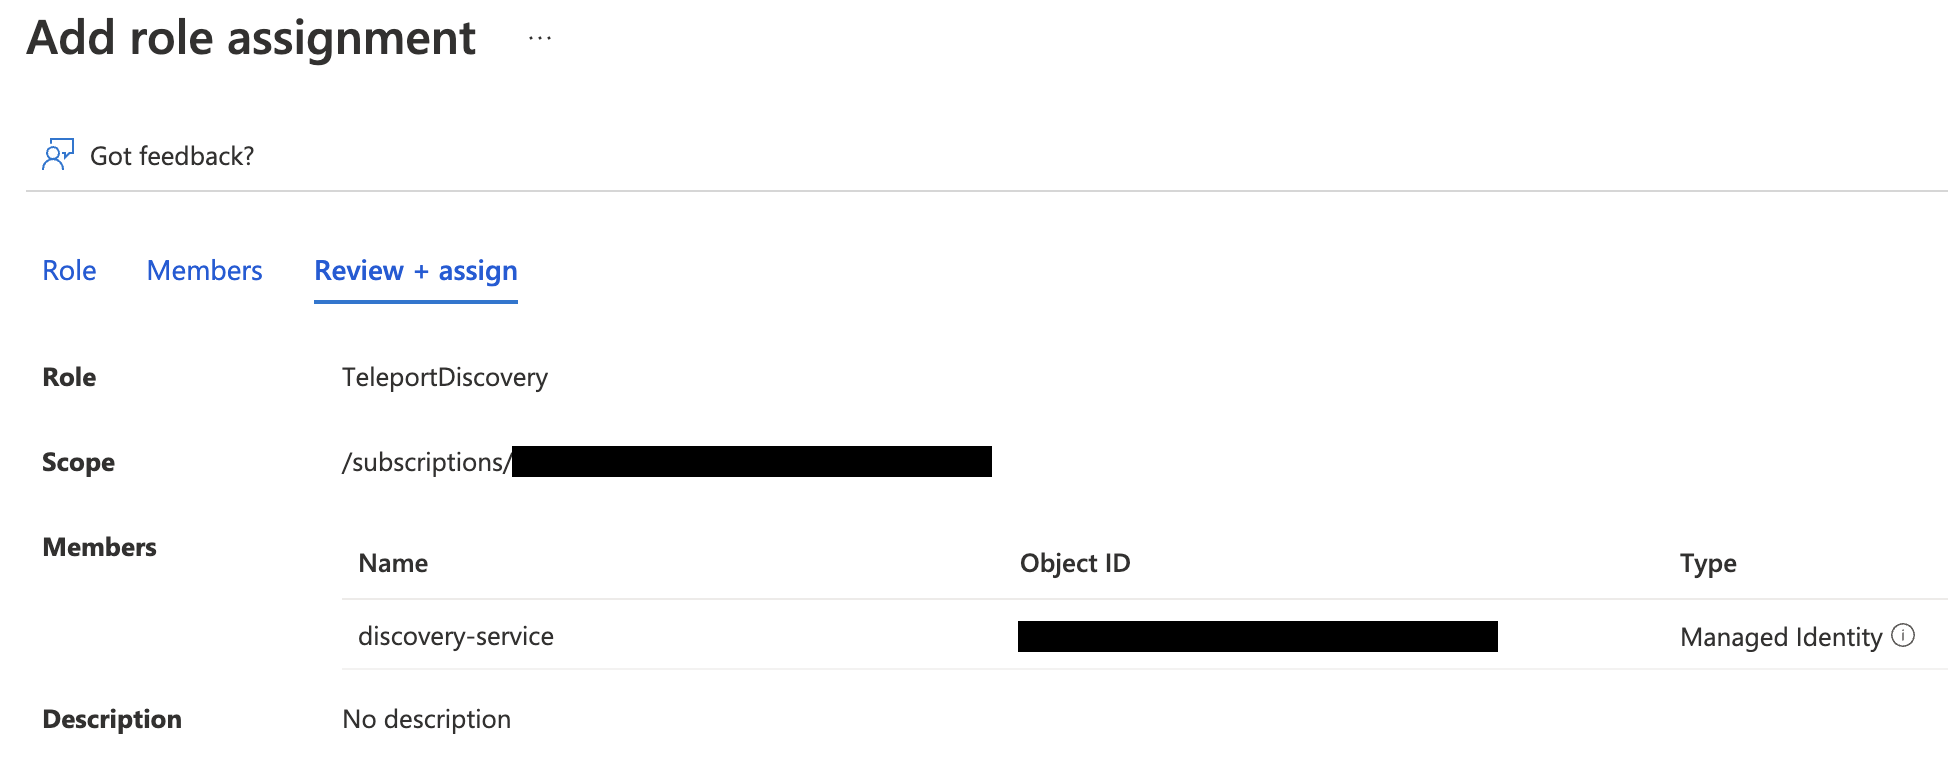
Teleport에 권한을 부여하려면 생성한 사용자 지정 역할을 Teleport 서비스 주체 - 즉 앞서 생성한 관리 ID 또는 앱 등록 -에 할당해야 합니다.

역할 할당을 수행할 리소스 범위로 이동합니다. *Access control (IAM)*을 클릭하고 Add > Add role assignment을 선택합니다. 생성한 사용자 지정 역할을 역할로 선택하고 Teleport 서비스 주체를 멤버로 선택합니다.
Assign role

Note

역할 할당은 Teleport Discovery Service가 일치하는 모든 가상 머신을 검색할 수 있을 만큼 충분히 높은 범위여야 합니다. Azure 범위와 역할 할당 생성에 대한 자세한 내용은 Identify the needed scope를 참고하십시오.

3/5단계. 탐색된 노드용 ID 설정#

탐색할 모든 Azure VM에는 시스템 할당 관리 ID 또는 사용자 할당 관리 ID 중 하나가 할당되어 있어야 합니다.

Note

이 섹션의 내용은 원문 문서를 참조하세요. (azure-join-enable-identity.mdx)

탐색할 VM에 시스템 관리 ID가 없고 사용자 관리 ID가 둘 이상 할당되어 있다면, 5단계에서 사용할 수 있도록 사용자 관리 ID 중 하나의 클라이언트 ID를 복사해 둡니다.

4/5단계. Teleport Discovery Service 설치#

Tip

이미 다른 Teleport 서비스(예: Auth 또는 프록시)를 실행 중인 호스트에서 Discovery Service를 실행할 계획이라면 이 단계를 건너뛸 수 있습니다.

Discovery Service를 실행할 가상 머신에 Teleport를 설치합니다.

Linux 서버에 Teleport Agent를 설치하려면:

권장 설치 방법은 클러스터 설치 스크립트입니다. 이 스크립트는 클러스터에 맞는 올바른 버전, 에디션, 설치 모드를 선택합니다.

  1. teleport.example.com:443에 Teleport 클러스터의 호스트명과 포트를 할당하되, 스킴(https://)은 포함하지 마십시오.

  2. 클러스터의 설치 스크립트를 실행하십시오:

    $ curl "https://teleport.example.com:443/scripts/install.sh" | sudo bash
    

5/5단계. Azure 인스턴스를 탐색하도록 Teleport 구성#

Note

이 섹션의 내용은 원문 문서를 참조하세요. (azure-vm-configure-discovery-service.mdx)

앞서 구성한 것과 동일한 디스커버리 그룹을 가진 Discovery Config 리소스를 생성하여 Azure VM 디스커버리를 활성화합니다.

다음 내용으로 discovery-azure-prod.yaml 파일을 생성합니다.

kind: discovery_config
version: v1
metadata:
  name: example-discovery-config
spec:
  discovery_group: azure-prod
  azure:
    - types: ["vm"]
      subscriptions: ["<subscription>"]
      resource_groups: ["<resource-group>"]
      regions: ["<region>"]
      tags:
        "env": "prod" # Match virtual machines where tag:env=prod
      install:
        azure:
          # Optional: If the VMs to discover have more than one managed
          # identity assigned to them, set the client ID here to the client
          # ID of the identity created in step 3.
          client_id: "<client-id>"

spec.azure 아래의 키를 사용 중인 Azure 환경에 맞게 조정합니다. 특히 Discovery Service와 연결할 리소스 그룹, 리전, 태그를 조정합니다.

다음 명령을 실행하여 Discovery Config를 생성합니다.

$ tctl create -f discovery-azure-prod.yaml

일치하는 인스턴스는 Teleport 클러스터에 자동으로 추가됩니다.

Discovery Config는 언제든지 업데이트할 수 있으며, 서비스가 변경 사항을 자동으로 다시 적용합니다.

Azure VM 디스커버리를 활성화하려면 teleport.yaml의 discovery_service.azure 섹션에 항목이 하나 이상 있어야 합니다.

# teleport.yaml
# ...
discovery_service:
  enabled: true
  discovery_group: azure-prod
  azure:
    - types: ["vm"]
      subscriptions: ["<subscription>"]
      resource_groups: ["<resource-group>"]
      regions: ["<region>"]
      tags:
        "env": "prod" # Match virtual machines where tag:env=prod
      install:
        azure:
          # Optional: If the VMs to discover have more than one managed
          # identity assigned to them, set the client ID here to the client
          # ID of the identity created in step 3.
          client_id: "<client-id>"

discovery_service.azure 아래의 키를 사용 중인 Azure 환경에 맞게 조정합니다. 특히 Discovery Service와 연결할 리전과 태그를 조정합니다.

자동 디스커버리 라벨#

Teleport는 자동 검색을 통해 클러스터에 조인하는 AWS, Azure, Google Cloud의 리소스에 기본 레이블 집합을 적용합니다. 자동 검색 레이블 레퍼런스를 참조하십시오.

고급 구성#

이 섹션에서는 서버를 발견하고 등록하기 위한 구성 옵션을 다룹니다.

동일한 인스턴스에 여러 Teleport 에이전트 설치#

블루-그린 배포나 기타 다중 클러스터 구성을 사용할 때, 서로 다른 클러스터에서 인스턴스에 접근하고 싶을 수 있습니다.

Teleport는 접미사가 붙은 설치(suffixed installation)를 사용하여 동일한 인스턴스에서 여러 에이전트를 설치하고 실행하는 것을 지원하며, 이를 통해 각 설치를 격리할 수 있습니다.

Dynamic configuration (recommended)

Discovery Service가 접미사가 붙은 설치를 사용하도록 구성하려면, Discovery Config를 편집하여 spec.aws.install.suffix 키를 설정합니다.

kind: discovery_config
# ...
spec:
  azure:
   - install:
       suffix: "blue-cluster"

Static configuration

Discovery Service가 접미사가 붙은 설치를 사용하도록 구성하려면, Discovery Service 설정에서 install.suffix 키를 지정합니다.

# teleport.yaml
version: v3
# ...
discovery_service:
  enabled: true
  azure:
   - install:
       suffix: "blue-cluster"

에이전트 관리형 업데이트가 활성화되어 있어야 합니다.

Managed Updates를 위한 그룹 정의#

Teleport 에이전트 관리형 업데이트를 사용하는 경우, 업데이트 그룹을 구성하여 어떤 인스턴스가 함께 업데이트되는지 제어할 수 있습니다.

Dynamic configuration (recommended)

업데이트 그룹을 설정하려면, Discovery Config를 편집하여 spec.aws.install.update_group 키를 설정합니다.

kind: discovery_config
# ...
spec:
  azure:
   - install:
       update_group: "update-group-1"

Static configuration

업데이트 그룹을 설정하려면, Discovery Service 설정에서 install.update_group 키를 지정합니다.

# teleport.yaml
version: v3
# ...
discovery_service:
  enabled: true
  azure:
   - install:
       update_group: "update-group-1"

Configure HTTP Proxy during installation#

설치 파일에 접근하기 위해 프록시가 필요한 인스턴스의 경우, Discovery Service에서 HTTP 프록시 설정을 구성할 수 있습니다.

Dynamic configuration (recommended)

HTTP 프록시 설정을 지정하려면, Discovery Config를 편집하여 spec.aws.install.http_proxy_settings 키를 설정합니다.

kind: discovery_config
# ...
spec:
  azure:
   - install:
       http_proxy_settings:
         https_proxy: http://172.31.5.130:3128
         http_proxy: http://172.31.5.130:3128
         no_proxy: my-local-domain

Static configuration

설정에서 install.http_proxy_settings 키를 설정해야 합니다.

# teleport.yaml
version: v3
# ...
discovery_service:
  enabled: true
  azure:
   - install:
       http_proxy_settings:
         https_proxy: http://172.31.5.130:3128
         http_proxy: http://172.31.5.130:3128
         no_proxy: my-local-domain

사용자 정의 설치 스크립트 사용#

설치 스크립트를 커스터마이즈하려면, 사용자에게 installer 리소스에 대한 list, create, read, update 동사를 허용하는 역할이 있어야 합니다.

다음 내용으로 installer-manager.yaml 파일을 생성합니다.

kind: role
version: v5
metadata:
  name: installer-manager
spec:
  allow:
    rules:
      - resources: [installer]
        verbs: [list, create, read, update]

역할을 생성합니다.

$ tctl create -f installer-manager.yaml
# role 'installer-manager' has been created
Tip

Web UI를 사용하여 역할을 생성하고 편집할 수도 있습니다. Access -> Roles로 이동하여 Create New Role을 클릭하거나 편집할 기존 역할을 선택하십시오.

프리셋 editor 역할은 기본적으로 필요한 권한을 가지고 있습니다.

기본 설치 스크립트를 커스터마이즈하려면, 워크스테이션에서 다음 명령을 실행합니다.

$ tctl edit installer/default-installer

기본 설치 스크립트를 원하는 대로 변경한 뒤, 텍스트 편집기에서 파일을 저장하고 닫습니다.

여러 개의 installer 리소스가 존재할 수 있으며, azure.install.script_name 섹션에서 지정할 수 있습니다.

Dynamic configuration (recommended)

Discovery Config를 편집하여 커스텀 설치 스크립트를 지정합니다.

<!-- INCLUDE:ENGLISH:docs/pages/includes/server-access/custom-installer-azure-dynamic.yaml -->
kind: discovery_config
# ...
spec:
  azure:
    - types: ["vm"]
      tags:
       - "env": "prod"
      install: # optional section when default-installer is used.
        script_name: "default-installer"
    - types: ["vm"]
      tags:
       - "env": "devel"
      install:
        script_name: "devel-installer"
<!-- /INCLUDE:ENGLISH -->

Static configuration

teleport.yaml 설정을 편집하여 커스텀 설치 스크립트를 지정합니다.

<!-- INCLUDE:ENGLISH:docs/pages/includes/server-access/custom-installer-azure.yaml -->
discovery_service:
  # ...
  azure:
    - types: ["vm"]
      tags:
       - "env": "prod"
      install: # optional section when default-installer is used.
        script_name: "default-installer"
    - types: ["vm"]
      tags:
       - "env": "devel"
      install:
        script_name: "devel-installer"
<!-- /INCLUDE:ENGLISH -->


installer 리소스에는 다음과 같은 템플릿 옵션이 있습니다.

  • {}: 리포지토리에서 설치할 때 사용할 Teleport의 메이저 버전입니다.
  • {}: 연결할 Teleport Proxy Service의 공용 주소입니다.
  • {}: 선택적 패키지 리포지토리(apt/yum) 채널 이름입니다. <channel>/<version> 형식이며 예를 들어 stable/v(=teleport.major_version=)와 같습니다. 자세한 내용은 설치를 참고하세요.
  • {}: 자동 업데이트가 활성화되었는지 비활성화되었는지를 나타냅니다. 값은 true 또는 false입니다. 자세한 내용은 자동 에이전트 업데이트를 참고하세요.
  • {}: 사용할 Teleport 패키지입니다. 클러스터가 엔터프라이즈인지 여부에 따라 값이 teleport-ent 또는 teleport가 됩니다.

이들은 다음과 같이 사용할 수 있습니다.

kind: installer
metadata:
  name: default-installer
spec:
  script: |
    echo {}
    echo Teleport-{}
    echo Repository Channel: {}
version: v1

이는 설치를 위해 조회될 때 다음과 같은 내용의 스크립트로 평가됩니다.

echo teleport.example.com
echo Teleport-(=teleport.version=)
echo Repository Channel: stable/v(=teleport.version=)

기본 설치 스크립트는 다음 작업을 수행합니다.

  • 지원되는 Linux 배포판에 공식 Teleport 리포지토리를 추가합니다.
  • apt 또는 yum을 통해 Teleport를 설치합니다.
  • Teleport 설정 파일을 생성하여 /etc/teleport.yaml에 기록합니다.
  • Teleport 서비스를 활성화하고 시작합니다.

Discovery Service 구성에서 client_id가 설정된 경우, 사용자 정의 설치 프로그램에는 {} 템플릿 옵션도 제공됩니다.

문제 해결#

자격 증명 제공자 없음 오류#

Discovery Service 로그에 DefaultAzureCredential: failed to acquire a token. 오류가 표시되면 Teleport가 Azure SDK에 연결하는 데 필요한 자격 증명을 감지하지 못하고 있는 것입니다. Teleport Discovery Service를 실행하는 머신에 자격 증명이 적용되어 있는지 확인한 뒤 Teleport Discovery Service를 다시 시작합니다. 자세한 내용은 Azure SDK Authorization을 참조합니다.

Note

이 섹션의 내용은 원문 문서를 참조하세요. (azure-vm-troubleshooting.mdx)

다음 단계#

Note

이 섹션의 내용은 원문 문서를 참조하세요. (azure-vm-next-steps.mdx)

Azure VM 자동 디스커버리 수동 구성

Teleport v18.11
원문 보기

요약

이 가이드는 Azure 가상 머신에 대한 자동 서버 디스커버리를 설정하는 방법을 설명합니다. Teleport Discovery Service는 Azure에 연결하여 구성된 라벨과 일치하는 가상 머신을 자동으로 탐색하고 등록할 수 있습니다.

이 가이드는 Azure 가상 머신에 대한 자동 서버 디스커버리를 설정하는 방법을 설명합니다.

작동 방식#

Teleport Discovery Service는 Azure에 연결하여 구성된 라벨과 일치하는 가상 머신을 자동으로 탐색하고 등록할 수 있습니다. 이후 탐색된 인스턴스에서 스크립트를 실행하여 Teleport를 설치하고 시작한 뒤 클러스터에 조인시킵니다.

관리 그룹의 여러 구독에 걸쳐 VM을 탐색하려면 관리 그룹 Azure VM 자동 디스커버리를 참조합니다.

사전 요구사항#

  • 실행 중인 Teleport 클러스터. Teleport를 시작하려면 무료 체험판에 가입하거나 데모 환경을 구성하세요.

  • tctl and tsh clients.

    Installing `tctl` and `tsh` clients
    1. Teleport 클러스터의 버전을 확인합니다. tctl and tsh clients는 Teleport 클러스터 버전보다 최대 한 개의 메이저 버전까지만 뒤처질 수 있습니다. Proxy Service의 /v1/webapi/find로 GET 요청을 보내고 JSON 쿼리 도구를 사용하여 클러스터 버전을 확인합니다. teleport.example.com:443를 Teleport Proxy Service의 웹 주소로 바꿉니다:

      $ TELEPORT_DOMAIN=teleport.example.com:443
      $ TELEPORT_VERSION="$(curl -s https://$TELEPORT_DOMAIN/v1/webapi/find | jq -r '.server_version')"
      
    2. 사용 중인 플랫폼에 대한 지침에 따라 tctl and tsh clients를 설치합니다:

Mac

     `tctl` and `tsh` clients가 포함된, 서명된 Teleport macOS .pkg 설치 프로그램을 다운로드합니다:
 
     ```code
     $ curl -O https://cdn.teleport.dev/teleport-${TELEPORT_VERSION?}.pkg
     ```

     Finder에서 `pkg` 파일을 더블 클릭하여 설치를 시작합니다.
 
     
Warning
       Homebrew를 사용하여 Teleport를 설치하는 것은 지원되지 않습니다. Homebrew의
       Teleport 패키지는 Teleport에서 유지 관리하지 않으므로 신뢰성이나 보안을
       보장할 수 없습니다.
     

Windows - Powershell

     ```code
     $ curl.exe -O https://cdn.teleport.dev/teleport-v${TELEPORT_VERSION?}-windows-amd64-bin.zip
     # Unzip the archive and move the `tctl` and `tsh` clients to your %PATH%
     # NOTE: Do not place the `tctl` and `tsh` clients in the System32 directory, as this can cause issues when using WinSCP.
     # Use %SystemRoot% (C:\Windows) or %USERPROFILE% (C:\Users\<username>) instead.
     ```


Linux

     Linux 설치판의 모든 Teleport 바이너리에는 `tctl` and `tsh` clients가 포함되어 있습니다.  RPM/DEB
     패키지 및 i386/ARM/ARM64용 다운로드를 포함한 더 많은 옵션은
     [설치 페이지](../installation/installation.mdx)를 참조하세요.
 
     ```code
     $ curl -O https://cdn.teleport.dev/teleport-v${TELEPORT_VERSION?}-linux-amd64-bin.tar.gz
     $ tar -xzf teleport-v${TELEPORT_VERSION?}-linux-amd64-bin.tar.gz
     $ cd teleport
     $ sudo ./install
     # Teleport binaries have been copied to /usr/local/bin
     ```


  • 가상 머신이 있고, 관리 ID를 생성하여 연결할 수 있는 권한이 있는 Azure 구독.
  • Teleport 클러스터에 조인할 Azure 가상 머신. 기본 Teleport 설치 스크립트를 사용하는 경우 Ubuntu/Debian/RHEL을 실행해야 합니다. (다른 Linux 배포판에서는 Teleport를 수동으로 설치할 수 있습니다.)

Teleport cluster에 연결할 수 있는지 확인하려면 tsh login으로 로그인한 다음, 현재 자격 증명으로 tctl 명령을 실행할 수 있는지 확인합니다.

예를 들어, teleport.example.com에 cluster 내 Teleport Proxy Service의 도메인 이름을, email@example.com에 Teleport 사용자 이름을 지정하여 다음 명령을 실행합니다:

$ tsh login --proxy=teleport.example.com --user=email@example.com
$ tctl status
# Cluster  (=teleport.url=)
# Version  (=teleport.version=)
# CA pin   (=presets.ca_pin=)

cluster에 연결하여 tctl status 명령을 실행할 수 있다면, 현재 자격 증명을 사용하여 워크스테이션에서 이후의 tctl 명령을 실행할 수 있습니다. 자체 Teleport cluster를 호스팅하는 경우, 전체 권한을 얻기 위해 Teleport Auth Service를 호스팅하는 컴퓨터에서 tctl 명령을 실행할 수도 있습니다.

1/5단계. Azure 초대 토큰 생성#

Azure 가상 머신을 탐색할 때 Teleport는 조인하는 SSH Service 인스턴스를 인증하기 위해 Azure 초대 토큰을 사용합니다.

token.yaml 파일을 생성합니다.

# token.yaml
kind: token
version: v2
metadata:
  # the token name is not a secret because instances must prove that they are
  # running in your Azure subscription to use this token
  name: azure-discovery-token
  # set a long expiry time, as the default for tokens is only 30 minutes
  expires: "3000-01-01T00:00:00Z"
spec:
  # use the minimal set of roles required
  roles: [Node]

  # set the join method allowed for this token
  join_method: azure

  azure:
    allow:
    # specify the Azure subscription which Nodes may join from
    - subscription: "11111111-1111-1111-1111-111111111111"

subscription 필드에 사용 중인 Azure 구독 ID를 지정합니다.

다음 명령으로 Teleport 클러스터에 토큰을 추가합니다.

$ tctl create -f token.yaml

2/5단계. Teleport용 IAM 권한 구성#

Teleport Discovery Service가 Azure 가상 머신을 탐색하고 등록하려면 Azure IAM 권한이 필요합니다.

Note

이 섹션의 내용은 원문 문서를 참조하세요. (azure-vm-configure-service-principal.mdx)

사용자 지정 역할 생성#

Teleport가 Azure VM을 탐색하고 등록하려면 다음 권한이 필요합니다.

  • Microsoft.Compute/virtualMachines/read
  • Microsoft.Compute/virtualMachines/runCommands/write
  • Microsoft.Compute/virtualMachines/runCommands/read
  • Microsoft.Compute/virtualMachineScaleSets/read
  • Microsoft.Compute/virtualMachineScaleSets/virtualMachines/read
  • Microsoft.Compute/virtualMachineScaleSets/virtualMachines/runCommands/read
  • Microsoft.Compute/virtualMachineScaleSets/virtualMachines/runCommands/write

다음은 Teleport가 Azure 가상 머신을 읽고 명령을 실행할 수 있도록 허용하는 역할 정의 예시입니다.

{
    "properties": {
        "roleName": "TeleportDiscovery",
        "description": "Allows Teleport to discover Azure virtual machines",
        "assignableScopes": [
            "/subscriptions/11111111-2222-3333-4444-555555555555"
        ],
        "permissions": [
            {
                "actions": [
                    "Microsoft.Compute/virtualMachines/read",
                    "Microsoft.Compute/virtualMachines/runCommands/write",
                    "Microsoft.Compute/virtualMachines/runCommands/read",
                    "Microsoft.Compute/virtualMachineScaleSets/read",
                    "Microsoft.Compute/virtualMachineScaleSets/virtualMachines/read",
                    "Microsoft.Compute/virtualMachineScaleSets/virtualMachines/runCommands/write",
                    "Microsoft.Compute/virtualMachineScaleSets/virtualMachines/runCommands/read"
                ],
                "notActions": [],
                "dataActions": [],
                "notDataActions": []
            }
        ]
    }
}
Tip

위의 역할 정의를 사용하면 Teleport가 VM과 Virtual Machine Scale Set(VMSS)의 VM을 등록할 수 있습니다.

VMSS에는 Uniform과 권장되는 Flexible의 두 가지 오케스트레이션 모드가 있습니다. Uniform 오케스트레이션 모드의 VMSS를 사용하지 않거나 등록하지 않으려면 Microsoft.Compute/virtualMachineScaleSets/* 권한을 제거하여 Teleport에 부여되는 권한을 더 제한할 수 있습니다.

Azure 포털로 이동하여 Orchestration mode 칼럼에서 VMSS의 오케스트레이션 모드를 확인하고, 그에 맞게 역할 권한을 조정합니다.

위의 assignableScopes 필드에는 구독 /subscriptions/<subscription>이 포함되어 있어, 역할을 해당 구독 안의 모든 리소스 범위 또는 구독 범위 자체에 할당할 수 있습니다. assignableScopes를 더 제한하려면 리소스 그룹 /subscriptions/<subscription>/resourceGroups/<group> 또는 관리 그룹 /providers/Microsoft.Management/managementGroups/<group>을 대신 사용할 수 있습니다.

이제 Subscriptions 페이지로 이동하여 구독을 선택합니다.

구독에서 *Access control (IAM)*을 클릭하고 Add > Add custom role을 선택합니다. IAM 사용자 지정 역할

사용자 지정 역할 생성 페이지에서 JSON 탭을 클릭한 다음 Edit를 클릭하고, JSON 예시를 붙여넣은 뒤 assignableScopes의 구독을 사용 중인 구독 ID로 바꿉니다. JSON 역할 생성

Teleport Discovery Service 주체에 대한 역할 할당 생성#

Teleport에 권한을 부여하려면 생성한 사용자 지정 역할을 Teleport 서비스 주체 - 즉 앞서 생성한 관리 ID 또는 앱 등록 -에 할당해야 합니다.

역할 할당을 수행할 리소스 범위로 이동합니다. *Access control (IAM)*을 클릭하고 Add > Add role assignment을 선택합니다. 생성한 사용자 지정 역할을 역할로 선택하고 Teleport 서비스 주체를 멤버로 선택합니다.

Assign role

Note

역할 할당은 Teleport Discovery Service가 일치하는 모든 가상 머신을 검색할 수 있을 만큼 충분히 높은 범위여야 합니다. Azure 범위와 역할 할당 생성에 대한 자세한 내용은 Identify the needed scope를 참고하십시오.

3/5단계. 탐색된 노드용 ID 설정#

탐색할 모든 Azure VM에는 시스템 할당 관리 ID 또는 사용자 할당 관리 ID 중 하나가 할당되어 있어야 합니다.

Note

이 섹션의 내용은 원문 문서를 참조하세요. (azure-join-enable-identity.mdx)

탐색할 VM에 시스템 관리 ID가 없고 사용자 관리 ID가 둘 이상 할당되어 있다면, 5단계에서 사용할 수 있도록 사용자 관리 ID 중 하나의 클라이언트 ID를 복사해 둡니다.

4/5단계. Teleport Discovery Service 설치#

Tip

이미 다른 Teleport 서비스(예: Auth 또는 프록시)를 실행 중인 호스트에서 Discovery Service를 실행할 계획이라면 이 단계를 건너뛸 수 있습니다.

Discovery Service를 실행할 가상 머신에 Teleport를 설치합니다.

Linux 서버에 Teleport Agent를 설치하려면:

권장 설치 방법은 클러스터 설치 스크립트입니다. 이 스크립트는 클러스터에 맞는 올바른 버전, 에디션, 설치 모드를 선택합니다.

  1. teleport.example.com:443에 Teleport 클러스터의 호스트명과 포트를 할당하되, 스킴(https://)은 포함하지 마십시오.

  2. 클러스터의 설치 스크립트를 실행하십시오:

    $ curl "https://teleport.example.com:443/scripts/install.sh" | sudo bash
    

5/5단계. Azure 인스턴스를 탐색하도록 Teleport 구성#

Note

이 섹션의 내용은 원문 문서를 참조하세요. (azure-vm-configure-discovery-service.mdx)

앞서 구성한 것과 동일한 디스커버리 그룹을 가진 Discovery Config 리소스를 생성하여 Azure VM 디스커버리를 활성화합니다.

다음 내용으로 discovery-azure-prod.yaml 파일을 생성합니다.

kind: discovery_config
version: v1
metadata:
  name: example-discovery-config
spec:
  discovery_group: azure-prod
  azure:
    - types: ["vm"]
      subscriptions: ["<subscription>"]
      resource_groups: ["<resource-group>"]
      regions: ["<region>"]
      tags:
        "env": "prod" # Match virtual machines where tag:env=prod
      install:
        azure:
          # Optional: If the VMs to discover have more than one managed
          # identity assigned to them, set the client ID here to the client
          # ID of the identity created in step 3.
          client_id: "<client-id>"

spec.azure 아래의 키를 사용 중인 Azure 환경에 맞게 조정합니다. 특히 Discovery Service와 연결할 리소스 그룹, 리전, 태그를 조정합니다.

다음 명령을 실행하여 Discovery Config를 생성합니다.

$ tctl create -f discovery-azure-prod.yaml

일치하는 인스턴스는 Teleport 클러스터에 자동으로 추가됩니다.

Discovery Config는 언제든지 업데이트할 수 있으며, 서비스가 변경 사항을 자동으로 다시 적용합니다.

Azure VM 디스커버리를 활성화하려면 teleport.yaml의 discovery_service.azure 섹션에 항목이 하나 이상 있어야 합니다.

# teleport.yaml
# ...
discovery_service:
  enabled: true
  discovery_group: azure-prod
  azure:
    - types: ["vm"]
      subscriptions: ["<subscription>"]
      resource_groups: ["<resource-group>"]
      regions: ["<region>"]
      tags:
        "env": "prod" # Match virtual machines where tag:env=prod
      install:
        azure:
          # Optional: If the VMs to discover have more than one managed
          # identity assigned to them, set the client ID here to the client
          # ID of the identity created in step 3.
          client_id: "<client-id>"

discovery_service.azure 아래의 키를 사용 중인 Azure 환경에 맞게 조정합니다. 특히 Discovery Service와 연결할 리전과 태그를 조정합니다.

자동 디스커버리 라벨#

Teleport는 자동 검색을 통해 클러스터에 조인하는 AWS, Azure, Google Cloud의 리소스에 기본 레이블 집합을 적용합니다. 자동 검색 레이블 레퍼런스를 참조하십시오.

고급 구성#

이 섹션에서는 서버를 발견하고 등록하기 위한 구성 옵션을 다룹니다.

동일한 인스턴스에 여러 Teleport 에이전트 설치#

블루-그린 배포나 기타 다중 클러스터 구성을 사용할 때, 서로 다른 클러스터에서 인스턴스에 접근하고 싶을 수 있습니다.

Teleport는 접미사가 붙은 설치(suffixed installation)를 사용하여 동일한 인스턴스에서 여러 에이전트를 설치하고 실행하는 것을 지원하며, 이를 통해 각 설치를 격리할 수 있습니다.

Dynamic configuration (recommended)

Discovery Service가 접미사가 붙은 설치를 사용하도록 구성하려면, Discovery Config를 편집하여 spec.aws.install.suffix 키를 설정합니다.

kind: discovery_config
# ...
spec:
  azure:
   - install:
       suffix: "blue-cluster"

Static configuration

Discovery Service가 접미사가 붙은 설치를 사용하도록 구성하려면, Discovery Service 설정에서 install.suffix 키를 지정합니다.

# teleport.yaml
version: v3
# ...
discovery_service:
  enabled: true
  azure:
   - install:
       suffix: "blue-cluster"

에이전트 관리형 업데이트가 활성화되어 있어야 합니다.

Managed Updates를 위한 그룹 정의#

Teleport 에이전트 관리형 업데이트를 사용하는 경우, 업데이트 그룹을 구성하여 어떤 인스턴스가 함께 업데이트되는지 제어할 수 있습니다.

Dynamic configuration (recommended)

업데이트 그룹을 설정하려면, Discovery Config를 편집하여 spec.aws.install.update_group 키를 설정합니다.

kind: discovery_config
# ...
spec:
  azure:
   - install:
       update_group: "update-group-1"

Static configuration

업데이트 그룹을 설정하려면, Discovery Service 설정에서 install.update_group 키를 지정합니다.

# teleport.yaml
version: v3
# ...
discovery_service:
  enabled: true
  azure:
   - install:
       update_group: "update-group-1"

Configure HTTP Proxy during installation#

설치 파일에 접근하기 위해 프록시가 필요한 인스턴스의 경우, Discovery Service에서 HTTP 프록시 설정을 구성할 수 있습니다.

Dynamic configuration (recommended)

HTTP 프록시 설정을 지정하려면, Discovery Config를 편집하여 spec.aws.install.http_proxy_settings 키를 설정합니다.

kind: discovery_config
# ...
spec:
  azure:
   - install:
       http_proxy_settings:
         https_proxy: http://172.31.5.130:3128
         http_proxy: http://172.31.5.130:3128
         no_proxy: my-local-domain

Static configuration

설정에서 install.http_proxy_settings 키를 설정해야 합니다.

# teleport.yaml
version: v3
# ...
discovery_service:
  enabled: true
  azure:
   - install:
       http_proxy_settings:
         https_proxy: http://172.31.5.130:3128
         http_proxy: http://172.31.5.130:3128
         no_proxy: my-local-domain

사용자 정의 설치 스크립트 사용#

설치 스크립트를 커스터마이즈하려면, 사용자에게 installer 리소스에 대한 list, create, read, update 동사를 허용하는 역할이 있어야 합니다.

다음 내용으로 installer-manager.yaml 파일을 생성합니다.

kind: role
version: v5
metadata:
  name: installer-manager
spec:
  allow:
    rules:
      - resources: [installer]
        verbs: [list, create, read, update]

역할을 생성합니다.

$ tctl create -f installer-manager.yaml
# role 'installer-manager' has been created
Tip

Web UI를 사용하여 역할을 생성하고 편집할 수도 있습니다. Access -> Roles로 이동하여 Create New Role을 클릭하거나 편집할 기존 역할을 선택하십시오.

프리셋 editor 역할은 기본적으로 필요한 권한을 가지고 있습니다.

기본 설치 스크립트를 커스터마이즈하려면, 워크스테이션에서 다음 명령을 실행합니다.

$ tctl edit installer/default-installer

기본 설치 스크립트를 원하는 대로 변경한 뒤, 텍스트 편집기에서 파일을 저장하고 닫습니다.

여러 개의 installer 리소스가 존재할 수 있으며, azure.install.script_name 섹션에서 지정할 수 있습니다.

Dynamic configuration (recommended)

Discovery Config를 편집하여 커스텀 설치 스크립트를 지정합니다.

<!-- INCLUDE:ENGLISH:docs/pages/includes/server-access/custom-installer-azure-dynamic.yaml -->
kind: discovery_config
# ...
spec:
  azure:
    - types: ["vm"]
      tags:
       - "env": "prod"
      install: # optional section when default-installer is used.
        script_name: "default-installer"
    - types: ["vm"]
      tags:
       - "env": "devel"
      install:
        script_name: "devel-installer"
<!-- /INCLUDE:ENGLISH -->

Static configuration

teleport.yaml 설정을 편집하여 커스텀 설치 스크립트를 지정합니다.

<!-- INCLUDE:ENGLISH:docs/pages/includes/server-access/custom-installer-azure.yaml -->
discovery_service:
  # ...
  azure:
    - types: ["vm"]
      tags:
       - "env": "prod"
      install: # optional section when default-installer is used.
        script_name: "default-installer"
    - types: ["vm"]
      tags:
       - "env": "devel"
      install:
        script_name: "devel-installer"
<!-- /INCLUDE:ENGLISH -->


installer 리소스에는 다음과 같은 템플릿 옵션이 있습니다.

  • {}: 리포지토리에서 설치할 때 사용할 Teleport의 메이저 버전입니다.
  • {}: 연결할 Teleport Proxy Service의 공용 주소입니다.
  • {}: 선택적 패키지 리포지토리(apt/yum) 채널 이름입니다. <channel>/<version> 형식이며 예를 들어 stable/v(=teleport.major_version=)와 같습니다. 자세한 내용은 설치를 참고하세요.
  • {}: 자동 업데이트가 활성화되었는지 비활성화되었는지를 나타냅니다. 값은 true 또는 false입니다. 자세한 내용은 자동 에이전트 업데이트를 참고하세요.
  • {}: 사용할 Teleport 패키지입니다. 클러스터가 엔터프라이즈인지 여부에 따라 값이 teleport-ent 또는 teleport가 됩니다.

이들은 다음과 같이 사용할 수 있습니다.

kind: installer
metadata:
  name: default-installer
spec:
  script: |
    echo {}
    echo Teleport-{}
    echo Repository Channel: {}
version: v1

이는 설치를 위해 조회될 때 다음과 같은 내용의 스크립트로 평가됩니다.

echo teleport.example.com
echo Teleport-(=teleport.version=)
echo Repository Channel: stable/v(=teleport.version=)

기본 설치 스크립트는 다음 작업을 수행합니다.

  • 지원되는 Linux 배포판에 공식 Teleport 리포지토리를 추가합니다.
  • apt 또는 yum을 통해 Teleport를 설치합니다.
  • Teleport 설정 파일을 생성하여 /etc/teleport.yaml에 기록합니다.
  • Teleport 서비스를 활성화하고 시작합니다.

Discovery Service 구성에서 client_id가 설정된 경우, 사용자 정의 설치 프로그램에는 {} 템플릿 옵션도 제공됩니다.

문제 해결#

자격 증명 제공자 없음 오류#

Discovery Service 로그에 DefaultAzureCredential: failed to acquire a token. 오류가 표시되면 Teleport가 Azure SDK에 연결하는 데 필요한 자격 증명을 감지하지 못하고 있는 것입니다. Teleport Discovery Service를 실행하는 머신에 자격 증명이 적용되어 있는지 확인한 뒤 Teleport Discovery Service를 다시 시작합니다. 자세한 내용은 Azure SDK Authorization을 참조합니다.

Note

이 섹션의 내용은 원문 문서를 참조하세요. (azure-vm-troubleshooting.mdx)

다음 단계#

Note

이 섹션의 내용은 원문 문서를 참조하세요. (azure-vm-next-steps.mdx)