InfoGrab DocsInfoGrab Docs

EC2 태그를 Teleport 노드 레이블로 사용

요약

이 가이드에서는 Amazon EC2에서 실행 중인 Teleport 에이전트에 태그를 기반으로 레이블을 할당하도록 Teleport 클러스터를 구성합니다. AWS EC2 인스턴스에서 실행할 때 Teleport는 EC2 태그를 자동으로 감지하고 SSH 노드, 애플리케이션, 데이터베이스, Kubernetes 클러스터의 Teleport 레이블로 가져옵니다.

이 가이드에서는 Amazon EC2에서 실행 중인 Teleport 에이전트에 태그를 기반으로 레이블을 할당하도록 Teleport 클러스터를 구성합니다.

AWS EC2 인스턴스에서 실행할 때 Teleport는 EC2 태그를 자동으로 감지하고 SSH 노드, 애플리케이션, 데이터베이스, Kubernetes 클러스터의 Teleport 레이블로 가져옵니다. 이 방식으로 생성된 레이블에는 aws/ 접두사가 붙습니다. Teleport 프로세스가 시작할 때 인스턴스 메타데이터 서비스에서 모든 태그를 가져와 레이블로 추가합니다. 프로세스는 매 시간 태그를 업데이트하므로 새로 생성되거나 삭제된 태그가 레이블에 반영됩니다.

TeleportHostname 태그가 있는 경우 해당 값(소문자여야 함)이 노드의 호스트명을 재정의합니다.

$ tsh ls
Node Name            Address        Labels                                                                                                                  
-------------------- -------------- ----------------------------------------------------------------------------------------------------------------------- 
fakehost.example.com 127.0.0.1:3022 env=example,hostname=ip-172-31-53-70,aws/Name=atburke-dev,aws/TagKey=TagValue,aws/TeleportHostname=fakehost.example.com
Note

여러 리소스를 관리하는 서비스(예: 데이터베이스 서비스)의 경우, 각 리소스는 EC2로부터 동일한 레이블을 받습니다.

사전 요구 사항#

  • 실행 중인 Teleport 클러스터. Teleport를 시작하려면 무료 체험판에 가입하거나 데모 환경을 구성하세요.

  • tctl and tsh clients.

    Installing `tctl` and `tsh` clients
    1. Teleport 클러스터의 버전을 확인합니다. tctl and tsh clients는 Teleport 클러스터 버전보다 최대 한 개의 메이저 버전까지만 뒤처질 수 있습니다. Proxy Service의 /v1/webapi/find로 GET 요청을 보내고 JSON 쿼리 도구를 사용하여 클러스터 버전을 확인합니다. teleport.example.com:443를 Teleport Proxy Service의 웹 주소로 바꿉니다:

      $ TELEPORT_DOMAIN=teleport.example.com:443
      $ TELEPORT_VERSION="$(curl -s https://$TELEPORT_DOMAIN/v1/webapi/find | jq -r '.server_version')"
      
    2. 사용 중인 플랫폼에 대한 지침에 따라 tctl and tsh clients를 설치합니다:

Mac

     `tctl` and `tsh` clients가 포함된, 서명된 Teleport macOS .pkg 설치 프로그램을 다운로드합니다:
 
     ```code
     $ curl -O https://cdn.teleport.dev/teleport-${TELEPORT_VERSION?}.pkg
     ```

     Finder에서 `pkg` 파일을 더블 클릭하여 설치를 시작합니다.
 
     
Warning
       Homebrew를 사용하여 Teleport를 설치하는 것은 지원되지 않습니다. Homebrew의
       Teleport 패키지는 Teleport에서 유지 관리하지 않으므로 신뢰성이나 보안을
       보장할 수 없습니다.
     

Windows - Powershell

     ```code
     $ curl.exe -O https://cdn.teleport.dev/teleport-v${TELEPORT_VERSION?}-windows-amd64-bin.zip
     # Unzip the archive and move the `tctl` and `tsh` clients to your %PATH%
     # NOTE: Do not place the `tctl` and `tsh` clients in the System32 directory, as this can cause issues when using WinSCP.
     # Use %SystemRoot% (C:\Windows) or %USERPROFILE% (C:\Users\<username>) instead.
     ```


Linux

     Linux 설치판의 모든 Teleport 바이너리에는 `tctl` and `tsh` clients가 포함되어 있습니다.  RPM/DEB
     패키지 및 i386/ARM/ARM64용 다운로드를 포함한 더 많은 옵션은
     [설치 페이지](../installation/installation.mdx)를 참조하세요.
 
     ```code
     $ curl -O https://cdn.teleport.dev/teleport-v${TELEPORT_VERSION?}-linux-amd64-bin.tar.gz
     $ tar -xzf teleport-v${TELEPORT_VERSION?}-linux-amd64-bin.tar.gz
     $ cd teleport
     $ sudo ./install
     # Teleport binaries have been copied to /usr/local/bin
     ```


  • Amazon EC2 인스턴스에서 실행 중인 Teleport 에이전트 1개. Teleport 에이전트 설정 방법은 가이드를 참고하세요.

인스턴스 메타데이터에서 태그 활성화#

Teleport가 EC2 태그를 가져올 수 있도록 하려면 인스턴스 메타데이터에서 태그를 활성화해야 합니다. 이는 AWS 콘솔이나 AWS CLI를 통해 수행할 수 있습니다. 자세한 내용은 AWS 문서를 참고하세요.

Note

Nitro 시스템에서 실행 중인 인스턴스만 실행 중에 태그를 업데이트합니다. 다른 모든 인스턴스 유형은 태그를 업데이트하려면 재시작해야 합니다.

AWS EC2 콘솔#

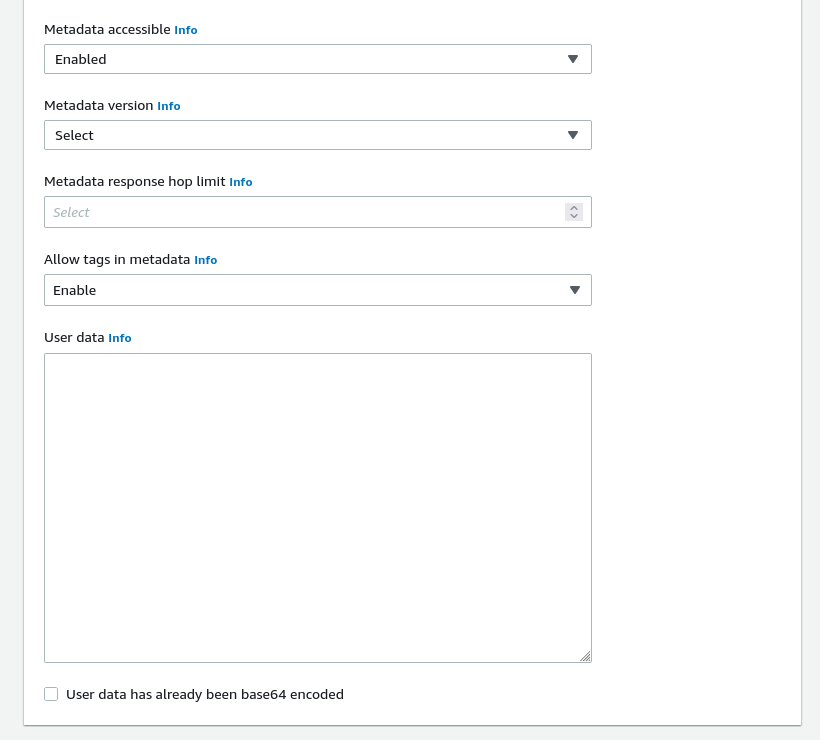
인스턴스 메타데이터 태그가 활성화된 새 인스턴스를 시작하려면:

  1. 페이지 하단의 Advanced Options를 엽니다.
  2. Metadata accessible이 비활성화되어 있지 않은지 확인합니다.
  3. Allow tags in metadata를 활성화합니다.

Advanced Options

기존 인스턴스에서 인스턴스 메타데이터 태그를 활성화하려면:

  1. 인스턴스 요약 화면에서 Actions > Instance Settings > Allow tags in instance metadata로 이동합니다.
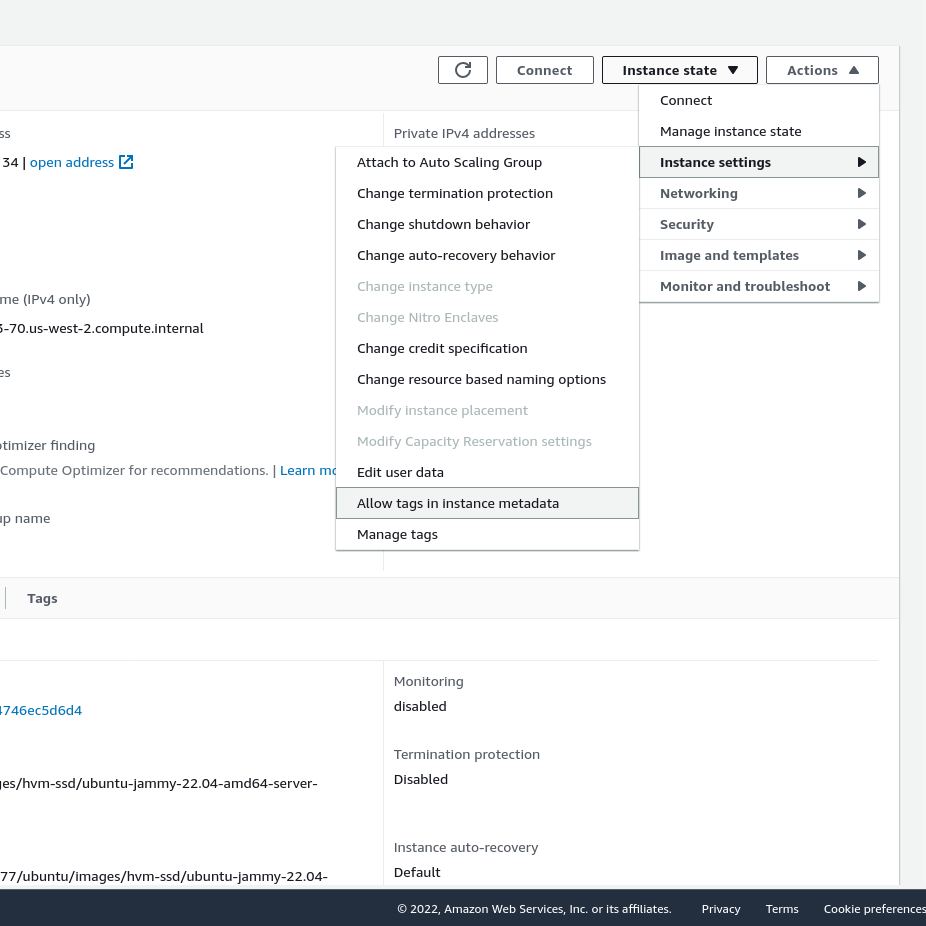
Instance Settings

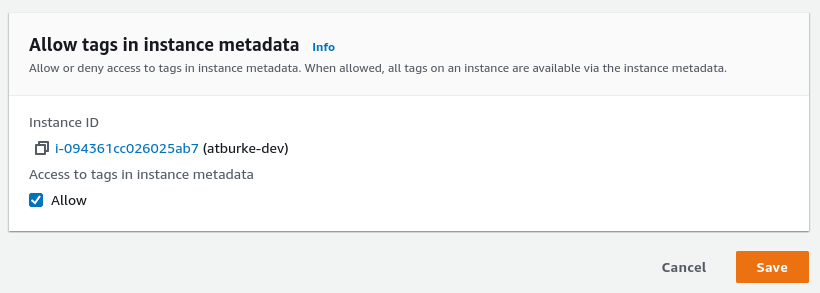
  1. Allow를 활성화합니다.

Allow Tags

AWS CLI#

인스턴스를 시작할 때 수정하려면:

$ aws ec2 run-instances \
    --image-id <image-id> \
    --instance-type <instance-type> \
    --metadata-options "InstanceMetadataTags=enabled"
    ...

실행 중인 인스턴스를 수정하려면:

$ aws ec2 modify-instance-metadata-options \
    --instance-id i-123456789example \
    --instance-metadata-tags enabled

EC2 태그를 Teleport 노드 레이블로 사용

Teleport v18.9
원문 보기
요약

이 가이드에서는 Amazon EC2에서 실행 중인 Teleport 에이전트에 태그를 기반으로 레이블을 할당하도록 Teleport 클러스터를 구성합니다. AWS EC2 인스턴스에서 실행할 때 Teleport는 EC2 태그를 자동으로 감지하고 SSH 노드, 애플리케이션, 데이터베이스, Kubernetes 클러스터의 Teleport 레이블로 가져옵니다.

이 가이드에서는 Amazon EC2에서 실행 중인 Teleport 에이전트에 태그를 기반으로 레이블을 할당하도록 Teleport 클러스터를 구성합니다.

AWS EC2 인스턴스에서 실행할 때 Teleport는 EC2 태그를 자동으로 감지하고 SSH 노드, 애플리케이션, 데이터베이스, Kubernetes 클러스터의 Teleport 레이블로 가져옵니다. 이 방식으로 생성된 레이블에는 aws/ 접두사가 붙습니다. Teleport 프로세스가 시작할 때 인스턴스 메타데이터 서비스에서 모든 태그를 가져와 레이블로 추가합니다. 프로세스는 매 시간 태그를 업데이트하므로 새로 생성되거나 삭제된 태그가 레이블에 반영됩니다.

TeleportHostname 태그가 있는 경우 해당 값(소문자여야 함)이 노드의 호스트명을 재정의합니다.

$ tsh ls
Node Name            Address        Labels                                                                                                                  
-------------------- -------------- ----------------------------------------------------------------------------------------------------------------------- 
fakehost.example.com 127.0.0.1:3022 env=example,hostname=ip-172-31-53-70,aws/Name=atburke-dev,aws/TagKey=TagValue,aws/TeleportHostname=fakehost.example.com
Note

여러 리소스를 관리하는 서비스(예: 데이터베이스 서비스)의 경우, 각 리소스는 EC2로부터 동일한 레이블을 받습니다.

사전 요구 사항#

  • 실행 중인 Teleport 클러스터. Teleport를 시작하려면 무료 체험판에 가입하거나 데모 환경을 구성하세요.

  • tctl and tsh clients.

    Installing `tctl` and `tsh` clients
    1. Teleport 클러스터의 버전을 확인합니다. tctl and tsh clients는 Teleport 클러스터 버전보다 최대 한 개의 메이저 버전까지만 뒤처질 수 있습니다. Proxy Service의 /v1/webapi/find로 GET 요청을 보내고 JSON 쿼리 도구를 사용하여 클러스터 버전을 확인합니다. teleport.example.com:443를 Teleport Proxy Service의 웹 주소로 바꿉니다:

      $ TELEPORT_DOMAIN=teleport.example.com:443
      $ TELEPORT_VERSION="$(curl -s https://$TELEPORT_DOMAIN/v1/webapi/find | jq -r '.server_version')"
      
    2. 사용 중인 플랫폼에 대한 지침에 따라 tctl and tsh clients를 설치합니다:

Mac

     `tctl` and `tsh` clients가 포함된, 서명된 Teleport macOS .pkg 설치 프로그램을 다운로드합니다:
 
     ```code
     $ curl -O https://cdn.teleport.dev/teleport-${TELEPORT_VERSION?}.pkg
     ```

     Finder에서 `pkg` 파일을 더블 클릭하여 설치를 시작합니다.
 
     
Warning
       Homebrew를 사용하여 Teleport를 설치하는 것은 지원되지 않습니다. Homebrew의
       Teleport 패키지는 Teleport에서 유지 관리하지 않으므로 신뢰성이나 보안을
       보장할 수 없습니다.
     

Windows - Powershell

     ```code
     $ curl.exe -O https://cdn.teleport.dev/teleport-v${TELEPORT_VERSION?}-windows-amd64-bin.zip
     # Unzip the archive and move the `tctl` and `tsh` clients to your %PATH%
     # NOTE: Do not place the `tctl` and `tsh` clients in the System32 directory, as this can cause issues when using WinSCP.
     # Use %SystemRoot% (C:\Windows) or %USERPROFILE% (C:\Users\<username>) instead.
     ```


Linux

     Linux 설치판의 모든 Teleport 바이너리에는 `tctl` and `tsh` clients가 포함되어 있습니다.  RPM/DEB
     패키지 및 i386/ARM/ARM64용 다운로드를 포함한 더 많은 옵션은
     [설치 페이지](../installation/installation.mdx)를 참조하세요.
 
     ```code
     $ curl -O https://cdn.teleport.dev/teleport-v${TELEPORT_VERSION?}-linux-amd64-bin.tar.gz
     $ tar -xzf teleport-v${TELEPORT_VERSION?}-linux-amd64-bin.tar.gz
     $ cd teleport
     $ sudo ./install
     # Teleport binaries have been copied to /usr/local/bin
     ```


  • Amazon EC2 인스턴스에서 실행 중인 Teleport 에이전트 1개. Teleport 에이전트 설정 방법은 가이드를 참고하세요.

인스턴스 메타데이터에서 태그 활성화#

Teleport가 EC2 태그를 가져올 수 있도록 하려면 인스턴스 메타데이터에서 태그를 활성화해야 합니다. 이는 AWS 콘솔이나 AWS CLI를 통해 수행할 수 있습니다. 자세한 내용은 AWS 문서를 참고하세요.

Note

Nitro 시스템에서 실행 중인 인스턴스만 실행 중에 태그를 업데이트합니다. 다른 모든 인스턴스 유형은 태그를 업데이트하려면 재시작해야 합니다.

AWS EC2 콘솔#

인스턴스 메타데이터 태그가 활성화된 새 인스턴스를 시작하려면:

  1. 페이지 하단의 Advanced Options를 엽니다.
  2. Metadata accessible이 비활성화되어 있지 않은지 확인합니다.
  3. Allow tags in metadata를 활성화합니다.

Advanced Options

기존 인스턴스에서 인스턴스 메타데이터 태그를 활성화하려면:

  1. 인스턴스 요약 화면에서 Actions > Instance Settings > Allow tags in instance metadata로 이동합니다.

Instance Settings

  1. Allow를 활성화합니다.

Allow Tags

AWS CLI#

인스턴스를 시작할 때 수정하려면:

$ aws ec2 run-instances \
    --image-id <image-id> \
    --instance-type <instance-type> \
    --metadata-options "InstanceMetadataTags=enabled"
    ...

실행 중인 인스턴스를 수정하려면:

$ aws ec2 modify-instance-metadata-options \
    --instance-id i-123456789example \
    --instance-metadata-tags enabled