
InfoGrab Docs

Amazon MemoryDB를 이용한 데이터베이스 접근

요약

Teleport can provide secure access to Amazon MemoryDB for Redis and Valkey via the Teleport Database Service. In this guide, you will:

Teleport can provide secure access to Amazon MemoryDB for Redis and Valkey via the Teleport Database Service. This allows for fine-grained access control through Teleport's RBAC.

In this guide, you will:

  1. Configure your Amazon MemoryDB for Redis and Valkey database IAM 인증을 사용하여.
  2. Add the database to your Teleport cluster.
  3. Connect to the database via Teleport.

작동 원리#

The Teleport Database Service proxies traffic from users to Amazon MemoryDB for Redis and Valkey. Authentication between the Database Service and the Amazon MemoryDB database can take one of two forms:

  • IAM authentication (preferred): The Teleport Database Service connects to the database using a short-lived AWS IAM authentication token. AWS IAM authentication is available for Amazon MemoryDB with engine version 7.0 or above.
  • Managing users: The Teleport Database Service manages users in a access control list, rotates their passwords every 15 minutes, and saves these passwords in AWS Secrets Manager. The Database Service automatically sends an AUTH command with the saved password when connecting the client to the Amazon MemoryDB server.
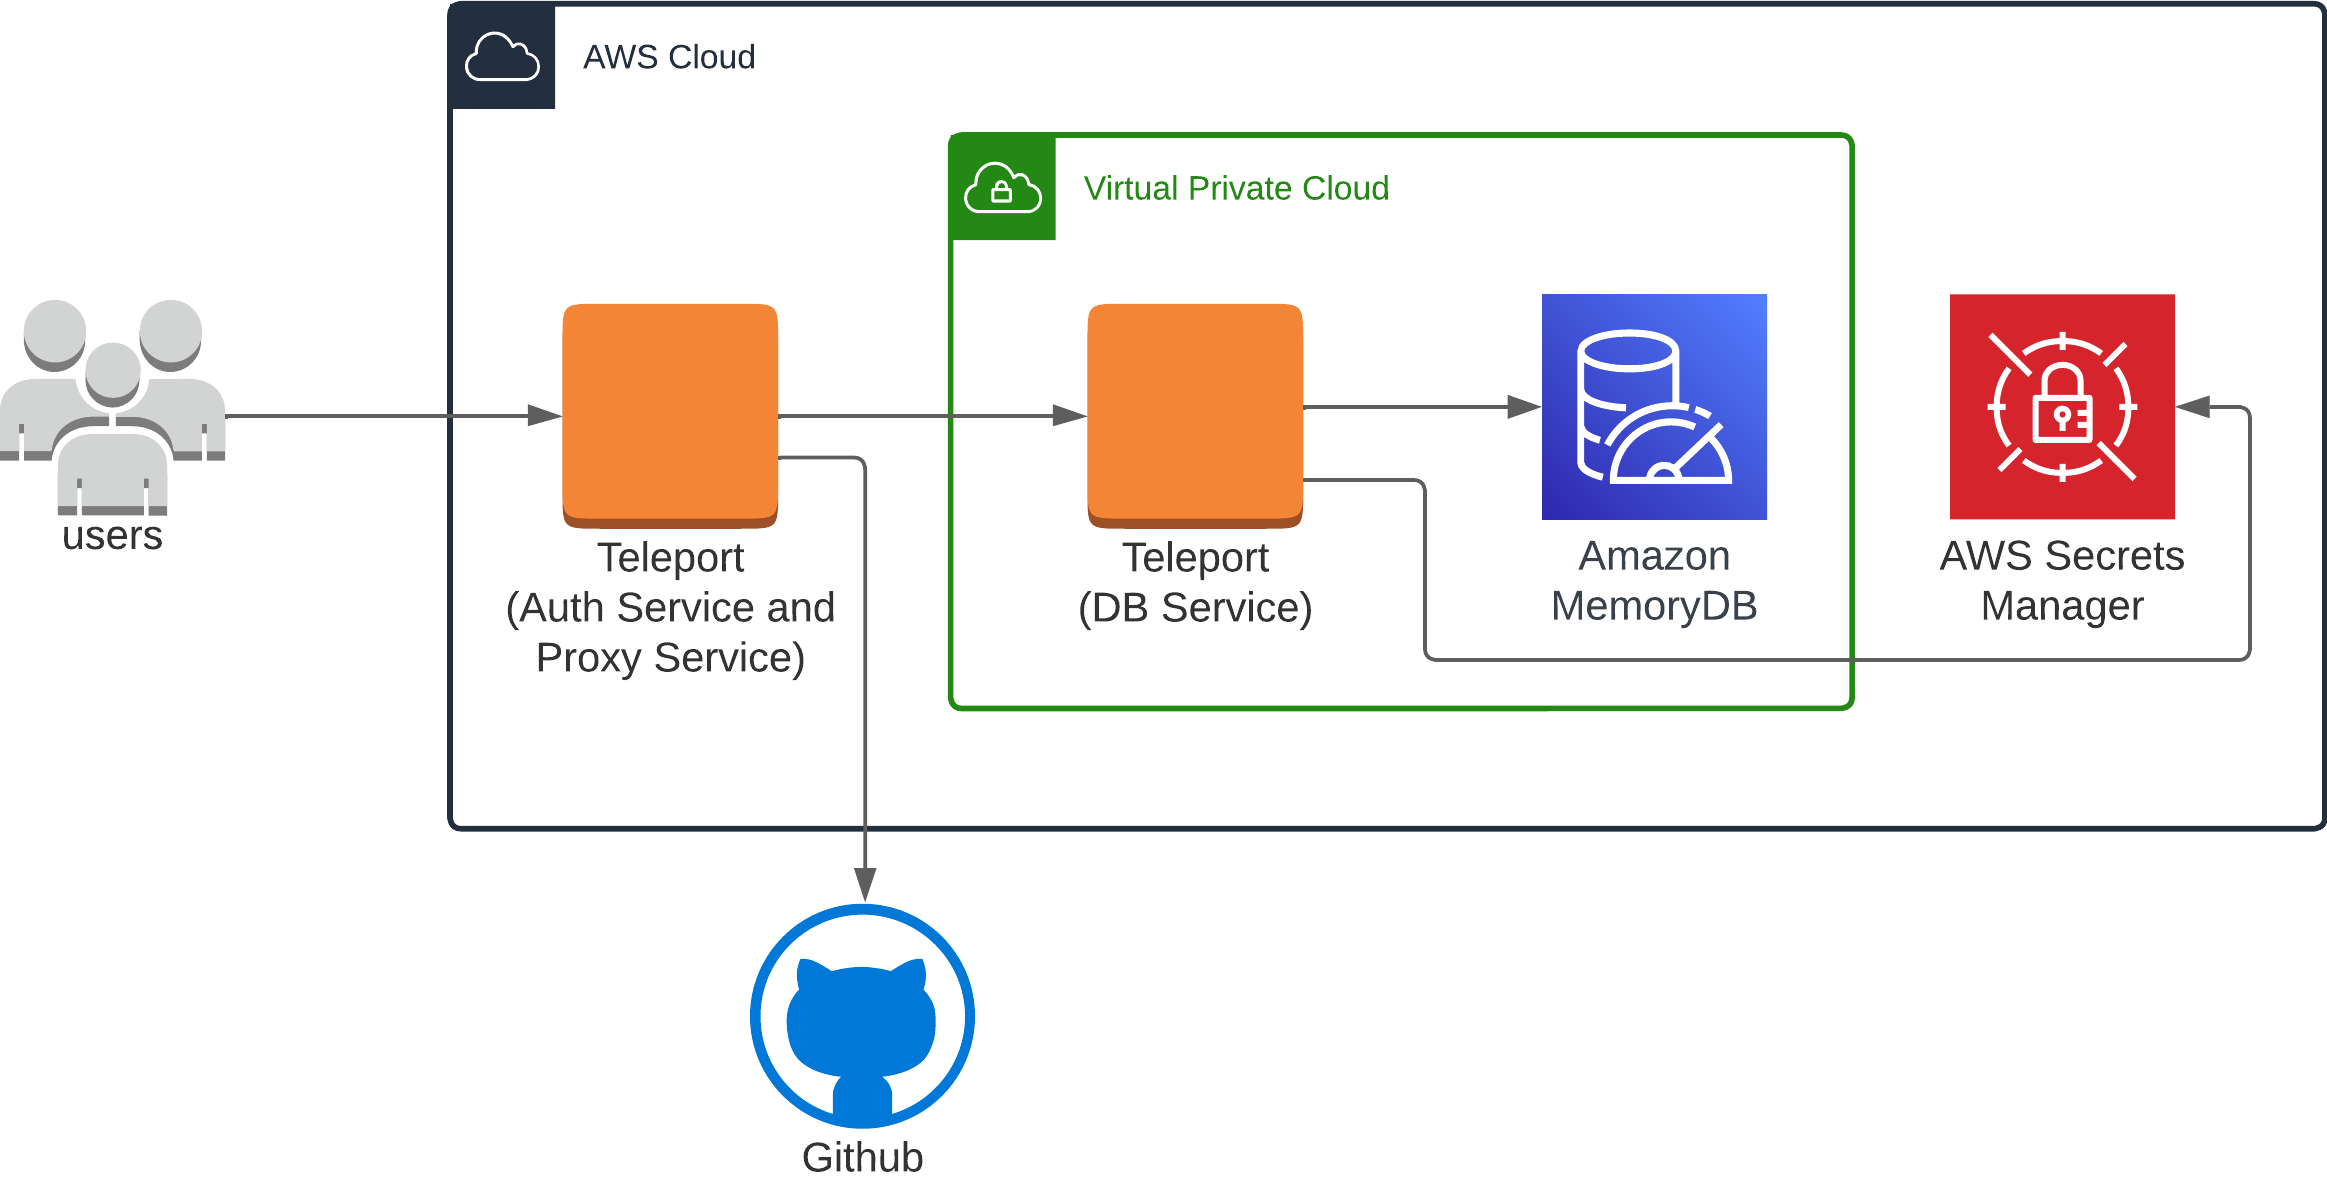
자체 호스팅 Teleport 클러스터로 MemoryDB 등록

클라우드 호스팅 Teleport 클러스터로 MemoryDB 등록

This guide shows how to register a single Amazon MemoryDB with your Teleport cluster. For a more scalable approach, learn how to set up Database Auto-Discovery to automatically enroll all AWS databases in your infrastructure.

필수 조건#

  • A running Teleport cluster. If you want to get started with Teleport, sign up for a free trial or set up a demo environment.

  • The tctl and tsh clients.

    Installing `tctl` and `tsh` clients
    1. Determine the version of your Teleport cluster. The tctl and tsh clients must be at most one major version behind your Teleport cluster version. Send a GET request to the Proxy Service at /v1/webapi/find and use a JSON query tool to obtain your cluster version. Replace with the web address of your Teleport Proxy Service:

      $ TELEPORT_DOMAIN=
      $ TELEPORT_VERSION="$(curl -s https://$TELEPORT_DOMAIN/v1/webapi/find | jq -r '.server_version')"
      
    2. Follow the instructions for your platform to install tctl and tsh clients:

  • Redis 또는 Valkey용 MemoryDB 클러스터가 있는 AWS 계정. 전송 중 암호화(TLS)가 활성화되어 있어야 합니다.
  • IAM 정책을 생성하고 연결할 권한.
  • redis-cli 버전 6.2 이상이 설치되어 시스템의 PATH 환경 변수에 추가된 상태.
  • Teleport 데이터베이스 서비스를 실행할 호스트 (예: EC2 인스턴스).
  • MemoryDB 클러스터에 ACL이 활성화된 상태.

A running Teleport Discovery Service if you plan to use Database Auto-Discovery.

To check that you can connect to your Teleport cluster, sign in with tsh login, then verify that you can run tctl commands using your current credentials.

For example, run the following command, assigning to the domain name of the Teleport Proxy Service in your cluster and to your Teleport username:

$ tsh login --proxy= --user=
$ tctl status
# Cluster  (=teleport.url=)
# Version  (=teleport.version=)
# CA pin   (=presets.ca_pin=)

If you can connect to the cluster and run the tctl status command, you can use your current credentials to run subsequent tctl commands from your workstation. If you host your own Teleport cluster, you can also run tctl commands on the computer that hosts the Teleport Auth Service for full permissions.

1/6단계. Teleport 사용자 생성#

Flag Description
--roles List of roles to assign to the user. The builtin access role allows them to connect to any database server registered with Teleport.
--db-users List of database usernames the user will be allowed to use when connecting to the databases. A wildcard allows any user.
--db-names List of logical databases (aka schemas) the user will be allowed to connect to within a database server. A wildcard allows any database.

For more detailed information about database access controls and how to restrict access see RBAC documentation.

2/6단계. 데이터베이스 서비스 구성 생성#

The Database Service requires a valid join token to join your Teleport cluster. Run the following tctl command and save the token output in /tmp/token on the server that will run the Database Service:

$ tctl tokens add --type=db --format=text
(=presets.tokens.first=)
Alternative methods

For users with a lot of infrastructure in AWS, or who might create or recreate many instances, consider alternative methods for joining new EC2 instances running Teleport:

To install a Teleport Agent on your Linux server:

The recommended installation method is the cluster install script. It will select the correct version, edition, and installation mode for your cluster.

  1. Assign to your Teleport cluster hostname and port, but not the scheme (https://).

  2. Run your cluster's install script:

    $ curl "https:///scripts/install.sh" | sudo bash
    

데이터베이스 서비스 구성을 생성합니다:

$ MEMORYDB_URI=""
$ sudo teleport db configure create \
   -o file \
   --name="memorydb" \
   --proxy=example.teleport.sh:443 \
   --protocol="redis" \
   --uri=${MEMORYDB_URI} \
   --token=/tmp/token

example.teleport.sh:443을 Teleport 프록시 서비스의 호스트와 포트로 변경합니다. MEMORYDB_URI를 MemoryDB 데이터베이스의 도메인 이름과 포트로 설정합니다.

이 명령은 데이터베이스 서비스 구성을 생성하고 /etc/teleport.yaml 위치에 저장합니다.

3/6단계. Teleport용 IAM 역할 생성#

The Teleport Database Service needs AWS IAM permissions to provide access to MemoryDB databases.

Teleport용 IAM 역할 생성#

Grant the Database Service access to credentials that it can use to authenticate to AWS.

  • If you are running the Database Service on an EC2 instance, you may use the EC2 Instance Metadata Service method
  • If you are running the Database Service in Kubernetes, you can use IAM Roles for Service Accounts (IRSA)
  • Otherwise, you must use environment variables
Have multiple sources of AWS credentials?

Teleport's AWS client loads credentials from different sources in the following order:

  • Environment Variables
  • Shared credentials file
  • Shared configuration file (Teleport always enables shared configuration)
  • EC2 Instance Metadata (credentials only)

While you can provide AWS credentials via a shared credentials file or shared configuration file, you will need to run the Database Service with the AWS_PROFILE environment variable assigned to the name of your profile of choice.

If you have a specific use case that the instructions above do not account for, consult the documentation for the AWS SDK for Go for a detailed description of credential loading behavior.

권한 부여#

MemoryDB supports IAM authentication for Redis engine version 7.0 or above. This is the recommended way to configure Teleport access to MemoryDB.

{
    "Version": "2012-10-17",
    "Statement": [
        {
            "Sid": "MemoryDBFetchMetadata",
            "Effect": "Allow",
            "Action": "memorydb:DescribeClusters",
            "Resource": "*"
        },
        {
            "Sid": "MemoryDBDescribeUsers",
            "Effect": "Allow",
            "Action": "memorydb:DescribeUsers",
            "Resource": "*"
        },
        {
            "Sid": "MemoryDBConnect",
            "Effect": "Allow",
            "Action": "memorydb:Connect",
            "Resource": "*"
        }
    ]
}
Statement Purpose
MemoryDBFetchMetadata Automatically import AWS tags as database labels or find missing information such as the database's AWS region.
MemoryDBDescribeUsers Determine whether a user is compatible with IAM authentication.
MemoryDBConnect Connect using IAM authentication.

You can reduce the scope of the MemoryDBConnect statement by updating it to only allow specific MemoryDB clusters and IAM users. The resource ARN you can specify has the following formats:

arn:aws:memorydb:{Region}:{AccountID}:cluster:{ClusterName}
arn:aws:memorydb:{Region}:{AccountID}:user:{UserName}

See Authenticating with IAM for MemoryDB for more information.

4/6단계. 데이터베이스 서비스 시작#

Configure the Database Service to start automatically when the host boots up by creating a systemd service for it. The instructions depend on how you installed the Database Service.

You can check the status of the Database Service with systemctl status teleport and view its logs with journalctl -fu teleport.

5/6단계. MemoryDB 사용자 인증 구성#

MemoryDB 데이터베이스에 대한 인증을 구성합니다. 따라야 할 단계는 Teleport 데이터베이스 서비스가 MemoryDB에 IAM 인증을 사용하도록 할지, 아니면 AWS Secrets Manager를 통한 비밀번호 관리 기반 인증을 사용하도록 할지에 따라 다릅니다:

모든 액세스를 허용하는 default 사용자를 사용하는 사전 설정된 open-access ACL 대신 다른 ACL을 사용하는 것이 강력히 권장됩니다.

다른 MemoryDB ACL이 없는 경우 하나를 생성합니다:

$ aws memorydb create-acl --acl-name my-acl

ACL이 MemoryDB 클러스터에 연결되어 있는지 확인합니다:

$ aws memorydb update-cluster --cluster-name my-memorydb --acl-name my-acl

이제 MemoryDB IAM 활성화 사용자를 생성합니다:

$ aws memorydb create-user \
  --user-name iam-user-01 \
  --authentication-mode Type=iam \
  --access-string "on ~* +@all"
액세스 문자열

위 예제는 모든 사용 가능한 키와 명령에 액세스할 수 있는 활성 사용자를 나타내는 액세스 문자열 on ~* +@all을 사용하여 MemoryDB 사용자를 생성합니다.

MemoryDB 사용자에게 덜 허용적인 액세스 문자열을 사용하는 것이 좋을 수 있습니다. 액세스 문자열에 대한 자세한 내용은 액세스 문자열을 사용한 권한 지정을 참조하세요.

그런 다음 이 사용자를 MemoryDB 클러스터에 연결된 ACL에 추가합니다:

$ aws memorydb update-acl --user-names-to-add iam-user-01 --acl-name my-acl

ACL을 활성화하려면 MemoryDB의 액세스 제어 목록을 사용한 사용자 인증을 참조하세요.

원하는 액세스로 MemoryDB 사용자를 생성한 후, 이 사용자에게 값이 true인 AWS 리소스 태그 teleport.dev/managed를 추가합니다:

관리 사용자 태그

데이터베이스 서비스는 등록된 데이터베이스와 연결된 경우 이 사용자를 자동으로 검색합니다. 태그가 추가된 후 데이터베이스 서비스가 이 사용자를 검색하는 데 시간(최대 20분)이 걸릴 수 있습니다.

If you choose not to use the above options, Teleport will not automatically authenticate with the database.

You can either set up a "no password" configuration for your MemoryDB user, or manually enter an AUTH command with the password you have configured after a successful client connection. However, it is strongly advised to use one of the first two options or a strong password for better security.

6/6단계. 연결#

데이터베이스 서비스가 시작되고 클러스터에 참가하면 등록된 데이터베이스를 확인하기 위해 로그인합니다:

$ tsh login --proxy=teleport.example.com --user=alice
$ tsh db ls
# Name        Description Labels
# ----------- ----------- --------
# my-memorydb             ...
$ tsh login --proxy=mytenant.teleport.sh --user=alice
$ tsh db ls
# Name        Description Labels
# ----------- ----------- --------
# my-memorydb             ...

데이터베이스의 자격 증명을 검색하고 연결하려면:

$ tsh db connect --db-user=my-database-user my-memorydb

If flag --db-user is not provided, Teleport logs in as the default user.

Now, depending on the authentication configurations, you may need to send an AUTH command to authenticate with the Redis server:

Note

이 섹션의 내용은 원문 문서를 참조하세요. (proxy-db-tunnel.mdx)

데이터베이스에서 로그아웃하고 자격 증명을 제거하려면:

# 특정 데이터베이스 인스턴스의 자격 증명 제거.
$ tsh db logout my-memorydb
# 모든 데이터베이스 인스턴스의 자격 증명 제거.
$ tsh db logout

문제 해결#

Certificate error#

If your tsh db connect error includes the following text, you likely have an RDS or DocumentDB database created before July 28, 2020, which presents an X.509 certificate that is incompatible with Teleport:

x509: certificate relies on legacy Common Name field, use SANs instead

AWS provides instructions to rotate your SSL/TLS certificate.

(!docs/pages/includes/aws-no-credential-provider.mdx service="Database"!)

Timeout errors#

(!docs/pages/includes/database-access/connection-timeout-troubleshooting.mdx!)

Not authorized to perform sts:AssumeRole#

The Database Service assumes an IAM role in one of following situations:

  • A Teleport user specifies an IAM role as the database user they wish to use when accessing AWS services that require IAM roles as database users. Databases that support using an IAM role as a database user include: DynamoDB, Keyspaces, Opensearch, Redshift, and Redshift Serverless.
  • The assume_role_arn field is specified for the database resources or dynamic resource matchers.
What if both situations apply? (role chaining) When both of the above conditions are true for a database connection, the Database Service performs a role chaining by assuming the IAM role specified in `assume_role_arn` first, then using that IAM role to assume the IAM role for the database user.

You may encounter the following error if the trust relationship is not configured properly between the IAM roles:

AccessDenied: User: arn:aws:sts::111111111111:assumed-role/teleport-db-service-role/i-* is not authorized to perform: sts:AssumeRole on resource: arn:aws:iam::111111111111:role/db-user-role
how to properly configure the trust relationship?

(!docs/pages/includes/database-access/iam_role_trust_relationship.mdx role1="teleport-db-service-role" role2="db-user-role" !)

You can test the trust relationship by running this AWS CLI command as teleport-db-service-role:

$ aws sts assume-role --role-arn arn:aws:iam::111111111111:role/db-user-role --role-session-name test-trust-relationship

Learn more on how to use trust policies with IAM roles.

다음 단계#

Amazon MemoryDB를 이용한 데이터베이스 접근

원문 보기
요약

Teleport can provide secure access to Amazon MemoryDB for Redis and Valkey via the Teleport Database Service. In this guide, you will:

Teleport can provide secure access to Amazon MemoryDB for Redis and Valkey via the Teleport Database Service. This allows for fine-grained access control through Teleport's RBAC.

In this guide, you will:

  1. Configure your Amazon MemoryDB for Redis and Valkey database IAM 인증을 사용하여.
  2. Add the database to your Teleport cluster.
  3. Connect to the database via Teleport.

작동 원리#

The Teleport Database Service proxies traffic from users to Amazon MemoryDB for Redis and Valkey. Authentication between the Database Service and the Amazon MemoryDB database can take one of two forms:

  • IAM authentication (preferred): The Teleport Database Service connects to the database using a short-lived AWS IAM authentication token. AWS IAM authentication is available for Amazon MemoryDB with engine version 7.0 or above.
  • Managing users: The Teleport Database Service manages users in a access control list, rotates their passwords every 15 minutes, and saves these passwords in AWS Secrets Manager. The Database Service automatically sends an AUTH command with the saved password when connecting the client to the Amazon MemoryDB server.
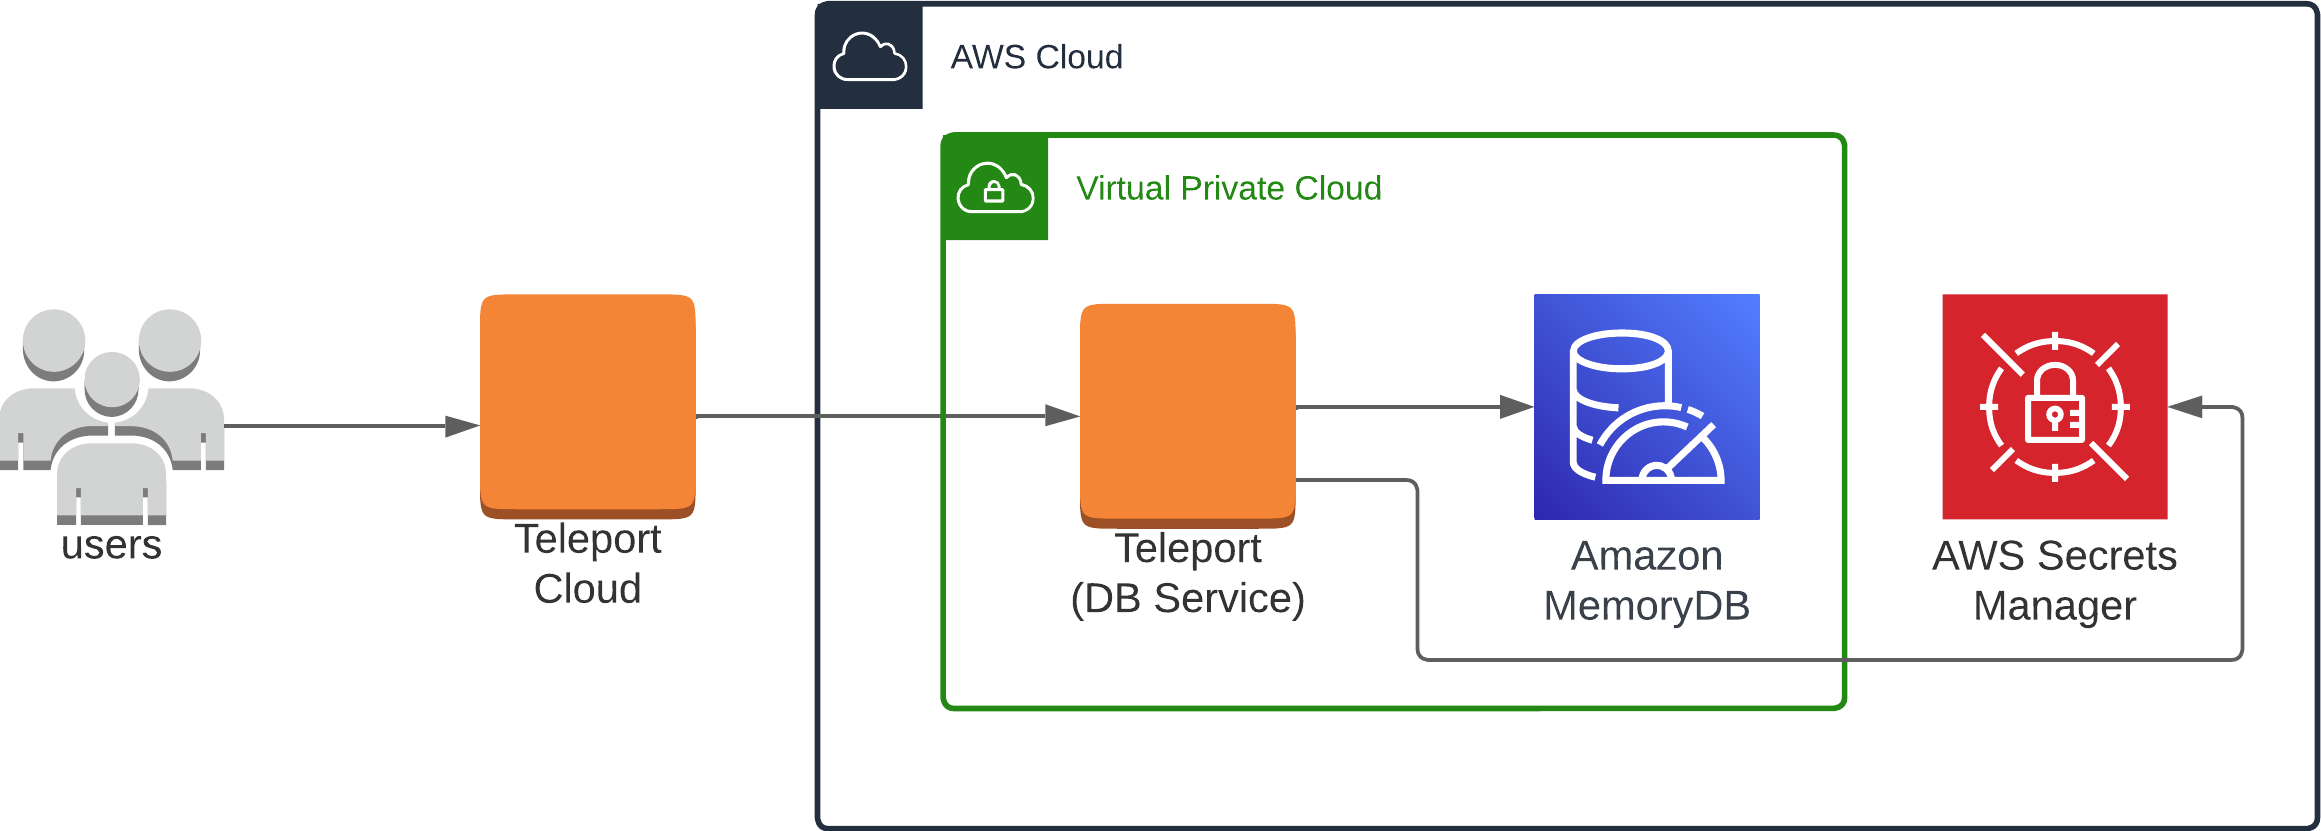
자체 호스팅 Teleport 클러스터로 MemoryDB 등록

클라우드 호스팅 Teleport 클러스터로 MemoryDB 등록

This guide shows how to register a single Amazon MemoryDB with your Teleport cluster. For a more scalable approach, learn how to set up Database Auto-Discovery to automatically enroll all AWS databases in your infrastructure.

필수 조건#

  • A running Teleport cluster. If you want to get started with Teleport, sign up for a free trial or set up a demo environment.

  • The tctl and tsh clients.

    Installing `tctl` and `tsh` clients
    1. Determine the version of your Teleport cluster. The tctl and tsh clients must be at most one major version behind your Teleport cluster version. Send a GET request to the Proxy Service at /v1/webapi/find and use a JSON query tool to obtain your cluster version. Replace with the web address of your Teleport Proxy Service:

      $ TELEPORT_DOMAIN=
      $ TELEPORT_VERSION="$(curl -s https://$TELEPORT_DOMAIN/v1/webapi/find | jq -r '.server_version')"
      
    2. Follow the instructions for your platform to install tctl and tsh clients:

  • Redis 또는 Valkey용 MemoryDB 클러스터가 있는 AWS 계정. 전송 중 암호화(TLS)가 활성화되어 있어야 합니다.
  • IAM 정책을 생성하고 연결할 권한.
  • redis-cli 버전 6.2 이상이 설치되어 시스템의 PATH 환경 변수에 추가된 상태.
  • Teleport 데이터베이스 서비스를 실행할 호스트 (예: EC2 인스턴스).
  • MemoryDB 클러스터에 ACL이 활성화된 상태.

A running Teleport Discovery Service if you plan to use Database Auto-Discovery.

To check that you can connect to your Teleport cluster, sign in with tsh login, then verify that you can run tctl commands using your current credentials.

For example, run the following command, assigning to the domain name of the Teleport Proxy Service in your cluster and to your Teleport username:

$ tsh login --proxy= --user=
$ tctl status
# Cluster  (=teleport.url=)
# Version  (=teleport.version=)
# CA pin   (=presets.ca_pin=)

If you can connect to the cluster and run the tctl status command, you can use your current credentials to run subsequent tctl commands from your workstation. If you host your own Teleport cluster, you can also run tctl commands on the computer that hosts the Teleport Auth Service for full permissions.

1/6단계. Teleport 사용자 생성#

Flag Description
--roles List of roles to assign to the user. The builtin access role allows them to connect to any database server registered with Teleport.
--db-users List of database usernames the user will be allowed to use when connecting to the databases. A wildcard allows any user.
--db-names List of logical databases (aka schemas) the user will be allowed to connect to within a database server. A wildcard allows any database.

For more detailed information about database access controls and how to restrict access see RBAC documentation.

2/6단계. 데이터베이스 서비스 구성 생성#

The Database Service requires a valid join token to join your Teleport cluster. Run the following tctl command and save the token output in /tmp/token on the server that will run the Database Service:

$ tctl tokens add --type=db --format=text
(=presets.tokens.first=)
Alternative methods

For users with a lot of infrastructure in AWS, or who might create or recreate many instances, consider alternative methods for joining new EC2 instances running Teleport:

To install a Teleport Agent on your Linux server:

The recommended installation method is the cluster install script. It will select the correct version, edition, and installation mode for your cluster.

  1. Assign to your Teleport cluster hostname and port, but not the scheme (https://).

  2. Run your cluster's install script:

    $ curl "https:///scripts/install.sh" | sudo bash
    

데이터베이스 서비스 구성을 생성합니다:

$ MEMORYDB_URI=""
$ sudo teleport db configure create \
   -o file \
   --name="memorydb" \
   --proxy=example.teleport.sh:443 \
   --protocol="redis" \
   --uri=${MEMORYDB_URI} \
   --token=/tmp/token

example.teleport.sh:443을 Teleport 프록시 서비스의 호스트와 포트로 변경합니다. MEMORYDB_URI를 MemoryDB 데이터베이스의 도메인 이름과 포트로 설정합니다.

이 명령은 데이터베이스 서비스 구성을 생성하고 /etc/teleport.yaml 위치에 저장합니다.

3/6단계. Teleport용 IAM 역할 생성#

The Teleport Database Service needs AWS IAM permissions to provide access to MemoryDB databases.

Teleport용 IAM 역할 생성#

Grant the Database Service access to credentials that it can use to authenticate to AWS.

  • If you are running the Database Service on an EC2 instance, you may use the EC2 Instance Metadata Service method
  • If you are running the Database Service in Kubernetes, you can use IAM Roles for Service Accounts (IRSA)
  • Otherwise, you must use environment variables
Have multiple sources of AWS credentials?

Teleport's AWS client loads credentials from different sources in the following order:

  • Environment Variables
  • Shared credentials file
  • Shared configuration file (Teleport always enables shared configuration)
  • EC2 Instance Metadata (credentials only)

While you can provide AWS credentials via a shared credentials file or shared configuration file, you will need to run the Database Service with the AWS_PROFILE environment variable assigned to the name of your profile of choice.

If you have a specific use case that the instructions above do not account for, consult the documentation for the AWS SDK for Go for a detailed description of credential loading behavior.

권한 부여#

MemoryDB supports IAM authentication for Redis engine version 7.0 or above. This is the recommended way to configure Teleport access to MemoryDB.

{
    "Version": "2012-10-17",
    "Statement": [
        {
            "Sid": "MemoryDBFetchMetadata",
            "Effect": "Allow",
            "Action": "memorydb:DescribeClusters",
            "Resource": "*"
        },
        {
            "Sid": "MemoryDBDescribeUsers",
            "Effect": "Allow",
            "Action": "memorydb:DescribeUsers",
            "Resource": "*"
        },
        {
            "Sid": "MemoryDBConnect",
            "Effect": "Allow",
            "Action": "memorydb:Connect",
            "Resource": "*"
        }
    ]
}
Statement Purpose
MemoryDBFetchMetadata Automatically import AWS tags as database labels or find missing information such as the database's AWS region.
MemoryDBDescribeUsers Determine whether a user is compatible with IAM authentication.
MemoryDBConnect Connect using IAM authentication.

You can reduce the scope of the MemoryDBConnect statement by updating it to only allow specific MemoryDB clusters and IAM users. The resource ARN you can specify has the following formats:

arn:aws:memorydb:{Region}:{AccountID}:cluster:{ClusterName}
arn:aws:memorydb:{Region}:{AccountID}:user:{UserName}

See Authenticating with IAM for MemoryDB for more information.

4/6단계. 데이터베이스 서비스 시작#

Configure the Database Service to start automatically when the host boots up by creating a systemd service for it. The instructions depend on how you installed the Database Service.

You can check the status of the Database Service with systemctl status teleport and view its logs with journalctl -fu teleport.

5/6단계. MemoryDB 사용자 인증 구성#

MemoryDB 데이터베이스에 대한 인증을 구성합니다. 따라야 할 단계는 Teleport 데이터베이스 서비스가 MemoryDB에 IAM 인증을 사용하도록 할지, 아니면 AWS Secrets Manager를 통한 비밀번호 관리 기반 인증을 사용하도록 할지에 따라 다릅니다:

모든 액세스를 허용하는 default 사용자를 사용하는 사전 설정된 open-access ACL 대신 다른 ACL을 사용하는 것이 강력히 권장됩니다.

다른 MemoryDB ACL이 없는 경우 하나를 생성합니다:

$ aws memorydb create-acl --acl-name my-acl

ACL이 MemoryDB 클러스터에 연결되어 있는지 확인합니다:

$ aws memorydb update-cluster --cluster-name my-memorydb --acl-name my-acl

이제 MemoryDB IAM 활성화 사용자를 생성합니다:

$ aws memorydb create-user \
  --user-name iam-user-01 \
  --authentication-mode Type=iam \
  --access-string "on ~* +@all"
액세스 문자열

위 예제는 모든 사용 가능한 키와 명령에 액세스할 수 있는 활성 사용자를 나타내는 액세스 문자열 on ~* +@all을 사용하여 MemoryDB 사용자를 생성합니다.

MemoryDB 사용자에게 덜 허용적인 액세스 문자열을 사용하는 것이 좋을 수 있습니다. 액세스 문자열에 대한 자세한 내용은 액세스 문자열을 사용한 권한 지정을 참조하세요.

그런 다음 이 사용자를 MemoryDB 클러스터에 연결된 ACL에 추가합니다:

$ aws memorydb update-acl --user-names-to-add iam-user-01 --acl-name my-acl

ACL을 활성화하려면 MemoryDB의 액세스 제어 목록을 사용한 사용자 인증을 참조하세요.

원하는 액세스로 MemoryDB 사용자를 생성한 후, 이 사용자에게 값이 true인 AWS 리소스 태그 teleport.dev/managed를 추가합니다:
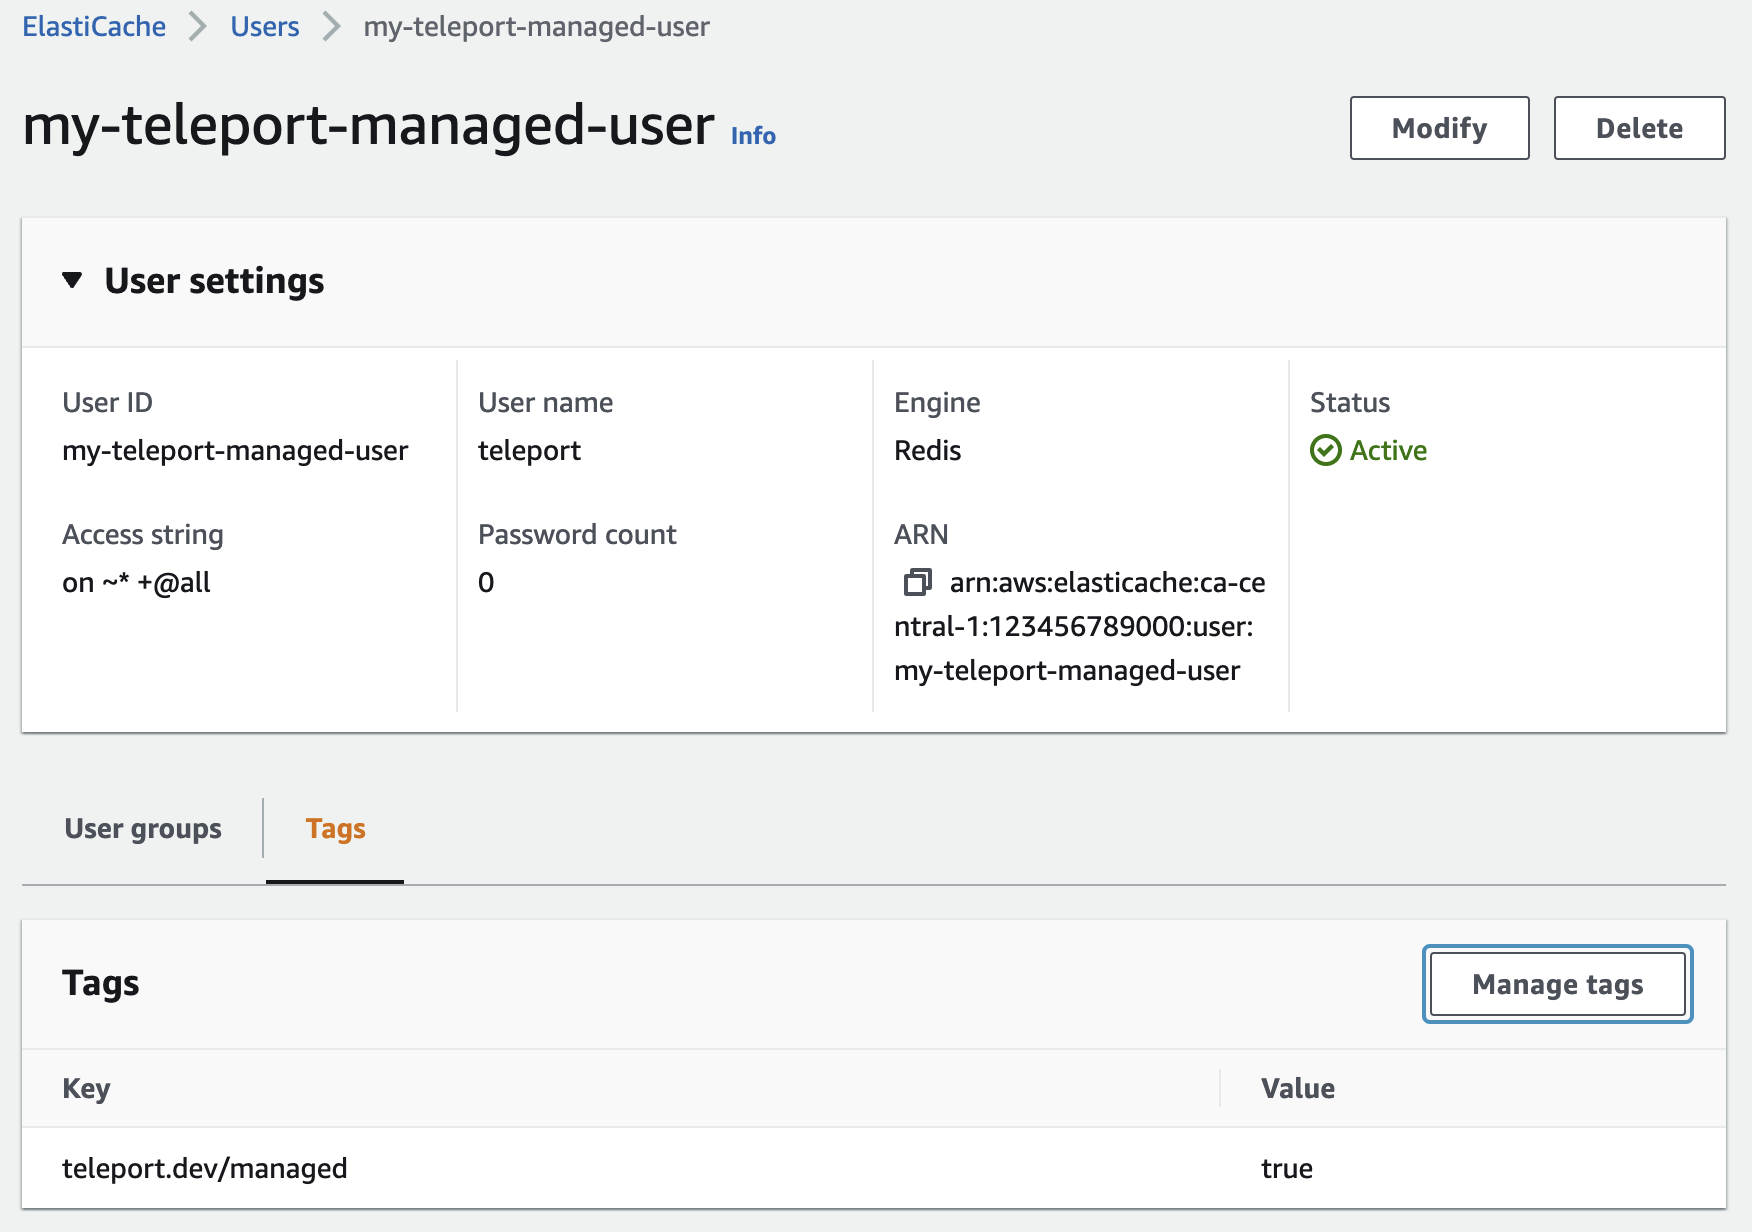
관리 사용자 태그

데이터베이스 서비스는 등록된 데이터베이스와 연결된 경우 이 사용자를 자동으로 검색합니다. 태그가 추가된 후 데이터베이스 서비스가 이 사용자를 검색하는 데 시간(최대 20분)이 걸릴 수 있습니다.

If you choose not to use the above options, Teleport will not automatically authenticate with the database.

You can either set up a "no password" configuration for your MemoryDB user, or manually enter an AUTH command with the password you have configured after a successful client connection. However, it is strongly advised to use one of the first two options or a strong password for better security.

6/6단계. 연결#

데이터베이스 서비스가 시작되고 클러스터에 참가하면 등록된 데이터베이스를 확인하기 위해 로그인합니다:

$ tsh login --proxy=teleport.example.com --user=alice
$ tsh db ls
# Name        Description Labels
# ----------- ----------- --------
# my-memorydb             ...
$ tsh login --proxy=mytenant.teleport.sh --user=alice
$ tsh db ls
# Name        Description Labels
# ----------- ----------- --------
# my-memorydb             ...

데이터베이스의 자격 증명을 검색하고 연결하려면:

$ tsh db connect --db-user=my-database-user my-memorydb

If flag --db-user is not provided, Teleport logs in as the default user.

Now, depending on the authentication configurations, you may need to send an AUTH command to authenticate with the Redis server:

Note

이 섹션의 내용은 원문 문서를 참조하세요. (proxy-db-tunnel.mdx)

데이터베이스에서 로그아웃하고 자격 증명을 제거하려면:

# 특정 데이터베이스 인스턴스의 자격 증명 제거.
$ tsh db logout my-memorydb
# 모든 데이터베이스 인스턴스의 자격 증명 제거.
$ tsh db logout

문제 해결#

Certificate error#

If your tsh db connect error includes the following text, you likely have an RDS or DocumentDB database created before July 28, 2020, which presents an X.509 certificate that is incompatible with Teleport:

x509: certificate relies on legacy Common Name field, use SANs instead

AWS provides instructions to rotate your SSL/TLS certificate.

(!docs/pages/includes/aws-no-credential-provider.mdx service="Database"!)

Timeout errors#

(!docs/pages/includes/database-access/connection-timeout-troubleshooting.mdx!)

Not authorized to perform sts:AssumeRole#

The Database Service assumes an IAM role in one of following situations:

  • A Teleport user specifies an IAM role as the database user they wish to use when accessing AWS services that require IAM roles as database users. Databases that support using an IAM role as a database user include: DynamoDB, Keyspaces, Opensearch, Redshift, and Redshift Serverless.
  • The assume_role_arn field is specified for the database resources or dynamic resource matchers.
What if both situations apply? (role chaining) When both of the above conditions are true for a database connection, the Database Service performs a role chaining by assuming the IAM role specified in `assume_role_arn` first, then using that IAM role to assume the IAM role for the database user.

You may encounter the following error if the trust relationship is not configured properly between the IAM roles:

AccessDenied: User: arn:aws:sts::111111111111:assumed-role/teleport-db-service-role/i-* is not authorized to perform: sts:AssumeRole on resource: arn:aws:iam::111111111111:role/db-user-role
how to properly configure the trust relationship?

(!docs/pages/includes/database-access/iam_role_trust_relationship.mdx role1="teleport-db-service-role" role2="db-user-role" !)

You can test the trust relationship by running this AWS CLI command as teleport-db-service-role:

$ aws sts assume-role --role-arn arn:aws:iam::111111111111:role/db-user-role --role-session-name test-trust-relationship

Learn more on how to use trust policies with IAM roles.

다음 단계#