





InfoGrab Docs

Kerberos 인증을 사용한 Amazon RDS Oracle을 이용한 데이터베이스 접근

요약

Teleport can provide secure access to Amazon RDS for Oracle via the Teleport Database Service. In this guide, you will: Teleport 데이터베이스 서비스는 Oracle 데이터베이스와 동일한 Active Directory 도메인에 가입하고 Kerberos 프로토콜을 사용하여 Oracle에 인증합니다.

Teleport can provide secure access to Amazon RDS for Oracle via the Teleport Database Service. This allows for fine-grained access control through Teleport's RBAC.

In this guide, you will:

  1. Configure your Amazon RDS for Oracle database with Kerberos authentication.
  2. Add the database to your Teleport cluster.
  3. Connect to the database via Teleport.

작동 방식#

Teleport 데이터베이스 서비스는 Oracle 데이터베이스와 동일한 Active Directory 도메인에 가입하고 Kerberos 프로토콜을 사용하여 Oracle에 인증합니다. 사용자가 Teleport를 통해 Oracle에 연결하면 데이터베이스 서비스는 Active Directory에서 서비스 티켓을 얻고, 데이터베이스 사용자의 장기 키를 사용하여 티켓을 복호화한 다음 Oracle에 연결합니다. 이 시점에서 데이터베이스 서비스는 사용자 트래픽을 데이터베이스로 전달합니다.

전제 조건#

  • A running Teleport (v17.4.0 or higher) cluster. If you want to get started with Teleport, sign up for a free trial or set up a demo environment.

  • The tctl and tsh clients.

    Installing `tctl` and `tsh` clients
    1. Determine the version of your Teleport cluster. The tctl and tsh clients must be at most one major version behind your Teleport cluster version. Send a GET request to the Proxy Service at /v1/webapi/find and use a JSON query tool to obtain your cluster version. Replace with the web address of your Teleport Proxy Service:

      $ TELEPORT_DOMAIN=
      $ TELEPORT_VERSION="$(curl -s https://$TELEPORT_DOMAIN/v1/webapi/find | jq -r '.server_version')"
      
    2. Follow the instructions for your platform to install tctl and tsh clients:

  • Amazon RDS for Oracle 데이터베이스 인스턴스.
  • AWS Directory Service 관리형 Microsoft AD.
  • 데이터베이스와 동일한 Active Directory 도메인에 가입된 Linux 노드. 없는 경우 이 가이드에서 가입 단계를 안내합니다.
  • Oracle 클라이언트. 기본 옵션은 SQLcl이지만, 대체 클라이언트는 아래에서 설명합니다.

To check that you can connect to your Teleport cluster, sign in with tsh login, then verify that you can run tctl commands using your current credentials.

For example, run the following command, assigning to the domain name of the Teleport Proxy Service in your cluster and to your Teleport username:

$ tsh login --proxy= --user=
$ tctl status
# Cluster  (=teleport.url=)
# Version  (=teleport.version=)
# CA pin   (=presets.ca_pin=)

If you can connect to the cluster and run the tctl status command, you can use your current credentials to run subsequent tctl commands from your workstation. If you host your own Teleport cluster, you can also run tctl commands on the computer that hosts the Teleport Auth Service for full permissions.

1/9단계. Oracle RDS 인스턴스 준비#

Teleport를 구성하기 전에 Oracle RDS 인스턴스에 Kerberos 인증과 TLS가 올바르게 구성되어 있는지 확인합니다:

  1. Amazon RDS Oracle Kerberos 설정 가이드를 따라 인스턴스에서 Kerberos 인증을 활성화합니다.
  2. Amazon RDS Oracle SSL 설정 문서를 따라 Oracle RDS 인스턴스에서 TLS를 활성화합니다. 최적의 보안을 위해 SQLNET.SSL_VERSION1.2로 설정되어 있는지 확인합니다. SSL 포트 선택을 기억해 두세요; 이 가이드의 나머지 부분에서는 포트가 2484라고 가정합니다. 또한 SQLNET.CIPHER_SUITE 파라미터에 지원되는 값(예: TLS_ECDHE_RSA_WITH_AES_256_GCM_SHA384)이 포함되어 있는지 확인합니다.
Note

계속 진행하기 전에 Teleport 데이터베이스 서비스 호스트와 Oracle RDS 인스턴스 간의 연결을 확인하세요.

2/9단계. Oracle AD 사용자 생성#

Note

Oracle 데이터베이스에 이미 Active Directory 로그인이 있는 경우 이 단계를 건너뛸 수 있습니다.

관리자 계정(예: admin)으로 Oracle 데이터베이스에 연결하고 Active Directory 인증을 사용할 사용자를 생성합니다:

CREATE USER "ALICE@EXAMPLE.COM" IDENTIFIED EXTERNALLY;
GRANT CREATE SESSION TO "ALICE@EXAMPLE.COM";
Note

Oracle RDS에서 예상하는 사용자 이름은 영역 이름이 뒤따르는 대문자 형식입니다. 다른 표기 방법은 문제를 일으킬 수 있습니다.

3/9단계. Linux 노드를 Active Directory에 가입#

Note

Oracle 인스턴스와 동일한 Active Directory 도메인에 가입된 Linux 노드가 이미 있는 경우 이 단계를 건너뛸 수 있습니다.

데이터베이스 서비스가 실행될 Linux 노드는 Oracle 데이터베이스와 동일한 Active Directory 도메인에 가입되어 있어야 합니다.

가입하려면 Linux 노드가 Active Directory 정규화된 도메인 이름을 확인할 수 있어야 합니다. 예를 들어, AWS 관리형 AD의 경우 디렉터리 개요 페이지의 "네트워킹 세부 정보"에 제공된 네임서버를 사용합니다.

필요한 패키지를 설치합니다:

$ sudo apt-get update
$ sudo apt-get -y install sssd realmd krb5-user samba-common packagekit adcli
$ sudo yum -y update
$ sudo yum -y install sssd realmd krb5-workstation samba-common-tools

/etc/krb5.conf를 편집하여 역방향 DNS 해석을 비활성화하고 기본 영역을 설정합니다. [realms] 섹션에 도메인 정의가 포함되어 있고 도메인 컨트롤러를 가리키는 admin_serverkdc 필드가 설정되어 있는지 확인합니다:

[libdefaults]
default_realm = EXAMPLE.COM
rdns = false

[realms]
  EXAMPLE.COM = {
    kdc = example.com
    admin_server = example.com
  }

영역에 가입합니다:

$ sudo realm join -v -U admin@EXAMPLE.COM example.com
...
 * Successfully enrolled machine in realm
Warning

admin@EXAMPLE.COM의 영역 이름은 반드시 대문자여야 합니다. 그렇지 않으면 노드가 가입하지 못할 수 있습니다.

노드가 영역에 가입했는지 확인하려면 realm list 명령을 사용합니다:

$ sudo realm list
example.com
  type: kerberos
  realm-name: EXAMPLE.COM
  domain-name: example.com
  configured: kerberos-member
  server-software: active-directory
  client-software: sssd
  ...

4/9단계. keytab 파일 생성#

Teleport는 Active Directory에서 Oracle 데이터베이스 인증을 위한 Kerberos 서비스 티켓을 얻기 위해 keytab 파일이 필요합니다. 이를 생성하는 가장 쉬운 방법은 adutil Linux CLI 유틸리티를 사용하는 것입니다.

Active Directory 도메인에 가입한 Linux 노드에 adutil을 설치합니다:

$ curl https://packages.microsoft.com/keys/microsoft.asc | sudo tee /etc/apt/trusted.gpg.d/microsoft.asc
$ curl https://packages.microsoft.com/config/ubuntu/18.04/prod.list | sudo tee /etc/apt/sources.list.d/msprod.list
$ sudo apt-get update
$ sudo ACCEPT_EULA=Y apt-get install -y adutil
$ curl https://packages.microsoft.com/keys/microsoft.asc | sudo tee /etc/apt/trusted.gpg.d/microsoft.asc
$ curl https://packages.microsoft.com/config/ubuntu/20.04/prod.list | sudo tee /etc/apt/sources.list.d/msprod.list
$ sudo apt-get update
$ sudo ACCEPT_EULA=Y apt-get install -y adutil
$ curl https://packages.microsoft.com/keys/microsoft.asc | sudo tee /etc/apt/trusted.gpg.d/microsoft.asc
$ curl https://packages.microsoft.com/config/ubuntu/22.04/prod.list | sudo tee /etc/apt/sources.list.d/msprod.list
$ sudo apt-get update
$ sudo ACCEPT_EULA=Y apt-get install -y adutil
$ sudo curl -o /etc/yum.repos.d/msprod.repo https://packages.microsoft.com/config/rhel/8/prod.repo
$ sudo ACCEPT_EULA=Y yum install -y adutil
$ sudo curl -o /etc/yum.repos.d/msprod.repo https://packages.microsoft.com/config/rhel/9/prod.repo
$ sudo ACCEPT_EULA=Y yum install -y adutil

배포판에서 adutil을 사용할 수 없는 경우 대신 ktutil을 사용할 수 있습니다. 표준 Kerberos 유틸리티로 사용 가능해야 합니다.

해당 사용자의 사용자 이름과 kvno를 기반으로 사용법을 조정합니다.

$ ktutil
ktutil: addent -password -p alice@EXAMPLE.COM -k 1 -e aes256-cts-hmac-sha1-96
Password for alice@EXAMPLE.COM: [enter password here]
ktutil: wkt teleport.keytab
ktutil: quit

kinit 명령을 사용하여 Active Directory에 로그인합니다:

$ kinit admin@EXAMPLE.COM

adutil keytab create 명령을 사용하여 Oracle 데이터베이스에 연결할 각 Active Directory 사용자에 대한 keytab 항목을 생성합니다:

$ adutil keytab create teleport.keytab alice
$ adutil keytab create teleport.keytab bob

각 사용자의 암호를 입력하라는 메시지가 표시됩니다. 모든 keytab 항목이 동일한 teleport.keytab 파일에 병합됩니다.

서비스 주체 이름 할당

adutil keytab create 명령이 작동하려면 각 사용자 계정에 서비스 주체 이름이 할당되어 있어야 합니다. 그렇지 않으면 명령이 kvno(키 버전 번호)를 확인할 수 없습니다.

사용자에게 할당된 SPN이 있는지 확인하려면 AWS 콘솔의 사용자 페이지로 이동하여 "계정 설정 - 선택사항" 섹션을 찾습니다.
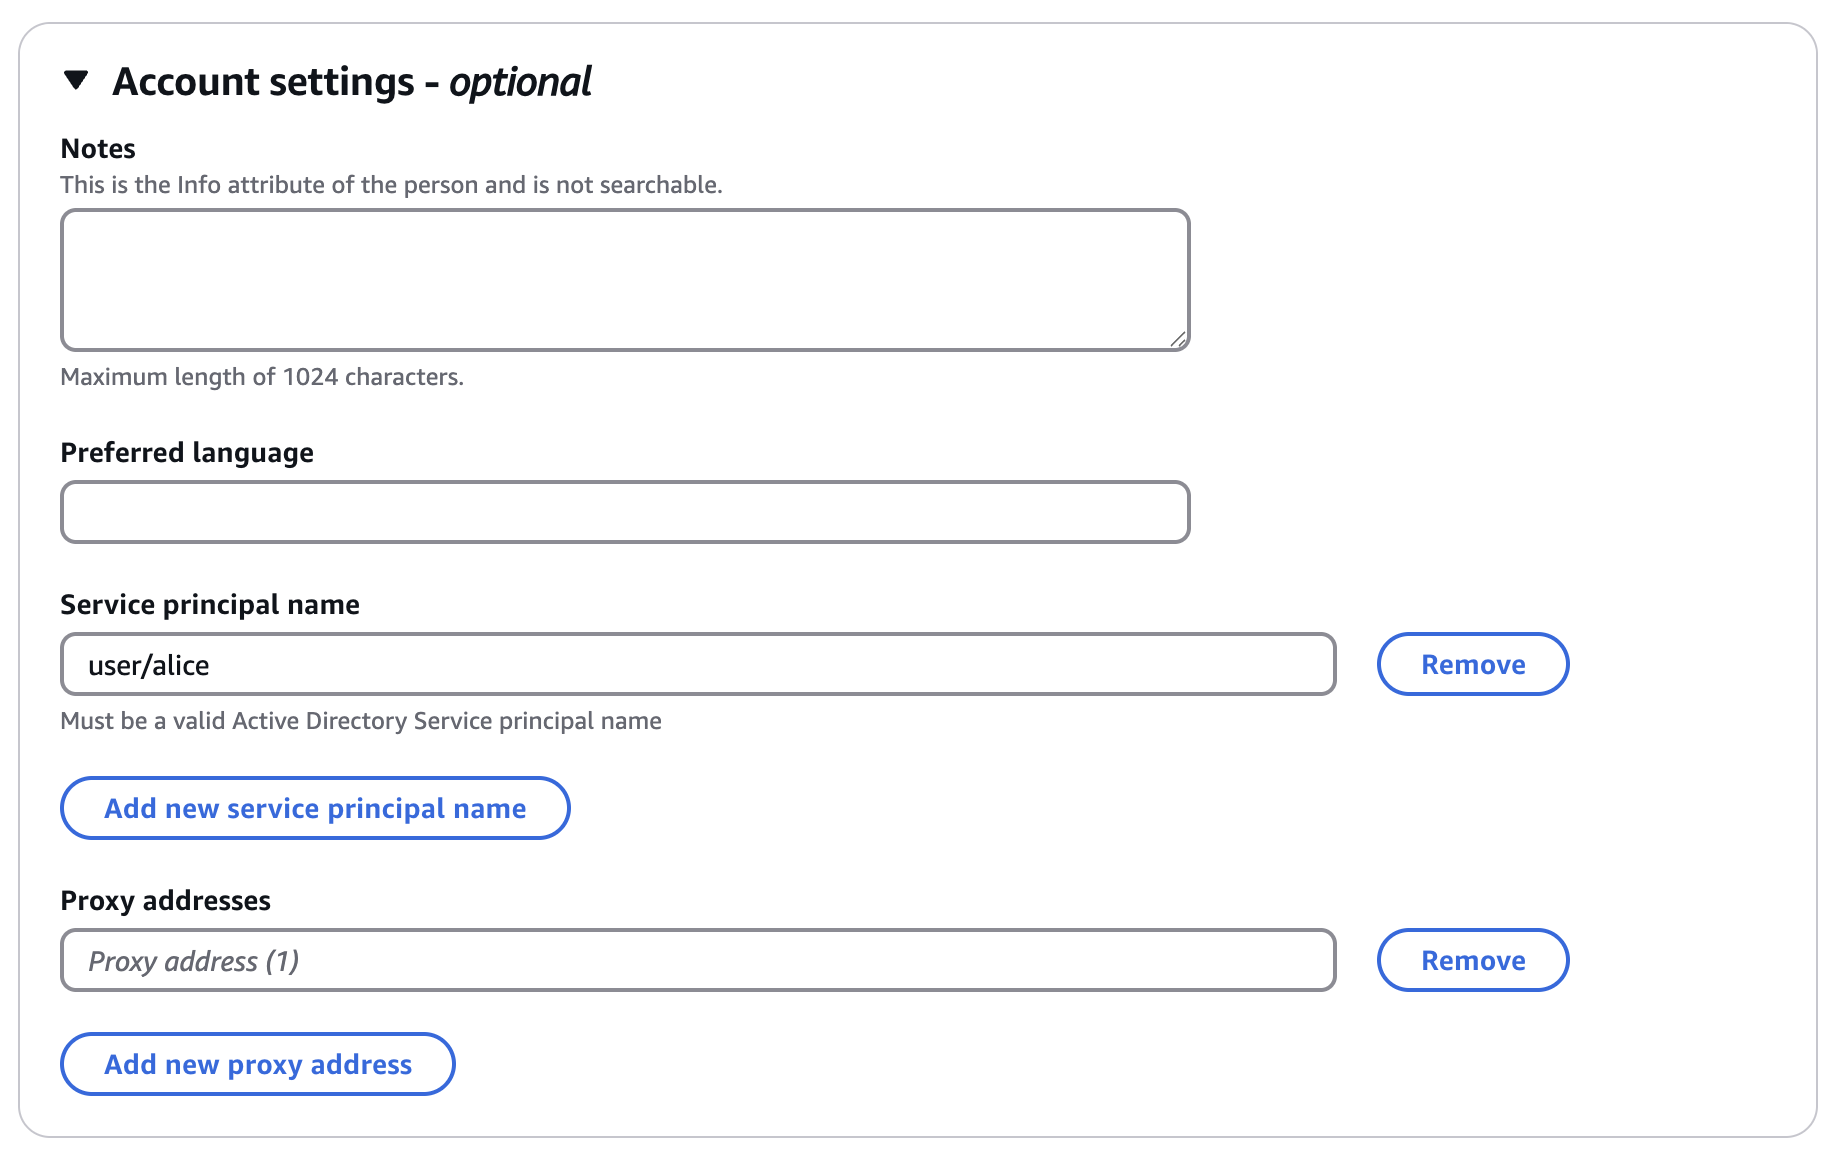
AWS AD SPN 설정

또는 Active Directory 도메인에 가입된 Windows 컴퓨터에서 다음 명령을 실행합니다:

$ setspn -L alice

사용자 계정에 SPN을 할당하려면 다음 명령을 사용합니다:

$ setspn -s user/alice alice

klist 명령을 사용하여 keytab 파일의 항목을 확인할 수 있습니다:

$ klist -ke teleport.keytab
Keytab name: FILE:teleport.keytab
KVNO Principal
---- --------------------------------------------------------------------------
   5 alice@EXAMPLE.COM (aes256-cts-hmac-sha1-96)
   2 bob@EXAMPLE.COM (aes256-cts-hmac-sha1-96)
Warning

인증 실패를 방지하려면 사용자의 암호를 업데이트한 후 keytab 파일을 업데이트해야 합니다.

5/9단계. Teleport 데이터베이스 서비스 설정#

The Database Service requires a valid join token to join your Teleport cluster. Run the following tctl command and save the token output in /tmp/token on the server that will run the Database Service:

$ tctl tokens add --type=db --format=text
(=presets.tokens.first=)

To install a Teleport Agent on your Linux server:

The recommended installation method is the cluster install script. It will select the correct version, edition, and installation mode for your cluster.

  1. Assign to your Teleport cluster hostname and port, but not the scheme (https://).

  2. Run your cluster's install script:

    $ curl "https:///scripts/install.sh" | sudo bash
    
Note

Teleport 데이터베이스 서비스는 Oracle 인스턴스와 동일한 Active Directory 도메인에 가입된 Linux 서버에서 실행되어야 합니다.

Teleport 데이터베이스 서비스를 구성합니다. --proxy를 Teleport 프록시 서비스 주소를 가리키도록, --uri를 Oracle 엔드포인트로 업데이트해야 합니다. 지정한 포트는 SSL 구성의 일부로 구성된 것이어야 하며 기본값은 2484입니다.

$ sudo teleport db configure create \
    -o file \
    --token=/tmp/token \
    --proxy=teleport.example.com:443 \
    --name=oracle \
    --protocol=oracle \
    --uri=oracle-instance.aabbccddeegg.eu-central-1.rds.amazonaws.com:2484 \
    --ad-keytab-file=/etc/teleport/teleport.keytab \
    --ad-domain=EXAMPLE.COM \
    --labels=env=dev

Active Directory 매개변수를 제공합니다:

플래그 설명
--ad-keytab-file 위에서 생성한 Kerberos keytab 파일의 경로.
--ad-domain Oracle이 가입된 Active Directory 도메인(Kerberos 영역).

6/9단계. 데이터베이스 서비스 시작#

Configure the Teleport Database Service to start automatically when the host boots up by creating a systemd service for it. The instructions depend on how you installed the Teleport Database Service.

You can check the status of the Teleport Database Service with systemctl status teleport and view its logs with journalctl -fu teleport.

7/9단계. Teleport 사용자 생성#

Flag Description
--roles List of roles to assign to the user. The builtin access role allows them to connect to any database server registered with Teleport.
--db-users List of database usernames the user will be allowed to use when connecting to the databases. A wildcard allows any user.
--db-names List of logical databases (aka schemas) the user will be allowed to connect to within a database server. A wildcard allows any database.

For more detailed information about database access controls and how to restrict access see RBAC documentation.

8/9단계. (선택사항) Oracle 감사 추적에서 감사 로그를 가져오도록 Teleport 구성#

Teleport는 Oracle 감사 추적에서 감사 로그를 가져올 수 있습니다. 이 기능을 활성화하려면 Oracle 감사 추적을 구성하고 Oracle 감사 추적에서 감사 이벤트를 가져오는 데 사용할 전용 Teleport 사용자를 생성해야 합니다.

Oracle 감사 추적에서 감사 이벤트를 가져올 내부 Oracle TELEPORT@EXAMPLE.COM 사용자를 생성합니다:

CREATE USER "TELEPORT@EXAMPLE.COM" IDENTIFIED EXTERNALLY;
GRANT CREATE SESSION TO "TELEPORT@EXAMPLE.COM";
GRANT SELECT ON SYS.DBA_AUDIT_TRAIL TO "TELEPORT@EXAMPLE.COM";
GRANT SELECT ON SYS.V_$SESSION TO "TELEPORT@EXAMPLE.COM";

AD에서 해당 TELEPORT@EXAMPLE.COM 사용자를 생성합니다.

RDS Oracle 파라미터 그룹 audit_traildb,extended로 수정하여 표준 감사를 활성화합니다.

감사 추적 변경 사항을 적용하려면 Oracle 인스턴스를 재부팅합니다.

alice 사용자에 대한 Oracle 감사를 활성화합니다:

AUDIT ALL STATEMENTS by "ALICE@EXAMPLE.COM" BY access;

Oracle에 연결하는 데 사용할 각 Teleport 사용자에 대해 감사를 활성화해야 합니다. 또한 각 사용자에 대해 다른 감사 정책을 생성할 수 있습니다.

이전에 생성한 감사 사용자를 지정하도록 데이터베이스 서비스 구성을 편집합니다.

db_service:
  enabled: true
  databases:
  - name: "oracle"
    protocol: "oracle"
    uri: "oracle-instance.aabbccddeegg.eu-central-1.rds.amazonaws.com:2484"
    ad:
      keytab_file: "/etc/teleport/teleport.keytab"
      domain: "EXAMPLE.COM"
      krb5_file: "/etc/krb5.conf"
+   oracle:
+     audit_user: "teleport"

Teleport는 Oracle 감사 추적에서 감사 추적 이벤트를 정리하지 않습니다. 디스크 공간 부족을 방지하기 위해 Oracle 감사 추적 정리 정책을 구성해야 합니다.

9/9단계. 연결#

Teleport 클러스터에 로그인합니다. Oracle 데이터베이스가 사용 가능한 데이터베이스 목록에 나타나야 합니다:

$ tsh login --proxy=teleport.example.com --user=alice
$ tsh db ls
# Name   Description         Labels
# ------ ------------------- -------
# oracle                     env=dev

데이터베이스에 연결합니다. 이를 위해 PATH에서 sql로 사용 가능한 SQLcl 클라이언트가 필요합니다.

$ tsh db connect --db-user=alice --db-name ORCL oracle

데이터베이스에서 로그아웃하고 자격 증명을 제거하려면:

# 특정 데이터베이스 인스턴스의 자격 증명을 제거합니다.
$ tsh db logout oracle
# 모든 데이터베이스 인스턴스의 자격 증명을 제거합니다.
$ tsh db logout

SQLcl 대신 tsh proxy db 명령과 함께 다른 클라이언트를 사용하여 다른 클라이언트가 사용할 터널을 열 수도 있습니다. 예를 들어:

$ tsh proxy db --db-user=alice --db-name ORCL oracle --port 12345 --tunnel
Started authenticated tunnel for the Oracle database "oracle" in cluster "teleport.example.com" on 127.0.0.1:12345.

Use the following command to connect to the Oracle database server using CLI:
  $ sql -L /@localhost:12345/ORCL

Other clients can use:
  - a direct connection to 127.0.0.1:12345 without a username and password
  - a custom JDBC connection string: 'jdbc:oracle:thin:@tcps://localhost:12345/ORCL?TNS_ADMIN=/home/alice/.tsh/keys/teleport.example.com/alice-db/teleport.example.com/oracle-wallet'

이 방법은 Oracle 그래픽 클라이언트 섹션에서 설명한 대로 다양한 그래픽 클라이언트를 사용할 수 있게 합니다.

다음 단계#

문제 해결#

Connection hangs or is refused#

A common issue when connecting to an Oracle database is a connection timeout or refusal. This typically indicates a networking problem where the Teleport Database Service cannot reach the Oracle database endpoint. Verify that network routing and access controls, such as firewalls and VPC security groups, allow traffic to flow from the Database Service host to the database endpoint.

You can validate connectivity using a native Oracle client, which helps confirm whether the issue is with Teleport or the underlying network configuration. For example, using Oracle SQLcl:

# Example: Oracle SQLcl
sql -L myuser/mypassword@oracle-instance.example.com:2484

Network connectivity issues are often detected by automated health checks.

To check the health status of all registered databases:

# All databases
tctl db ls --format=json | jq -r '.[] | [.metadata.name, .status.target_health]'

An unhealthy database will have output similar to the following:

...
  "oracle",
  {
    "address": "11.22.33.44:2484",
    "protocol": "TCP",
    "status": "unhealthy",
    "transition_timestamp": "2025-09-25T09:47:39.435973Z",
    "transition_reason": "threshold_reached",
    "transition_error": "dial tcp 11.22.33.44:2484: i/o timeout",
    "message": "1 health check failed"
  }
...

TLS negotiation fails#

Properly configuring TLS on an Oracle database can be challenging. Different underlying issues can result in the same error message, such as the following from Teleport:

Original Error: *tls.permanentError remote error: tls: handshake failure

Or you might see the following in the Oracle logs:

ORA-00609: could not attach to incoming connection
ORA-28860: Fatal SSL error

To identify the root cause, follow the debugging steps in the sections below. The output of the following openssl command can help diagnose many common TLS issues. Capture the output and use it as you follow the debugging steps.

> openssl s_client -connect oracle.example.com:2484 -showcerts

Wrong server certificate#

Teleport rejects connections to databases with untrusted server certificates. If you are using Teleport to issue certificates, ensure that the server certificate was issued by the Teleport Database CA. An invalid server certificate will prevent Teleport from establishing a secure connection.

You can view the Teleport Database CA certificate with the following command:

tctl auth export --type=db | openssl x509 -issuer -noout
...
issuer=O=teleport.example.com, CN=teleport.example.com, serialNumber=200129862304303044762346177566738813560

Compare the issuer in the server certificate with the issuer of the Teleport Database CA certificate. The openssl s_client command from the previous section will show you the server certificate:

# openssl s_client output:
...
Server certificate
subject=CN=oracle.example.com
issuer=O=teleport.example.com, CN=teleport.example.com, serialNumber=200129862304303044762346177566738813560
...

You can also inspect the Oracle wallet directly using the orapki utility to verify the server certificate.

# Prompt for wallet password
orapki wallet display -complete -wallet /path/to/wallet

The "User Certificates" section of the output should contain the server's certificate. Its Issuer should match the Subject of the Teleport Database CA.

User Certificates:
Subject:        CN=oracle.example.com
Issuer:         SERIALNUMBER=200129862304303044762346177566738813560,CN=teleport.example.com,O=teleport.example.com
Serial Number:  ...

Wrong client certificate#

If the Oracle server rejects client certificates presented by the Teleport Database Service, you should verify that the Oracle database trusts the Teleport Database User CA.

You can view the Teleport Database User CA with this command:

tctl auth export --type=db-client | openssl x509 -issuer -noout
issuer=O=teleport.example.com, CN=teleport.example.com, serialNumber=183359545647055551607366887578713393931

Compare the Teleport Database User CA with the list of CAs trusted by the Oracle database. The openssl s_client command from earlier will show the list of CAs the Oracle database trusts:

# openssl s_client output:
...
---
Acceptable client certificate CA names
O=teleport.example.com, CN=teleport.example.com, serialNumber=183359545647055551607366887578713393931

Ensure that the Teleport Database User CA certificate has been added to the correct wallet and that the Oracle server configuration references this wallet.

You can also inspect the Oracle wallet directly using the orapki utility to verify that the Teleport Database User CA is trusted.

# Prompt for wallet password
orapki wallet display -complete -wallet /path/to/wallet

The "Trusted Certificates" section of the output should contain the Teleport Database User CA. Its Issuer should match the issuer of the Teleport Database User CA.

Trusted Certificates:
Subject:        SERIALNUMBER=183359545647055551607366887578713393931,CN=teleport.example.com,O=teleport.example.com
Issuer:         SERIALNUMBER=183359545647055551607366887578713393931,CN=teleport.example.com,O=teleport.example.com
Serial Number:  ...

Wrong TLS version#

Teleport rejects connections that use TLS 1.0 or 1.1 due to known weaknesses. Ensure that the SSL_VERSION parameter in your Oracle configuration is set to 1.2 or higher to enable TLS 1.2 or a newer version.

No common cipher suites#

Ensure that the SQLNET.CIPHER_SUITE parameter in your Oracle configuration contains modern TLS cipher suites that match the configured TLS version. The following cipher suites are secure and widely supported across different Oracle versions.

For TLS 1.2:

  • TLS_ECDHE_ECDSA_WITH_AES_128_GCM_SHA256
  • TLS_ECDHE_ECDSA_WITH_AES_256_GCM_SHA384

For TLS 1.3:

  • TLS_AES_128_GCM_SHA256
  • TLS_AES_256_GCM_SHA384

Must be logged on to the server error#

The following error indicates that the login procedure has failed:

ORA-17430: Must be logged on to the server.

This is most commonly caused by the Oracle database enforcing native encryption or data-integrity checksums on a TCPS endpoint. Teleport uses TLS for transport security, and does not support native Oracle encryption.

To disable the redundant encryption requirement for the TCPS endpoint, add the following line to your sqlnet.ora file:

SQLNET.IGNORE_ANO_ENCRYPTION_FOR_TCPS=TRUE

Make sure to use an up-to-date version of the Oracle database. In older versions, this setting may not disable data-integrity checksums, which will lead to continued failures.

Invalid username#

An incorrectly specified username will result in the following error:

ORA-01017: invalid username/password; logon denied

When using TLS-based authentication, Oracle maps the Common Name (CN) from the client certificate to an external user in the database. Verify the EXTERNAL_NAME for your user in the dba_users table. It should be in the format cn=<name>, where <name> matches the value of the --db-user flag used in the tsh db login command.

You can query the dba_users table to check the EXTERNAL_NAME of your users:

SQL> SELECT username, authentication_type, external_name
  2  FROM   dba_users
  3  WHERE  authentication_type = 'EXTERNAL'
  4  ORDER  BY 1;

USERNAME      AUTHENTICATION_TYPE    EXTERNAL_NAME
_____________ ______________________ ________________
ALICE         EXTERNAL               cn=alice

사용자 이름 인식 불가#

로그인이 거부되면 사용 중인 사용자 이름을 확인하세요. 특정 사용자 이름을 참조할 때 소문자/대문자 관례를 따르는 데 특별히 주의하세요. 일반적인 설정에서는 다음을 볼 수 있습니다:

  • tsh 명령에 전달되는 소문자, 도메인 없는 사용자(예: --db-user alice)
  • keytab 생성 시 소문자, 도메인 없는 사용자(예: alice)
  • Oracle 데이터베이스에서 대문자, 도메인이 있는 사용자(예: ALICE@EXAMPLE.COM)

설치별 구성 변형은 다른 값을 초래할 수 있습니다. 지침은 로컬 AD 관리자에게 문의하세요.

추가 정보#

Kerberos 인증을 사용한 Amazon RDS Oracle을 이용한 데이터베이스 접근

원문 보기
요약

Teleport can provide secure access to Amazon RDS for Oracle via the Teleport Database Service. In this guide, you will: Teleport 데이터베이스 서비스는 Oracle 데이터베이스와 동일한 Active Directory 도메인에 가입하고 Kerberos 프로토콜을 사용하여 Oracle에 인증합니다.

Teleport can provide secure access to Amazon RDS for Oracle via the Teleport Database Service. This allows for fine-grained access control through Teleport's RBAC.

In this guide, you will:

  1. Configure your Amazon RDS for Oracle database with Kerberos authentication.
  2. Add the database to your Teleport cluster.
  3. Connect to the database via Teleport.

작동 방식#

Teleport 데이터베이스 서비스는 Oracle 데이터베이스와 동일한 Active Directory 도메인에 가입하고 Kerberos 프로토콜을 사용하여 Oracle에 인증합니다. 사용자가 Teleport를 통해 Oracle에 연결하면 데이터베이스 서비스는 Active Directory에서 서비스 티켓을 얻고, 데이터베이스 사용자의 장기 키를 사용하여 티켓을 복호화한 다음 Oracle에 연결합니다. 이 시점에서 데이터베이스 서비스는 사용자 트래픽을 데이터베이스로 전달합니다.

전제 조건#

  • A running Teleport (v17.4.0 or higher) cluster. If you want to get started with Teleport, sign up for a free trial or set up a demo environment.

  • The tctl and tsh clients.

    Installing `tctl` and `tsh` clients
    1. Determine the version of your Teleport cluster. The tctl and tsh clients must be at most one major version behind your Teleport cluster version. Send a GET request to the Proxy Service at /v1/webapi/find and use a JSON query tool to obtain your cluster version. Replace with the web address of your Teleport Proxy Service:

      $ TELEPORT_DOMAIN=
      $ TELEPORT_VERSION="$(curl -s https://$TELEPORT_DOMAIN/v1/webapi/find | jq -r '.server_version')"
      
    2. Follow the instructions for your platform to install tctl and tsh clients:

  • Amazon RDS for Oracle 데이터베이스 인스턴스.
  • AWS Directory Service 관리형 Microsoft AD.
  • 데이터베이스와 동일한 Active Directory 도메인에 가입된 Linux 노드. 없는 경우 이 가이드에서 가입 단계를 안내합니다.
  • Oracle 클라이언트. 기본 옵션은 SQLcl이지만, 대체 클라이언트는 아래에서 설명합니다.

To check that you can connect to your Teleport cluster, sign in with tsh login, then verify that you can run tctl commands using your current credentials.

For example, run the following command, assigning to the domain name of the Teleport Proxy Service in your cluster and to your Teleport username:

$ tsh login --proxy= --user=
$ tctl status
# Cluster  (=teleport.url=)
# Version  (=teleport.version=)
# CA pin   (=presets.ca_pin=)

If you can connect to the cluster and run the tctl status command, you can use your current credentials to run subsequent tctl commands from your workstation. If you host your own Teleport cluster, you can also run tctl commands on the computer that hosts the Teleport Auth Service for full permissions.

1/9단계. Oracle RDS 인스턴스 준비#

Teleport를 구성하기 전에 Oracle RDS 인스턴스에 Kerberos 인증과 TLS가 올바르게 구성되어 있는지 확인합니다:

  1. Amazon RDS Oracle Kerberos 설정 가이드를 따라 인스턴스에서 Kerberos 인증을 활성화합니다.
  2. Amazon RDS Oracle SSL 설정 문서를 따라 Oracle RDS 인스턴스에서 TLS를 활성화합니다. 최적의 보안을 위해 SQLNET.SSL_VERSION1.2로 설정되어 있는지 확인합니다. SSL 포트 선택을 기억해 두세요; 이 가이드의 나머지 부분에서는 포트가 2484라고 가정합니다. 또한 SQLNET.CIPHER_SUITE 파라미터에 지원되는 값(예: TLS_ECDHE_RSA_WITH_AES_256_GCM_SHA384)이 포함되어 있는지 확인합니다.
Note

계속 진행하기 전에 Teleport 데이터베이스 서비스 호스트와 Oracle RDS 인스턴스 간의 연결을 확인하세요.

2/9단계. Oracle AD 사용자 생성#

Note

Oracle 데이터베이스에 이미 Active Directory 로그인이 있는 경우 이 단계를 건너뛸 수 있습니다.

관리자 계정(예: admin)으로 Oracle 데이터베이스에 연결하고 Active Directory 인증을 사용할 사용자를 생성합니다:

CREATE USER "ALICE@EXAMPLE.COM" IDENTIFIED EXTERNALLY;
GRANT CREATE SESSION TO "ALICE@EXAMPLE.COM";
Note

Oracle RDS에서 예상하는 사용자 이름은 영역 이름이 뒤따르는 대문자 형식입니다. 다른 표기 방법은 문제를 일으킬 수 있습니다.

3/9단계. Linux 노드를 Active Directory에 가입#

Note

Oracle 인스턴스와 동일한 Active Directory 도메인에 가입된 Linux 노드가 이미 있는 경우 이 단계를 건너뛸 수 있습니다.

데이터베이스 서비스가 실행될 Linux 노드는 Oracle 데이터베이스와 동일한 Active Directory 도메인에 가입되어 있어야 합니다.

가입하려면 Linux 노드가 Active Directory 정규화된 도메인 이름을 확인할 수 있어야 합니다. 예를 들어, AWS 관리형 AD의 경우 디렉터리 개요 페이지의 "네트워킹 세부 정보"에 제공된 네임서버를 사용합니다.

필요한 패키지를 설치합니다:

$ sudo apt-get update
$ sudo apt-get -y install sssd realmd krb5-user samba-common packagekit adcli
$ sudo yum -y update
$ sudo yum -y install sssd realmd krb5-workstation samba-common-tools

/etc/krb5.conf를 편집하여 역방향 DNS 해석을 비활성화하고 기본 영역을 설정합니다. [realms] 섹션에 도메인 정의가 포함되어 있고 도메인 컨트롤러를 가리키는 admin_serverkdc 필드가 설정되어 있는지 확인합니다:

[libdefaults]
default_realm = EXAMPLE.COM
rdns = false

[realms]
  EXAMPLE.COM = {
    kdc = example.com
    admin_server = example.com
  }

영역에 가입합니다:

$ sudo realm join -v -U admin@EXAMPLE.COM example.com
...
 * Successfully enrolled machine in realm
Warning

admin@EXAMPLE.COM의 영역 이름은 반드시 대문자여야 합니다. 그렇지 않으면 노드가 가입하지 못할 수 있습니다.

노드가 영역에 가입했는지 확인하려면 realm list 명령을 사용합니다:

$ sudo realm list
example.com
  type: kerberos
  realm-name: EXAMPLE.COM
  domain-name: example.com
  configured: kerberos-member
  server-software: active-directory
  client-software: sssd
  ...

4/9단계. keytab 파일 생성#

Teleport는 Active Directory에서 Oracle 데이터베이스 인증을 위한 Kerberos 서비스 티켓을 얻기 위해 keytab 파일이 필요합니다. 이를 생성하는 가장 쉬운 방법은 adutil Linux CLI 유틸리티를 사용하는 것입니다.

Active Directory 도메인에 가입한 Linux 노드에 adutil을 설치합니다:

$ curl https://packages.microsoft.com/keys/microsoft.asc | sudo tee /etc/apt/trusted.gpg.d/microsoft.asc
$ curl https://packages.microsoft.com/config/ubuntu/18.04/prod.list | sudo tee /etc/apt/sources.list.d/msprod.list
$ sudo apt-get update
$ sudo ACCEPT_EULA=Y apt-get install -y adutil
$ curl https://packages.microsoft.com/keys/microsoft.asc | sudo tee /etc/apt/trusted.gpg.d/microsoft.asc
$ curl https://packages.microsoft.com/config/ubuntu/20.04/prod.list | sudo tee /etc/apt/sources.list.d/msprod.list
$ sudo apt-get update
$ sudo ACCEPT_EULA=Y apt-get install -y adutil
$ curl https://packages.microsoft.com/keys/microsoft.asc | sudo tee /etc/apt/trusted.gpg.d/microsoft.asc
$ curl https://packages.microsoft.com/config/ubuntu/22.04/prod.list | sudo tee /etc/apt/sources.list.d/msprod.list
$ sudo apt-get update
$ sudo ACCEPT_EULA=Y apt-get install -y adutil
$ sudo curl -o /etc/yum.repos.d/msprod.repo https://packages.microsoft.com/config/rhel/8/prod.repo
$ sudo ACCEPT_EULA=Y yum install -y adutil
$ sudo curl -o /etc/yum.repos.d/msprod.repo https://packages.microsoft.com/config/rhel/9/prod.repo
$ sudo ACCEPT_EULA=Y yum install -y adutil

배포판에서 adutil을 사용할 수 없는 경우 대신 ktutil을 사용할 수 있습니다. 표준 Kerberos 유틸리티로 사용 가능해야 합니다.

해당 사용자의 사용자 이름과 kvno를 기반으로 사용법을 조정합니다.

$ ktutil
ktutil: addent -password -p alice@EXAMPLE.COM -k 1 -e aes256-cts-hmac-sha1-96
Password for alice@EXAMPLE.COM: [enter password here]
ktutil: wkt teleport.keytab
ktutil: quit

kinit 명령을 사용하여 Active Directory에 로그인합니다:

$ kinit admin@EXAMPLE.COM

adutil keytab create 명령을 사용하여 Oracle 데이터베이스에 연결할 각 Active Directory 사용자에 대한 keytab 항목을 생성합니다:

$ adutil keytab create teleport.keytab alice
$ adutil keytab create teleport.keytab bob

각 사용자의 암호를 입력하라는 메시지가 표시됩니다. 모든 keytab 항목이 동일한 teleport.keytab 파일에 병합됩니다.

서비스 주체 이름 할당

adutil keytab create 명령이 작동하려면 각 사용자 계정에 서비스 주체 이름이 할당되어 있어야 합니다. 그렇지 않으면 명령이 kvno(키 버전 번호)를 확인할 수 없습니다.

사용자에게 할당된 SPN이 있는지 확인하려면 AWS 콘솔의 사용자 페이지로 이동하여 "계정 설정 - 선택사항" 섹션을 찾습니다.

AWS AD SPN 설정

또는 Active Directory 도메인에 가입된 Windows 컴퓨터에서 다음 명령을 실행합니다:

$ setspn -L alice

사용자 계정에 SPN을 할당하려면 다음 명령을 사용합니다:

$ setspn -s user/alice alice

klist 명령을 사용하여 keytab 파일의 항목을 확인할 수 있습니다:

$ klist -ke teleport.keytab
Keytab name: FILE:teleport.keytab
KVNO Principal
---- --------------------------------------------------------------------------
   5 alice@EXAMPLE.COM (aes256-cts-hmac-sha1-96)
   2 bob@EXAMPLE.COM (aes256-cts-hmac-sha1-96)
Warning

인증 실패를 방지하려면 사용자의 암호를 업데이트한 후 keytab 파일을 업데이트해야 합니다.

5/9단계. Teleport 데이터베이스 서비스 설정#

The Database Service requires a valid join token to join your Teleport cluster. Run the following tctl command and save the token output in /tmp/token on the server that will run the Database Service:

$ tctl tokens add --type=db --format=text
(=presets.tokens.first=)

To install a Teleport Agent on your Linux server:

The recommended installation method is the cluster install script. It will select the correct version, edition, and installation mode for your cluster.

  1. Assign to your Teleport cluster hostname and port, but not the scheme (https://).

  2. Run your cluster's install script:

    $ curl "https:///scripts/install.sh" | sudo bash
    
Note

Teleport 데이터베이스 서비스는 Oracle 인스턴스와 동일한 Active Directory 도메인에 가입된 Linux 서버에서 실행되어야 합니다.

Teleport 데이터베이스 서비스를 구성합니다. --proxy를 Teleport 프록시 서비스 주소를 가리키도록, --uri를 Oracle 엔드포인트로 업데이트해야 합니다. 지정한 포트는 SSL 구성의 일부로 구성된 것이어야 하며 기본값은 2484입니다.

$ sudo teleport db configure create \
    -o file \
    --token=/tmp/token \
    --proxy=teleport.example.com:443 \
    --name=oracle \
    --protocol=oracle \
    --uri=oracle-instance.aabbccddeegg.eu-central-1.rds.amazonaws.com:2484 \
    --ad-keytab-file=/etc/teleport/teleport.keytab \
    --ad-domain=EXAMPLE.COM \
    --labels=env=dev

Active Directory 매개변수를 제공합니다:

플래그 설명
--ad-keytab-file 위에서 생성한 Kerberos keytab 파일의 경로.
--ad-domain Oracle이 가입된 Active Directory 도메인(Kerberos 영역).

6/9단계. 데이터베이스 서비스 시작#

Configure the Teleport Database Service to start automatically when the host boots up by creating a systemd service for it. The instructions depend on how you installed the Teleport Database Service.

You can check the status of the Teleport Database Service with systemctl status teleport and view its logs with journalctl -fu teleport.

7/9단계. Teleport 사용자 생성#

Flag Description
--roles List of roles to assign to the user. The builtin access role allows them to connect to any database server registered with Teleport.
--db-users List of database usernames the user will be allowed to use when connecting to the databases. A wildcard allows any user.
--db-names List of logical databases (aka schemas) the user will be allowed to connect to within a database server. A wildcard allows any database.

For more detailed information about database access controls and how to restrict access see RBAC documentation.

8/9단계. (선택사항) Oracle 감사 추적에서 감사 로그를 가져오도록 Teleport 구성#

Teleport는 Oracle 감사 추적에서 감사 로그를 가져올 수 있습니다. 이 기능을 활성화하려면 Oracle 감사 추적을 구성하고 Oracle 감사 추적에서 감사 이벤트를 가져오는 데 사용할 전용 Teleport 사용자를 생성해야 합니다.

Oracle 감사 추적에서 감사 이벤트를 가져올 내부 Oracle TELEPORT@EXAMPLE.COM 사용자를 생성합니다:

CREATE USER "TELEPORT@EXAMPLE.COM" IDENTIFIED EXTERNALLY;
GRANT CREATE SESSION TO "TELEPORT@EXAMPLE.COM";
GRANT SELECT ON SYS.DBA_AUDIT_TRAIL TO "TELEPORT@EXAMPLE.COM";
GRANT SELECT ON SYS.V_$SESSION TO "TELEPORT@EXAMPLE.COM";

AD에서 해당 TELEPORT@EXAMPLE.COM 사용자를 생성합니다.

RDS Oracle 파라미터 그룹 audit_traildb,extended로 수정하여 표준 감사를 활성화합니다.

감사 추적 변경 사항을 적용하려면 Oracle 인스턴스를 재부팅합니다.

alice 사용자에 대한 Oracle 감사를 활성화합니다:

AUDIT ALL STATEMENTS by "ALICE@EXAMPLE.COM" BY access;

Oracle에 연결하는 데 사용할 각 Teleport 사용자에 대해 감사를 활성화해야 합니다. 또한 각 사용자에 대해 다른 감사 정책을 생성할 수 있습니다.

이전에 생성한 감사 사용자를 지정하도록 데이터베이스 서비스 구성을 편집합니다.

db_service:
  enabled: true
  databases:
  - name: "oracle"
    protocol: "oracle"
    uri: "oracle-instance.aabbccddeegg.eu-central-1.rds.amazonaws.com:2484"
    ad:
      keytab_file: "/etc/teleport/teleport.keytab"
      domain: "EXAMPLE.COM"
      krb5_file: "/etc/krb5.conf"
+   oracle:
+     audit_user: "teleport"

Teleport는 Oracle 감사 추적에서 감사 추적 이벤트를 정리하지 않습니다. 디스크 공간 부족을 방지하기 위해 Oracle 감사 추적 정리 정책을 구성해야 합니다.

9/9단계. 연결#

Teleport 클러스터에 로그인합니다. Oracle 데이터베이스가 사용 가능한 데이터베이스 목록에 나타나야 합니다:

$ tsh login --proxy=teleport.example.com --user=alice
$ tsh db ls
# Name   Description         Labels
# ------ ------------------- -------
# oracle                     env=dev

데이터베이스에 연결합니다. 이를 위해 PATH에서 sql로 사용 가능한 SQLcl 클라이언트가 필요합니다.

$ tsh db connect --db-user=alice --db-name ORCL oracle

데이터베이스에서 로그아웃하고 자격 증명을 제거하려면:

# 특정 데이터베이스 인스턴스의 자격 증명을 제거합니다.
$ tsh db logout oracle
# 모든 데이터베이스 인스턴스의 자격 증명을 제거합니다.
$ tsh db logout

SQLcl 대신 tsh proxy db 명령과 함께 다른 클라이언트를 사용하여 다른 클라이언트가 사용할 터널을 열 수도 있습니다. 예를 들어:

$ tsh proxy db --db-user=alice --db-name ORCL oracle --port 12345 --tunnel
Started authenticated tunnel for the Oracle database "oracle" in cluster "teleport.example.com" on 127.0.0.1:12345.

Use the following command to connect to the Oracle database server using CLI:
  $ sql -L /@localhost:12345/ORCL

Other clients can use:
  - a direct connection to 127.0.0.1:12345 without a username and password
  - a custom JDBC connection string: 'jdbc:oracle:thin:@tcps://localhost:12345/ORCL?TNS_ADMIN=/home/alice/.tsh/keys/teleport.example.com/alice-db/teleport.example.com/oracle-wallet'

이 방법은 Oracle 그래픽 클라이언트 섹션에서 설명한 대로 다양한 그래픽 클라이언트를 사용할 수 있게 합니다.

다음 단계#

문제 해결#

Connection hangs or is refused#

A common issue when connecting to an Oracle database is a connection timeout or refusal. This typically indicates a networking problem where the Teleport Database Service cannot reach the Oracle database endpoint. Verify that network routing and access controls, such as firewalls and VPC security groups, allow traffic to flow from the Database Service host to the database endpoint.

You can validate connectivity using a native Oracle client, which helps confirm whether the issue is with Teleport or the underlying network configuration. For example, using Oracle SQLcl:

# Example: Oracle SQLcl
sql -L myuser/mypassword@oracle-instance.example.com:2484

Network connectivity issues are often detected by automated health checks.

To check the health status of all registered databases:

# All databases
tctl db ls --format=json | jq -r '.[] | [.metadata.name, .status.target_health]'

An unhealthy database will have output similar to the following:

...
  "oracle",
  {
    "address": "11.22.33.44:2484",
    "protocol": "TCP",
    "status": "unhealthy",
    "transition_timestamp": "2025-09-25T09:47:39.435973Z",
    "transition_reason": "threshold_reached",
    "transition_error": "dial tcp 11.22.33.44:2484: i/o timeout",
    "message": "1 health check failed"
  }
...

TLS negotiation fails#

Properly configuring TLS on an Oracle database can be challenging. Different underlying issues can result in the same error message, such as the following from Teleport:

Original Error: *tls.permanentError remote error: tls: handshake failure

Or you might see the following in the Oracle logs:

ORA-00609: could not attach to incoming connection
ORA-28860: Fatal SSL error

To identify the root cause, follow the debugging steps in the sections below. The output of the following openssl command can help diagnose many common TLS issues. Capture the output and use it as you follow the debugging steps.

> openssl s_client -connect oracle.example.com:2484 -showcerts

Wrong server certificate#

Teleport rejects connections to databases with untrusted server certificates. If you are using Teleport to issue certificates, ensure that the server certificate was issued by the Teleport Database CA. An invalid server certificate will prevent Teleport from establishing a secure connection.

You can view the Teleport Database CA certificate with the following command:

tctl auth export --type=db | openssl x509 -issuer -noout
...
issuer=O=teleport.example.com, CN=teleport.example.com, serialNumber=200129862304303044762346177566738813560

Compare the issuer in the server certificate with the issuer of the Teleport Database CA certificate. The openssl s_client command from the previous section will show you the server certificate:

# openssl s_client output:
...
Server certificate
subject=CN=oracle.example.com
issuer=O=teleport.example.com, CN=teleport.example.com, serialNumber=200129862304303044762346177566738813560
...

You can also inspect the Oracle wallet directly using the orapki utility to verify the server certificate.

# Prompt for wallet password
orapki wallet display -complete -wallet /path/to/wallet

The "User Certificates" section of the output should contain the server's certificate. Its Issuer should match the Subject of the Teleport Database CA.

User Certificates:
Subject:        CN=oracle.example.com
Issuer:         SERIALNUMBER=200129862304303044762346177566738813560,CN=teleport.example.com,O=teleport.example.com
Serial Number:  ...

Wrong client certificate#

If the Oracle server rejects client certificates presented by the Teleport Database Service, you should verify that the Oracle database trusts the Teleport Database User CA.

You can view the Teleport Database User CA with this command:

tctl auth export --type=db-client | openssl x509 -issuer -noout
issuer=O=teleport.example.com, CN=teleport.example.com, serialNumber=183359545647055551607366887578713393931

Compare the Teleport Database User CA with the list of CAs trusted by the Oracle database. The openssl s_client command from earlier will show the list of CAs the Oracle database trusts:

# openssl s_client output:
...
---
Acceptable client certificate CA names
O=teleport.example.com, CN=teleport.example.com, serialNumber=183359545647055551607366887578713393931

Ensure that the Teleport Database User CA certificate has been added to the correct wallet and that the Oracle server configuration references this wallet.

You can also inspect the Oracle wallet directly using the orapki utility to verify that the Teleport Database User CA is trusted.

# Prompt for wallet password
orapki wallet display -complete -wallet /path/to/wallet

The "Trusted Certificates" section of the output should contain the Teleport Database User CA. Its Issuer should match the issuer of the Teleport Database User CA.

Trusted Certificates:
Subject:        SERIALNUMBER=183359545647055551607366887578713393931,CN=teleport.example.com,O=teleport.example.com
Issuer:         SERIALNUMBER=183359545647055551607366887578713393931,CN=teleport.example.com,O=teleport.example.com
Serial Number:  ...

Wrong TLS version#

Teleport rejects connections that use TLS 1.0 or 1.1 due to known weaknesses. Ensure that the SSL_VERSION parameter in your Oracle configuration is set to 1.2 or higher to enable TLS 1.2 or a newer version.

No common cipher suites#

Ensure that the SQLNET.CIPHER_SUITE parameter in your Oracle configuration contains modern TLS cipher suites that match the configured TLS version. The following cipher suites are secure and widely supported across different Oracle versions.

For TLS 1.2:

  • TLS_ECDHE_ECDSA_WITH_AES_128_GCM_SHA256
  • TLS_ECDHE_ECDSA_WITH_AES_256_GCM_SHA384

For TLS 1.3:

  • TLS_AES_128_GCM_SHA256
  • TLS_AES_256_GCM_SHA384

Must be logged on to the server error#

The following error indicates that the login procedure has failed:

ORA-17430: Must be logged on to the server.

This is most commonly caused by the Oracle database enforcing native encryption or data-integrity checksums on a TCPS endpoint. Teleport uses TLS for transport security, and does not support native Oracle encryption.

To disable the redundant encryption requirement for the TCPS endpoint, add the following line to your sqlnet.ora file:

SQLNET.IGNORE_ANO_ENCRYPTION_FOR_TCPS=TRUE

Make sure to use an up-to-date version of the Oracle database. In older versions, this setting may not disable data-integrity checksums, which will lead to continued failures.

Invalid username#

An incorrectly specified username will result in the following error:

ORA-01017: invalid username/password; logon denied

When using TLS-based authentication, Oracle maps the Common Name (CN) from the client certificate to an external user in the database. Verify the EXTERNAL_NAME for your user in the dba_users table. It should be in the format cn=<name>, where <name> matches the value of the --db-user flag used in the tsh db login command.

You can query the dba_users table to check the EXTERNAL_NAME of your users:

SQL> SELECT username, authentication_type, external_name
  2  FROM   dba_users
  3  WHERE  authentication_type = 'EXTERNAL'
  4  ORDER  BY 1;

USERNAME      AUTHENTICATION_TYPE    EXTERNAL_NAME
_____________ ______________________ ________________
ALICE         EXTERNAL               cn=alice

사용자 이름 인식 불가#

로그인이 거부되면 사용 중인 사용자 이름을 확인하세요. 특정 사용자 이름을 참조할 때 소문자/대문자 관례를 따르는 데 특별히 주의하세요. 일반적인 설정에서는 다음을 볼 수 있습니다:

  • tsh 명령에 전달되는 소문자, 도메인 없는 사용자(예: --db-user alice)
  • keytab 생성 시 소문자, 도메인 없는 사용자(예: alice)
  • Oracle 데이터베이스에서 대문자, 도메인이 있는 사용자(예: ALICE@EXAMPLE.COM)

설치별 구성 변형은 다른 값을 초래할 수 있습니다. 지침은 로컬 AD 관리자에게 문의하세요.

추가 정보#