





Amazon Redshift Serverless를 사용한 데이터베이스 접근
Teleport v18.10요약
Teleport는 Teleport Database Service를 통해 Amazon Redshift Serverless에 대한 보안 접근을 제공할 수 있습니다. Teleport Database Service는 IAM 인증을 사용하여 Redshift Serverless와 통신합니다.
Teleport는 Teleport Database Service를 통해 Amazon Redshift Serverless에 대한 보안 접근을 제공할 수 있습니다. 이를 통해 Teleport의 RBAC를 사용한 세분화된 접근 제어가 가능합니다.
이 가이드에서는 다음을 수행합니다:
- Amazon Redshift Serverless 데이터베이스를 구성합니다 with IAM authentication.
- 데이터베이스를 Teleport 클러스터에 추가합니다.
- Teleport를 통해 데이터베이스에 연결합니다.
작동 방식#
Teleport Database Service는 IAM 인증을 사용하여 Redshift Serverless와 통신합니다. 사용자가 Teleport를 통해 데이터베이스에 연결하면 Teleport Database Service는 AWS 자격 증명을 얻고 데이터베이스에 액세스할 수 있는 권한을 가진 IAM 주체(principal)로 AWS에 인증합니다.
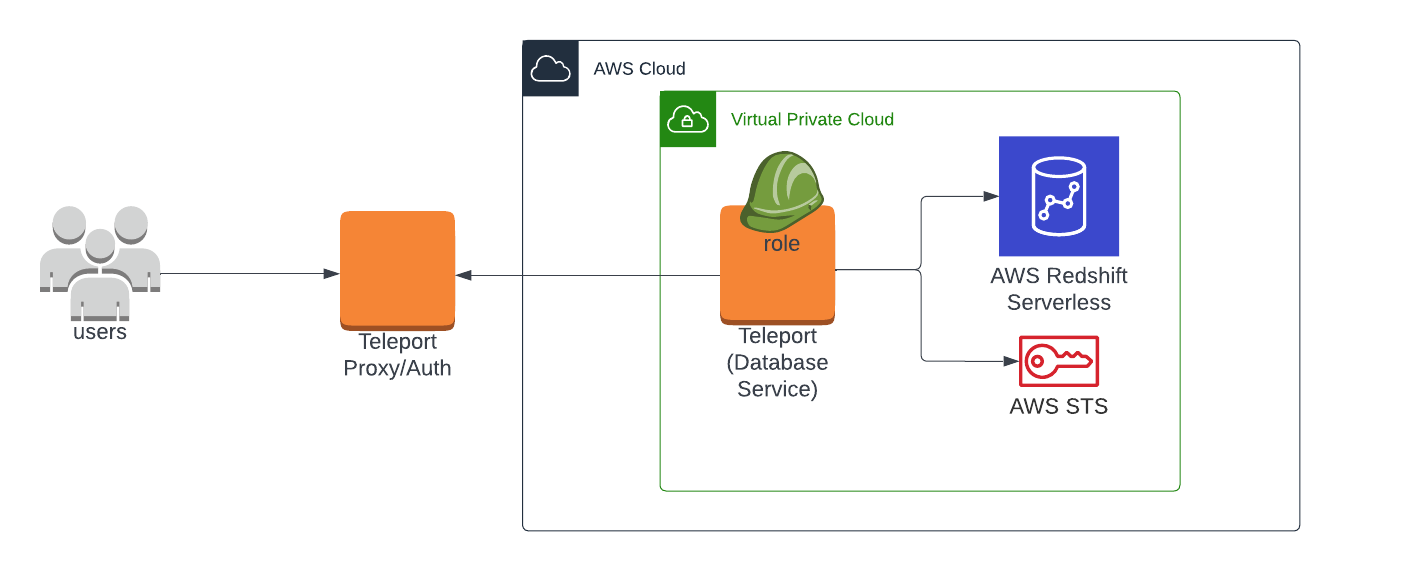
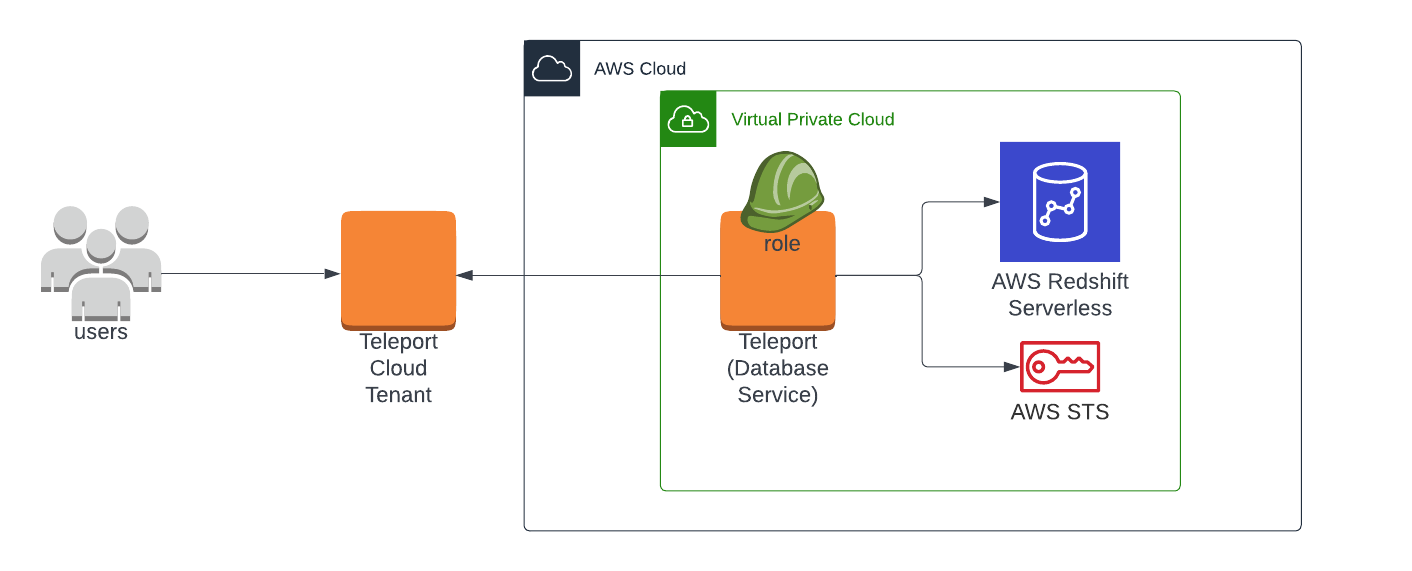
이 가이드는 단일 Amazon Redshift Serverless database를 Teleport 클러스터에 등록하는 방법을 보여줍니다. 보다 확장 가능한 접근 방식을 원한다면, 데이터베이스 자동 검색을 설정하여 인프라의 모든 AWS 데이터베이스를 자동으로 등록하는 방법을 알아보십시오.
사전 요구사항#
-
실행 중인 Teleport 클러스터. Teleport를 시작하려면 무료 체험판에 가입하거나 데모 환경을 구성하세요.
-
tctlandtshclients.Installing `tctl` and `tsh` clients
-
Teleport 클러스터의 버전을 확인합니다.
tctlandtshclients는 Teleport 클러스터 버전보다 최대 한 개의 메이저 버전까지만 뒤처질 수 있습니다. Proxy Service의/v1/webapi/find로 GET 요청을 보내고 JSON 쿼리 도구를 사용하여 클러스터 버전을 확인합니다.teleport.example.com:443를 Teleport Proxy Service의 웹 주소로 바꿉니다:$ TELEPORT_DOMAIN=teleport.example.com:443 $ TELEPORT_VERSION="$(curl -s https://$TELEPORT_DOMAIN/v1/webapi/find | jq -r '.server_version')" -
사용 중인 플랫폼에 대한 지침에 따라
tctlandtshclients를 설치합니다:
-
Mac
     `tctl` and `tsh` clients가 포함된, 서명된 Teleport macOS .pkg 설치 프로그램을 다운로드합니다:

     ```code
     $ curl -O https://cdn.teleport.dev/teleport-${TELEPORT_VERSION?}.pkg
     ```

     Finder에서 `pkg` 파일을 더블 클릭하여 설치를 시작합니다.
       Homebrew를 사용하여 Teleport를 설치하는 것은 지원되지 않습니다. Homebrew의
       Teleport 패키지는 Teleport에서 유지 관리하지 않으므로 신뢰성이나 보안을
       보장할 수 없습니다.
Windows - Powershell
     ```code
     $ curl.exe -O https://cdn.teleport.dev/teleport-v${TELEPORT_VERSION?}-windows-amd64-bin.zip
     # Unzip the archive and move the `tctl` and `tsh` clients to your %PATH%
     # NOTE: Do not place the `tctl` and `tsh` clients in the System32 directory, as this can cause issues when using WinSCP.
     # Use %SystemRoot% (C:\Windows) or %USERPROFILE% (C:\Users\<username>) instead.
     ```
Linux
     Linux 설치판의 모든 Teleport 바이너리에는 `tctl` and `tsh` clients가 포함되어 있습니다.  RPM/DEB
     패키지 및 i386/ARM/ARM64용 다운로드를 포함한 더 많은 옵션은
     [설치 페이지](../installation/installation.mdx)를 참조하세요.

     ```code
     $ curl -O https://cdn.teleport.dev/teleport-v${TELEPORT_VERSION?}-linux-amd64-bin.tar.gz
     $ tar -xzf teleport-v${TELEPORT_VERSION?}-linux-amd64-bin.tar.gz
     $ cd teleport
     $ sudo ./install
     # Teleport binaries have been copied to /usr/local/bin
     ```
- Redshift Serverless 구성과 IAM 정책을 생성 및 연결할 수 있는 권한이 있는 AWS 계정.
- 명령줄 클라이언트
psql이 설치되어 있고 시스템의PATH환경 변수에 추가되어 있어야 합니다. - Teleport Database Service를 실행할 호스트. 이 가이드에서는 EC2 인스턴스를 가정하고 이에 해당하는 접근 제어 예시를 제공합니다.
Teleport cluster에 연결할 수 있는지 확인하려면 tsh login으로 로그인한 다음,
현재 자격 증명으로 tctl 명령을 실행할 수 있는지 확인합니다.
예를 들어, teleport.example.com에 cluster 내 Teleport Proxy Service의
도메인 이름을, email@example.com에 Teleport 사용자 이름을 지정하여
다음 명령을 실행합니다:
$ tsh login --proxy=teleport.example.com --user=email@example.com
$ tctl status
# Cluster  (=teleport.url=)
# Version  (=teleport.version=)
# CA pin   (=presets.ca_pin=)
cluster에 연결하여 tctl status 명령을 실행할 수 있다면, 현재 자격 증명을 사용하여
워크스테이션에서 이후의 tctl 명령을 실행할 수 있습니다.
자체 Teleport cluster를 호스팅하는 경우, 전체 권한을 얻기 위해 Teleport Auth Service를
호스팅하는 컴퓨터에서 tctl 명령을 실행할 수도 있습니다.
1/5단계. 사용자 접근을 위한 IAM 역할 생성#
Redshift Serverless에 대한 사용자 접근을 제공하기 위해 AWS IAM 역할을 생성합니다. 이 역할은 해당 Teleport 역할을 통해 Teleport 사용자에게 부여됩니다. 이 가이드에서는 이 역할에 teleport-redshift-serverless-access라는 이름을 사용합니다.
AWS 계정을 신뢰하도록 역할의 신뢰 정책을 구성합니다. 이렇게 하면 다음 단계에서 설정할 Teleport Database Service가 이 역할을 수임할 수 있습니다. aws-account-id에 AWS 계정 ID를 할당합니다:
{
    "Version": "2012-10-17",
    "Statement": [
        {
            "Sid": "Statement1",
            "Effect": "Allow",
            "Principal": {
                "AWS": "arn:aws:iam::aws-account-id:root"
            },
            "Action": "sts:AssumeRole"
        }
    ]
}
예시 AWS 계정 ID를 교체하는 것을 잊지 마세요.
Redshift Serverless 데이터베이스에 연결할 수 있도록 역할에 권한 정책을 연결합니다:
{
    "Version": "2012-10-17",
    "Statement": [
        {
            "Effect": "Allow",
            "Action": "redshift-serverless:GetCredentials",
            "Resource": "*"
        }
    ]
}
리소스 ARN 문자열의 형식은 다음과 같으며, 특정 워크그룹에만 접근을 허용하려면 더 구체적으로 지정할 수 있습니다:
arn:aws:redshift-serverless:{Region}:{AccountID}:workgroup/{WorkgroupID}
Redshift Serverless 권한 구성에 대한 자세한 내용은 Amazon Redshift Serverless의 자격 증명 및 접근 관리를 참고하세요.
2/5단계. Database Service IAM 권한 구성#
Teleport Database Service가 Redshift Serverless databases에 대한 접근을 제공하려면 AWS IAM 권한이 필요합니다.
Teleport를 위한 IAM 역할 생성#
the Database Service이(가) AWS에 인증하는 데 사용할 수 있는 자격 증명에 대한 접근 권한을 부여합니다.
- the Database Service을(를) EC2 인스턴스에서 실행하는 경우 EC2 Instance Metadata Service 방식을 사용할 수 있습니다
- the Database Service을(를) Kubernetes에서 실행하는 경우 IAM Roles for Service Accounts (IRSA)를 사용할 수 있습니다
- 그 외의 경우에는 환경 변수를 사용해야 합니다
Instance Metadata Service
Teleport는 EC2 인스턴스에서 실행 중일 때를 감지하고 Instance Metadata Service를 사용하여 자격 증명을 가져옵니다.
EC2 인스턴스는 EC2 인스턴스 프로파일을 사용하도록 구성되어야 합니다. 자세한 내용은 Using Instance Profiles를 참고하세요.
Kubernetes IRSA
AWS에서 OIDC provider를 설정하고 pod의 서비스 계정이 role을 assume할 수 있도록 허용하는 AWS IAM role을 구성하려면 IAM Roles for Service Accounts (IRSA)를 참고하세요.
Environment Variables
Teleport의 내장 AWS 클라이언트는 다음 환경 변수에서 자격 증명을 읽습니다:
AWS_ACCESS_KEY_IDAWS_SECRET_ACCESS_KEYAWS_DEFAULT_REGION
the Database Service을(를) 시작하면 서비스는 /etc/default/teleport 경로의
파일에서 환경 변수를 읽습니다. 이러한 자격 증명은 조직에서 얻으세요. 각
변수의 값을 교체하여 /etc/default/teleport가 다음 내용을 담도록 하세요:
AWS_ACCESS_KEY_ID=00000000000000000000
AWS_SECRET_ACCESS_KEY=0000000000000000000000000000000000000000
AWS_DEFAULT_REGION=
AWS 자격 증명 소스가 여러 개인가요?
Teleport의 AWS 클라이언트는 다음 순서로 여러 소스에서 자격 증명을 로드합니다:
- 환경 변수
- 공유 자격 증명 파일
- 공유 구성 파일 (Teleport는 항상 공유 구성을 활성화합니다)
- EC2 Instance Metadata (자격 증명만)
공유 자격 증명 파일이나 공유 구성 파일을 통해 AWS 자격 증명을 제공할 수
있지만, 원하는 프로파일의 이름을 AWS_PROFILE 환경 변수에 할당하여
the Database Service을(를) 실행해야 합니다.
위의 지침이 다루지 않는 특정 사용 사례가 있다면, 자격 증명 로딩 동작에 대한 자세한 설명은 AWS SDK for Go 문서를 참고하세요.
권한 부여#
Database Service IAM 역할에 다음 AWS IAM 권한을 연결합니다:
aws-account-id에 여러분의 AWS 계정 ID를 지정합니다:
{
    "Version": "2012-10-17",
    "Statement": [
        {
            "Sid": "RedshiftServerlessConnectAsIAMRole",
            "Effect": "Allow",
            "Action": "sts:AssumeRole",
            "Resource": [
                "arn:aws:iam::aws-account-id:role/teleport-redshift-serverless-access"
            ]
        },
        {
            "Sid": "RedshiftServerlessFetchMetadata",
            "Effect": "Allow",
            "Action": [
                "redshift-serverless:GetEndpointAccess",
                "redshift-serverless:GetWorkgroup"
            ],
            "Resource": "*"
        }
    ]
}
| Statement | 목적 |
|---|---|
RedshiftServerlessFetchMetadata |
AWS 태그를 데이터베이스 레이블로 자동 가져오거나 데이터베이스의 AWS 리전과 같은 누락된 정보를 찾습니다. |
RedshiftServerlessConnectAsIAMRole |
IAM 역할을 assume하여 데이터베이스 사용자로 연결합니다. |
Teleport Discovery Service에 의해 검색된 데이터베이스는 완전한 메타데이터와 함께
등록되어야 하므로, 모든 AWS 데이터베이스가 자동 검색되고 있다면 RedshiftServerlessFetchMetadata
권한을 생략할 수도 있습니다.
Redshift Serverless는 IAM 역할을 데이터베이스 사용자에 매핑합니다. Teleport Database Service는 IAM 인증 토큰을 생성할 수 있는 IAM 권한이 부여된 이러한 "access" IAM 역할을 assume할 수 있어야 합니다.
3/5단계. Database Service 배포#
Teleport Database Service는 Redshift Serverless 엔드포인트와 Teleport 클러스터에 대한 네트워크 연결이 필요합니다.
AWS에 배포하는 경우, 필요한 경로가 있는 서브넷에 배포되어 있는지 확인하고 보안 그룹이 아웃바운드 트래픽을 허용하는지 확인하세요.
또한, Redshift Serverless 워크그룹에 연결된 보안 그룹이 Teleport Database Service 호스트로부터의 인바운드 트래픽을 허용하는지 확인하세요.
Teleport 설치#
Linux 서버에 Teleport Agent를 설치하려면:
권장 설치 방법은 클러스터 설치 스크립트입니다. 이 스크립트는 클러스터에 맞는 올바른 버전, 에디션, 설치 모드를 선택합니다.
-
teleport.example.com:443에 Teleport 클러스터의 호스트명과 포트를 할당하되, 스킴(https://)은 포함하지 마십시오. -
클러스터의 설치 스크립트를 실행하십시오:
$ curl "https://teleport.example.com:443/scripts/install.sh" | sudo bash
구성 파일 생성#
REDSHIFT_SERVERLESS_URI를 클러스터의 도메인 이름 및 포트로 업데이트합니다. Database Service가 실행 중인 노드에서 구성 파일을 생성하고, example.teleport.sh:443를 Teleport Proxy Service의 호스트 및 웹 포트로 교체합니다(예: Teleport Cloud를 사용하는 경우 example.teleport.sh):
$ sudo teleport db configure create \
   -o file \
   --name="redshift-serverless" \
   --proxy=example.teleport.sh:443  \
   --protocol=postgres \
   --uri=REDSHIFT_SERVERLESS_URI \
   --token=/tmp/token
이 명령은 AWS Redshift Serverless 인스턴스를 프록시하는 Database Service 구성을 생성하여 /etc/teleport.yaml 위치에 저장합니다.
조인 토큰 생성#
Database Service가 Teleport 클러스터에 조인하려면 유효한 조인 토큰이 필요합니다.
다음 tctl 명령을 실행하고 Database Service를 실행할 서버에서
토큰 출력을 /tmp/token에 저장합니다:
$ tctl tokens add --type=db --format=text
(=presets.tokens.first=)
대체 방법
AWS에 많은 인프라를 보유하고 있거나 많은 인스턴스를 생성 또는 재생성할 수 있는 사용자의 경우, Teleport를 실행하는 새 EC2 인스턴스를 조인하는 대체 방법을 고려하십시오:
Database Service 시작#
systemd 서비스를 생성하여 호스트가 부팅될 때 the Database Service이 자동으로 시작되도록 구성합니다. 지침은 the Database Service을 어떻게 설치했는지에 따라 다릅니다.
Package Manager
the Database Service을 실행할 호스트에서 Teleport를 활성화하고 시작합니다:
$ sudo systemctl enable teleport
$ sudo systemctl start teleport
TAR Archive
the Database Service을 실행할 호스트에서 Teleport용 systemd 서비스 구성을 생성하고, Teleport 서비스를 활성화한 후 Teleport를 시작합니다:
$ sudo teleport install systemd -o /etc/systemd/system/teleport.service
$ sudo systemctl enable teleport
$ sudo systemctl start teleport
systemctl status teleport로 the Database Service의 상태를 확인하고 journalctl -fu teleport로
로그를 볼 수 있습니다.
4/5단계. Teleport 역할 생성#
tsh로 Teleport 클러스터에 로그인된 워크스테이션에서 Redshift Serverless에 대한 접근을 제공하는 새 역할을 정의합니다. 예시 파일은
redshift-role.yaml입니다:
version: v5
kind: role
metadata:
  name: redshift-serverless-access
spec:
  allow:
    db_labels:
      '*': '*'
    db_names:
    - dev
    db_users:
    - 'teleport-redshift-serverless-access'
db_users의 값은 이전 단계에서 생성한 IAM 역할에 해당합니다. 역할 이름 또는 IAM 역할의 전체 AWS ARN을 제공할 수 있습니다.db_names의 값은 Redshift Serverless 구성에 따라 다르지만,dev는 AWS에서 적용하는 기본 이름입니다. 모든 인스턴스에 대한 접근을 부여하려면*을 제공할 수도 있습니다.
이 파일을 저장하고 Teleport 클러스터에 적용합니다:
$ tctl create -f redshift-role.yaml
role 'redshift-serverless-access' has been created
Web UI를 사용하여 역할을 생성하고 편집할 수도 있습니다. Access -> Roles로 이동하여 Create New Role을 클릭하거나 편집할 기존 역할을 선택하십시오.
인증 공급자에 맞는 적절한 명령을 실행하여 redshift-serverless-access 역할을
your Teleport user에게 할당하십시오:
Local User
-
로컬 사용자의 역할을 쉼표로 구분된 목록으로 가져옵니다:
$ ROLES=$(tsh status -f json | jq -r '.active.roles | join(",")') -
로컬 사용자를 편집하여 새 역할을 추가합니다:
$ tctl users update $(tsh status -f json | jq -r '.active.username') \ --set-roles "${ROLES?},redshift-serverless-access" -
Teleport 클러스터에서 로그아웃한 다음 다시 로그인하여 새 역할을 적용합니다.
GitHub
-
텍스트 편집기에서
github인증 커넥터를 엽니다:$ tctl edit github/github -
github커넥터를 편집하여teams_to_roles섹션에redshift-serverless-access을 추가합니다.이 역할에 매핑해야 할 팀은 조직의 역할 기반 액세스 제어(RBAC)를 어떻게 설계했는지에 따라 달라집니다. 다만, 해당 팀은 여러분의 사용자 계정을 포함해야 하며 조직 내에서 가능한 한 가장 작은 팀이어야 합니다.
다음은 예시입니다:
teams_to_roles: - organization: octocats team: admins roles: - access + - redshift-serverless-access -
편집기에서 파일을 저장하고 닫아 변경 사항을 적용합니다.
-
Teleport 클러스터에서 로그아웃한 다음 다시 로그인하여 새 역할을 적용합니다.
SAML
-
saml구성 리소스를 가져옵니다:$ tctl get --with-secrets saml/mysaml > saml.yaml--with-secrets플래그는spec.signing_key_pair.private_key값을saml.yaml파일에 추가한다는 점에 유의하십시오. 이 키에는 민감한 값이 포함되어 있으므로, 리소스를 업데이트한 직후 saml.yaml 파일을 삭제해야 합니다. -
saml.yaml을 편집하여attributes_to_roles섹션에redshift-serverless-access을 추가합니다.이 역할에 매핑해야 할 속성은 조직의 역할 기반 액세스 제어(RBAC)를 어떻게 설계했는지에 따라 달라집니다. 다만, 해당 그룹은 여러분의 사용자 계정을 포함해야 하며 조직 내에서 가능한 한 가장 작은 그룹이어야 합니다.
다음은 예시입니다:
attributes_to_roles: - name: "groups" value: "my-group" roles: - access + - redshift-serverless-access -
변경 사항을 적용합니다:
$ tctl create -f saml.yaml -
Teleport 클러스터에서 로그아웃한 다음 다시 로그인하여 새 역할을 적용합니다.
OIDC
-
oidc구성 리소스를 가져옵니다:$ tctl get oidc/myoidc --with-secrets > oidc.yaml--with-secrets플래그는spec.signing_key_pair.private_key값을oidc.yaml파일에 추가한다는 점에 유의하십시오. 이 키에는 민감한 값이 포함되어 있으므로, 리소스를 업데이트한 직후 oidc.yaml 파일을 삭제해야 합니다. -
oidc.yaml을 편집하여claims_to_roles섹션에redshift-serverless-access을 추가합니다.이 역할에 매핑해야 할 클레임은 조직의 역할 기반 액세스 제어(RBAC)를 어떻게 설계했는지에 따라 달라집니다. 다만, 해당 그룹은 여러분의 사용자 계정을 포함해야 하며 조직 내에서 가능한 한 가장 작은 그룹이어야 합니다.
다음은 예시입니다:
claims_to_roles: - name: "groups" value: "my-group" roles: - access + - redshift-serverless-access -
변경 사항을 적용합니다:
$ tctl create -f oidc.yaml -
Teleport 클러스터에서 로그아웃한 다음 다시 로그인하여 새 역할을 적용합니다.
5/5단계. 연결#
Database Service가 시작되어 클러스터에 연결된 후, 등록된 데이터베이스를 확인하려면 로그인합니다. --proxy를 Teleport
Proxy Service 또는 클라우드 테넌트의 주소로 교체하세요:
$ tsh login --proxy=mytenant.teleport.sh --user=alice
$ tsh db ls
Name        Description Labels
----------- ----------- ------
my-redshift             ...
Redshift Serverless 인스턴스에 연결하려면:
$ tsh db connect my-redshift --db-user=teleport-redshift-serverless-access --db-name=dev
psql (15.1, server 8.0.2)
WARNING: psql major version 15, server major version 8.0.
         Some psql features might not work.
SSL connection (protocol: TLSv1.3, cipher: TLS_CHACHA20_POLY1305_SHA256, compression: off)
Type "help" for help.

dev=>
이 섹션의 내용은 원문 문서를 참조하세요. (proxy-db-tunnel.mdx)
[Web UI를 사용하여 PostgreSQL 데이터베이스에 접근](../../connect-your-client/teleport-clients/web-ui.mdx#starting-a-database-session)할 수도 있습니다.
데이터베이스에서 로그아웃하고 자격 증명을 제거하려면:
$ tsh db logout my-redshift
문제 해결#
사용자 권한 오류#
IAM 역할 teleport-redshift-serverless-access는 Redshift Serverless 데이터베이스 내에서 자동으로
IAMR:teleport-redshift-serverless-access로 매핑됩니다.
사용자(데이터베이스 관리자)는 이 새 IAM 역할로 로그인하기 전에 선택적으로 이 데이터베이스 사용자의 권한을 설정하여 사용자 권한 문제를 예방하거나 해결할 수 있습니다:
-
Redshift Serverless 워크그룹에 관리자 사용자로 연결하고 다음을 실행합니다:
CREATE USER "IAMR:teleport-redshift-serverless-access" WITH PASSWORD DISABLE; -
이 사용자에게 적절한 데이터베이스 내 권한을 부여합니다. 예:
GRANT SELECT ON TABLE users TO "IAMR:teleport-redshift-serverless-access";
Certificate error#
tsh db connect 오류에 다음 텍스트가 포함되어 있다면, 2020년 7월 28일 이전에 생성된 RDS 또는 DocumentDB 데이터베이스일 가능성이 높으며, 이 경우 Teleport와 호환되지 않는 X.509 인증서를 제공합니다.
x509: certificate relies on legacy Common Name field, use SANs instead
AWS는 SSL/TLS 인증서를 교체하는 방법에 대한 지침을 제공합니다.
No credential providers error#
Database Service 로그에서 NoCredentialProviders: no valid providers in chain 오류가
보인다면, Teleport가 AWS IAM 권한을 통해 연결하는 데 필요한 자격 증명을 감지하지
못하는 것입니다. Teleport Database Service를 실행하는 머신에 자격 증명 또는
보안 역할이 적용되었는지 확인합니다.
EKS에서 실행할 때, 워커 노드 인스턴스의 PUT 요청 홉 한도가 1로 설정되어 있어 Teleport Database Service가 IMDSv2에 접근할 수 없는 경우 이 오류가 발생할 수 있습니다. 다음 명령을 사용하여 홉 한도를 확인할 수 있습니다:
$ aws ec2 describe-instances --instance-ids <node-instance-id> | grep HttpPutResponseHopLimit
                        "HttpPutResponseHopLimit": 1,
자세한 내용은 EKS의 IMDSv2 지원과 EKS 모범 사례를 참조하십시오.
Timeout errors#
Teleport Database Service는 데이터베이스 엔드포인트로의 연결이 필요합니다.
방화벽 규칙(예: AWS 보안 그룹)이 Teleport Database Service와 데이터베이스 엔드포인트 간의 연결을 허용하는지 확인하세요.
- 데이터베이스에 대한 인바운드 방화벽 규칙은 Teleport Database Service로부터의 연결을 허용해야 합니다.
- Teleport Database Service에 대한 아웃바운드 방화벽 규칙은 데이터베이스 엔드포인트로의 연결을 허용해야 합니다.
Teleport Database Service와 동일한 호스트에서 nc를 실행하여 데이터베이스 포트에 도달할 수 있는지 확인해 보세요.
- 데이터베이스 호스트:
postgres-instance-1.sadas.us-east-1.rds.amazonaws.com - 데이터베이스 포트:
5432
$ nc -zv database-host database-port
# Connection to postgres-instance-1.sadas.us-east-1.rds.amazonaws.com (172.31.24.172) 5432 port [tcp/postgresql] succeeded!
AWS에서 연결 시간 초과 오류 디버깅
AWS 배포의 경우, AWS Reachability Analyzer를 사용하여 Teleport Database Service와 데이터베이스 간의 네트워크 경로를 분석하는 것이 도움이 될 수 있습니다.
- Teleport Database Service 호스트와 연결된 Elastic Network Interface(ENI)를 식별합니다. 이는 EC2 console에서 확인할 수 있습니다.
- 데이터베이스의 프라이빗 IP 주소를 식별합니다.
- 네트워크 경로를 생성하고 분석합니다:
- 경로 소스를 Teleport Database Service 호스트와 연결된 ENI로 설정합니다.
- 경로 대상을 데이터베이스 IP로 설정합니다.
- 분석 결과를 확인하여 도달성 문제를 식별합니다.
데이터베이스가 동적으로 또는 자동 검색을 통해 등록된 경우, 이 데이터베이스를
프록시하는 모든* Teleport Database Service 인스턴스에 대해 위의 연결
테스트를 반복하세요. 주어진 데이터베이스와 연결된 모든 Teleport Database
Service 인스턴스를 나열하려면 tctl get db_server/<db_name> 명령을
실행하세요. 예를 들어:
$ tctl get db_server/postgres-instance-1 --format json | jq '.[] | {hostname: .spec.hostname, host_id: .spec.host_id, version: .spec.version, target_health: .status.target_health}'
{
  "hostname": "ip-10-0-0-111.ca-central-1.compute.internal",
  "host_id": "e5e670ac-a7b8-44ef-b373-6296d87f50e8",
  "version": "18.3.0",
  "target_health": {
    "status": "unhealthy",
    ...
  }
}
{
  "hostname": "ip-10-0-0-222.ca-central-1.compute.internal",
  ...
}
여기에 나열된 Database Service 인스턴스 중 데이터베이스를 프록시해서는
안 되는 인스턴스가 있는 경우(예: 연결이 되지 않는 다른 VPC 또는 AWS
리전에 있는 Database Service 인스턴스), 해당 구성을 찾아 도달할 수 있는
데이터베이스만 수신하거나 검색하도록 업데이트하세요. 대부분의 경우
vpc-id 레이블을 추가하는 등 태그 필터를 세분화하여 이를 달성할 수 있습니다.
Not authorized to perform sts:AssumeRole#
Database Service는 다음 상황 중 하나에서 IAM 역할을 맡습니다.
- Teleport 사용자가 IAM 역할을 데이터베이스 사용자로 요구하는 AWS 서비스에 접근할 때, 사용하려는 데이터베이스 사용자로 IAM 역할을 지정하는 경우. IAM 역할을 데이터베이스 사용자로 사용할 수 있는 데이터베이스에는 DynamoDB, Keyspaces, Opensearch, Redshift, Redshift Serverless가 있습니다.
- 데이터베이스 리소스 또는 동적 리소스 매처에
assume_role_arn필드가 지정된 경우.
What if both situations apply? (role chaining)
데이터베이스 연결에 대해 위 두 조건이 모두 참인 경우, Database Service는 먼저 `assume_role_arn`에 지정된 IAM 역할을 맡은 다음, 그 IAM 역할을 사용하여 데이터베이스 사용자에 해당하는 IAM 역할을 맡는 역할 체이닝(role chaining)을 수행합니다.IAM 역할 간의 신뢰 관계가 올바르게 구성되지 않은 경우 다음과 같은 오류가 발생할 수 있습니다.
AccessDenied: User: arn:aws:sts::111111111111:assumed-role/teleport-db-service-role/i-* is not authorized to perform: sts:AssumeRole on resource: arn:aws:iam::111111111111:role/db-user-role
신뢰 관계를 올바르게 구성하는 방법은?
IAM Role teleport-db-service-role이(가) IAM Role db-user-role을(를) assume하도록 허용하려면
일반적으로 다음이 필요합니다:
1. db-user-role에 신뢰 관계(Trust Relationship) 구성
teleport-db-service-role 또는 해당 AWS 계정이 db-user-role의 신뢰 정책에서 Principal로
설정되어야 합니다.
Role as principal
aws-account-id에 사용자의 AWS 계정 ID를 지정합니다:
{
  "Version": "2012-10-17",
  "Statement": [
    {
      "Effect": "Allow",
      "Principal": {
        "AWS": "arn:aws:iam::aws-account-id:role/teleport-db-service-role"
      },
      "Action": "sts:AssumeRole"
    }
  ]
}
Account as principal
aws-account-id에 사용자의 AWS 계정 ID를 지정합니다:
{
  "Version": "2012-10-17",
  "Statement": [
    {
      "Effect": "Allow",
      "Principal": {
        "AWS": "arn:aws:iam::aws-account-id:root"
      },
      "Action": "sts:AssumeRole"
    }
  ]
}
Cross-account with external-id
external-aws-account-id에 외부 AWS 계정 ID를 지정합니다:
{
  "Version": "2012-10-17",
  "Statement": [
    {
      "Effect": "Allow",
      "Principal": {
        "AWS": "arn:aws:iam::external-aws-account-id:role/teleport-db-service-role"
      },
      "Action": "sts:AssumeRole",
      "Condition": {
        "StringEquals": {
          "sts:ExternalId": "example-external-id"
        }
      }
    }
  ]
}
2. teleport-db-service-role에 권한 정책(Permissions Policy) 구성
teleport-db-service-role에는 sts:AssumeRole 권한이 필요합니다. 예를 들면 다음과 같습니다:
{
    "Version": "2012-10-17",
    "Statement": [
        {
            "Action": "sts:AssumeRole",
            "Effect": "Allow",
            "Resource": "arn:aws:iam::aws-account-id:role/db-user-role"
        }
    ]
}
teleport-db-service-role과(와) db-user-role이(가) 동일한 AWS 계정에 있고 teleport-db-service-role의 전체 ARN이
db-user-role의 신뢰 정책에 Principal로 구성되어 있는 경우에는 이 정책을 생략할 수 있습니다.
3. teleport-db-service-role에 권한 경계(Permissions Boundary) 구성
teleport-db-service-role에 연결된
권한 경계(Permissions boundary)가
없다면 이 단계를 건너뛸 수 있습니다.
그렇지 않은 경우, teleport-db-service-role에 연결된 경계 정책에는 sts:AssumeRole 권한이
포함되어야 합니다. 예를 들면 다음과 같습니다:
{
    "Version": "2012-10-17",
    "Statement": [
        {
            "Action": "sts:AssumeRole",
            "Effect": "Allow",
            "Resource": "*"
        }
    ]
}
teleport-db-service-role로 다음 AWS CLI 명령을 실행하여 신뢰 관계를 테스트할 수 있습니다.
$ aws sts assume-role --role-arn arn:aws:iam::111111111111:role/db-user-role --role-session-name test-trust-relationship
IAM 역할에서 신뢰 정책을 사용하는 방법에 대해 자세히 알아보세요.
쿼리를 취소할 수 없음#
psql과 같은 PostgreSQL CLI 클라이언트를 사용하여 Ctrl+C로 쿼리를 취소하려고
했으나 쿼리가 취소되지 않는다면, 대신 tsh 로컬 프록시를 사용하여 연결해야 합니다.
psql이 쿼리를 취소할 때는 TLS 인증서 없이 새 연결을 설정하지만, Teleport는 인증
뿐만 아니라 데이터베이스 연결을 라우팅하는 데에도 TLS 인증서를 필요로 합니다.
Teleport에서 TLS Routing을 활성화
하면 tsh db connect가 모든 연결에 대해 로컬 프록시를 자동으로 시작합니다.
또는 마찬가지로 로컬 프록시를 사용하는
Teleport Connect를
통해 연결할 수도 있습니다.
그 외의 경우에는 tsh proxy db를 사용하여 tsh 로컬 프록시를 수동으로 시작하고 로컬
프록시를 통해 연결해야 합니다.
Ctrl+C로 취소할 수 없는 장기 실행 쿼리를 psql 세션에서 이미 시작한 경우, 새
클라이언트 세션을 시작하여 해당 쿼리를 수동으로 취소할 수 있습니다:
먼저 쿼리의 프로세스 식별자(PID)를 찾습니다:
SELECT session_id AS pid, database_name,start_time,trim(query_text) AS query FROM SYS_QUERY_HISTORY WHERE status = 'running';
다음으로, PID를 사용하여 쿼리를 정상적으로 취소합니다. 이는 해당 쿼리의 postgres 백엔드 프로세스에 SIGINT 시그널을 보냅니다:
SELECT pg_cancel_backend(<PID>);
항상 먼저 쿼리를 정상적으로 종료하려고 시도해야 하지만, 정상적인 취소가 너무 오래 걸린다면 대신 쿼리를 강제로 종료할 수 있습니다. 이는 해당 쿼리의 postgres 백엔드 프로세스에 SIGTERM 시그널을 보냅니다:
SELECT pg_terminate_backend(<PID>);
pg_cancel_backend 및 pg_terminate_backend 함수에 대한 자세한 내용은 PostgreSQL
문서의
관리 함수를
참조하십시오.
다음 단계#
- Amazon Redshift에 대해 IAM 인증을 사용하여 데이터베이스 사용자 자격 증명 생성하는 방법을 자세히 알아보세요.
- 특정 사용자 및 데이터베이스에 대한 접근 제한 방법을 알아보세요.
- 고가용성(HA) 가이드를 확인하세요.
- YAML 구성 참조를 살펴보세요.