
InfoGrab Docs

Azure PostgreSQL 및 MySQL을 통한 데이터베이스 액세스

요약

Teleport can provide secure access to Azure PostgreSQL or MySQL via the Teleport Database Service. In this guide, you will:

Teleport can provide secure access to Azure PostgreSQL or MySQL via the Teleport Database Service. This allows for fine-grained access control through Teleport's RBAC.

In this guide, you will:

  1. Configure your Azure PostgreSQL or MySQL database with Microsoft Entra ID-based authentication.
  2. Add the database to your Teleport cluster.
  3. Connect to the database via Teleport.

작동 방식#

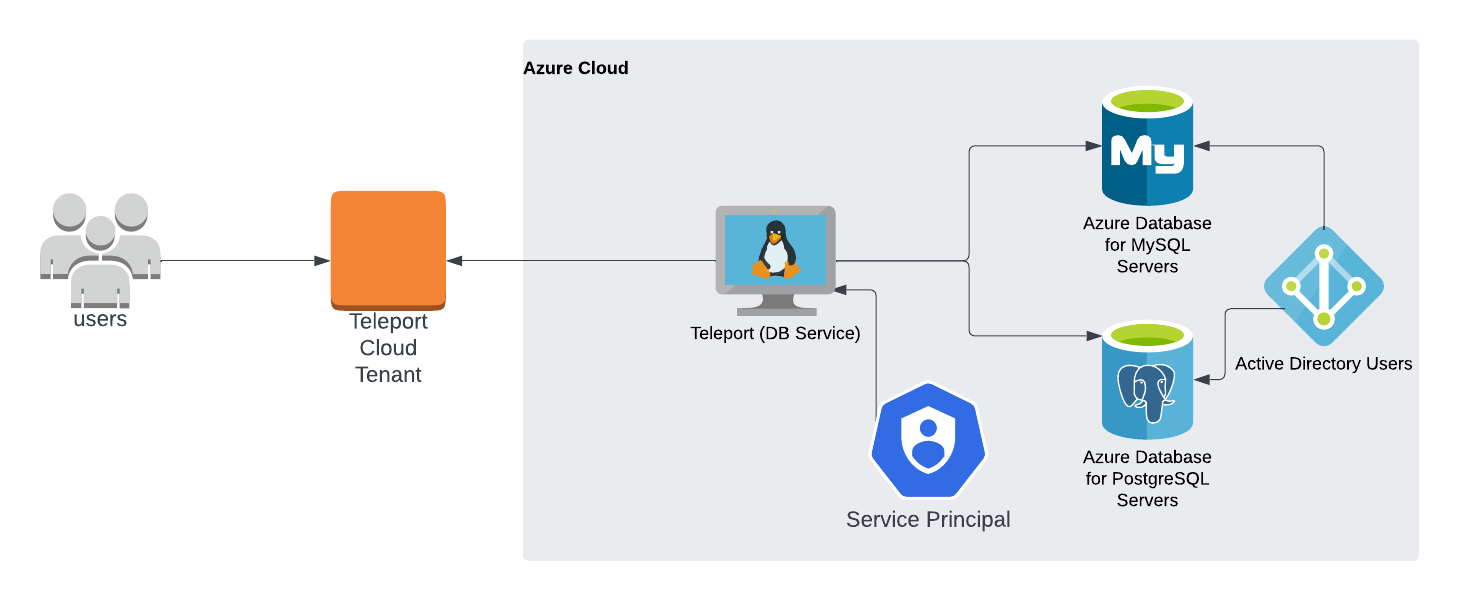
Teleport Database Service는 Teleport 사용자와 Azure PostgreSQL 및 MySQL 간의 트래픽을 프록시합니다. 사용자가 Teleport를 통해 데이터베이스에 연결하면 Database Service는 Microsoft Entra ID(이전의 Azure AD)에서 액세스 토큰을 가져와 데이터베이스를 관리할 권한이 있는 주체로 Azure에 인증합니다.
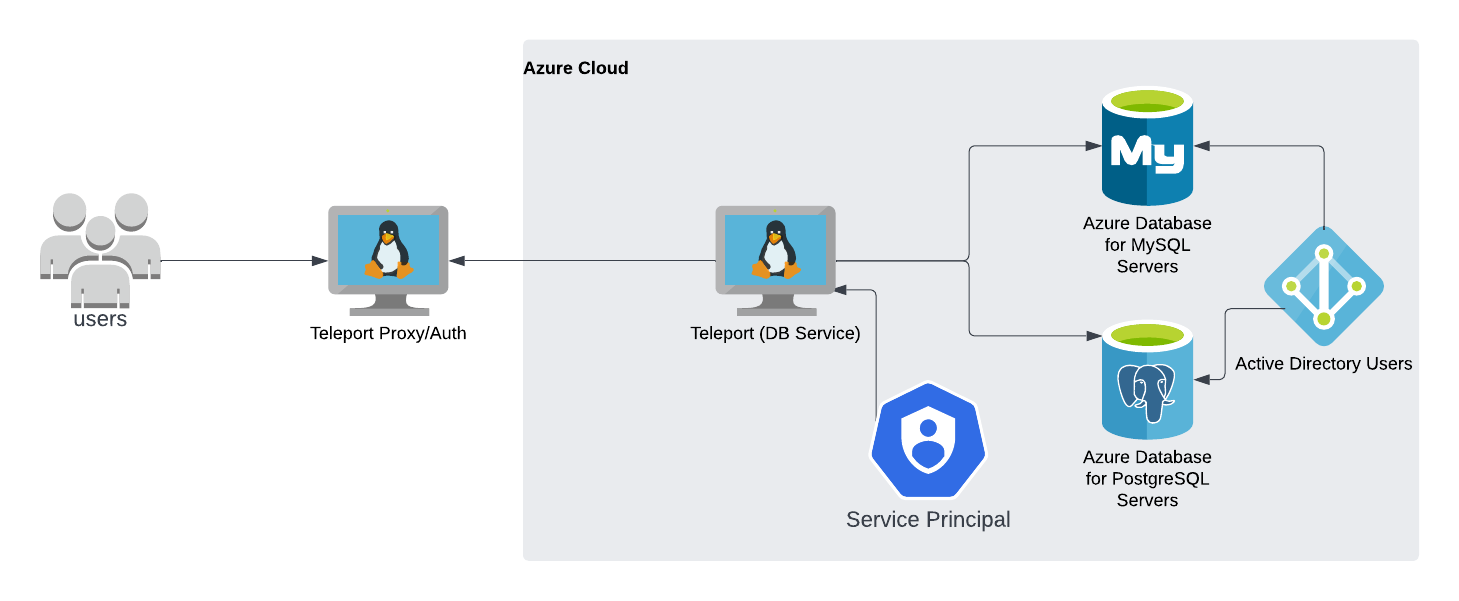
자체 호스팅 Teleport 클러스터로 Azure PostgreSQL/MySQL 등록

클라우드 호스팅 Teleport 클러스터로 Azure PostgreSQL/MySQL 등록

사전 요구 사항#

  • A running Teleport cluster. If you want to get started with Teleport, sign up for a free trial or set up a demo environment.

  • The tctl and tsh clients.

    Installing `tctl` and `tsh` clients
    1. Determine the version of your Teleport cluster. The tctl and tsh clients must be at most one major version behind your Teleport cluster version. Send a GET request to the Proxy Service at /v1/webapi/find and use a JSON query tool to obtain your cluster version. Replace with the web address of your Teleport Proxy Service:

      $ TELEPORT_DOMAIN=
      $ TELEPORT_VERSION="$(curl -s https://$TELEPORT_DOMAIN/v1/webapi/find | jq -r '.server_version')"
      
    2. Follow the instructions for your platform to install tctl and tsh clients:

  • 배포된 Azure Database for PostgreSQL 또는 MySQL 서버.
  • Microsoft Entra ID 관리자 권한.
  • Teleport Database Service를 실행할 호스트(예: Azure VM 인스턴스).

To check that you can connect to your Teleport cluster, sign in with tsh login, then verify that you can run tctl commands using your current credentials.

For example, run the following command, assigning to the domain name of the Teleport Proxy Service in your cluster and to your Teleport username:

$ tsh login --proxy= --user=
$ tctl status
# Cluster  (=teleport.url=)
# Version  (=teleport.version=)
# CA pin   (=presets.ca_pin=)

If you can connect to the cluster and run the tctl status command, you can use your current credentials to run subsequent tctl commands from your workstation. If you host your own Teleport cluster, you can also run tctl commands on the computer that hosts the Teleport Auth Service for full permissions.

1/5단계. Azure 서비스 주체 구성#

PostgreSQL 또는 MySQL 데이터베이스에 인증하려면 Teleport Database Service가 Microsoft Entra ID에서 액세스 토큰을 가져와야 합니다.

There are a couple of ways for the Teleport Database Service to access Azure resources:

  • The Database Service can run on an Azure VM with attached managed identity. This is the recommended way of deploying the Database Service in production since it eliminates the need to manage Azure credentials.
  • The Database Service can be registered as a Microsoft Entra ID application (via "App registrations") and configured with its credentials. This is only recommended for development and testing purposes since it requires Azure credentials to be present in the Database Service's environment.

Go to the App registrations page of Microsoft Entra ID and click on New registration:
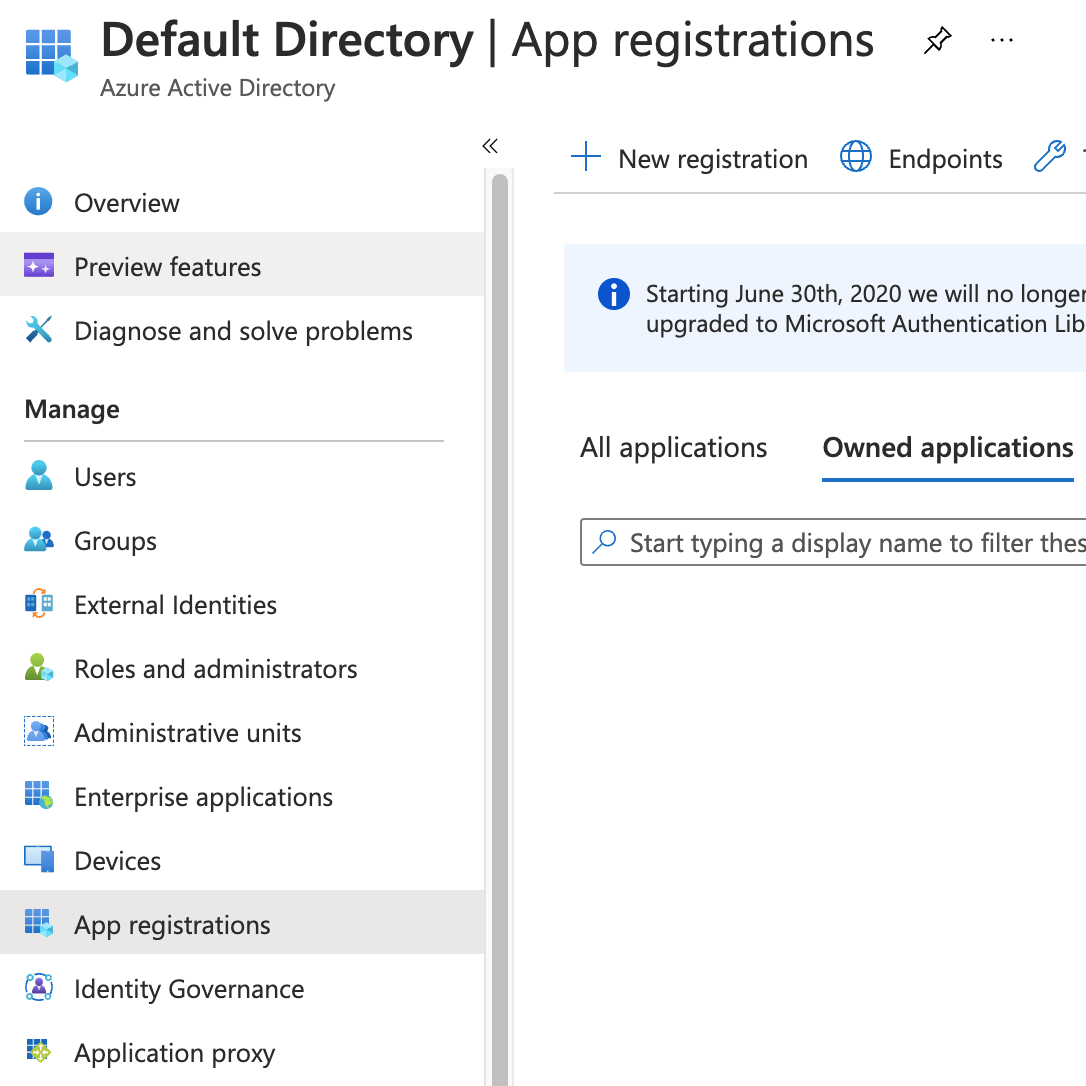
App registrations

Pick a name (e.g. DatabaseService) and register a new application. Once the app has been created, take note of its Application (client) ID and click on Add a certificate or secret:
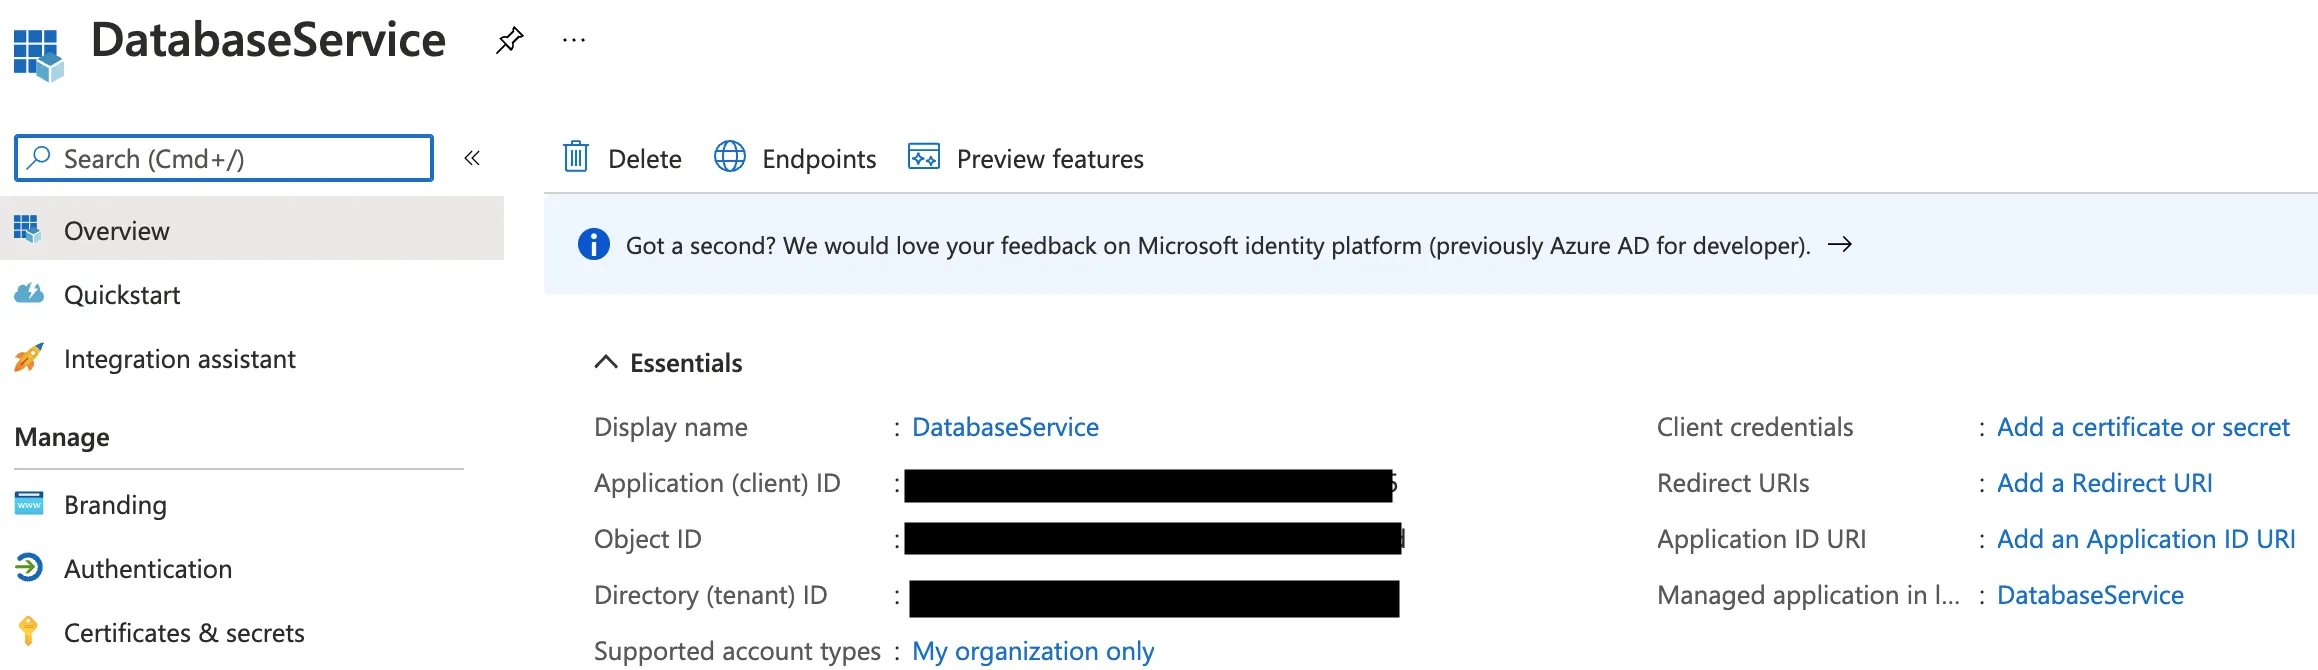
Registered app

Create a new client secret that the Database Service agent will use to authenticate with the Azure API:
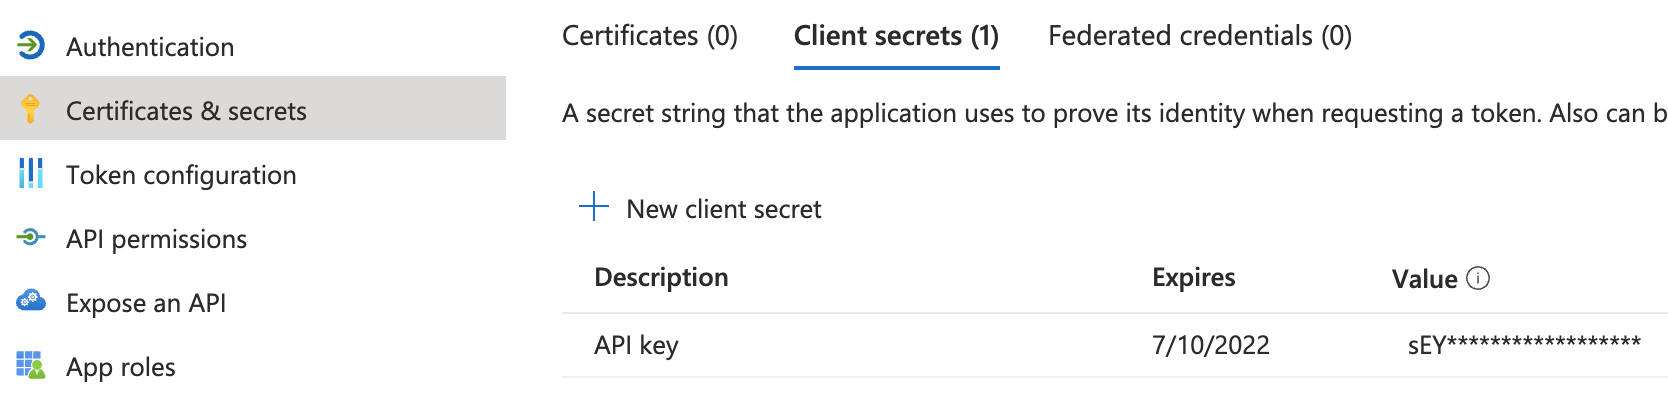
Registered app secrets

The Teleport Database Service uses Azure SDK's default credential provider chain to look for credentials. Refer to Azure SDK Authorization to pick a method suitable for your use-case. For example, to use environment-based authentication with a client secret, the Database Service should have the following environment variables set:

export AZURE_TENANT_ID=
export AZURE_CLIENT_ID=
export AZURE_CLIENT_SECRET=

2/5단계. Teleport를 위한 IAM 권한 구성#

사용자 지정 역할 생성#

Teleport는 MySQL 및 PostgreSQL 데이터베이스를 검색하고 등록하기 위해 Azure IAM 권한이 필요합니다. Teleport가 검색해야 할 모든 데이터베이스를 포함하는 할당 가능한 범위로 역할을 생성합니다. 예:

{
    "properties": {
        "roleName": "TeleportDiscovery",
        "description": "Allows Teleport to discover MySQL and PostgreSQL databases",
        "assignableScopes": [
            "/subscriptions/11111111-2222-3333-4444-555555555555"
        ],
        "permissions": [
            {
                "actions": [
                    "Microsoft.DBforMySQL/servers/read",
                    "Microsoft.DBforPostgreSQL/servers/read",
                    "Microsoft.DBforMySQL/flexibleServers/read",
                    "Microsoft.DBforPostgreSQL/flexibleServers/read"
                ],
                "notActions": [],
                "dataActions": [],
                "notDataActions": []
            }
        ]
    }
}

이 역할 정의를 통해 Teleport는 MySQL 및 PostgreSQL 데이터베이스를 검색할 수 있지만, 실제로 보유한 데이터베이스 유형에 대한 권한만 필요합니다. 할당 가능한 범위에 구독이 포함되어 있으므로 해당 구독 내의 모든 리소스 범위에서 역할을 할당하거나 구독 범위 자체를 사용하여 할당할 수 있습니다.

Custom role assignable scope

Azure 기본 제공 역할과 달리 사용자 지정 역할은 루트 할당 가능 범위를 가질 수 없습니다. 사용자 지정 역할에서 사용할 수 있는 가장 높은 할당 가능 범위는 구독 범위입니다. 관리 그룹 범위 사용은 현재 Azure 미리 보기 기능으로, 역할 정의의 "assignableScopes"에서 단일 관리 그룹만 허용합니다. 자세한 내용은 Azure RBAC 사용자 지정 역할을 참고하세요.

구독 페이지로 이동하여 구독을 선택합니다.

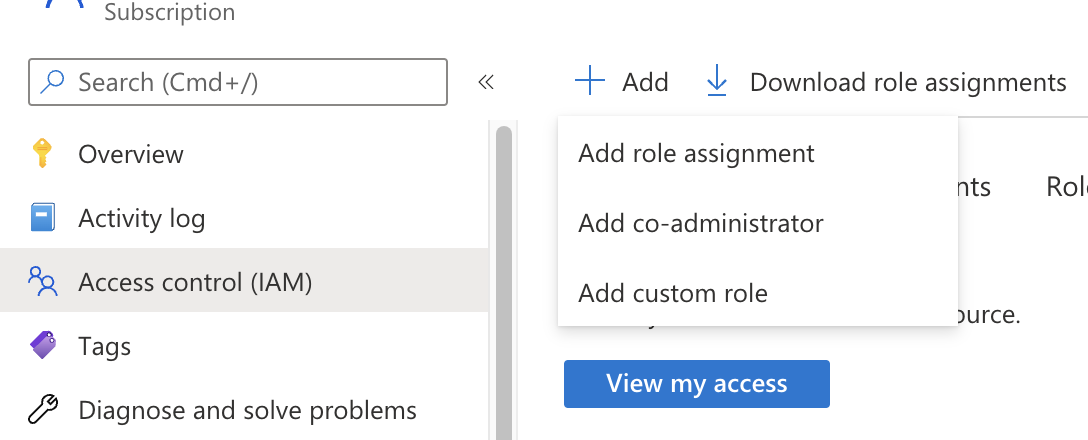
구독에서 *액세스 제어(IAM)*를 클릭하고 추가 > 사용자 지정 역할 추가를 선택합니다: IAM 사용자 지정 역할
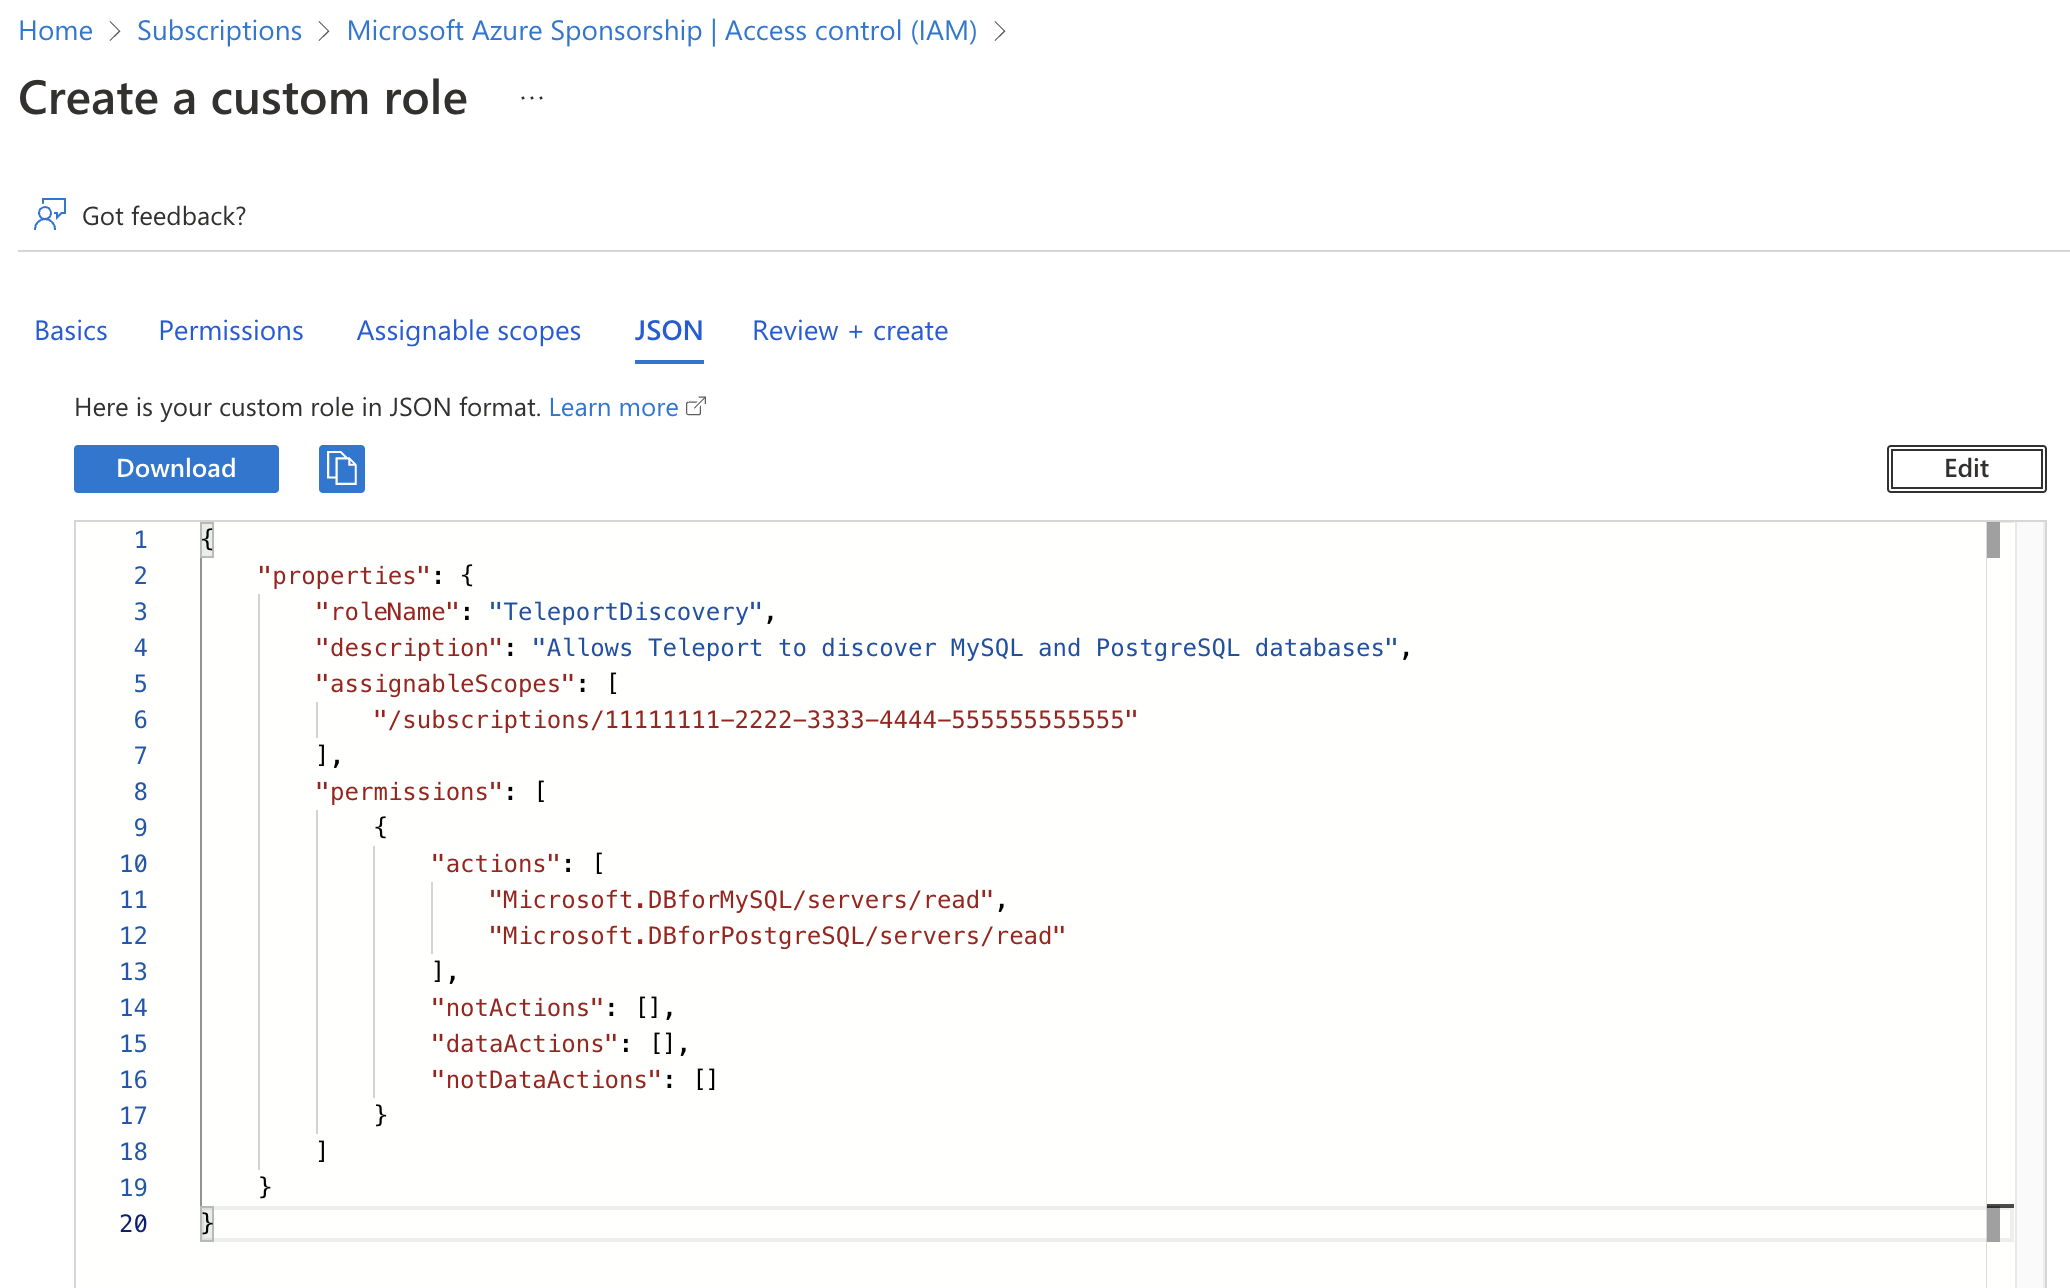
사용자 지정 역할 생성 페이지에서 JSON 탭을 클릭하고 편집을 클릭한 다음 JSON 예시를 붙여넣고 "assignableScopes"의 구독을 본인의 구독 ID로 교체합니다: JSON 역할 생성
Teleport Database Service 주체에 역할 할당 생성#

To grant Teleport permissions, the custom role you created must be assigned to the Teleport service principal - either the managed identity or the app registration you created earlier.

Navigate to the resource scope where you want to make the role assignment. Click Access control (IAM) and select Add > Add role assignment. Choose the custom role you created as the role and the Teleport service principal as a member.
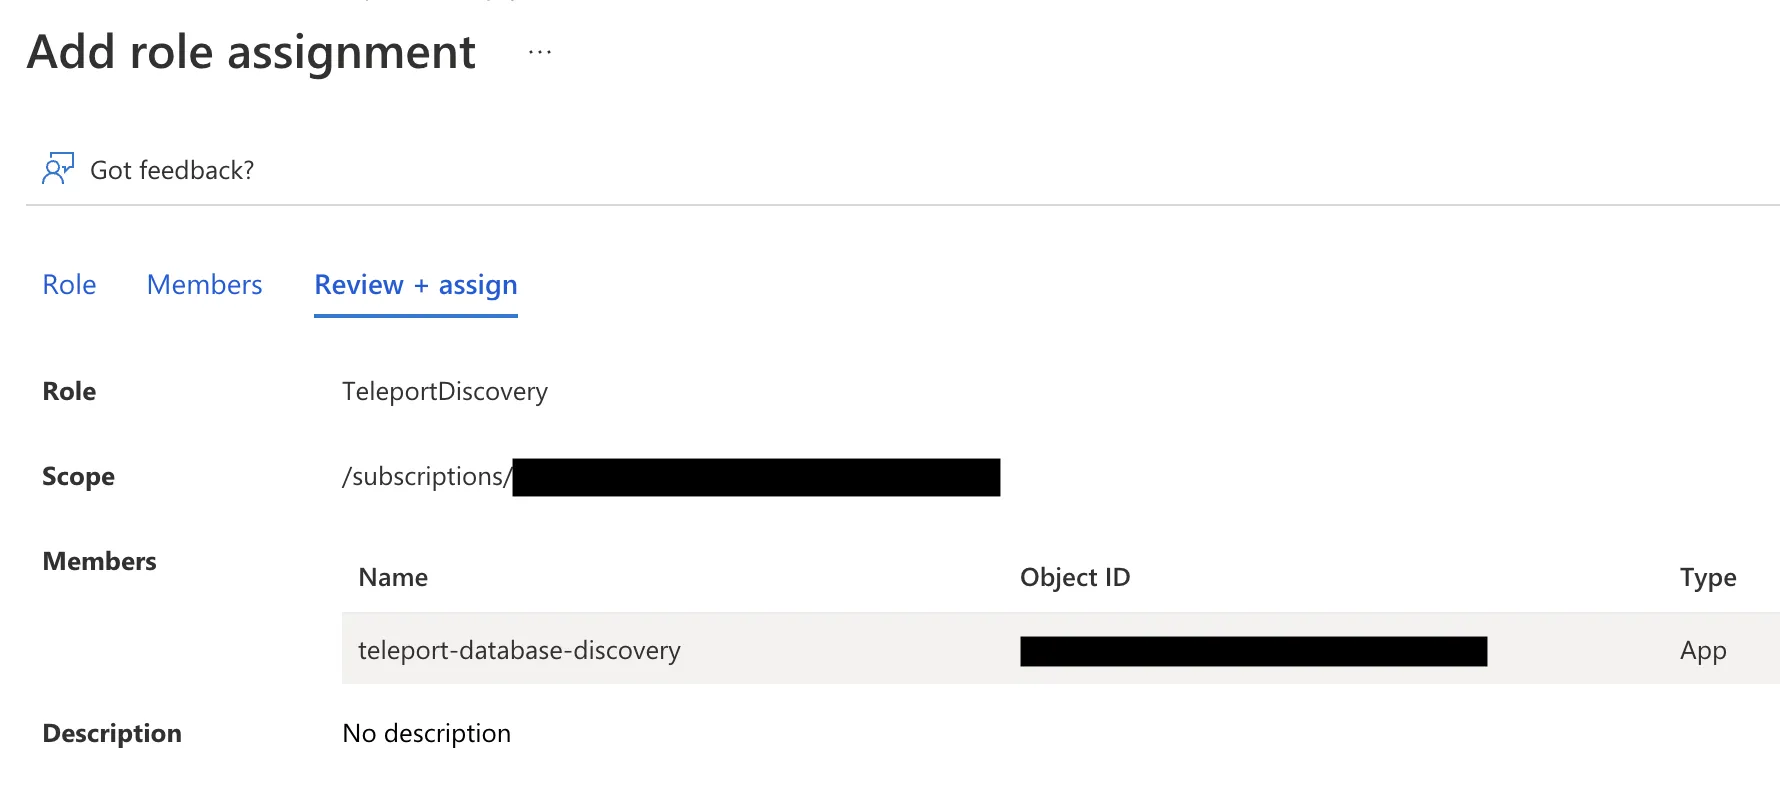
Assign role

3/5단계. Azure 데이터베이스 사용자 생성#

Teleport가 서비스 주체로 인증하여 Azure 데이터베이스에 연결하려면 해당 주체에 의해 인증된 Entra ID 사용자를 데이터베이스에 생성해야 합니다.

Entra ID 관리자 할당#

데이터베이스의 Entra ID 관리자만 연결하여 Entra ID 사용자를 생성할 수 있습니다.

데이터베이스의 인증 페이지로 이동하여 편집 버튼을 사용하여 AD 관리자를 설정합니다:
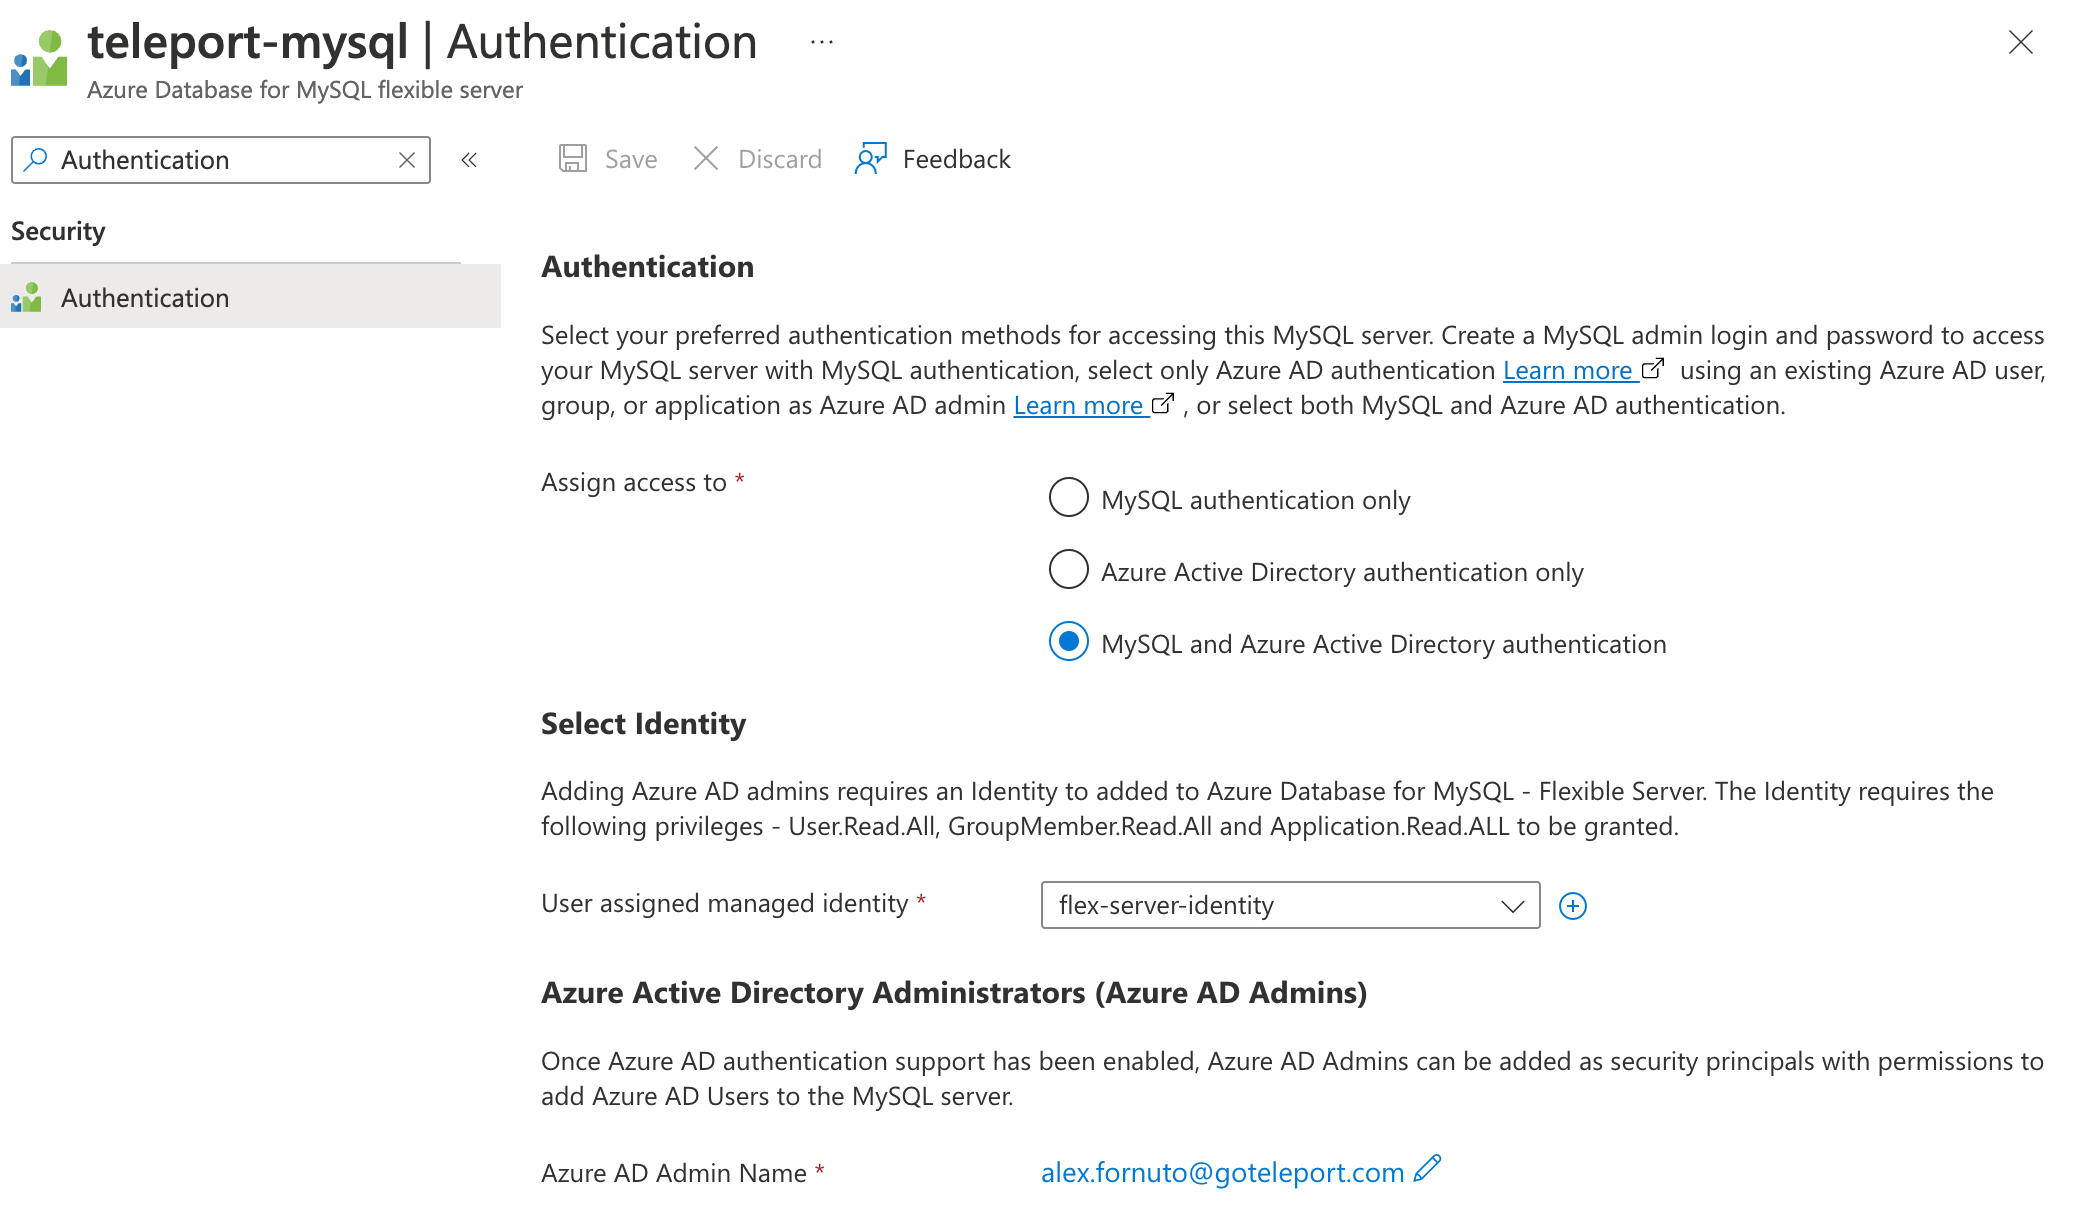
AD 관리자 설정

데이터베이스의 인증 페이지로 이동하여 + Entra ID 관리자 추가를 선택하여 AD 관리자를 설정합니다:
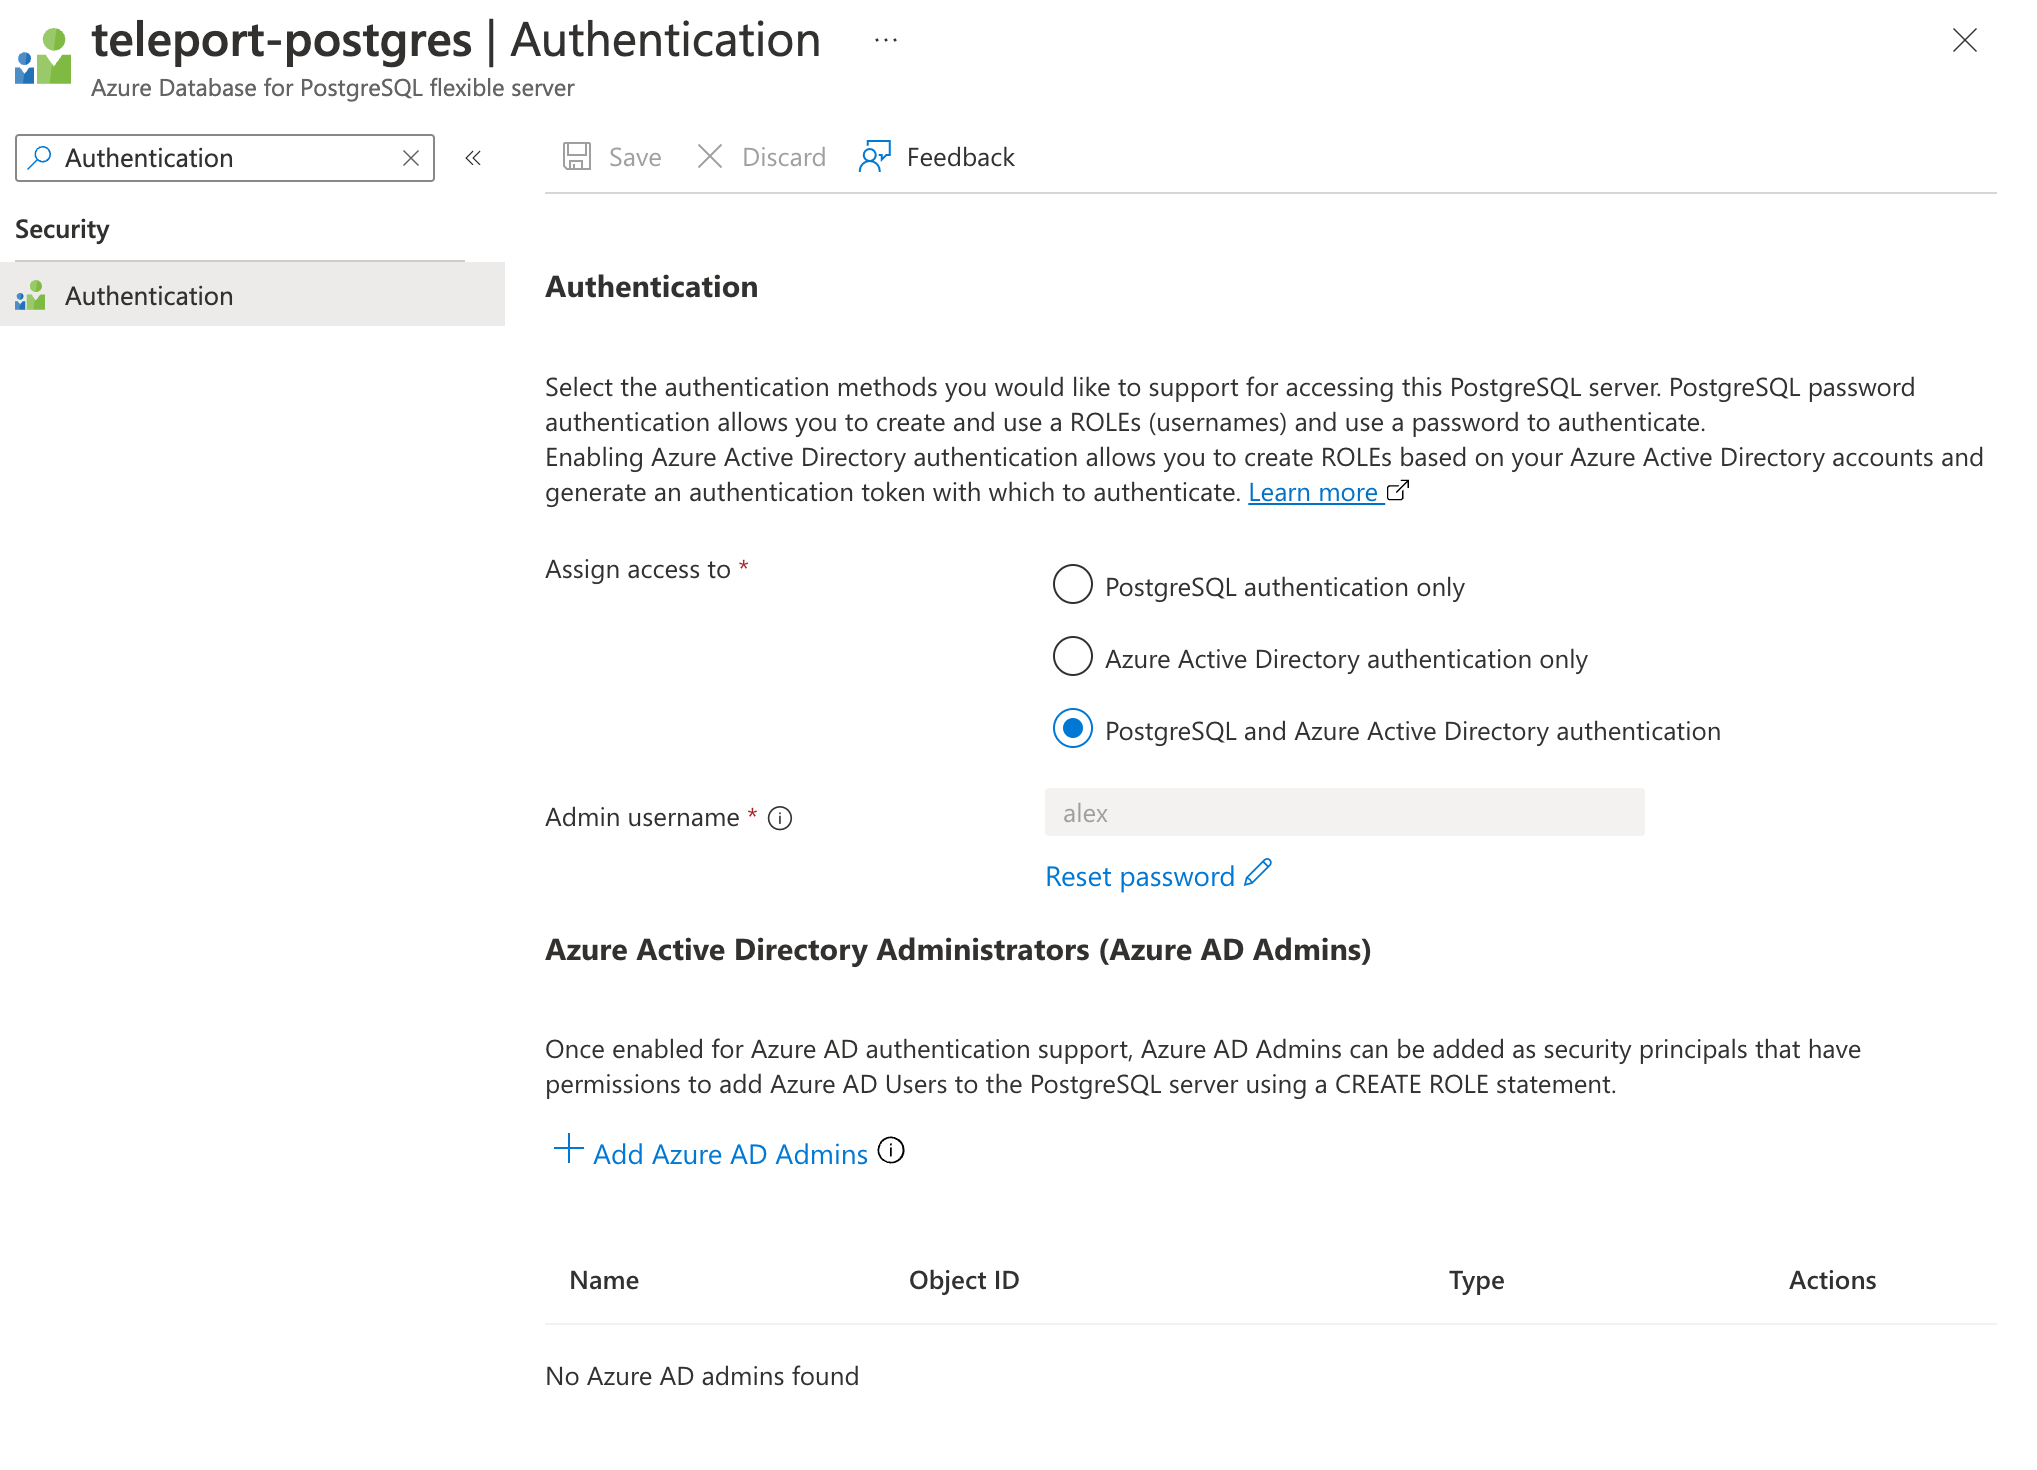
AD 관리자 설정

데이터베이스의 Active Directory 관리자 페이지로 이동하여 관리자 설정 버튼을 사용하여 AD 관리자를 설정합니다:
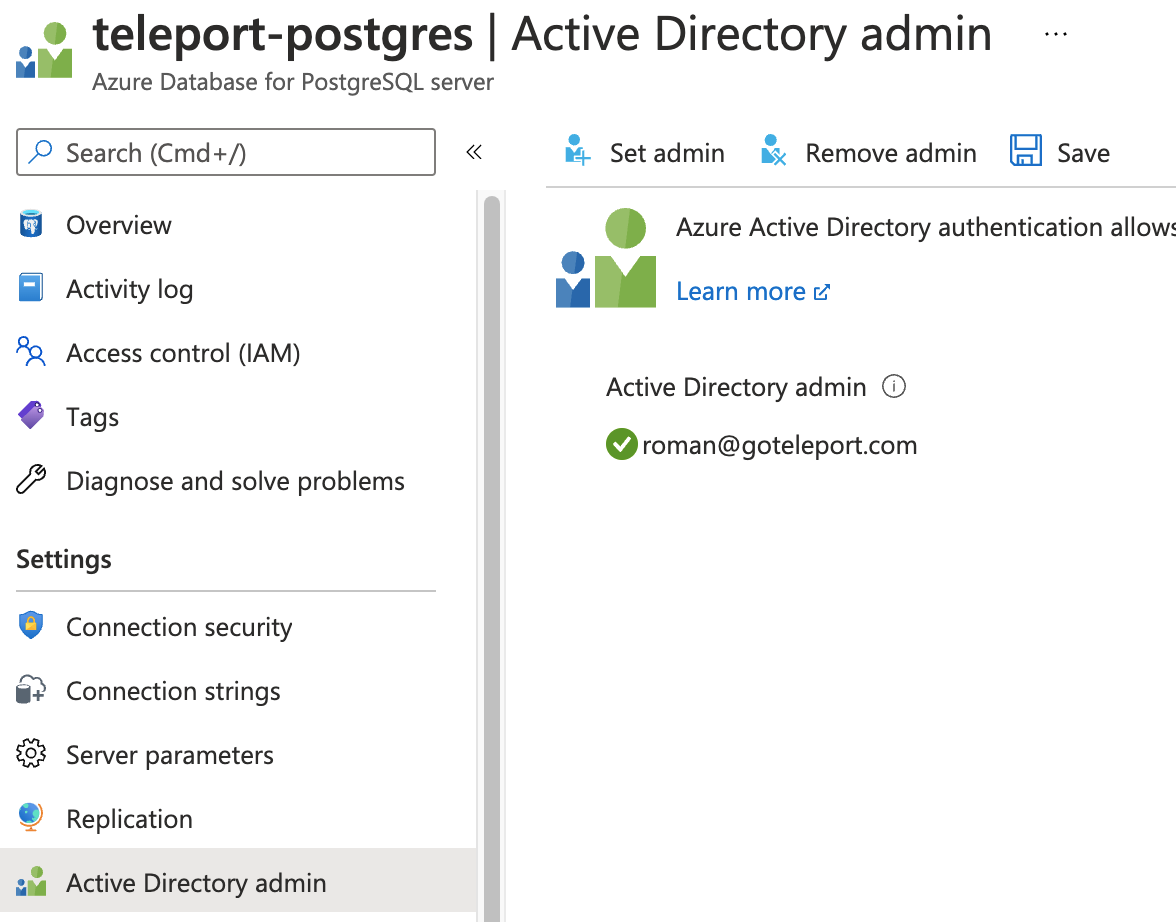
AD 관리자 설정

Entra ID Admin

데이터베이스의 Entra ID 관리자로는 하나의 Azure 사용자(또는 그룹)만 설정할 수 있습니다. 서버에서 Entra ID 관리자가 제거되면 해당 서버에 대한 모든 Entra ID 로그인이 비활성화됩니다. 동일한 테넌트에서 새 Entra ID 관리자를 추가하면 Entra ID 로그인이 다시 활성화됩니다. 자세한 내용은 PostgreSQL 인증에 Microsoft Entra ID 사용을 참고하세요.

AD 관리자로 데이터베이스에 연결#

다음으로, AD 관리자 사용자로 데이터베이스에 연결해야 합니다.

Azure az CLI 유틸리티를 사용하여 AD 관리자로 설정한 사용자로 로그인하고 액세스 토큰을 가져와 데이터베이스에 연결할 때 비밀번호로 사용합니다:

$ az login -u ad@example.com
$ TOKEN=`az account get-access-token --resource-type oss-rdbms --output tsv --query accessToken`
$ PGPASSWORD=$TOKEN psql "host=example.postgres.database.azure.com user=ad@example.com sslmode=require dbname=postgres"
$ az login -u ad@example.com
$ TOKEN=`az account get-access-token --resource-type oss-rdbms --output tsv --query accessToken`
$ PGPASSWORD=$TOKEN psql "host=example.postgres.database.azure.com user=ad@example.com@instance-name sslmode=require dbname=postgres"
$ az login -u ad-admin@example.com
$ TOKEN=`az account get-access-token --resource-type oss-rdbms --output tsv --query accessToken`
$ mysql -h example.mysql.database.azure.com -P 3306 -u ad@example.com --enable-cleartext-plugin --password=$TOKEN
$ az login -u ad-admin@example.com
$ TOKEN=`az account get-access-token --resource-type oss-rdbms --output tsv --query accessToken`
$ mysql -h example.mysql.database.azure.com -P 3306 -u ad@example.com@instance-name --enable-cleartext-plugin --password=$TOKEN

데이터베이스 사용자 이름에는 연결하는 Azure 데이터베이스 인스턴스 이름을 포함한 @instance-name 접미사가 포함되어야 합니다.

AD 사용자 생성#

AD 관리자로 데이터베이스에 연결된 후, Teleport Database Service가 사용할 서비스 주체에 대한 데이터베이스 사용자를 생성합니다. 관리형 ID를 사용할 때는 Client ID를 사용하고, 앱 등록을 사용할 때는 Application (client) ID를 사용합니다:

postgres=> SET aad_validate_oids_in_tenant = off;
SET
postgres=> CREATE ROLE teleport WITH LOGIN PASSWORD '11111111-2222-3333-4444-555555555555' IN ROLE azure_ad_user;
CREATE ROLE
postgres=> SELECT * FROM pgaadauth_create_principal_with_oid('teleport', '11111111-2222-3333-4444-555555555555', 'service', false, false);
-------------------------------------
 Created role for teleport
(1 row)
mysql> SET aad_auth_validate_oids_in_tenant = OFF;
mysql> CREATE AADUSER 'teleport' IDENTIFIED BY '11111111-2222-3333-4444-555555555555';
Query OK, 0 rows affected (0.92 sec)

생성된 사용자는 기본적으로 아무것도 액세스하지 못할 수 있으므로 일부 권한을 부여해 봅시다:

GRANT ALL ON `%`.* TO 'teleport'@'%';

동일한 서비스 주체로 식별된 여러 데이터베이스 사용자를 생성할 수 있습니다.

4/5단계. Teleport Database Service 설치#

The Database Service requires a valid join token to join your Teleport cluster. Run the following tctl command and save the token output in /tmp/token on the server that will run the Database Service:

$ tctl tokens add --type=db --format=text
(=presets.tokens.first=)

Teleport Database Service를 실행할 호스트에 Teleport를 설치합니다:

To install a Teleport Agent on your Linux server:

The recommended installation method is the cluster install script. It will select the correct version, edition, and installation mode for your cluster.

  1. Assign to your Teleport cluster hostname and port, but not the scheme (https://).

  2. Run your cluster's install script:

    $ curl "https:///scripts/install.sh" | sudo bash
    

Database Service 구성을 생성합니다.

  • --azure-postgres-discovery에서 데이터베이스의 지역을 지정합니다.

  • --proxy 값을 Teleport Proxy Service 주소 또는 Teleport Enterprise (Cloud) URI(예: example.teleport.sh:443)로 교체합니다:

    $ sudo teleport db configure create \
      -o file \
      --proxy=teleport.example.com:443 \
      --token=/tmp/token \
      --azure-postgres-discovery=eastus
    
  • --azure-mysql-discovery에서 데이터베이스의 지역을 지정합니다.

  • --proxy 값을 Teleport Proxy Service 주소 또는 Teleport Enterprise (Cloud) URI(예: example.teleport.sh:443)로 교체합니다:

    $ sudo teleport db configure create \
      -o file \
      --proxy=teleport.example.com:443 \
      --token=/tmp/token \
      --azure-mysql-discovery=eastus
    

Database Service 호스트에서 다음 명령을 실행합니다:

$ sudo teleport db configure create \
  -o file \
  --proxy=teleport.example.com:443 \
  --token=/tmp/token \
  --azure-mysql-discovery=eastus \
  --azure-postgres-discovery=eastus

이렇게 하면 teleport.yaml에 각 데이터베이스 유형에 대한 두 개의 types 엔티티가 생성됩니다. 각 데이터베이스 유형에 대해 다른 지역, 태그 또는 레이블을 원하는 경우 유용합니다.

또는 teleport.yaml을 편집하여 단일 항목에 두 데이터베이스 유형을 포함할 수 있습니다:

db_service:
  azure:
  - types: ["mysql", "postgres"]
  ...

이 명령은 eastus 지역에서 Azure MySQL/Postgres 데이터베이스 자동 검색이 활성화된 Database Service 구성을 생성하여 /etc/teleport.yaml 위치에 저장합니다.

Teleport 역할 생성#

tsh로 Teleport 클러스터에 로그인된 워크스테이션에서 Azure 데이터베이스에 대한 액세스를 제공하는 새 역할을 정의합니다. 다음 내용으로 azure-database-role.yaml이라는 파일을 생성합니다:

version: v7
kind: role
metadata:
  name: azure-database-access
spec:
  allow:
    db_labels:
      'engine':
        - "Microsoft.DBforMySQL/servers"
        - "Microsoft.DBforMySQL/flexibleServers"
        - "Microsoft.DBforPostgreSQL/servers"
        - "Microsoft.DBforPostgreSQL/flexibleServers"
    db_names:
    - '*'
    db_users:
    - teleport
플래그 설명
--db-users 데이터베이스에 연결할 때 사용할 수 있는 데이터베이스 사용자 이름 목록. 와일드카드는 모든 사용자를 허용합니다.
--db-names 데이터베이스 서버 내에서 연결할 수 있는 논리적 데이터베이스(스키마) 목록. 와일드카드는 모든 데이터베이스를 허용합니다.
--db-labels 사용자가 액세스할 수 있는 데이터베이스에 할당된 레이블 목록. 와일드카드 항목은 모든 데이터베이스를 허용합니다.

이 파일을 저장하고 Teleport 클러스터에 적용합니다:

$ tctl create -f azure-database-role.yaml
role 'azure-database-access' has been created

Assign the azure-database-access role to your Teleport user by running the appropriate commands for your authentication provider:

Teleport Database Service 시작#

Configure the Teleport Database Service to start automatically when the host boots up by creating a systemd service for it. The instructions depend on how you installed the Teleport Database Service.

You can check the status of the Teleport Database Service with systemctl status teleport and view its logs with journalctl -fu teleport.

Tip

단일 Teleport 프로세스는 여러 다른 서비스를 실행할 수 있습니다. 예를 들어 여러 Database Service 에이전트뿐만 아니라 SSH Service 또는 Application Service도 함께 실행할 수 있습니다.

5/5단계. 연결#

Teleport 클러스터에 로그인합니다. Azure 데이터베이스가 사용 가능한 데이터베이스 목록에 나타나야 합니다:

$ tsh login --proxy=teleport.example.com --user=alice
$ tsh db ls
# Name     Description         Labels
# -------- ------------------- -------
# azure-db                     env=dev
$ tsh login --proxy=mytenant.teleport.sh --user=alice
$ tsh db ls
# Name     Description         Labels
# -------- ------------------- -------
# azure-db                     env=dev

(!docs/pages/includes/database-access/db-access-webui-ad.mdx dbType="MySQL or MariaDB"!)

(!docs/pages/includes/database-access/db-access-webui-ad.mdx dbType="PostgreSQL"!)

데이터베이스에서 로그아웃하고 자격 증명을 제거하려면:

$ tsh db logout azure-db

문제 해결#

No credential providers error#

If you see the error DefaultAzureCredential: failed to acquire a token. in Database Service logs then Teleport is not detecting the required credentials to connect to the Azure SDK. Check whether the credentials have been applied in the machine running the Teleport Database Service and restart the Teleport Database Service. Refer to Azure SDK Authorization for more information.

Timeout errors#

The Teleport Database Service needs connectivity to your database endpoints. That may require enabling inbound traffic on the database from the Database Service on the same VPC or routing rules from another VPC. Using the nc program you can verify connections to databases:

$ nc -zv server-name.postgres.database.azure.com 5432
# Connection to server-name.postgres.database.azure.com 5432 port [tcp/postgresql] succeeded!

Unable to cancel a query#

If you use a PostgreSQL cli client like psql, and you try to cancel a query with Ctrl+C, but it doesn't cancel the query, then you need to connect using a tsh local proxy instead. When psql cancels a query, it establishes a new connection without TLS certificates, however Teleport requires TLS certificates not only for authentication, but also to route database connections.

If you enable TLS Routing in Teleport then tsh db connect will automatically start a local proxy for every connection. Alternatively, you can connect via Teleport Connect which also uses a local proxy. Otherwise, you need to start a tsh local proxy manually using tsh proxy db and connect via the local proxy.

If you have already started a long-running query in a psql session that you cannot cancel with Ctrl+C, you can start a new client session to cancel that query manually:

First, find the query's process identifier (PID):

SELECT pid,usename,backend_start,query FROM pg_stat_activity WHERE state = 'active';

Next, gracefully cancel the query using its PID. This will send a SIGINT signal to the postgres backend process for that query:

SELECT pg_cancel_backend(<PID>);

You should always try to gracefully terminate a query first, but if graceful cancellation is taking too long, then you can forcefully terminate the query instead. This will send a SIGTERM signal to the postgres backend process for that query:

SELECT pg_terminate_backend(<PID>);

See the PostgreSQL documentation on admin functions for more information about the pg_cancel_backend and pg_terminate_backend functions.

SSL SYSCALL error#

You may encounter the following error when your local psql is not compatible with newer versions of OpenSSL:

$ tsh db connect --db-user postgres --db-name postgres postgres
psql: error: connection to server at "localhost" (::1), port 12345 failed: Connection refused
    Is the server running on that host and accepting TCP/IP connections?
connection to server at "localhost" (127.0.0.1), port 12345 failed: SSL SYSCALL error: Undefined error: 0

Please upgrade your local psql to the latest version.

다음 단계#

Azure PostgreSQL 및 MySQL을 통한 데이터베이스 액세스

원문 보기
요약

Teleport can provide secure access to Azure PostgreSQL or MySQL via the Teleport Database Service. In this guide, you will:

Teleport can provide secure access to Azure PostgreSQL or MySQL via the Teleport Database Service. This allows for fine-grained access control through Teleport's RBAC.

In this guide, you will:

  1. Configure your Azure PostgreSQL or MySQL database with Microsoft Entra ID-based authentication.
  2. Add the database to your Teleport cluster.
  3. Connect to the database via Teleport.

작동 방식#

Teleport Database Service는 Teleport 사용자와 Azure PostgreSQL 및 MySQL 간의 트래픽을 프록시합니다. 사용자가 Teleport를 통해 데이터베이스에 연결하면 Database Service는 Microsoft Entra ID(이전의 Azure AD)에서 액세스 토큰을 가져와 데이터베이스를 관리할 권한이 있는 주체로 Azure에 인증합니다.

자체 호스팅 Teleport 클러스터로 Azure PostgreSQL/MySQL 등록

클라우드 호스팅 Teleport 클러스터로 Azure PostgreSQL/MySQL 등록

사전 요구 사항#

  • A running Teleport cluster. If you want to get started with Teleport, sign up for a free trial or set up a demo environment.

  • The tctl and tsh clients.

    Installing `tctl` and `tsh` clients
    1. Determine the version of your Teleport cluster. The tctl and tsh clients must be at most one major version behind your Teleport cluster version. Send a GET request to the Proxy Service at /v1/webapi/find and use a JSON query tool to obtain your cluster version. Replace with the web address of your Teleport Proxy Service:

      $ TELEPORT_DOMAIN=
      $ TELEPORT_VERSION="$(curl -s https://$TELEPORT_DOMAIN/v1/webapi/find | jq -r '.server_version')"
      
    2. Follow the instructions for your platform to install tctl and tsh clients:

  • 배포된 Azure Database for PostgreSQL 또는 MySQL 서버.
  • Microsoft Entra ID 관리자 권한.
  • Teleport Database Service를 실행할 호스트(예: Azure VM 인스턴스).

To check that you can connect to your Teleport cluster, sign in with tsh login, then verify that you can run tctl commands using your current credentials.

For example, run the following command, assigning to the domain name of the Teleport Proxy Service in your cluster and to your Teleport username:

$ tsh login --proxy= --user=
$ tctl status
# Cluster  (=teleport.url=)
# Version  (=teleport.version=)
# CA pin   (=presets.ca_pin=)

If you can connect to the cluster and run the tctl status command, you can use your current credentials to run subsequent tctl commands from your workstation. If you host your own Teleport cluster, you can also run tctl commands on the computer that hosts the Teleport Auth Service for full permissions.

1/5단계. Azure 서비스 주체 구성#

PostgreSQL 또는 MySQL 데이터베이스에 인증하려면 Teleport Database Service가 Microsoft Entra ID에서 액세스 토큰을 가져와야 합니다.

There are a couple of ways for the Teleport Database Service to access Azure resources:

  • The Database Service can run on an Azure VM with attached managed identity. This is the recommended way of deploying the Database Service in production since it eliminates the need to manage Azure credentials.
  • The Database Service can be registered as a Microsoft Entra ID application (via "App registrations") and configured with its credentials. This is only recommended for development and testing purposes since it requires Azure credentials to be present in the Database Service's environment.

Go to the App registrations page of Microsoft Entra ID and click on New registration:

App registrations

Pick a name (e.g. DatabaseService) and register a new application. Once the app has been created, take note of its Application (client) ID and click on Add a certificate or secret:

Registered app

Create a new client secret that the Database Service agent will use to authenticate with the Azure API:

Registered app secrets

The Teleport Database Service uses Azure SDK's default credential provider chain to look for credentials. Refer to Azure SDK Authorization to pick a method suitable for your use-case. For example, to use environment-based authentication with a client secret, the Database Service should have the following environment variables set:

export AZURE_TENANT_ID=
export AZURE_CLIENT_ID=
export AZURE_CLIENT_SECRET=

2/5단계. Teleport를 위한 IAM 권한 구성#

사용자 지정 역할 생성#

Teleport는 MySQL 및 PostgreSQL 데이터베이스를 검색하고 등록하기 위해 Azure IAM 권한이 필요합니다. Teleport가 검색해야 할 모든 데이터베이스를 포함하는 할당 가능한 범위로 역할을 생성합니다. 예:

{
    "properties": {
        "roleName": "TeleportDiscovery",
        "description": "Allows Teleport to discover MySQL and PostgreSQL databases",
        "assignableScopes": [
            "/subscriptions/11111111-2222-3333-4444-555555555555"
        ],
        "permissions": [
            {
                "actions": [
                    "Microsoft.DBforMySQL/servers/read",
                    "Microsoft.DBforPostgreSQL/servers/read",
                    "Microsoft.DBforMySQL/flexibleServers/read",
                    "Microsoft.DBforPostgreSQL/flexibleServers/read"
                ],
                "notActions": [],
                "dataActions": [],
                "notDataActions": []
            }
        ]
    }
}

이 역할 정의를 통해 Teleport는 MySQL 및 PostgreSQL 데이터베이스를 검색할 수 있지만, 실제로 보유한 데이터베이스 유형에 대한 권한만 필요합니다. 할당 가능한 범위에 구독이 포함되어 있으므로 해당 구독 내의 모든 리소스 범위에서 역할을 할당하거나 구독 범위 자체를 사용하여 할당할 수 있습니다.

Custom role assignable scope

Azure 기본 제공 역할과 달리 사용자 지정 역할은 루트 할당 가능 범위를 가질 수 없습니다. 사용자 지정 역할에서 사용할 수 있는 가장 높은 할당 가능 범위는 구독 범위입니다. 관리 그룹 범위 사용은 현재 Azure 미리 보기 기능으로, 역할 정의의 "assignableScopes"에서 단일 관리 그룹만 허용합니다. 자세한 내용은 Azure RBAC 사용자 지정 역할을 참고하세요.

구독 페이지로 이동하여 구독을 선택합니다.

구독에서 *액세스 제어(IAM)*를 클릭하고 추가 > 사용자 지정 역할 추가를 선택합니다: IAM 사용자 지정 역할

사용자 지정 역할 생성 페이지에서 JSON 탭을 클릭하고 편집을 클릭한 다음 JSON 예시를 붙여넣고 "assignableScopes"의 구독을 본인의 구독 ID로 교체합니다: JSON 역할 생성

Teleport Database Service 주체에 역할 할당 생성#

To grant Teleport permissions, the custom role you created must be assigned to the Teleport service principal - either the managed identity or the app registration you created earlier.

Navigate to the resource scope where you want to make the role assignment. Click Access control (IAM) and select Add > Add role assignment. Choose the custom role you created as the role and the Teleport service principal as a member.

Assign role

3/5단계. Azure 데이터베이스 사용자 생성#

Teleport가 서비스 주체로 인증하여 Azure 데이터베이스에 연결하려면 해당 주체에 의해 인증된 Entra ID 사용자를 데이터베이스에 생성해야 합니다.

Entra ID 관리자 할당#

데이터베이스의 Entra ID 관리자만 연결하여 Entra ID 사용자를 생성할 수 있습니다.

데이터베이스의 인증 페이지로 이동하여 편집 버튼을 사용하여 AD 관리자를 설정합니다:

AD 관리자 설정

데이터베이스의 인증 페이지로 이동하여 + Entra ID 관리자 추가를 선택하여 AD 관리자를 설정합니다:

AD 관리자 설정

데이터베이스의 Active Directory 관리자 페이지로 이동하여 관리자 설정 버튼을 사용하여 AD 관리자를 설정합니다:

AD 관리자 설정

Entra ID Admin

데이터베이스의 Entra ID 관리자로는 하나의 Azure 사용자(또는 그룹)만 설정할 수 있습니다. 서버에서 Entra ID 관리자가 제거되면 해당 서버에 대한 모든 Entra ID 로그인이 비활성화됩니다. 동일한 테넌트에서 새 Entra ID 관리자를 추가하면 Entra ID 로그인이 다시 활성화됩니다. 자세한 내용은 PostgreSQL 인증에 Microsoft Entra ID 사용을 참고하세요.

AD 관리자로 데이터베이스에 연결#

다음으로, AD 관리자 사용자로 데이터베이스에 연결해야 합니다.

Azure az CLI 유틸리티를 사용하여 AD 관리자로 설정한 사용자로 로그인하고 액세스 토큰을 가져와 데이터베이스에 연결할 때 비밀번호로 사용합니다:

$ az login -u ad@example.com
$ TOKEN=`az account get-access-token --resource-type oss-rdbms --output tsv --query accessToken`
$ PGPASSWORD=$TOKEN psql "host=example.postgres.database.azure.com user=ad@example.com sslmode=require dbname=postgres"
$ az login -u ad@example.com
$ TOKEN=`az account get-access-token --resource-type oss-rdbms --output tsv --query accessToken`
$ PGPASSWORD=$TOKEN psql "host=example.postgres.database.azure.com user=ad@example.com@instance-name sslmode=require dbname=postgres"
$ az login -u ad-admin@example.com
$ TOKEN=`az account get-access-token --resource-type oss-rdbms --output tsv --query accessToken`
$ mysql -h example.mysql.database.azure.com -P 3306 -u ad@example.com --enable-cleartext-plugin --password=$TOKEN
$ az login -u ad-admin@example.com
$ TOKEN=`az account get-access-token --resource-type oss-rdbms --output tsv --query accessToken`
$ mysql -h example.mysql.database.azure.com -P 3306 -u ad@example.com@instance-name --enable-cleartext-plugin --password=$TOKEN

데이터베이스 사용자 이름에는 연결하는 Azure 데이터베이스 인스턴스 이름을 포함한 @instance-name 접미사가 포함되어야 합니다.

AD 사용자 생성#

AD 관리자로 데이터베이스에 연결된 후, Teleport Database Service가 사용할 서비스 주체에 대한 데이터베이스 사용자를 생성합니다. 관리형 ID를 사용할 때는 Client ID를 사용하고, 앱 등록을 사용할 때는 Application (client) ID를 사용합니다:

postgres=> SET aad_validate_oids_in_tenant = off;
SET
postgres=> CREATE ROLE teleport WITH LOGIN PASSWORD '11111111-2222-3333-4444-555555555555' IN ROLE azure_ad_user;
CREATE ROLE
postgres=> SELECT * FROM pgaadauth_create_principal_with_oid('teleport', '11111111-2222-3333-4444-555555555555', 'service', false, false);
-------------------------------------
 Created role for teleport
(1 row)
mysql> SET aad_auth_validate_oids_in_tenant = OFF;
mysql> CREATE AADUSER 'teleport' IDENTIFIED BY '11111111-2222-3333-4444-555555555555';
Query OK, 0 rows affected (0.92 sec)

생성된 사용자는 기본적으로 아무것도 액세스하지 못할 수 있으므로 일부 권한을 부여해 봅시다:

GRANT ALL ON `%`.* TO 'teleport'@'%';

동일한 서비스 주체로 식별된 여러 데이터베이스 사용자를 생성할 수 있습니다.

4/5단계. Teleport Database Service 설치#

The Database Service requires a valid join token to join your Teleport cluster. Run the following tctl command and save the token output in /tmp/token on the server that will run the Database Service:

$ tctl tokens add --type=db --format=text
(=presets.tokens.first=)

Teleport Database Service를 실행할 호스트에 Teleport를 설치합니다:

To install a Teleport Agent on your Linux server:

The recommended installation method is the cluster install script. It will select the correct version, edition, and installation mode for your cluster.

  1. Assign to your Teleport cluster hostname and port, but not the scheme (https://).

  2. Run your cluster's install script:

    $ curl "https:///scripts/install.sh" | sudo bash
    

Database Service 구성을 생성합니다.

  • --azure-postgres-discovery에서 데이터베이스의 지역을 지정합니다.

  • --proxy 값을 Teleport Proxy Service 주소 또는 Teleport Enterprise (Cloud) URI(예: example.teleport.sh:443)로 교체합니다:

    $ sudo teleport db configure create \
      -o file \
      --proxy=teleport.example.com:443 \
      --token=/tmp/token \
      --azure-postgres-discovery=eastus
    
  • --azure-mysql-discovery에서 데이터베이스의 지역을 지정합니다.

  • --proxy 값을 Teleport Proxy Service 주소 또는 Teleport Enterprise (Cloud) URI(예: example.teleport.sh:443)로 교체합니다:

    $ sudo teleport db configure create \
      -o file \
      --proxy=teleport.example.com:443 \
      --token=/tmp/token \
      --azure-mysql-discovery=eastus
    

Database Service 호스트에서 다음 명령을 실행합니다:

$ sudo teleport db configure create \
  -o file \
  --proxy=teleport.example.com:443 \
  --token=/tmp/token \
  --azure-mysql-discovery=eastus \
  --azure-postgres-discovery=eastus

이렇게 하면 teleport.yaml에 각 데이터베이스 유형에 대한 두 개의 types 엔티티가 생성됩니다. 각 데이터베이스 유형에 대해 다른 지역, 태그 또는 레이블을 원하는 경우 유용합니다.

또는 teleport.yaml을 편집하여 단일 항목에 두 데이터베이스 유형을 포함할 수 있습니다:

db_service:
  azure:
  - types: ["mysql", "postgres"]
  ...

이 명령은 eastus 지역에서 Azure MySQL/Postgres 데이터베이스 자동 검색이 활성화된 Database Service 구성을 생성하여 /etc/teleport.yaml 위치에 저장합니다.

Teleport 역할 생성#

tsh로 Teleport 클러스터에 로그인된 워크스테이션에서 Azure 데이터베이스에 대한 액세스를 제공하는 새 역할을 정의합니다. 다음 내용으로 azure-database-role.yaml이라는 파일을 생성합니다:

version: v7
kind: role
metadata:
  name: azure-database-access
spec:
  allow:
    db_labels:
      'engine':
        - "Microsoft.DBforMySQL/servers"
        - "Microsoft.DBforMySQL/flexibleServers"
        - "Microsoft.DBforPostgreSQL/servers"
        - "Microsoft.DBforPostgreSQL/flexibleServers"
    db_names:
    - '*'
    db_users:
    - teleport
플래그 설명
--db-users 데이터베이스에 연결할 때 사용할 수 있는 데이터베이스 사용자 이름 목록. 와일드카드는 모든 사용자를 허용합니다.
--db-names 데이터베이스 서버 내에서 연결할 수 있는 논리적 데이터베이스(스키마) 목록. 와일드카드는 모든 데이터베이스를 허용합니다.
--db-labels 사용자가 액세스할 수 있는 데이터베이스에 할당된 레이블 목록. 와일드카드 항목은 모든 데이터베이스를 허용합니다.

이 파일을 저장하고 Teleport 클러스터에 적용합니다:

$ tctl create -f azure-database-role.yaml
role 'azure-database-access' has been created

Assign the azure-database-access role to your Teleport user by running the appropriate commands for your authentication provider:

Teleport Database Service 시작#

Configure the Teleport Database Service to start automatically when the host boots up by creating a systemd service for it. The instructions depend on how you installed the Teleport Database Service.

You can check the status of the Teleport Database Service with systemctl status teleport and view its logs with journalctl -fu teleport.

Tip

단일 Teleport 프로세스는 여러 다른 서비스를 실행할 수 있습니다. 예를 들어 여러 Database Service 에이전트뿐만 아니라 SSH Service 또는 Application Service도 함께 실행할 수 있습니다.

5/5단계. 연결#

Teleport 클러스터에 로그인합니다. Azure 데이터베이스가 사용 가능한 데이터베이스 목록에 나타나야 합니다:

$ tsh login --proxy=teleport.example.com --user=alice
$ tsh db ls
# Name     Description         Labels
# -------- ------------------- -------
# azure-db                     env=dev
$ tsh login --proxy=mytenant.teleport.sh --user=alice
$ tsh db ls
# Name     Description         Labels
# -------- ------------------- -------
# azure-db                     env=dev

(!docs/pages/includes/database-access/db-access-webui-ad.mdx dbType="MySQL or MariaDB"!)

(!docs/pages/includes/database-access/db-access-webui-ad.mdx dbType="PostgreSQL"!)

데이터베이스에서 로그아웃하고 자격 증명을 제거하려면:

$ tsh db logout azure-db

문제 해결#

No credential providers error#

If you see the error DefaultAzureCredential: failed to acquire a token. in Database Service logs then Teleport is not detecting the required credentials to connect to the Azure SDK. Check whether the credentials have been applied in the machine running the Teleport Database Service and restart the Teleport Database Service. Refer to Azure SDK Authorization for more information.

Timeout errors#

The Teleport Database Service needs connectivity to your database endpoints. That may require enabling inbound traffic on the database from the Database Service on the same VPC or routing rules from another VPC. Using the nc program you can verify connections to databases:

$ nc -zv server-name.postgres.database.azure.com 5432
# Connection to server-name.postgres.database.azure.com 5432 port [tcp/postgresql] succeeded!

Unable to cancel a query#

If you use a PostgreSQL cli client like psql, and you try to cancel a query with Ctrl+C, but it doesn't cancel the query, then you need to connect using a tsh local proxy instead. When psql cancels a query, it establishes a new connection without TLS certificates, however Teleport requires TLS certificates not only for authentication, but also to route database connections.

If you enable TLS Routing in Teleport then tsh db connect will automatically start a local proxy for every connection. Alternatively, you can connect via Teleport Connect which also uses a local proxy. Otherwise, you need to start a tsh local proxy manually using tsh proxy db and connect via the local proxy.

If you have already started a long-running query in a psql session that you cannot cancel with Ctrl+C, you can start a new client session to cancel that query manually:

First, find the query's process identifier (PID):

SELECT pid,usename,backend_start,query FROM pg_stat_activity WHERE state = 'active';

Next, gracefully cancel the query using its PID. This will send a SIGINT signal to the postgres backend process for that query:

SELECT pg_cancel_backend(<PID>);

You should always try to gracefully terminate a query first, but if graceful cancellation is taking too long, then you can forcefully terminate the query instead. This will send a SIGTERM signal to the postgres backend process for that query:

SELECT pg_terminate_backend(<PID>);

See the PostgreSQL documentation on admin functions for more information about the pg_cancel_backend and pg_terminate_backend functions.

SSL SYSCALL error#

You may encounter the following error when your local psql is not compatible with newer versions of OpenSSL:

$ tsh db connect --db-user postgres --db-name postgres postgres
psql: error: connection to server at "localhost" (::1), port 12345 failed: Connection refused
    Is the server running on that host and accepting TCP/IP connections?
connection to server at "localhost" (127.0.0.1), port 12345 failed: SSL SYSCALL error: Undefined error: 0

Please upgrade your local psql to the latest version.

다음 단계#