





Cloud SQL for MySQL을 통한 데이터베이스 액세스
Teleport v18.10요약
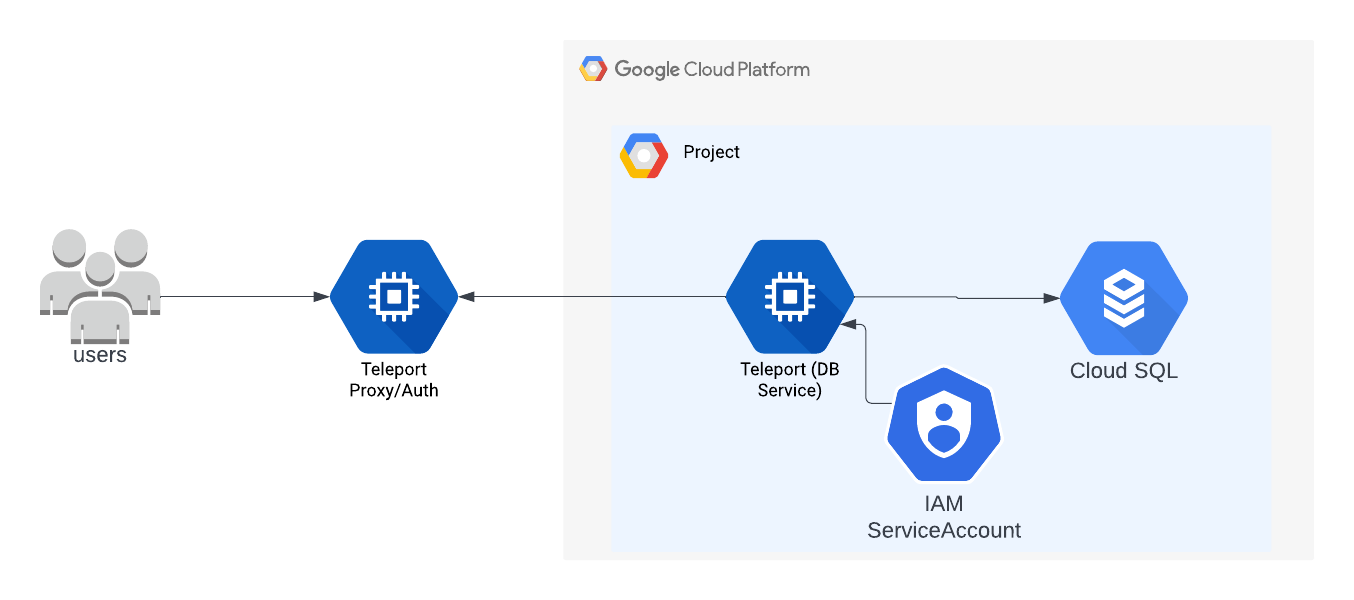
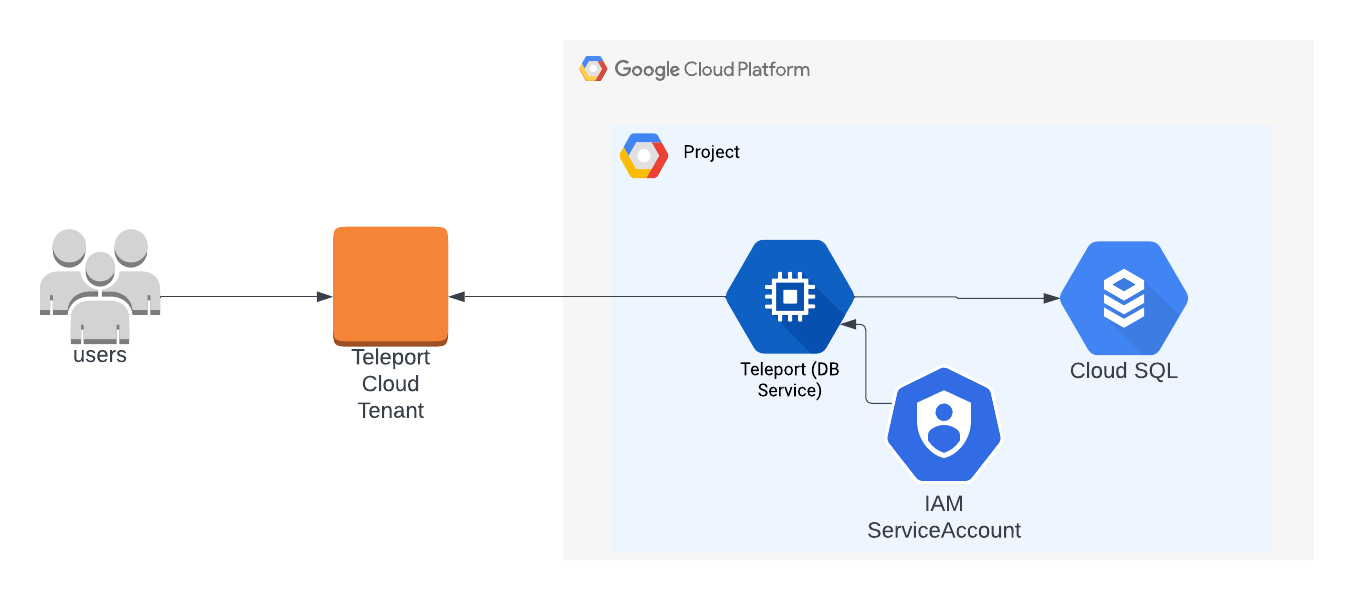
Teleport는 Teleport Database Service를 통해 MySQL on Google Cloud SQL에 대한 보안 접근을 제공할 수 있습니다. Teleport Database Service는 IAM 인증을 사용하여 MySQL와 통신합니다.
Teleport는 Teleport Database Service를 통해 MySQL on Google Cloud SQL에 대한 보안 접근을 제공할 수 있습니다. 이를 통해 Teleport의 RBAC를 사용한 세분화된 접근 제어가 가능합니다.
이 가이드에서는 다음을 수행합니다:
- MySQL on Google Cloud SQL 데이터베이스를 구성합니다 with a service account.
- 데이터베이스를 Teleport 클러스터에 추가합니다.
- Teleport를 통해 데이터베이스에 연결합니다.
작동 방식#
Teleport Database Service는 IAM 인증을 사용하여 MySQL와 통신합니다. 사용자가 Teleport를 통해 데이터베이스에 연결하면 Teleport Database Service는 Google Cloud 자격 증명을 얻고 데이터베이스에 액세스할 수 있는 권한을 가진 IAM 주체(principal)로 Google Cloud에 인증합니다.
사전 요구 사항#
-
실행 중인 Teleport 클러스터. Teleport를 시작하려면 무료 체험판에 가입하거나 데모 환경을 구성하세요.
-
tctlandtshclients.Installing `tctl` and `tsh` clients
-
Teleport 클러스터의 버전을 확인합니다.
tctlandtshclients는 Teleport 클러스터 버전보다 최대 한 개의 메이저 버전까지만 뒤처질 수 있습니다. Proxy Service의/v1/webapi/find로 GET 요청을 보내고 JSON 쿼리 도구를 사용하여 클러스터 버전을 확인합니다.teleport.example.com:443를 Teleport Proxy Service의 웹 주소로 바꿉니다:$ TELEPORT_DOMAIN=teleport.example.com:443 $ TELEPORT_VERSION="$(curl -s https://$TELEPORT_DOMAIN/v1/webapi/find | jq -r '.server_version')" -
사용 중인 플랫폼에 대한 지침에 따라
tctlandtshclients를 설치합니다:
-
Mac
     `tctl` and `tsh` clients가 포함된, 서명된 Teleport macOS .pkg 설치 프로그램을 다운로드합니다:

     ```code
     $ curl -O https://cdn.teleport.dev/teleport-${TELEPORT_VERSION?}.pkg
     ```

     Finder에서 `pkg` 파일을 더블 클릭하여 설치를 시작합니다.
       Homebrew를 사용하여 Teleport를 설치하는 것은 지원되지 않습니다. Homebrew의
       Teleport 패키지는 Teleport에서 유지 관리하지 않으므로 신뢰성이나 보안을
       보장할 수 없습니다.
Windows - Powershell
     ```code
     $ curl.exe -O https://cdn.teleport.dev/teleport-v${TELEPORT_VERSION?}-windows-amd64-bin.zip
     # Unzip the archive and move the `tctl` and `tsh` clients to your %PATH%
     # NOTE: Do not place the `tctl` and `tsh` clients in the System32 directory, as this can cause issues when using WinSCP.
     # Use %SystemRoot% (C:\Windows) or %USERPROFILE% (C:\Users\<username>) instead.
     ```
Linux
     Linux 설치판의 모든 Teleport 바이너리에는 `tctl` and `tsh` clients가 포함되어 있습니다.  RPM/DEB
     패키지 및 i386/ARM/ARM64용 다운로드를 포함한 더 많은 옵션은
     [설치 페이지](../installation/installation.mdx)를 참조하세요.

     ```code
     $ curl -O https://cdn.teleport.dev/teleport-v${TELEPORT_VERSION?}-linux-amd64-bin.tar.gz
     $ tar -xzf teleport-v${TELEPORT_VERSION?}-linux-amd64-bin.tar.gz
     $ cd teleport
     $ sudo ./install
     # Teleport binaries have been copied to /usr/local/bin
     ```
- Google Cloud 계정
- Teleport 데이터베이스 서비스를 실행할 호스트(예: Compute Engine 인스턴스)
Teleport cluster에 연결할 수 있는지 확인하려면 tsh login으로 로그인한 다음,
현재 자격 증명으로 tctl 명령을 실행할 수 있는지 확인합니다.
예를 들어, teleport.example.com에 cluster 내 Teleport Proxy Service의
도메인 이름을, email@example.com에 Teleport 사용자 이름을 지정하여
다음 명령을 실행합니다:
$ tsh login --proxy=teleport.example.com --user=email@example.com
$ tctl status
# Cluster  (=teleport.url=)
# Version  (=teleport.version=)
# CA pin   (=presets.ca_pin=)
cluster에 연결하여 tctl status 명령을 실행할 수 있다면, 현재 자격 증명을 사용하여
워크스테이션에서 이후의 tctl 명령을 실행할 수 있습니다.
자체 Teleport cluster를 호스팅하는 경우, 전체 권한을 얻기 위해 Teleport Auth Service를
호스팅하는 컴퓨터에서 tctl 명령을 실행할 수도 있습니다.
1단계/9. Teleport 데이터베이스 서비스를 위한 서비스 계정 생성#
GCP 서비스 계정은 Teleport Database Service가 인증된 Teleport 사용자를 대신하여 작동할 때 다른 GCP 서비스 계정에 대한 임시 액세스 토큰을 생성하는 데 사용됩니다.
서비스 계정 생성#
Service Accounts 페이지로 이동하여 서비스 계정을 생성하십시오:

(선택 사항) 권한 부여#
Teleport Database Service는 Cloud SQL 인스턴스의 루트 CA 인증서를 자동으로 다운로드하고 임시 클라이언트 인증서를 생성하기 위한 권한이 필요합니다.
CA 인증서를 수동으로 다운로드할 예정이고 Cloud SQL 인스턴스의 SSL 모드가 "require trusted client certificates"가 아니라면 이 단계를 건너뛸 수 있습니다.
그렇지 않은 경우, 서비스 계정 생성 대화상자의 두 번째 단계에서 서비스 계정에 사전 정의된 GCP IAM 역할 "Cloud SQL Client"를 할당한 다음 "Done"을 클릭합니다.
Cloud SQL Client permissions
"Cloud SQL Client" 역할에는 다음과 같은 권한이 있습니다.# Used to auto-download the instance's root CA certificate and check SSL mode.
cloudsql.instances.get
# Used to generate an ephemeral client certificate
cloudsql.instances.connect
이러한 권한 중 하나만 필요한 경우, 대신 사용자 지정 IAM 역할을 정의하여 서비스 계정에 할당할 수 있습니다.
(선택 사항) 사용자 유형 확인 권한 부여#
사용자가 Teleport를 통해 Cloud SQL 데이터베이스에 연결할 때, 데이터베이스 사용자로 사용하려는
서비스 계정의 이름을 지정해야 합니다.
사용자는 서비스 계정의 짧은 이름 또는 전체 이메일 중 하나를 사용할 수 있습니다.
예를 들어 계정 이메일이 cloudsql-user@project.iam.gserviceaccount.com이면
전체 이메일 대신 "cloudsql-user"를 사용할 수 있습니다.
하지만 서비스 계정의 짧은 이름을 사용하는 경우, Teleport가 사용해야 할 인증 종류 (IAM 인증 또는 레거시 일회용 비밀번호 인증)를 판단하는 권한이 필요합니다. 이 권한이 없으면 기본적으로 일회용 비밀번호를 사용하려고 시도합니다. 서비스 계정의 짧은 이름으로 IAM 인증을 지원하려면 다음 권한이 필요합니다.
# 데이터베이스 사용자 유형을 확인하는 데 사용됩니다.
cloudsql.users.get
사전 정의된 "Cloud SQL Viewer" 역할에는 이 권한이 포함되어 있지만, 필요하지 않은 다른 권한도 함께 포함되어 있습니다. 최소 권한 원칙을 따르려면 사용자 지정 역할을 정의하여 서비스 계정에 바인딩하세요.
레거시 일회용 비밀번호 인증에 대한 지원은 향후 폐지될 예정입니다. 이 가이드를 따르고 있으며 IAM 데이터베이스 사용자 인증 지원이 도입되기 전에 이미 Teleport를 설정한 경우, 이 가이드에서 설명하는 대로 IAM 인증을 사용하도록 데이터베이스 사용자를 구성해야 합니다.
2단계/9. 데이터베이스 사용자를 위한 서비스 계정 생성#
Teleport는 서비스 계정을 사용하여 Cloud SQL 데이터베이스에 연결합니다.
서비스 계정 생성#
IAM & Admin Service Accounts 페이지로 이동하여 "cloudsql-user"라는 이름의 새 서비스 계정을 생성합니다:
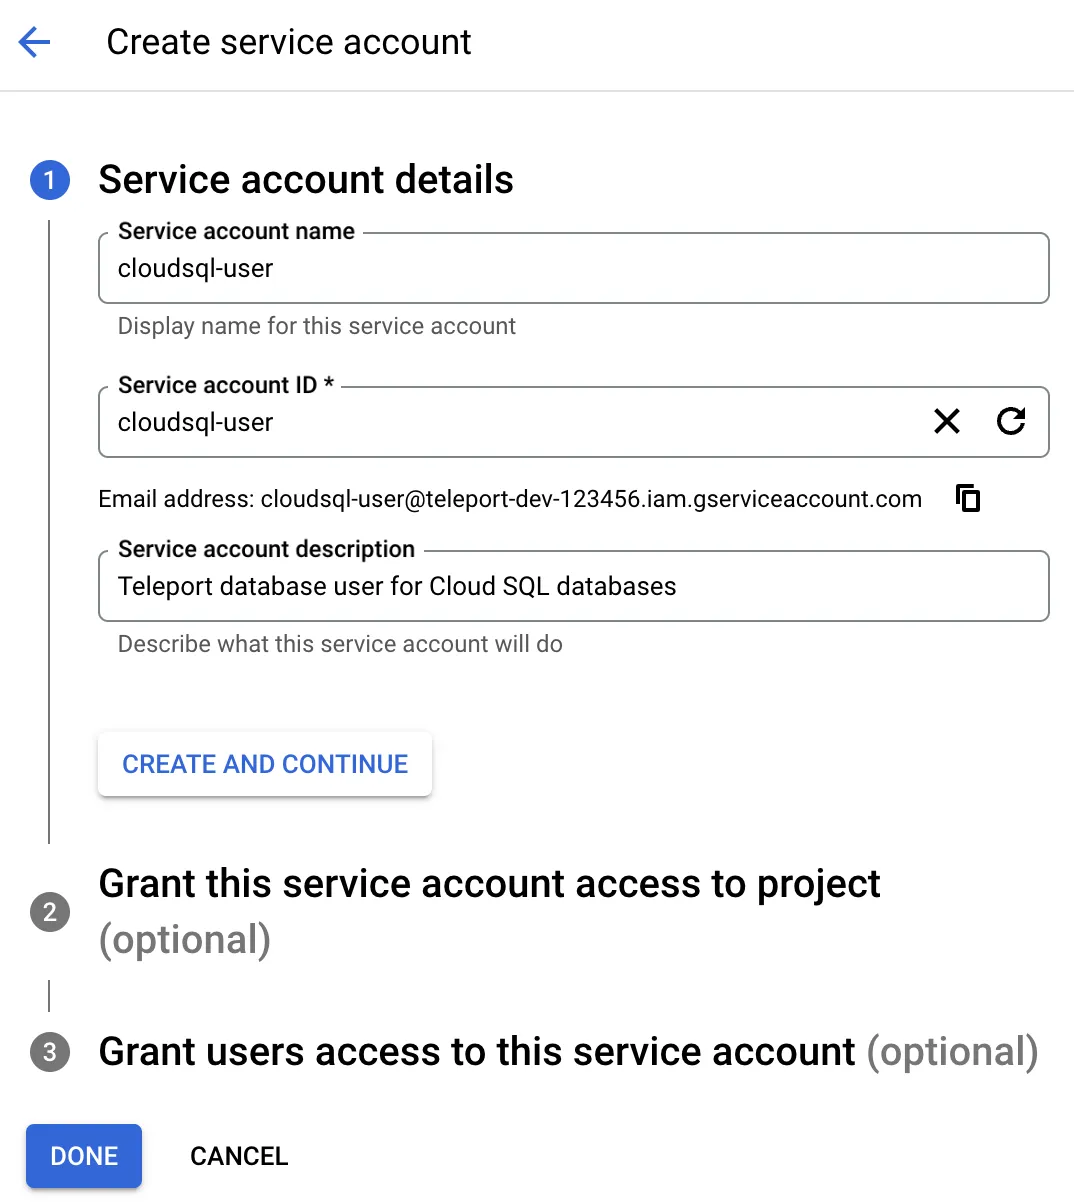
"Create and continue"를 클릭합니다.
권한 부여#
두 번째 단계에서 이 서비스 계정에 "Cloud SQL Instance User" 역할을 부여합니다. 이 역할을 통해 인증을 위한 IAM 토큰을 사용하여 Cloud SQL 인스턴스에 연결할 수 있습니다:
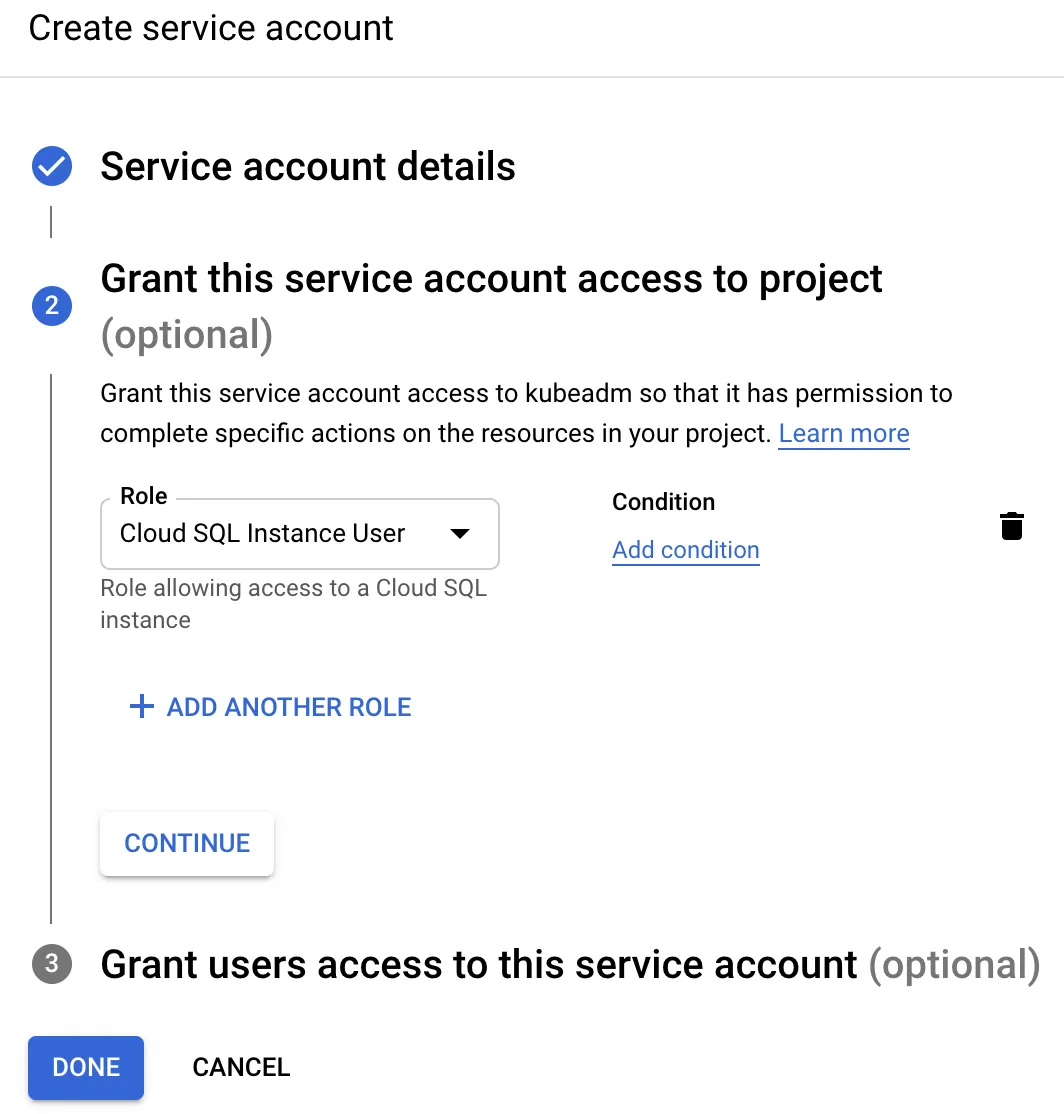
"Done"을 클릭합니다.
서비스 계정에 대한 액세스 부여#
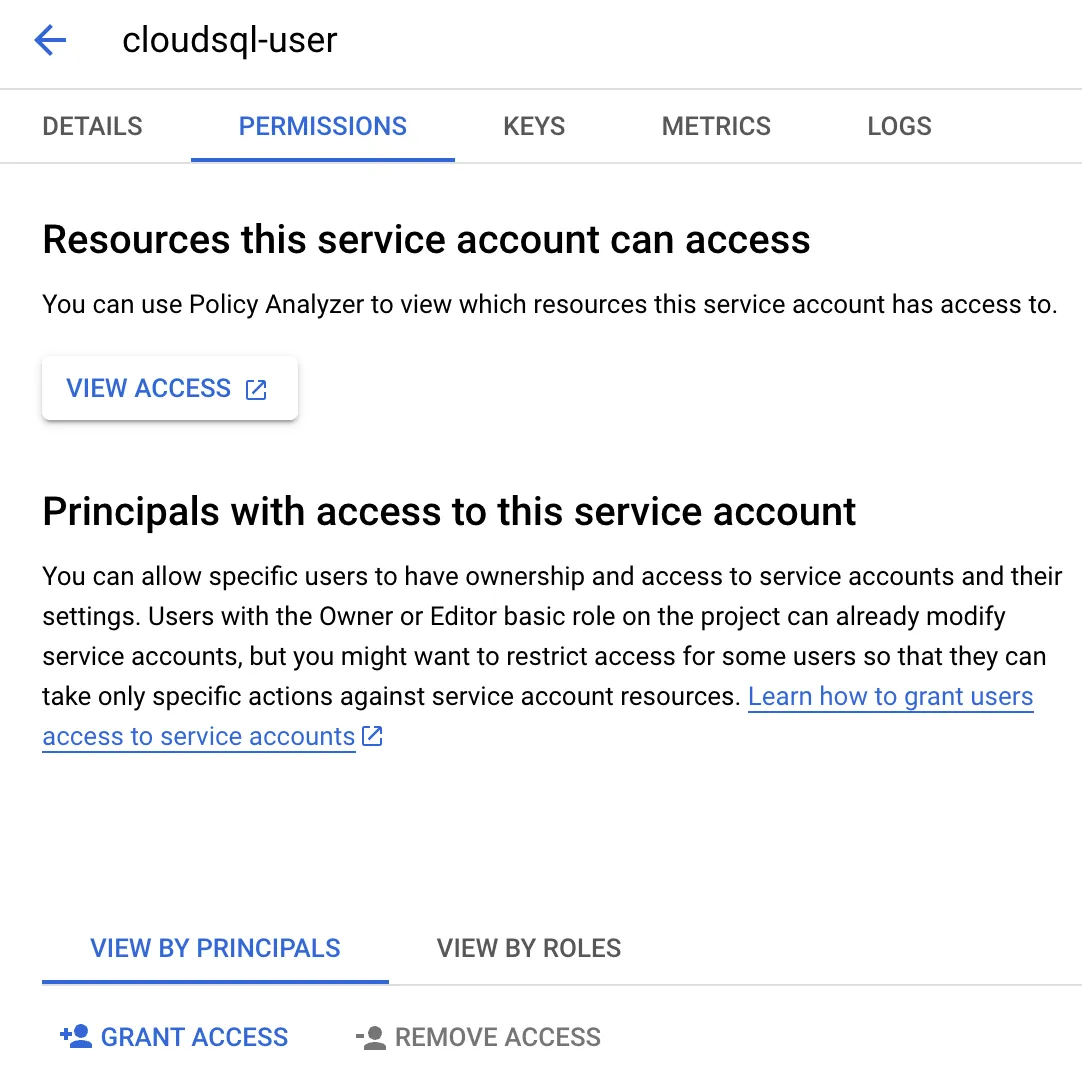
Teleport Database Service는 이 서비스 계정을 임퍼소네이션할 수 있어야 합니다. "cloudsql-user" 서비스 계정 개요 페이지로 이동하여 "permissions" 탭을 선택하세요:
"Grant Access"를 클릭하고 "teleport-db-service" 프린시펄 ID를 추가하세요. "Service Account Token Creator" 역할을 선택하고 변경 사항을 저장하세요:
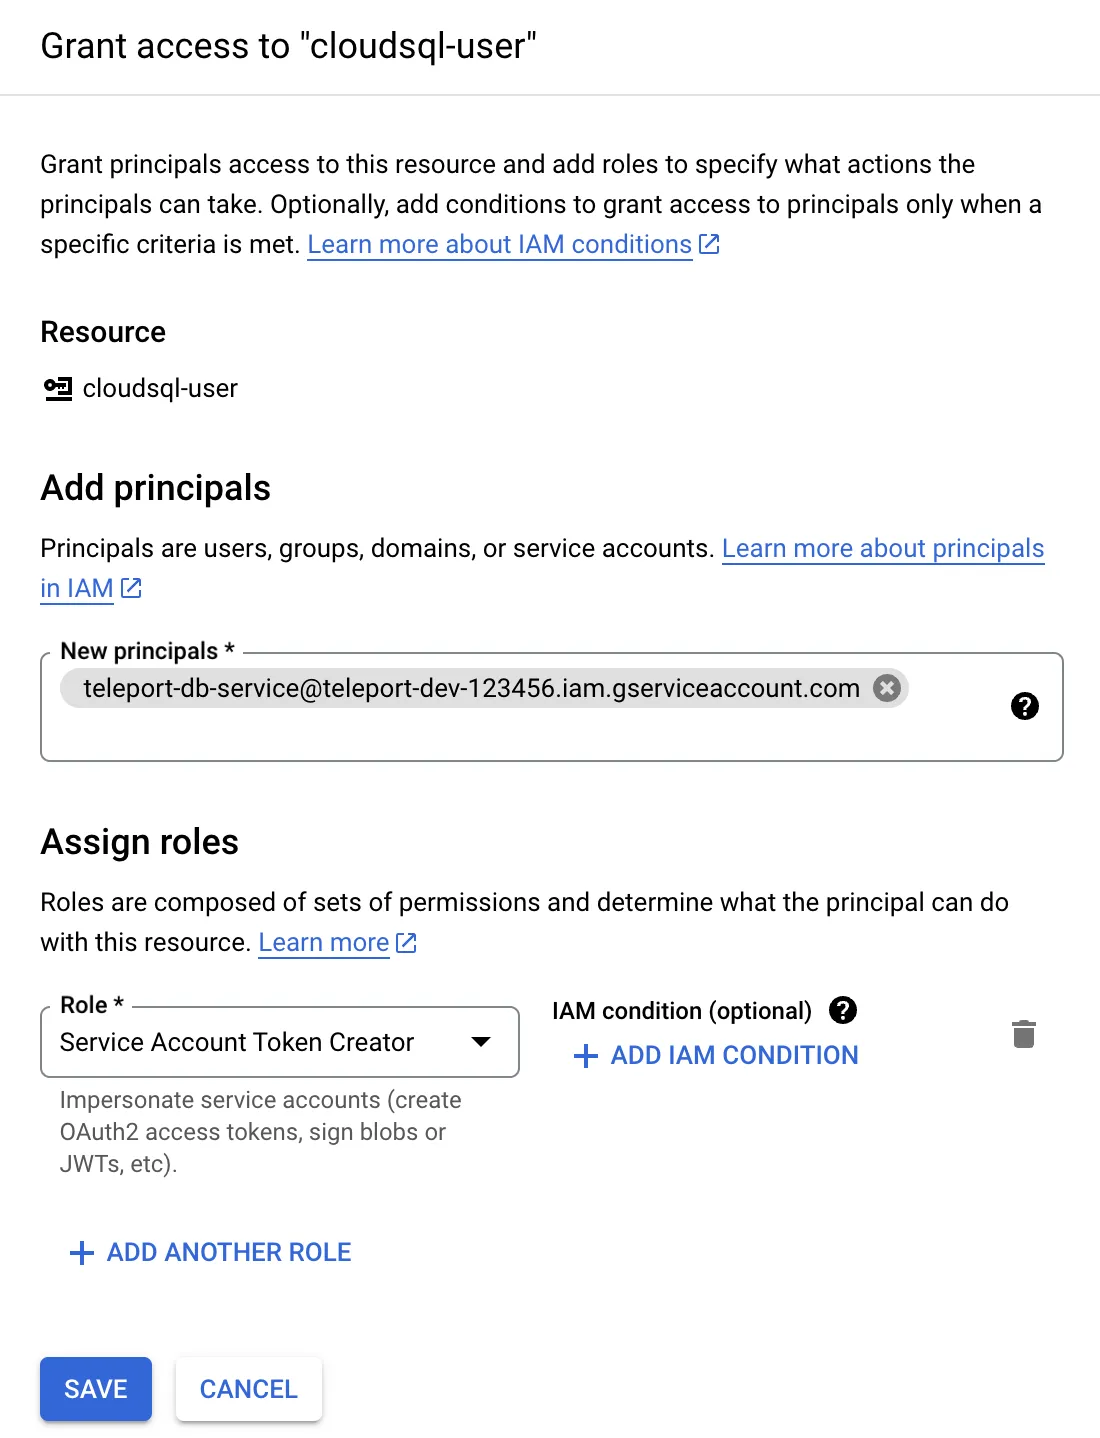
"Service Account Token Creator" IAM 역할에는 Teleport Database Service에 필요한 것보다 더 많은 권한이 포함되어 있습니다. 서비스 계정을 더욱 제한하려면, 다음 권한만 포함하는 역할을 생성할 수 있습니다:
# Used to generate IAM auth tokens when connecting to a database instance.
iam.serviceAccounts.getAccessToken
3단계/9. Cloud SQL 데이터베이스 구성#
Cloud SQL IAM 인증 활성화#
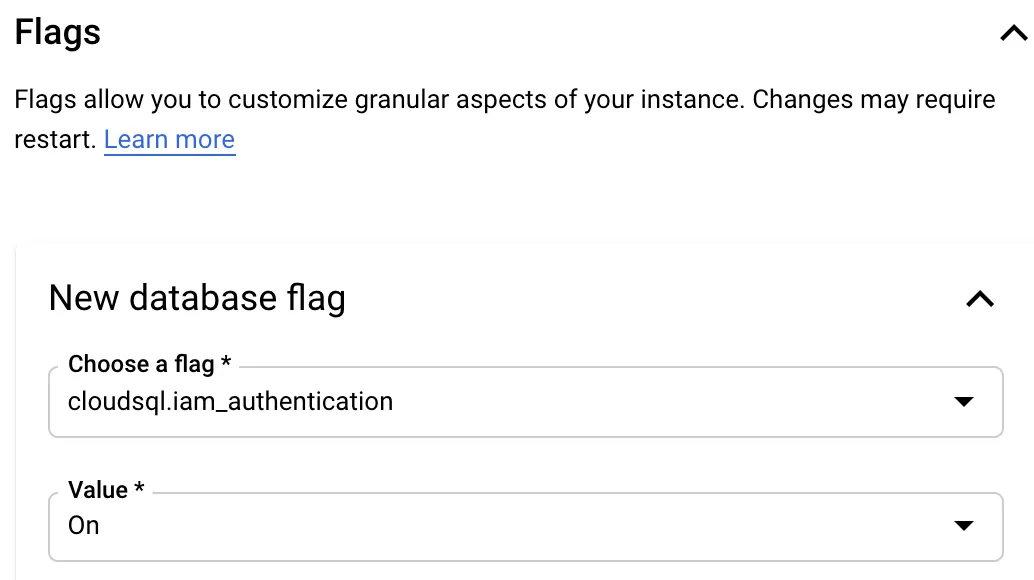
Teleport는 Cloud SQL MySQL 인스턴스에서 IAM 인증을 사용합니다.
새 MySQL 인스턴스를 생성하는
경우 "Customize your instance / Flags" 섹션에서 cloudsql.iam_authentication
데이터베이스 플래그를 반드시 추가하세요:
기존 Cloud SQL 인스턴스에 대해 IAM 인증이 활성화되어 있는지 확인하려면 인스턴스의 Overview 페이지에 있는 Configuration 패널에서 해당 플래그를 찾으세요:
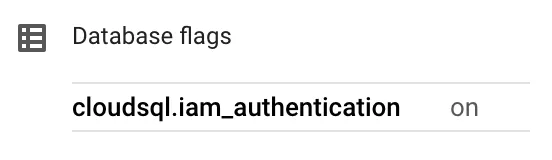
활성화되어 있지 않은 경우 Configuration 패널 하단의 "Edit configuration" 대화 상자를 사용하여 이 플래그를 추가할 수 있습니다. 이 설정을 변경하면 데이터베이스 인스턴스를 재부팅해야 할 수 있습니다.
(선택 사항) "신뢰할 수 있는 클라이언트 인증서 필요" SSL 모드#
"신뢰할 수 있는 클라이언트 인증서 필요"가 활성화된 Cloud SQL MySQL을 사용하는 경우,
Teleport는 기본 3306 포트 대신 데이터베이스의 Cloud SQL Proxy 포트인 3307에
연결합니다. 이는 기본 Cloud SQL MySQL 리스너가 생성된 임시(ephemeral) 인증서를
신뢰하지 않기 때문입니다. 따라서 "신뢰할 수 있는 클라이언트 인증서 필요"를 사용할 때는
3307 포트를 허용해야 합니다.
"신뢰할 수 있는 클라이언트 인증서 필요" SSL 모드는 클라이언트(Teleport)가 신뢰할 수 있는 클라이언트 인증서를 제공하도록 강제할 뿐입니다. Teleport는 인스턴스의 SSL 모드 설정과 관계없이 항상 암호화된 TLS를 통해 데이터베이스에 연결합니다.
데이터베이스 사용자 생성#
이제 Cloud SQL 인스턴스의 Users 페이지로 돌아가 새 사용자 계정을 추가합니다. 사이드바에서 "Cloud IAM" 인증 유형을 선택하고 2단계에서 생성한 "cloudsql-user" 서비스 계정을 추가합니다.
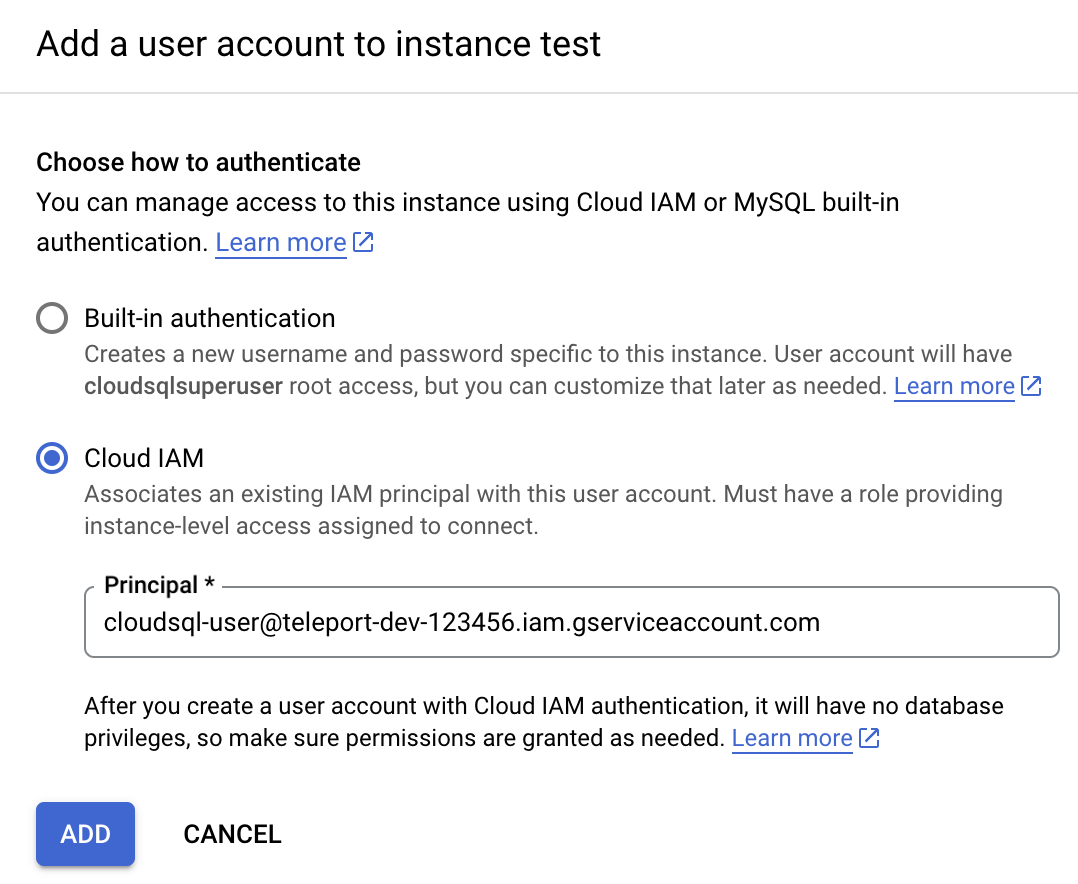
"Add"를 누릅니다. 자세한 내용은 Google Cloud 문서의 IAM 사용자 생성 및 관리를 참조하세요.
4단계/9. Teleport 설치#
Linux 서버에 Teleport Agent를 설치하려면:
권장 설치 방법은 클러스터 설치 스크립트입니다. 이 스크립트는 클러스터에 맞는 올바른 버전, 에디션, 설치 모드를 선택합니다.
-
teleport.example.com:443에 Teleport 클러스터의 호스트명과 포트를 할당하되, 스킴(https://)은 포함하지 마십시오. -
클러스터의 설치 스크립트를 실행하십시오:
$ curl "https://teleport.example.com:443/scripts/install.sh" | sudo bash
5단계/9. Teleport 데이터베이스 서비스 구성#
조인 토큰 생성#
Database Service가 Teleport 클러스터에 조인하려면 유효한 조인 토큰이 필요합니다.
다음 tctl 명령을 실행하고 Database Service를 실행할 서버에서
토큰 출력을 /tmp/token에 저장합니다:
$ tctl tokens add --type=db --format=text
(=presets.tokens.first=)
(선택 사항) Cloud SQL CA 인증서 다운로드#
Teleport Database Service가 데이터베이스 인스턴스가 제시하는 인증서를 검증할 수 있도록 Cloud SQL 인스턴스의 루트 CA 인증서가 필요합니다.
Teleport Database Service는 "cloudsql.instances.get" 권한이 부여된 경우 인스턴스의 루트 CA 인증서를 자동으로 다운로드할 수 있습니다.
또는 "Security" 섹션 아래의 "Connections" 탭에서 인스턴스의 CA 인증서 파일을 다운로드할 수 있습니다:
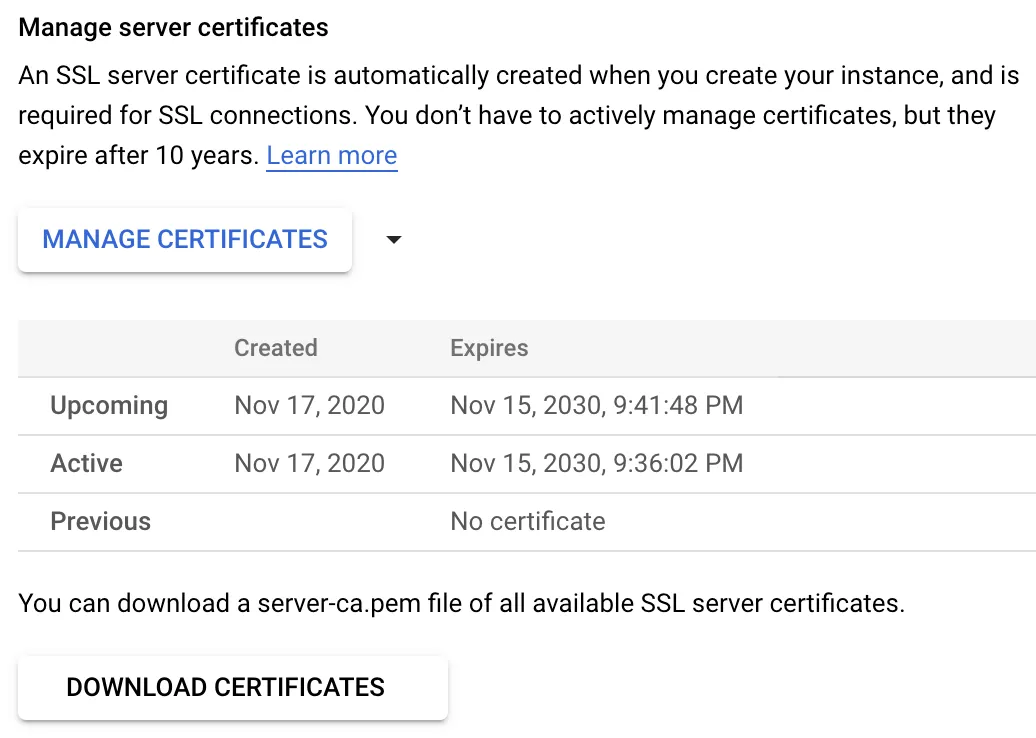
Teleport 구성 생성#
Configure Teleport With Automatic CA Download
다음 정보를 입력한 다음 Teleport Database Service용 구성 파일을 생성합니다:
example.teleport.sh:443Teleport Proxy Service 또는 Enterprise Cloud 사이트의 호스트 및 포트public-ipCloud SQL 인스턴스의 퍼블릭 IP 주소. 이 주소는 Cloud SQL 인스턴스 대시보드의 "Overview" 페이지에 있는 "Connect to this instance" 패널에서 확인할 수 있습니다.project-idGCP 프로젝트 ID. 일반적으로 GCP 대시보드 상단의 조직 보기에서 확인할 수 있습니다.instance-idCloud SQL 인스턴스의 이름.
$ sudo teleport db configure create \
   -o file \
   --name=cloudsql \
   --protocol=mysql \
   --labels=env=dev \
   --token=/tmp/token \
   --proxy=example.teleport.sh:443  \
   --uri=public-ip:3306 \
   --gcp-project-id=project-id \
   --gcp-instance-id=instance-id
Configure Teleport With Manual CA Download
다음 정보를 입력한 다음 Teleport Database Service용 구성 파일을 생성합니다:
example.teleport.sh:443Teleport Proxy Service 또는 Enterprise Cloud 사이트의 호스트 및 포트public-ipCloud SQL 인스턴스의 퍼블릭 IP 주소. 이 주소는 Cloud SQL 인스턴스 대시보드의 "Overview" 페이지에 있는 "Connect to this instance" 패널에서 확인할 수 있습니다.project-idGCP 프로젝트 ID. 일반적으로 GCP 대시보드 상단의 조직 보기에서 확인할 수 있습니다.instance-idCloud SQL 인스턴스의 이름./path/to/cloudsql/instance/server-ca.pemCloud SQL 인스턴스의 루트 CA 인증서 경로
$ sudo teleport db configure create \
   -o file \
   --name=cloudsql \
   --protocol=mysql \
   --labels=env=dev \
   --token=/tmp/token \
   --proxy=example.teleport.sh:443  \
   --uri=public-ip:3306 \
   --gcp-project-id=project-id \
   --gcp-instance-id=instance-id \
   --ca-cert-file=/path/to/cloudsql/instance/server-ca.pem
이 명령은 Teleport Database Service 구성 파일을 생성하여
/etc/teleport.yaml에 저장합니다.
6단계/9. GCP 자격 증명 구성#
Teleport Database Service에는 "teleport-db-service" GCP 서비스 계정에 대한 자격 증명이 있어야 합니다.
Teleport Database Service가 GCE 인스턴스에서 호스팅되는 경우, 연결된 서비스 계정을 변경할 수 있습니다. GCE가 아닌 Teleport 배포의 경우 workload identity 사용을 권장합니다.
서비스 계정 키 사용(안전하지 않음)
또는 해당 서비스 계정의 Keys 탭으로 이동하여 새 키를 생성하십시오:
반드시 JSON 형식을 선택하십시오:

파일을 저장하십시오. GOOGLE_APPLICATION_CREDENTIALS 환경 변수가 앞서 다운로드한
JSON 자격 증명 파일을 가리키도록 설정하십시오. 예를 들어, systemd를 사용하여
teleport를 시작하는 경우, 해당 서비스의 EnvironmentFile을 편집하여
환경 변수를 포함시켜야 합니다:
$ echo 'GOOGLE_APPLICATION_CREDENTIALS=/path/to/credentials.json' | sudo tee -a /etc/default/teleport
서비스 계정 키는 보안 위험이 될 수 있으며, 이 가이드에서는 단순함을 위해서만 키 사용을 설명합니다. 프로덕션 환경에서는 서비스 계정 키 사용을 권장하지 않습니다. 서비스 계정 인증 방식에 대한 자세한 내용은 Google Cloud 문서의 authentication을 참조하십시오.
7단계/9. Teleport 데이터베이스 서비스 시작#
systemd 서비스를 생성하여 호스트가 부팅될 때 the Teleport Database Service이 자동으로 시작되도록 구성합니다. 지침은 the Teleport Database Service을 어떻게 설치했는지에 따라 다릅니다.
Package Manager
the Teleport Database Service을 실행할 호스트에서 Teleport를 활성화하고 시작합니다:
$ sudo systemctl enable teleport
$ sudo systemctl start teleport
TAR Archive
the Teleport Database Service을 실행할 호스트에서 Teleport용 systemd 서비스 구성을 생성하고, Teleport 서비스를 활성화한 후 Teleport를 시작합니다:
$ sudo teleport install systemd -o /etc/systemd/system/teleport.service
$ sudo systemctl enable teleport
$ sudo systemctl start teleport
systemctl status teleport로 the Teleport Database Service의 상태를 확인하고 journalctl -fu teleport로
로그를 볼 수 있습니다.
8단계/9. Teleport 사용자 생성#
기존 사용자를 수정하여 Database Service 접근 권한을 부여하려면 Database Access Controls를 참조하십시오.
Teleport Community Edition
내장 access 역할을 가진 로컬 Teleport 사용자를 생성합니다:
$ tctl users add \
  --roles=access \
  --db-users="*" \
  --db-names="*" \
  alice
Teleport Enterprise/Enterprise Cloud
내장 access 및 requester 역할을 가진 로컬 Teleport 사용자를 생성합니다:
$ tctl users add \
  --roles=access,requester \
  --db-users="*" \
  --db-names="*" \
  alice
| Flag | 설명 |
|---|---|
--roles |
사용자에게 할당할 역할 목록입니다. 내장 access 역할은 Teleport에 등록된 모든 데이터베이스 서버에 연결할 수 있게 합니다. |
--db-users |
사용자가 데이터베이스에 연결할 때 사용할 수 있는 데이터베이스 사용자명 목록입니다. 와일드카드는 모든 사용자를 허용합니다. |
--db-names |
사용자가 데이터베이스 서버 내에서 연결할 수 있는 논리적 데이터베이스(즉, 스키마) 목록입니다. 와일드카드는 모든 데이터베이스를 허용합니다. |
데이터베이스 이름은 PostgreSQL, MongoDB, Cloud Spanner 데이터베이스에서만 적용됩니다.
데이터베이스 접근 제어 및 접근 제한 방법에 대한 자세한 정보는 RBAC 문서를 참조하십시오.
9단계/9. 연결#
Teleport 데이터베이스 서비스가 클러스터에 조인되면, 로그인하여 사용 가능한 데이터베이스를 확인합니다.
$ tsh login --proxy=teleport.example.com --user=alice
$ tsh db ls
# Name     Description         Labels
# -------- ------------------- --------
# cloudsql GCP Cloud SQL MySQL env=dev
$ tsh login --proxy=mytenant.teleport.sh --user=alice
$ tsh db ls
# Name     Description         Labels
# -------- ------------------- --------
# cloudsql GCP Cloud SQL MySQL env=dev
자신의 Teleport 역할이 접근 권한을 가진 데이터베이스만 볼 수 있습니다. 자세한 내용은 RBAC 가이드를 참조하세요.
데이터베이스에 연결할 때는 데이터베이스 사용자 이름 또는 서비스 계정의 이메일 ID 중
하나를 사용하세요. 사용자 이름과 서비스 계정의 이메일 ID는 모두 Cloud SQL 인스턴스의
Users 페이지에 표시됩니다.
project-id를 Google Cloud 프로젝트 ID로 지정하여 "cloudsql" 예제
데이터베이스의 자격 증명을 검색하고 연결합니다.
# 데이터베이스 사용자 서비스 계정의 짧은 이름으로 연결:
$ tsh db connect --db-user=cloudsql-user --db-name=mysql cloudsql
# 또는 전체 이메일 ID로 연결:
$ tsh db connect --db-user=cloudsql-user@project-id.iam.gserviceaccount.com --db-name=mysql cloudsql
이 섹션의 내용은 원문 문서를 참조하세요. (proxy-db-tunnel.mdx)
[Web UI를 사용하여 MySQL 데이터베이스에 접근](../../connect-your-client/teleport-clients/web-ui.mdx#starting-a-database-session)할 수도 있습니다.
데이터베이스에서 로그아웃하고 자격 증명을 제거하려면:
# 특정 데이터베이스 인스턴스의 자격 증명 제거:
$ tsh db logout cloudsql
# 또는 모든 데이터베이스의 자격 증명 제거:
$ tsh db logout
문제 해결#
복제본 인스턴스 연결 시 오류#
복제본 인스턴스에 연결할 때 다음과 같은 오류가 발생할 수 있습니다.
$ tsh db connect --db-user=cloudsql-user --db-name=test cloudsql-replica
ERROR 1105 (HY000): Could not update Cloud SQL user "<username>" password:

  The requested operation is not valid for a replica instance.

...
비밀번호를 사용하는 내장 데이터베이스 사용자로는 Cloud SQL 복제본 인스턴스에 연결할 수 없습니다. 이 가이드를 따라 대신 IAM 인증을 사용하세요.
Could not find default credentials#
이 오류는 클라이언트 애플리케이션 또는 Teleport 중 어느 쪽에서든 발생할 수 있습니다.
클라이언트 애플리케이션의 경우 GCP 자격 증명 로딩을 비활성화했는지 확인합니다. GCP 자격 증명은 Teleport Database Service가 제공하므로 클라이언트는 자격 증명을 로드하려고 시도해서는 안 됩니다.
Teleport Database Service 로그(DEBUG 로그 레벨)에서 자격 증명 오류 메시지가 보인다면, Teleport Database Service에 GCP 자격 증명이 올바르게 구성되지 않은 것입니다.
서비스 계정 키를 사용하는 경우 환경 변수
GOOGLE_APPLICATION_CREDENTIALS=/path/to/credentials.json가 설정되어 있는지
확인하고, 해당 환경 변수가 teleport에서 사용 가능하도록 Teleport Database
Service를 재시작합니다.
예를 들어 Teleport Database Service가 systemd 서비스로 실행되는 경우:
$ echo 'GOOGLE_APPLICATION_CREDENTIALS=/path/to/credentials.json' | sudo tee -a /etc/default/teleport
$ sudo systemctl restart teleport
서비스 계정 인증 방식에 대한 자세한 내용은 Google Cloud 문서의 authentication을 참조하십시오.
다음 단계#
-
특정 사용자 및 데이터베이스에 대한 접근을 제한하는 방법을 알아보십시오.
-
고가용성 (HA) 가이드를 확인하십시오.
-
YAML 구성 레퍼런스를 살펴보십시오.
-
전체 CLI 레퍼런스를 참조하십시오.
-
Google Cloud에서 서비스 계정으로 인증하기에 대해 자세히 알아보세요.