





ClickHouse 데이터베이스 접근
Teleport v18.10요약
Teleport ClickHouse 통합을 통해 ClickHouse 데이터베이스를 Teleport에 등록할 수 있습니다. 이 가이드를 통해 다음을 수행할 수 있습니다: Teleport 데이터베이스 서비스는 x509 인증서를 사용하여 ClickHouse에 인증하며, 이 인증서는 ClickHouse HTTP 및 Native(TCP) 인터페이스에서 사용 가능합니다.
Teleport ClickHouse 통합을 통해 ClickHouse 데이터베이스를 Teleport에 등록할 수 있습니다.
이 가이드를 통해 다음을 수행할 수 있습니다:
- Teleport 데이터베이스 서비스 에이전트를 설치하고 구성합니다.
- 셀프 호스팅 ClickHouse 데이터베이스에 접근하기 위해 Teleport를 설정합니다.
- Teleport를 통해 데이터베이스에 연결합니다.
작동 방식#
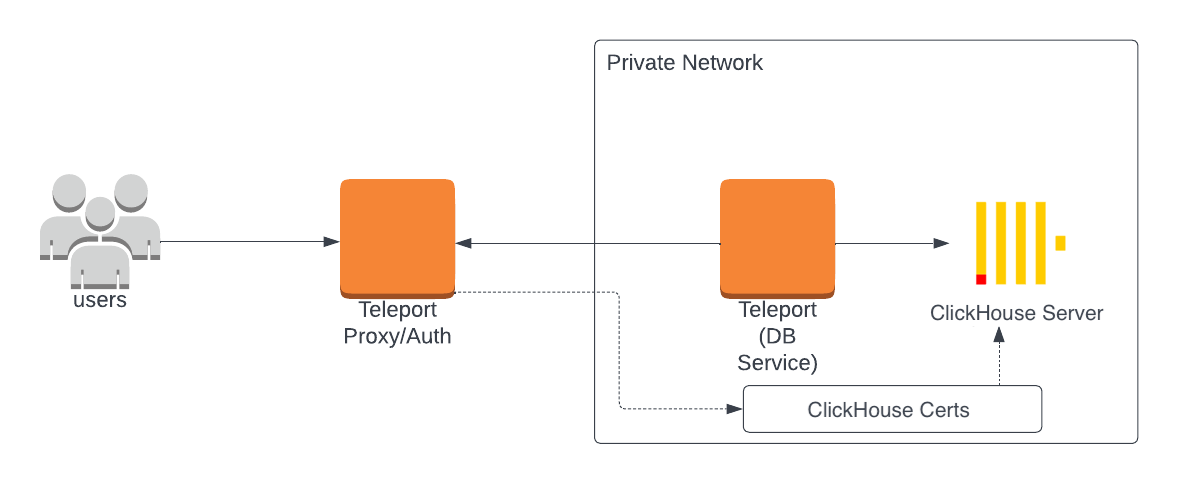
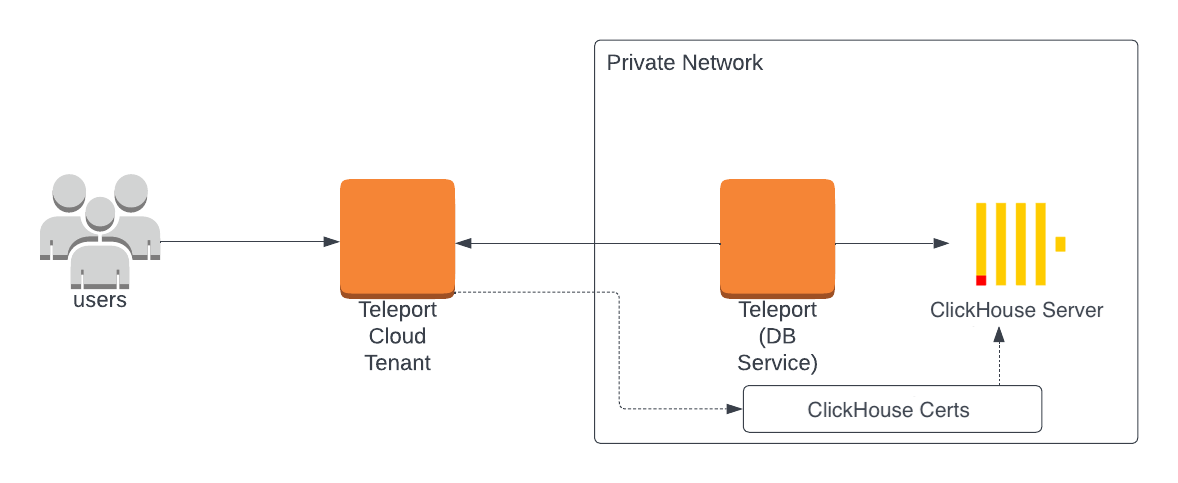
Teleport 데이터베이스 서비스는 x509 인증서를 사용하여 ClickHouse에 인증하며, 이 인증서는 ClickHouse HTTP 및 Native(TCP) 인터페이스에서 사용 가능합니다. Teleport 데이터베이스 서비스는 ClickHouse Native(TCP) 및 HTTP 프로토콜 모두로 통신할 수 있으며, Teleport 데이터베이스 서비스를 구성할 때 사용할 프로토콜을 선택할 수 있습니다.
쿼리 활동에 대한 Teleport 감사 로그는 ClickHouse HTTP 인터페이스에서만 지원됩니다. ClickHouse의 네이티브 인터페이스에 대한 Teleport 지원에는 데이터베이스 쿼리 활동에 대한 감사 로그가 포함되지 않습니다.
사전 요구사항#
-
실행 중인 Teleport 클러스터. Teleport를 시작하려면 무료 체험판에 가입하거나 데모 환경을 구성하세요.
-
tctlandtshclients.Installing `tctl` and `tsh` clients
-
Teleport 클러스터의 버전을 확인합니다.
tctlandtshclients는 Teleport 클러스터 버전보다 최대 한 개의 메이저 버전까지만 뒤처질 수 있습니다. Proxy Service의/v1/webapi/find로 GET 요청을 보내고 JSON 쿼리 도구를 사용하여 클러스터 버전을 확인합니다.teleport.example.com:443를 Teleport Proxy Service의 웹 주소로 바꿉니다:$ TELEPORT_DOMAIN=teleport.example.com:443 $ TELEPORT_VERSION="$(curl -s https://$TELEPORT_DOMAIN/v1/webapi/find | jq -r '.server_version')" -
사용 중인 플랫폼에 대한 지침에 따라
tctlandtshclients를 설치합니다:
-
Mac
     `tctl` and `tsh` clients가 포함된, 서명된 Teleport macOS .pkg 설치 프로그램을 다운로드합니다:

     ```code
     $ curl -O https://cdn.teleport.dev/teleport-${TELEPORT_VERSION?}.pkg
     ```

     Finder에서 `pkg` 파일을 더블 클릭하여 설치를 시작합니다.
       Homebrew를 사용하여 Teleport를 설치하는 것은 지원되지 않습니다. Homebrew의
       Teleport 패키지는 Teleport에서 유지 관리하지 않으므로 신뢰성이나 보안을
       보장할 수 없습니다.
Windows - Powershell
     ```code
     $ curl.exe -O https://cdn.teleport.dev/teleport-v${TELEPORT_VERSION?}-windows-amd64-bin.zip
     # Unzip the archive and move the `tctl` and `tsh` clients to your %PATH%
     # NOTE: Do not place the `tctl` and `tsh` clients in the System32 directory, as this can cause issues when using WinSCP.
     # Use %SystemRoot% (C:\Windows) or %USERPROFILE% (C:\Users\<username>) instead.
     ```
Linux
     Linux 설치판의 모든 Teleport 바이너리에는 `tctl` and `tsh` clients가 포함되어 있습니다.  RPM/DEB
     패키지 및 i386/ARM/ARM64용 다운로드를 포함한 더 많은 옵션은
     [설치 페이지](../installation/installation.mdx)를 참조하세요.

     ```code
     $ curl -O https://cdn.teleport.dev/teleport-v${TELEPORT_VERSION?}-linux-amd64-bin.tar.gz
     $ tar -xzf teleport-v${TELEPORT_VERSION?}-linux-amd64-bin.tar.gz
     $ cd teleport
     $ sudo ./install
     # Teleport binaries have been copied to /usr/local/bin
     ```
- Teleport 데이터베이스 서비스를 실행할 Linux 호스트 또는 Kubernetes 클러스터.
선택한 ClickHouse 프로토콜에 따라 다음도 필요합니다:
- ClickHouse Server v22.3 이상의 셀프 호스팅 배포.
- ClickHouse Server v23.3 이상의 셀프 호스팅 배포.
- clickhouse-client가 설치되어 사용자의
PATH환경 변수에 추가되어 있어야 합니다.
- 선택 사항: 셀프 호스팅 데이터베이스에 대한 인증서를 발급하는 인증 기관.
1/5단계. Teleport 토큰 및 사용자 생성#
Database Service가 Teleport 클러스터에 조인하려면 유효한 조인 토큰이 필요합니다.
다음 tctl 명령을 실행하고 Database Service를 실행할 서버에서
토큰 출력을 /tmp/token에 저장합니다:
$ tctl tokens add --type=db --format=text
(=presets.tokens.first=)
기존 사용자를 수정하여 Database Service 접근 권한을 부여하려면 Database Access Controls를 참조하십시오.
Teleport Community Edition
내장 access 역할을 가진 로컬 Teleport 사용자를 생성합니다:
$ tctl users add \
  --roles=access \
  --db-users="*" \
  --db-names="*" \
  alice
Teleport Enterprise/Enterprise Cloud
내장 access 및 requester 역할을 가진 로컬 Teleport 사용자를 생성합니다:
$ tctl users add \
  --roles=access,requester \
  --db-users="*" \
  --db-names="*" \
  alice
| Flag | 설명 |
|---|---|
--roles |
사용자에게 할당할 역할 목록입니다. 내장 access 역할은 Teleport에 등록된 모든 데이터베이스 서버에 연결할 수 있게 합니다. |
--db-users |
사용자가 데이터베이스에 연결할 때 사용할 수 있는 데이터베이스 사용자명 목록입니다. 와일드카드는 모든 사용자를 허용합니다. |
--db-names |
사용자가 데이터베이스 서버 내에서 연결할 수 있는 논리적 데이터베이스(즉, 스키마) 목록입니다. 와일드카드는 모든 데이터베이스를 허용합니다. |
데이터베이스 이름은 PostgreSQL, MongoDB, Cloud Spanner 데이터베이스에서만 적용됩니다.
데이터베이스 접근 제어 및 접근 제한 방법에 대한 자세한 정보는 RBAC 문서를 참조하십시오.
2/5단계. 인증서/키 쌍 생성#
Teleport는 자체 호스팅 데이터베이스와 상호 TLS 인증을 사용합니다. 이러한 데이터베이스는 Teleport Database Service가 제시하는 인증서를 검증할 수 있어야 합니다. 자체 호스팅 데이터베이스에는 Teleport가 검증할 수 있는 인증서/키 쌍도 필요합니다.
기본적으로 Teleport Database Service는 Teleport Auth Service가 관리하는 인증 기관(CA)이 발급한 인증서를 신뢰합니다. 다음 중 하나를 선택할 수 있습니다:
- 자체 호스팅 데이터베이스가 이 CA를 신뢰하도록 구성하고, Teleport가 데이터베이스가 Teleport Database Service에 제시할 인증서를 발급하도록 지시합니다.
- Database Service가 커스텀 CA를 신뢰하도록 구성합니다.
Use the Teleport CA
데이터베이스가 Teleport CA를 신뢰하도록 구성하고 데이터베이스용 인증서를 발급하려면 워크스테이션에서 다음 지침을 따르십시오:
-
워크스테이션에서
tctl을 사용하려면 데이터베이스 인증서를 생성할 수 있도록 Teleport 사용자가 시스템 roleDb를 임퍼소네이트할 수 있는 권한이 있어야 합니다. Teleport 사용자의 role에 다음allow규칙을 포함하십시오:allow: impersonate: users: ["Db"] roles: ["Db"] -
Teleport의 인증 기관을 내보내고 인증서/키 쌍을 생성합니다. 이 예시는 유효 기간이 90일인 인증서를 생성합니다.
db.example.com은 Teleport Database Service가 Clickhouse 서버에 도달할 수 있는 호스트 이름입니다.$ tctl auth sign --format=db --host=db.example.com --out=server --ttl=2160h
더 짧은 TTL을 사용하는 것을 권장하지만, 연결 기능을 잃지 않으려면 데이터베이스 서버 인증서가 만료되기 전에 갱신해야 한다는 점에 유의하십시오. 사용 사례에 가장 적합한 TTL 값을 선택하십시오.
이 명령은 server.cas, server.crt, server.key 3개의 파일을 생성합니다.
Use a custom CA
Clickhouse 데이터베이스에 인증서 서명에 사용하는 CA가 이미 있다면,
데이터베이스가 Teleport Database Service의 트래픽을 인증할 수 있도록
Teleport CA 인증서만 내보내면 됩니다. Db 임퍼소네이션 권한을 활성화할
필요는 없습니다.
-
example.teleport.sh:443를 클러스터의 Teleport Proxy Service 호스트 및 웹 포트로 바꾸십시오. 워크스테이션에서 다음 명령을 실행하십시오:$ tctl auth export --type=db-client --auth-server=example.teleport.sh:443 > db-client.cas이 명령은
db-client.cas파일 1개를 생성합니다. -
db-client.cas의 내용을 데이터베이스의 기존 CA 인증서 파일에 추가하십시오. 이 가이드에서는 해당 파일 이름을server.cas로 가정합니다. -
기존 데이터베이스 CA에서 데이터베이스 서버용으로 서명된 TLS 인증서와 개인 키를 가져와
server.crt와server.key를 생성하십시오. 이 파일들은 가이드 뒷부분에서 사용하게 됩니다.
3/5단계. ClickHouse 구성#
생성된 시크릿을 사용하여 clickhouse-server/config.xml 구성 파일에서 상호 TLS를 활성화합니다:
<openSSL>
    <server>
       <privateKeyFile>/path/to/server.key</privateKeyFile>
       <caConfig>/path/to/server.cas</caConfig>
       <certificateFile>/path/to/server.crt</certificateFile>
       <verificationMode>strict</verificationMode>
    </server>
</openSSL>
이 구성을 활성화하려면 ClickHouse Server를 재시작하세요. 또한 ClickHouse 데이터베이스 사용자 계정은 유효한 클라이언트 인증서를 요구하도록 구성되어야 합니다:
CREATE USER alice IDENTIFIED WITH ssl_certificate CN 'alice';
기본적으로 생성된 사용자는 아무것에도 접근할 수 없어 연결할 수 없으므로 일부 권한을 부여합니다:
GRANT ALL ON *.* TO alice;
4/5단계. 데이터베이스 서비스 구성 및 시작#
Teleport 데이터베이스 서비스를 실행할 호스트 또는 Kubernetes 클러스터에 Teleport를 설치하고 구성합니다. HTTP 프로토콜에는 protocol을
clickhouse-http로 지정하고, 네이티브 ClickHouse 프로토콜에는 clickhouse로 지정합니다:
Linux 서버에 Teleport Agent를 설치하려면:
권장 설치 방법은 클러스터 설치 스크립트입니다. 이 스크립트는 클러스터에 맞는 올바른 버전, 에디션, 설치 모드를 선택합니다.
-
teleport.example.com:443에 Teleport 클러스터의 호스트명과 포트를 할당하되, 스킴(https://)은 포함하지 마십시오. -
클러스터의 설치 스크립트를 실행하십시오:
$ curl "https://teleport.example.com:443/scripts/install.sh" | sudo bash
아래 단계는 기존 구성 파일을 덮어쓰므로, 여러 서비스를 실행 중인 경우 --output=stdout을 추가하여 터미널에 구성을 출력하고
/etc/teleport.yaml을 수동으로 조정하세요.
Teleport 데이터베이스 서비스를 실행할 호스트에서 적절한 구성으로 Teleport를 시작합니다.
단일 Teleport 프로세스는 여러 다른 서비스를 실행할 수 있습니다. 예를 들어 여러 데이터베이스 서비스 에이전트뿐만 아니라 SSH 서비스 또는
애플리케이션 서비스도 함께 실행할 수 있습니다. 아래 단계는 기존 구성 파일을 덮어쓰므로, 여러 서비스를 실행 중인 경우 --output=stdout을
추가하여 터미널에 구성을 출력하고 /etc/teleport.yaml을 수동으로 조정하세요.
데이터베이스 서비스용 구성 파일을 /etc/teleport.yaml에 생성하려면 다음 명령을 실행하세요. Teleport Proxy
서비스의 호스트와 포트를 사용하도록
teleport.example.com:443을 업데이트하세요:
$ sudo teleport db configure create \
   -o file \
   --token=/tmp/token \
   --proxy=teleport.example.com:443 \
   --name=example-clickhouse \
   --protocol=protocol \
   --uri=clickhouse.example.com:8443 \
   --labels=env=dev
Teleport 데이터베이스 서비스가 커스텀 CA를 신뢰하도록 구성하려면:
-
커스텀 CA의 CA 인증서를 내보내고 Teleport 데이터베이스 서비스 호스트의
/var/lib/teleport/db.ca에서 사용할 수 있도록 만듭니다. -
--ca-cert-file플래그를 사용하는 위 명령의 변형을 실행합니다. 이렇게 하면 Teleport 데이터베이스 서비스가db.ca의 CA 인증서를 사용하여 데이터베이스에서 오는 트래픽을 확인하도록 구성됩니다:$ sudo teleport db configure create \ -o file \ --token=/tmp/token \ --proxy=teleport.example.com:443 \ --name=example-clickhouse \ --protocol=protocol \ --uri=clickhouse.example.com:8443 \ --ca-cert-file="/var/lib/teleport/db.ca" \ --labels=env=dev
systemd 서비스를 생성하여 호스트가 부팅될 때 the Teleport Database Service이 자동으로 시작되도록 구성합니다. 지침은 the Teleport Database Service을 어떻게 설치했는지에 따라 다릅니다.
Package Manager
the Teleport Database Service을 실행할 호스트에서 Teleport를 활성화하고 시작합니다:
$ sudo systemctl enable teleport
$ sudo systemctl start teleport
TAR Archive
the Teleport Database Service을 실행할 호스트에서 Teleport용 systemd 서비스 구성을 생성하고, Teleport 서비스를 활성화한 후 Teleport를 시작합니다:
$ sudo teleport install systemd -o /etc/systemd/system/teleport.service
$ sudo systemctl enable teleport
$ sudo systemctl start teleport
systemctl status teleport로 the Teleport Database Service의 상태를 확인하고 journalctl -fu teleport로
로그를 볼 수 있습니다.
Teleport는 Kubernetes 클러스터에 Teleport 데이터베이스 서비스를 설치하기 위한 Helm 차트를 제공합니다.
Teleport Helm 리포지토리에서 Teleport 차트를 가져오도록 Helm을 구성하십시오.
$ helm repo add teleport (=teleport.helm_repo_url=)
최신 차트를 가져와 로컬 Helm 캐시를 새로 고치십시오.
$ helm repo update
Teleport 데이터베이스 서비스 구성으로 Teleport 에이전트를 Kubernetes 클러스터에 설치합니다.
다음 내용으로 values.yaml 파일을 만듭니다. Teleport Proxy 서비스의 호스트와 포트를 사용하도록 teleport.example.com:443을 업데이트하고, JOIN_TOKEN은 이전에 생성한 조인 토큰으로 설정합니다:
roles: db
proxyAddr: teleport.example.com:443
# Teleport Community Edition을 사용하는 경우 false로 설정
enterprise: true
authToken: JOIN_TOKEN
databases:
  - name: example-clickhouse
    uri: clickhouse.example.com:8443
    protocol: protocol
    static_labels:
      env: dev
Teleport 데이터베이스 서비스가 커스텀 CA를 신뢰하도록 구성하려면:
-
커스텀 CA의 CA 인증서를 내보내고 워크스테이션의
db.ca에서 사용할 수 있도록 만듭니다. -
다음 명령을 사용하여 Teleport와 동일한 네임스페이스에 데이터베이스 CA 인증서를 포함하는 시크릿을 생성합니다:
$ kubectl create secret generic db-ca --from-file=ca.pem=/path/to/db.ca -
values.yaml에 다음을 추가합니다:
  roles: db
  proxyAddr: teleport.example.com:443
  # Teleport Community Edition을 사용하는 경우 false로 설정
  enterprise: true
  authToken: JOIN_TOKEN
  databases:
    - name: example-clickhouse
      uri: clickhouse.example.com:8443
      protocol: <protocol>
+     tls:
+       ca_cert_file: "/etc/teleport-tls-db/db-ca/ca.pem"
      static_labels:
        env: dev
+ extraVolumes:
+   - name: db-ca
+     secret:
+       secretName: db-ca
+ extraVolumeMounts:
+   - name: db-ca
+     mountPath: /etc/teleport-tls-db/db-ca
+     readOnly: true
차트를 설치합니다:
$ helm install teleport-kube-agent teleport/teleport-kube-agent \
  --create-namespace \
  --namespace teleport-agent \
  --version (=teleport.version=) \
  -f values.yaml
Teleport 에이전트 파드가 실행 중인지 확인합니다. 단일 준비 완료 컨테이너가 있는 teleport-kube-agent 파드 하나가
표시되어야 합니다:
$ kubectl -n teleport-agent get pods
NAME                    READY   STATUS    RESTARTS   AGE
teleport-kube-agent-0   1/1     Running   0          32s
하나의 Teleport 프로세스는 여러 서비스를 실행할 수 있습니다. 예를 들어, 여러 Database Service 인스턴스뿐만 아니라 SSH Service나 Application Service와 같은 다른 서비스도 함께 실행할 수 있습니다.
5/5단계. 연결#
데이터베이스 서비스가 클러스터에 합류하면 로그인하여 사용 가능한 데이터베이스를 확인합니다:
Teleport에 로그인하고 연결할 수 있는 데이터베이스를 나열합니다. 이전에 등록한 ClickHouse 데이터베이스가 표시되어야 합니다:
$ tsh login --proxy=teleport.example.com --user=alice
$ tsh db ls
# Name                      Description Allowed Users Labels  Connect
# ------------------------- ----------- ------------- ------- -------
# example-clickhouse-http               [*]           env=dev
GUI 데이터베이스 클라이언트를 통해 ClickHouse에 연결하거나 curl을 통해 요청을 보낼 수 있도록 인증된 프록시 터널을 생성합니다:
$ tsh proxy db --db-user=alice --tunnel example-clickhouse-http
# Started authenticated tunnel for the Clickhouse (HTTP) database "clickhouse-http" in cluster "teleport.example.com" on 127.0.0.1:59215.
# To avoid port randomization, you can choose the listening port using the --port flag.
#
# Use the following command to connect to the database or to the address above using other database GUI/CLI clients:
#   $ curl http://localhost:59215/
연결을 테스트하려면 다음 명령을 실행합니다:
$ echo 'select currentUser();' | curl http://localhost:59215/  --data-binary @-
# alice
데이터베이스에서 로그아웃하고 자격 증명을 제거하려면:
# 특정 데이터베이스 인스턴스의 자격 증명 제거.
$ tsh db logout example-clickhouse-http
# 모든 데이터베이스 인스턴스의 자격 증명 제거.
$ tsh db logout
Teleport에 로그인하고 연결할 수 있는 데이터베이스를 나열합니다. 이전에 등록한 ClickHouse 데이터베이스가 표시되어야 합니다:
$ tsh login --proxy=teleport.example.com --user=alice
$ tsh db ls
# Name                    Description Allowed Users Labels  Connect
# ----------------------- ----------- ------------- ------- -------
# example-clickhouse                  [*]           env=dev
데이터베이스에 연결합니다:
$ tsh db connect --db-user=alice example-clickhouse
# ClickHouse client version 22.7.2.1.
# Connecting to localhost:59502 as user default.
# Connected to ClickHouse server version 23.4.2 revision 54462.
#
# 350ddafd1941 :) select 1;
#
# SELECT 1
#
# Query id: 327cfd34-2fec-4e04-a185-79fc840aa5cf
#
# ┌─1─┐
# │ 1 │
# └───┘
# ↓ Progress: 1.00 rows, 1.00 B (208.59 rows/s., 208.59 B/s.)                                                                                                                                                            (0.0 CPU, 9.19 KB RAM)
# 1 row in set. Elapsed: 0.005 sec.
#
# 350ddafd1941 :)
데이터베이스에서 로그아웃하고 자격 증명을 제거하려면:
# 특정 데이터베이스 인스턴스의 자격 증명 제거.
$ tsh db logout example-clickhouse
# 모든 데이터베이스 인스턴스의 자격 증명 제거.
$ tsh db logout