





Redis Cluster를 사용한 데이터베이스 접근
Teleport v18.10요약
Redis 스탠드얼론을 구성하려면 Redis를 사용한 데이터베이스 접근을 참조하십시오. Teleport는 Teleport Database Service를 통해 Redis cluster에 대한 안전한 접근을 제공할 수 있습니다.
Redis 스탠드얼론을 구성하려면 Redis를 사용한 데이터베이스 접근을 참조하십시오.
Teleport는 Teleport Database Service를 통해 Redis cluster에 대한 안전한 접근을 제공할 수 있습니다. 이를 통해 Teleport RBAC 시스템을 사용한 세분화된 접근 제어가 가능합니다.
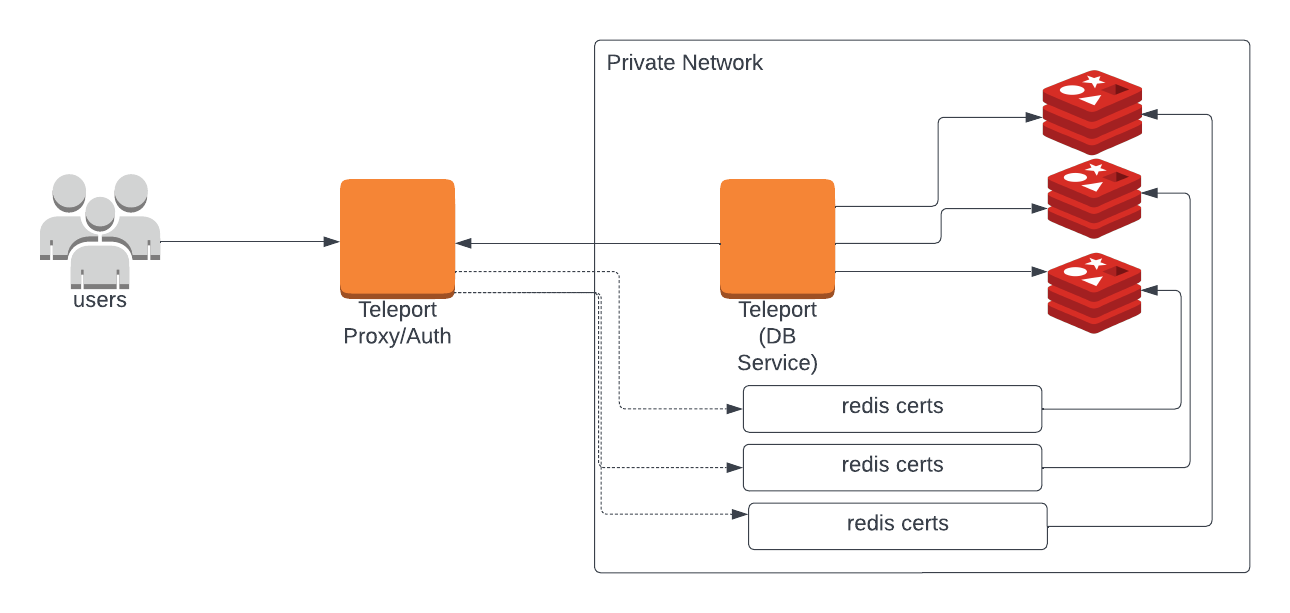
Teleport Database Service는 데이터베이스 클라이언트의 트래픽을 인프라에 있는 자체 호스팅 데이터베이스로 프록시합니다. Teleport는 데이터베이스 클라이언트를 위한 인증 기관(CA)을 유지합니다. 데이터베이스가 Teleport 데이터베이스 클라이언트 CA를 신뢰하도록 구성하면, Teleport Database Service는 사용자 트래픽을 프록시할 때 이 CA로 서명된 인증서를 제시합니다. 이러한 설정을 사용하면 자체 호스팅 데이터베이스에 대한 장기 자격 증명을 저장할 필요가 없습니다.
한편 Teleport Database Service는 자체 호스팅 데이터베이스의 TLS 인증서를 Teleport 데이터베이스 CA 또는 데이터베이스에 사용되는 사용자 지정 CA와 대조하여 데이터베이스를 검증합니다.
이 가이드에서는 다음을 수행합니다.
- Teleport 접근을 위해 Redis cluster 데이터베이스를 구성합니다.
- 데이터베이스를 Teleport 클러스터에 추가합니다.
- Teleport를 통해 데이터베이스에 연결합니다.
동작 원리#
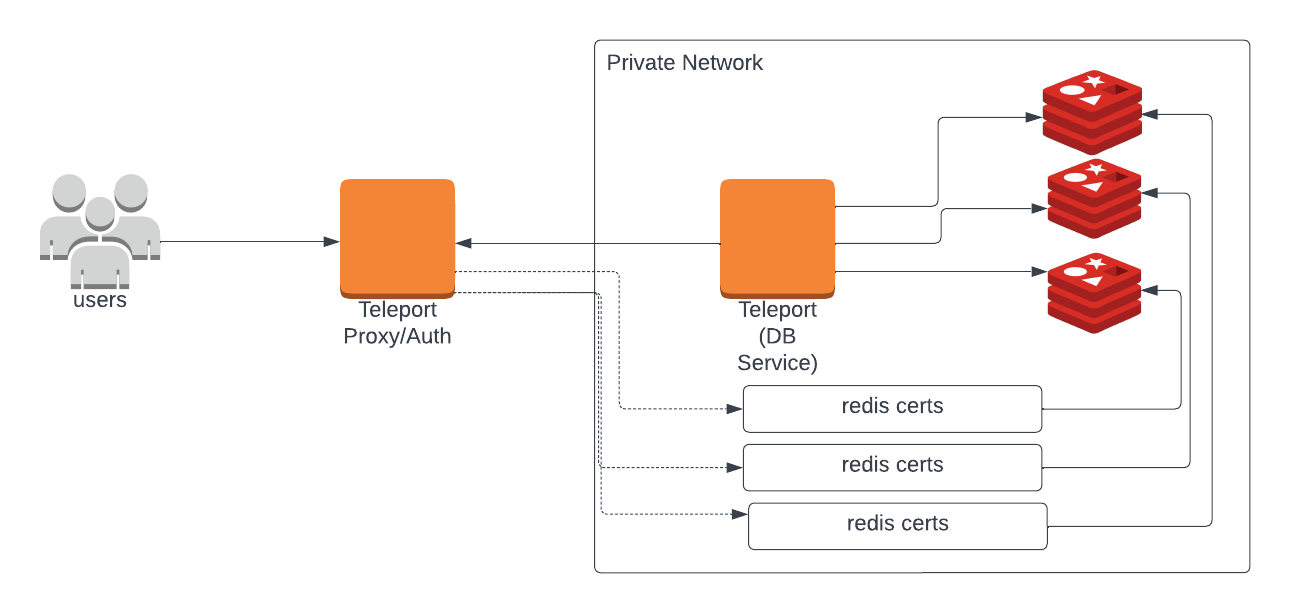
Teleport Database Service는 상호 TLS(mutual TLS)를 사용하여 자체 호스팅된 Redis cluster 데이터베이스에 인증합니다. Redis cluster는 데이터베이스 클라이언트에 대한 Teleport 인증 기관(CA)을 신뢰하며, Teleport 데이터베이스 CA 또는 커스텀 CA가 서명한 인증서를 제시합니다. 사용자가 데이터베이스 세션을 시작하면 Teleport Database Service는 Teleport가 서명한 인증서를 제시합니다. 이후 인증된 연결이 사용자의 클라이언트 트래픽을 프록시합니다.
사전 요구사항#
-
실행 중인 Teleport 클러스터. Teleport를 시작하려면 무료 체험판에 가입하거나 데모 환경을 구성하세요.
-
tctlandtshclients.Installing `tctl` and `tsh` clients
-
Teleport 클러스터의 버전을 확인합니다.
tctlandtshclients는 Teleport 클러스터 버전보다 최대 한 개의 메이저 버전까지만 뒤처질 수 있습니다. Proxy Service의/v1/webapi/find로 GET 요청을 보내고 JSON 쿼리 도구를 사용하여 클러스터 버전을 확인합니다.teleport.example.com:443를 Teleport Proxy Service의 웹 주소로 바꿉니다:$ TELEPORT_DOMAIN=teleport.example.com:443 $ TELEPORT_VERSION="$(curl -s https://$TELEPORT_DOMAIN/v1/webapi/find | jq -r '.server_version')" -
사용 중인 플랫폼에 대한 지침에 따라
tctlandtshclients를 설치합니다:
-
Mac
     `tctl` and `tsh` clients가 포함된, 서명된 Teleport macOS .pkg 설치 프로그램을 다운로드합니다:

     ```code
     $ curl -O https://cdn.teleport.dev/teleport-${TELEPORT_VERSION?}.pkg
     ```

     Finder에서 `pkg` 파일을 더블 클릭하여 설치를 시작합니다.
       Homebrew를 사용하여 Teleport를 설치하는 것은 지원되지 않습니다. Homebrew의
       Teleport 패키지는 Teleport에서 유지 관리하지 않으므로 신뢰성이나 보안을
       보장할 수 없습니다.
Windows - Powershell
     ```code
     $ curl.exe -O https://cdn.teleport.dev/teleport-v${TELEPORT_VERSION?}-windows-amd64-bin.zip
     # Unzip the archive and move the `tctl` and `tsh` clients to your %PATH%
     # NOTE: Do not place the `tctl` and `tsh` clients in the System32 directory, as this can cause issues when using WinSCP.
     # Use %SystemRoot% (C:\Windows) or %USERPROFILE% (C:\Users\<username>) instead.
     ```
Linux
     Linux 설치판의 모든 Teleport 바이너리에는 `tctl` and `tsh` clients가 포함되어 있습니다.  RPM/DEB
     패키지 및 i386/ARM/ARM64용 다운로드를 포함한 더 많은 옵션은
     [설치 페이지](../installation/installation.mdx)를 참조하세요.

     ```code
     $ curl -O https://cdn.teleport.dev/teleport-v${TELEPORT_VERSION?}-linux-amd64-bin.tar.gz
     $ tar -xzf teleport-v${TELEPORT_VERSION?}-linux-amd64-bin.tar.gz
     $ cd teleport
     $ sudo ./install
     # Teleport binaries have been copied to /usr/local/bin
     ```
-
Redis 버전
6.0이상.NoteRESP3 (REdis Serialization Protocol)은 현재 지원되지 않습니다.
-
redis-cli버전6.2이상이 설치되어 시스템의PATH환경 변수에 추가되어 있어야 합니다. -
Teleport Database Service를 실행할 호스트.
-
Redis Cluster의 노드에 서버 인증서를 발급할 인증 기관.
왜 자체 CA가 필요한가요?
Redis Cluster와 같은 분산 데이터베이스는 노드 간 통신에 mTLS를 사용합니다. Teleport는 노드 간 mTLS 통신을 위한 인증서를 발급하려면 자체 CA를 보유해야 한다고 요구합니다.Teleport는 데이터베이스 액세스에 split-CA 아키텍처를 사용합니다. Teleport
dbCA는 서버 인증서를 발급하고db_clientCA는 클라이언트 인증서를 발급합니다.데이터베이스는 클라이언트 인증을 위해 Teleport
db_clientCA는 신뢰하지만dbCA는 신뢰하지 않도록 구성됩니다. 또한 Teleport는 임시(ephemeral)db_clientCA 인증서만 발급합니다.Redis Cluster 노드가 다른 Redis Cluster 노드에 연결할 때, 상대 노드가 클라이언트 인증을 위해 신뢰하는 인증서를 제시해야 합니다. Teleport는 수명이 긴
db_client인증서를 발급하지 않으므로, 노드는 피어 노드가 신뢰하는 다른 CA가 발급한 수명이 긴 인증서를 보유해야 합니다.분할된
db및db_clientCA 아키텍처는 Teleport 버전 (= db_client_ca.released_version.v14 =) 및 (= db_client_ca.released_version.v15 =)에서 보안 수정 사항으로 도입되었습니다.자세한 내용은 Database CA Migrations를 참조하세요.
Teleport cluster에 연결할 수 있는지 확인하려면
tsh login으로 로그인한 다음, 현재 자격 증명으로tctl명령을 실행할 수 있는지 확인합니다.예를 들어,
teleport.example.com에 cluster 내 Teleport Proxy Service의 도메인 이름을,email@example.com에 Teleport 사용자 이름을 지정하여 다음 명령을 실행합니다:$ tsh login --proxy=teleport.example.com --user=email@example.com $ tctl status # Cluster (=teleport.url=) # Version (=teleport.version=) # CA pin (=presets.ca_pin=)cluster에 연결하여
tctl status명령을 실행할 수 있다면, 현재 자격 증명을 사용하여 워크스테이션에서 이후의tctl명령을 실행할 수 있습니다. 자체 Teleport cluster를 호스팅하는 경우, 전체 권한을 얻기 위해 Teleport Auth Service를 호스팅하는 컴퓨터에서tctl명령을 실행할 수도 있습니다.1/6단계. Teleport Database Service 설정#
Database Service가 Teleport 클러스터에 조인하려면 유효한 조인 토큰이 필요합니다. 다음
tctl명령을 실행하고 Database Service를 실행할 서버에서 토큰 출력을/tmp/token에 저장합니다:$ tctl tokens add --type=db --format=text (=presets.tokens.first=)Teleport Database Service를 실행할 위치에 Teleport를 설치하고 구성합니다:
Linux 서버에 Teleport Agent를 설치하려면:
권장 설치 방법은 클러스터 설치 스크립트입니다. 이 스크립트는 클러스터에 맞는 올바른 버전, 에디션, 설치 모드를 선택합니다.
-
teleport.example.com:443에 Teleport 클러스터의 호스트명과 포트를 할당하되, 스킴(https://)은 포함하지 마십시오. -
클러스터의 설치 스크립트를 실행하십시오:
$ curl "https://teleport.example.com:443/scripts/install.sh" | sudo bash
Teleport Database Service를 실행할 호스트에서 적절한 구성으로 Teleport를 시작합니다.
단일 Teleport 프로세스는 여러 개의 서로 다른 서비스를 실행할 수 있습니다. 예를 들어 여러 개의 Database Service 에이전트뿐만 아니라 SSH Service나 Application Service도 함께 실행할 수 있습니다. 아래 단계는 기존 구성 파일을 덮어쓰므로, 여러 서비스를 실행 중이라면
--output=stdout를 추가하여 터미널에 구성을 출력한 다음/etc/teleport.yaml을 수동으로 조정합니다.Database Service를 위한 구성 파일을
/etc/teleport.yaml에 생성합니다:Teleport Enterprise/Enterprise Cloud
$ sudo teleport db configure create \
   -o file \
   --token=/tmp/token \
   --proxy=teleport.example.com:443 \
   --name=example-redis \
   --protocol=redis \
   --uri=rediss://redis.example.com:6379?mode=cluster \
   --labels=env=dev
Teleport Community Edition
$ sudo teleport db configure create \
   -o file \
   --token=/tmp/token \
   --proxy=mytenant.teleport.sh:443 \
   --name=example-redis \
   --protocol=redis \
   --uri=rediss://redis.example.com:6379?mode=cluster \
   --labels=env=dev
systemd 서비스를 생성하여 호스트가 부팅될 때 the Teleport Database Service이 자동으로 시작되도록 구성합니다. 지침은 the Teleport Database Service을 어떻게 설치했는지에 따라 다릅니다.
Package Manager
the Teleport Database Service을 실행할 호스트에서 Teleport를 활성화하고 시작합니다:
$ sudo systemctl enable teleport
$ sudo systemctl start teleport
TAR Archive
the Teleport Database Service을 실행할 호스트에서 Teleport용 systemd 서비스 구성을 생성하고, Teleport 서비스를 활성화한 후 Teleport를 시작합니다:
$ sudo teleport install systemd -o /etc/systemd/system/teleport.service
$ sudo systemctl enable teleport
$ sudo systemctl start teleport
systemctl status teleport로 the Teleport Database Service의 상태를 확인하고journalctl -fu teleport로 로그를 볼 수 있습니다.Teleport는 Kubernetes 클러스터에 Teleport Database Service를 설치하기 위한 Helm 차트를 제공합니다.
Teleport Helm 리포지토리에서 Teleport 차트를 가져오도록 Helm을 구성하십시오.
$ helm repo add teleport (=teleport.helm_repo_url=)최신 차트를 가져와 로컬 Helm 캐시를 새로 고치십시오.
$ helm repo updateSelf-Hosted
Teleport Database Service 구성으로 Teleport Kube Agent를 Kubernetes 클러스터에 설치합니다.
$ JOIN_TOKEN=$(cat /tmp/token)
$ helm install teleport-kube-agent teleport/teleport-kube-agent \
  --create-namespace \
  --namespace teleport-agent \
  --set roles=db \
  --set proxyAddr=teleport.example.com:443 \
  --set authToken=${JOIN_TOKEN?} \
  --set "databases[0].name=example-redis" \
  --set "databases[0].uri=rediss://redis.example.com:6379?mode=cluster" \
  --set "databases[0].protocol=redis" \
  --set "databases[0].static_labels.env=dev" \
  --version (=teleport.version=)
Cloud-Hosted
Teleport Database Service 구성으로 Teleport Kube Agent를 Kubernetes 클러스터에 설치합니다.
$ JOIN_TOKEN=$(cat /tmp/token)
$ helm install teleport-kube-agent teleport/teleport-kube-agent \
  --create-namespace \
  --namespace teleport-agent \
  --set roles=db \
  --set proxyAddr=mytenant.teleport.sh:443 \
  --set authToken=${JOIN_TOKEN?} \
  --set "databases[0].name=example-redis" \
  --set "databases[0].uri=rediss://redis.example.com:6379?mode=cluster" \
  --set "databases[0].protocol=redis" \
  --set "databases[0].static_labels.env=dev" \
  --version (=cloud.version=)
Teleport Agent 파드가 실행 중인지 확인합니다. 준비된 컨테이너가 하나 있는
teleport-kube-agent파드 하나가 표시되어야 합니다:$ kubectl -n teleport-agent get pods NAME READY STATUS RESTARTS AGE teleport-kube-agent-0 1/1 Running 0 32sTip하나의 Teleport 프로세스는 여러 서비스를 실행할 수 있습니다. 예를 들어, 여러 Database Service 인스턴스뿐만 아니라 SSH Service나 Application Service와 같은 다른 서비스도 함께 실행할 수 있습니다.
2/6단계. Teleport 사용자 생성#
Tip기존 사용자를 수정하여 Database Service 접근 권한을 부여하려면 Database Access Controls를 참조하십시오.
Teleport Community Edition
내장
access역할을 가진 로컬 Teleport 사용자를 생성합니다:$ tctl users add \ --roles=access \ --db-users="*" \ --db-names="*" \ aliceTeleport Enterprise/Enterprise Cloud
내장
access및requester역할을 가진 로컬 Teleport 사용자를 생성합니다:$ tctl users add \ --roles=access,requester \ --db-users="*" \ --db-names="*" \ aliceFlag 설명 --roles사용자에게 할당할 역할 목록입니다. 내장 access역할은 Teleport에 등록된 모든 데이터베이스 서버에 연결할 수 있게 합니다.--db-users사용자가 데이터베이스에 연결할 때 사용할 수 있는 데이터베이스 사용자명 목록입니다. 와일드카드는 모든 사용자를 허용합니다. --db-names사용자가 데이터베이스 서버 내에서 연결할 수 있는 논리적 데이터베이스(즉, 스키마) 목록입니다. 와일드카드는 모든 데이터베이스를 허용합니다. Warning데이터베이스 이름은 PostgreSQL, MongoDB, Cloud Spanner 데이터베이스에서만 적용됩니다.
데이터베이스 접근 제어 및 접근 제한 방법에 대한 자세한 정보는 RBAC 문서를 참조하십시오.
3/6단계. Redis 사용자 생성#
각 Redis 사용자는 강력한 비밀번호로 보호되어야 합니다. 비밀번호 생성에는 OpenSSL 사용을 권장합니다:
openssl rand -hex 32NoteRedis에 접근할 수 있다면 Redis 콘솔에서 아래 명령을 사용하여 비밀번호를 생성할 수도 있습니다:
ACL GENPASSRedis 배포의 사용자, 특정 사용자로 로그인하는 데 필요한 비밀번호, 그리고 ACL 규칙 집합을 정의하는
users.acl파일을 생성합니다. Redis는 비밀번호를 평문 또는 SHA256 해시로 제공할 수 있게 합니다. 평문 비밀번호 대신 SHA256 해시를 사용할 것을 강력히 권장합니다.아래 명령을 사용하여 비밀번호로부터 SHA256 해시를 생성할 수 있습니다.
echo -n STRONG_GENERATED_PASSWORD | sha256sumuser alice on #57639ed88a85996453555f22f5aa4147b4c9614056585d931e5d976f610651e9 allcommands allkeys user default off더 많은 ACL 예시는 Redis 문서를 참조하십시오.
Warningdefault사용자를 비활성화하거나 비밀번호로 보호하는 것이 매우 중요합니다. 그렇지 않으면 데이터베이스에 접근할 수 있는 모든 사람이 기본적으로 관리자 권한을 가진default사용자로 로그인할 수 있습니다.4/6단계. 상호 TLS 설정#
Teleport 클러스터의
db_clientCA 인증서를 내보내고 Redis Cluster의 CA 인증서(PEM 형식)와 연결하여/path/to/your/ca.crt에 CA 인증서 경로를 할당합니다:$ tctl auth export --type=db-client > db-client-ca.crt $ cat /path/to/your/ca.crt db-client-ca.crt > pem-bundle.casRedis Cluster의 CA를 사용하여 각 Redis Cluster 노드에 대한
server.crt를 발급하고redis.conf구성 파일에서 상호 TLS를 활성화한 다음 각 노드를 재시작합니다:tls-port 7001 port 0 cluster-enabled yes tls-replication yes tls-cluster yes aclfile /path/to/users.acl masterauth GENERATED_STRONG_PASSWORD masteruser replica-user tls-cert-file /usr/local/etc/redis/certs/server.crt tls-key-file /usr/local/etc/redis/certs/server.key tls-ca-cert-file /usr/local/etc/redis/certs/pem-bundle.cas tls-protocols "TLSv1.2 TLSv1.3"상호 TLS가 활성화되면 유효한 클라이언트 인증서 없이는 더 이상 클러스터에 연결할 수 없습니다.
tls-auth-clients optional설정을 사용하면 인증서를 제공하지 않는 클라이언트의 연결을 허용할 수 있습니다.자세한 내용은 Redis 문서의 TLS 지원을 참조하십시오.
Teleport Database Service가 사용자의 Redis Cluster CA를 신뢰하도록 수정하고,
/path/to/your/ca.crt에 사용자의 CA 인증서 경로를 할당하십시오:databases: - name: "example-redis" protocol: "redis" uri: "rediss://redis.example.com:6379?mode=cluster" static_labels: "env": "example" tls: ca_cert_file: "/path/to/your/ca.crt"이제 Teleport Database Service는 사용자의 Redis Cluster가 제시하는 인증서를 신뢰합니다.
5/6단계. 클러스터 생성#
상호 TLS가 활성화된 후 클러스터를 생성하려면 Redis 노드가 클라이언트 인증에 신뢰하는 인증서를 사용해야 합니다. 노드 중 하나에 이미 발급된 인증서(예:
server.crt)를 사용하거나 Redis Cluster CA를 사용하여 새 클라이언트 인증서를 발급할 수 있습니다.다음 명령을 사용하여 클러스터를 생성합니다.
redis-cli --cluster create는 IP 주소만 허용합니다.$ export REDISCLI_AUTH=STRONG_GENERATED_PASSWORD $ export CERTS_DIR=/path/to/certs/ $ export IP1=10.0.0.1 # 실제 노드 1 IP로 업데이트 $ export IP2=10.0.0.2 # 실제 노드 2 IP로 업데이트 $ export IP3=10.0.0.3 # 실제 노드 3 IP로 업데이트 $ export IP4=10.0.0.4 # 실제 노드 4 IP로 업데이트 $ export IP5=10.0.0.5 # 실제 노드 5 IP로 업데이트 $ export IP6=10.0.0.6 # 실제 노드 6 IP로 업데이트 $ redis-cli --user alice --cluster-replicas 1 --tls --cluster-yes \ --cluster create ${IP1}:7001 ${IP2}:7002 ${IP3}:7003 ${IP4}:7004 ${IP5}:7005 ${IP6}:7006 \ --cacert ${CERTS_DIR}/ca.crt --key ${CERTS_DIR}/server.key --cert ${CERTS_DIR}/server.crt6/6단계. 연결#
Teleport에서 Redis 클러스터 모드를 활성화하려면 Teleport Database Service 구성 파일의 연결 URI에
mode=cluster매개변수를 추가합니다.databases: - name: "redis-cluster" uri: "rediss://redis.example.com:6379?mode=cluster"Teleport 클러스터에 로그인하고 사용 가능한 데이터베이스를 확인합니다:
Self-Hosted
```code
$ tsh login --proxy=teleport.example.com --user=alice
$ tsh db ls
# Name          Description     Labels
# ------------- --------------- --------
# example-redis Example Redis   env=dev
```
Cloud-Hosted
```code
$ tsh login --proxy=mytenant.teleport.sh --user=alice
$ tsh db ls
# Name          Description     Labels
# ------------- --------------- --------
# example-redis Example Redis   env=dev
```
특정 데이터베이스 인스턴스에 연결하려면:
$ tsh db connect example-redis데이터베이스 인스턴스에 연결할 때 기본적으로 사용할 데이터베이스 사용자를 선택적으로 지정할 수 있습니다:
$ tsh db connect --db-user=alice example-redis--db-user플래그가 제공되지 않으면, Teleport는default사용자로 로그인합니다.이제 아래 명령을 사용하여 이전에 생성한 사용자로 로그인할 수 있습니다:
AUTH alice STRONG_GENERATED_PASSWORD데이터베이스에서 로그아웃하고 자격 증명을 제거하려면:
# Remove credentials for a particular database instance.
$ tsh db logout example-redis
# Remove credentials for all database instances.
$ tsh db logout
지원되는 Redis Cluster 명령어#
클러스터 모드의 Redis는 다음 명령어를 지원하지 않습니다. 위에 나열된 명령어 중 하나가 호출되면 Teleport는
ERR Teleport: command not supported지원되지 않는 명령어
- `ACL` - `ASKING` - `CLIENT` - `CLUSTER` - `CONFIG` - `DEBUG` - `EXEC` - `HELLO` - `INFO` - `LATENCY` - `MEMORY` - `MIGRATE` - `MODULE` - `MONITOR` - `MULTI` - `PFDEBUG` - `PFSELFTEST` - `PSUBSCRIBE` - `PSYNC` - `PUNSUBSCRIBE` - `READONLY` - `READWRITE` - `REPLCONF` - `REPLICAOF` - `ROLE` - `SCAN` - `SCRIPT DEBUG` - `SCRIPT KILL` - `SHUTDOWN` - `SLAVEOF` - `SLOWLOG` - `SSUBSCRIBE` - `SUNSUBSCRIBE` - `SYNC` - `TIME` - `WAIT` - `WATCH`Teleport는 Redis Cluster와 통신하기 전에 다음 명령어에 대해 추가 처리를 수행합니다:
명령어 설명 DBSIZE모든 노드에 쿼리를 보내고 전체 클러스터의 키 수를 반환합니다. KEYS모든 노드에 쿼리를 보내고 전체 클러스터의 모든 키 목록을 반환합니다. MGET명령어를 여러 GET으로 변환하여 여러 노드로 보냅니다. 결과는 Teleport에서 병합되어 클라이언트로 반환됩니다. Teleport가 최소 하나의 키를 가져오지 못하면 오류가 반환됩니다.FLUSHDB모든 노드에 쿼리를 보냅니다. FLUSHALLFLUSHDB와 동일하게 작동합니다.SCRIPT EXISTS모든 노드에 쿼리를 보냅니다. 모든 노드에 스크립트가 있는 경우에만 1이 반환됩니다.SCRIPT LOAD모든 노드에 스크립트를 보냅니다. SCRIPT FLUSH모든 노드에 쿼리를 보냅니다. ASYNC매개변수는 무시됩니다.다음 단계#
-