





InfoGrab DocsInfoGrab Docs

SSE MCP 서버로 MCP 접근하기

요약

Teleport는 SSE 전송 방식을 사용하는 MCP 서버에 대해 안전한 접근을 제공할 수 있습니다. 이 가이드에서는 다음 방법을 다룹니다: 사용자는 Claude Desktop과 같은 MCP 클라이언트를 구성하여 tsh를 사용해 MCP 서버를 시작할 수 있습니다.

Teleport는 SSE 전송 방식을 사용하는 MCP 서버에 대해 안전한 접근을 제공할 수 있습니다.

이 가이드에서는 다음 방법을 다룹니다:

  • SSE 전송 방식을 사용하는 MCP 서버를 Teleport 클러스터에 등록하는 방법.
  • Teleport를 통해 SSE MCP 서버에 연결하는 방법.

작동 방식#
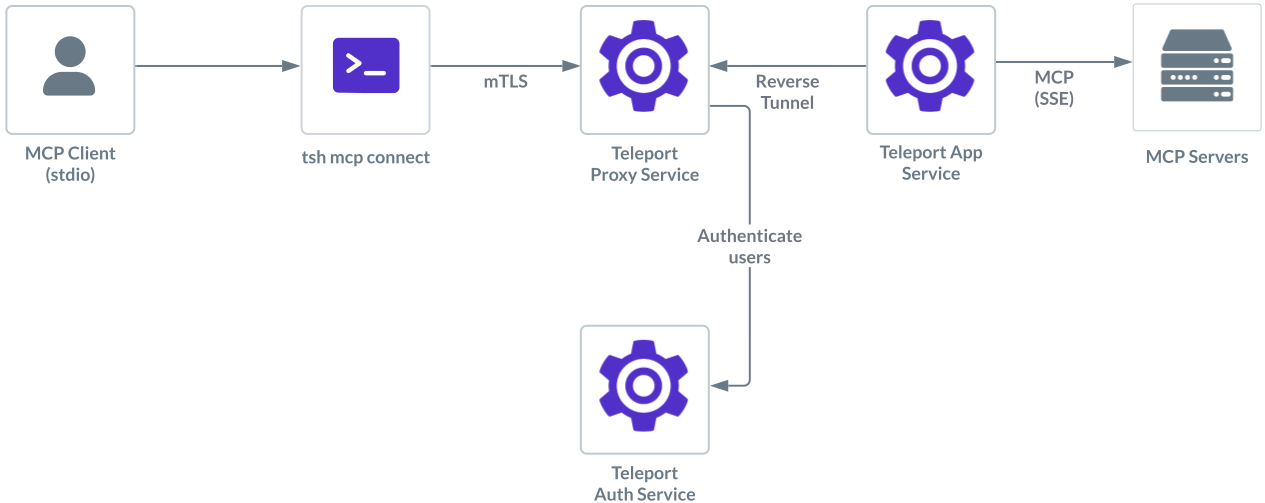
작동 방식

사용자는 Claude Desktop과 같은 MCP 클라이언트를 구성하여 tsh를 사용해 MCP 서버를 시작할 수 있습니다. 인가에 성공하면 tsh는 Application Service와 세션을 수립합니다.

Teleport Application Service는 먼저 애플리케이션 정의에 지정된 원격 MCP 서버로 SSE 연결을 시작합니다. 이후 Teleport는 클라이언트와 원격 MCP 서버 간의 MCP 프로토콜을 프록시하면서, 사용자에게 제공되는 도구를 필터링하는 등 역할 기반 접근 제어를 추가로 적용합니다. 프록시하는 동안 Teleport는 MCP 프로토콜 요청을 감사 이벤트로도 기록하여 사용자 활동에 대한 가시성을 제공합니다.

Warning

HTTP를 통한 SSE 전송 방식은 MCP 사양 버전 2025-03-26에서 지원 중단 (deprecated)되었습니다. MCP 서버를 streamable-HTTP 전송 방식을 사용하도록 업데이트하는 것이 권장됩니다.

사전 요구 사항#

  • 실행 중인 Teleport (v18.3.0 or higher) 클러스터. Teleport를 시작하려면 무료 체험판에 가입하거나 데모 환경을 구성하세요.

  • tctl and tsh clients.

    Installing `tctl` and `tsh` clients
    1. Teleport 클러스터의 버전을 확인합니다. tctl and tsh clients는 Teleport 클러스터 버전보다 최대 한 개의 메이저 버전까지만 뒤처질 수 있습니다. Proxy Service의 /v1/webapi/find로 GET 요청을 보내고 JSON 쿼리 도구를 사용하여 클러스터 버전을 확인합니다. teleport.example.com:443를 Teleport Proxy Service의 웹 주소로 바꿉니다:

      $ TELEPORT_DOMAIN=teleport.example.com:443
      $ TELEPORT_VERSION="$(curl -s https://$TELEPORT_DOMAIN/v1/webapi/find | jq -r '.server_version')"
      
    2. 사용 중인 플랫폼에 대한 지침에 따라 tctl and tsh clients를 설치합니다:

Mac

     `tctl` and `tsh` clients가 포함된, 서명된 Teleport macOS .pkg 설치 프로그램을 다운로드합니다:
 
     ```code
     $ curl -O https://cdn.teleport.dev/teleport-${TELEPORT_VERSION?}.pkg
     ```

     Finder에서 `pkg` 파일을 더블 클릭하여 설치를 시작합니다.
 
     
Warning
       Homebrew를 사용하여 Teleport를 설치하는 것은 지원되지 않습니다. Homebrew의
       Teleport 패키지는 Teleport에서 유지 관리하지 않으므로 신뢰성이나 보안을
       보장할 수 없습니다.
     

Windows - Powershell

     ```code
     $ curl.exe -O https://cdn.teleport.dev/teleport-v${TELEPORT_VERSION?}-windows-amd64-bin.zip
     # Unzip the archive and move the `tctl` and `tsh` clients to your %PATH%
     # NOTE: Do not place the `tctl` and `tsh` clients in the System32 directory, as this can cause issues when using WinSCP.
     # Use %SystemRoot% (C:\Windows) or %USERPROFILE% (C:\Users\<username>) instead.
     ```


Linux

     Linux 설치판의 모든 Teleport 바이너리에는 `tctl` and `tsh` clients가 포함되어 있습니다.  RPM/DEB
     패키지 및 i386/ARM/ARM64용 다운로드를 포함한 더 많은 옵션은
     [설치 페이지](../installation/installation.mdx)를 참조하세요.
 
     ```code
     $ curl -O https://cdn.teleport.dev/teleport-v${TELEPORT_VERSION?}-linux-amd64-bin.tar.gz
     $ tar -xzf teleport-v${TELEPORT_VERSION?}-linux-amd64-bin.tar.gz
     $ cd teleport
     $ sudo ./install
     # Teleport binaries have been copied to /usr/local/bin
     ```


  • Teleport Application Service를 실행할 호스트(예: EC2 인스턴스).
  • SSE MCP 서버의 엔드포인트 http://my-sse-server/sse.

1/3단계. Teleport Application Service 구성#

MCP 서버를 활성화하려면 기존 Application Service를 업데이트하거나 새로 생성할 수 있습니다.

Update an existing service

이미 실행 중인 Application Service가 있는 경우, YAML 구성에 MCP 서버를 추가할 수 있습니다:

app_service:
  enabled: true
  apps:
  - name: "everything"
    uri: "mcp+sse+MCP endpoint"
    labels:
      env: dev
    description:

Create a new service

Join Token 가져오기#

Application Service가 Teleport 클러스터에 조인하려면 유효한 조인 토큰이 필요합니다. 다음 tctl 명령을 실행하고 Application Service를 실행할 서버에서 토큰 출력을 /tmp/token에 저장합니다:

$ tctl tokens add --type=app --format=text
(=presets.tokens.first=)
대체 방법

AWS에 많은 인프라를 보유하고 있거나 많은 인스턴스를 생성 또는 재생성할 수 있는 사용자의 경우, Teleport를 실행하는 새 EC2 인스턴스를 조인하는 대체 방법을 고려하십시오:

Teleport Application Service 설치#

Teleport Application Service를 실행할 호스트에 Teleport를 설치합니다:

Linux 서버에 Teleport Agent를 설치하려면:

권장 설치 방법은 클러스터 설치 스크립트입니다. 이 스크립트는 클러스터에 맞는 올바른 버전, 에디션, 설치 모드를 선택합니다.

  1. teleport.example.com:443에 Teleport 클러스터의 호스트명과 포트를 할당하되, 스킴(https://)은 포함하지 마십시오.

  2. 클러스터의 설치 스크립트를 실행하십시오:

    $ curl "https://teleport.example.com:443/scripts/install.sh" | sudo bash
    

Teleport Application Service 구성#

Teleport Application Service를 실행할 호스트에서 다음 내용으로 /etc/teleport.yaml 파일을 생성합니다:

version: v3
teleport:
  join_params:
    token_name: "/tmp/token"
    method: token
  proxy_server: "teleport.example.com:443"
auth_service:
  enabled: false
proxy_service:
  enabled: false
ssh_service:
  enabled: false
app_service:
  enabled: true
  apps:
  - name: "everything"
    uri: "mcp+sse+MCP endpoint"
    labels:
      env: dev
    description:

teleport.example.com:443를 Teleport Proxy Service 또는 Teleport Cloud 테넌트의 호스트와 포트로 바꾸고, MCP 세부 정보를 실행하려는 MCP 서버로 바꿉니다.

Teleport Application Service 시작#

systemd 서비스를 생성하여 호스트가 부팅될 때 the Application Service이 자동으로 시작되도록 구성합니다. 지침은 the Application Service을 어떻게 설치했는지에 따라 다릅니다.

Package Manager

the Application Service을 실행할 호스트에서 Teleport를 활성화하고 시작합니다:

$ sudo systemctl enable teleport
$ sudo systemctl start teleport

TAR Archive

the Application Service을 실행할 호스트에서 Teleport용 systemd 서비스 구성을 생성하고, Teleport 서비스를 활성화한 후 Teleport를 시작합니다:

$ sudo teleport install systemd -o /etc/systemd/system/teleport.service
$ sudo systemctl enable teleport
$ sudo systemctl start teleport

systemctl status teleport로 the Application Service의 상태를 확인하고 journalctl -fu teleport로 로그를 볼 수 있습니다.

2/3단계. Teleport 사용자 구성#

이 단계에서는 Teleport 사용자에게 모든 MCP 서버와 그 MCP 도구에 대한 액세스 권한을 부여합니다.

Configure an existing user

기존 Teleport 사용자가 있다면 해당 사용자에게 사전 설정 role인 mcp-user를 할당합니다. mcp-user role은 모든 MCP 서버와 그 도구에 대한 액세스를 허용합니다:

kind: role
version: v8
metadata:
  description: Access to MCP servers
  labels:
    teleport.internal/resource-type: preset
  name: mcp-user
spec:
  allow:
    app_labels:
      'teleport.internal/app-sub-kind': 'mcp'
    mcp:
      tools:
      - '*'

또는 위의 allow 권한을 기존 Teleport role에 추가할 수도 있습니다.

Create a new user

MCP 액세스 권한을 가진 my_user라는 새 로컬 사용자를 생성합니다:

$ tctl users add my_user --roles=mcp-user
Tip

Web UI를 사용하여 역할을 생성하고 편집할 수도 있습니다. Access -> Roles로 이동하여 Create New Role을 클릭하거나 편집할 기존 역할을 선택하십시오.

3/3단계. 연결#

방금 생성한 사용자 my_user로 Teleport에 로그인합니다:

$ tsh login --proxy=teleport.example.com:443 --user=my_user

이제 사용 가능한 MCP 서버를 확인할 수 있습니다:

$ tsh mcp ls
Name       Description           Type  Labels
---------- --------------------- ----- ----------
everything everything MCP server SSE   env=dev

MCP 클라이언트가 연결할 수 있도록 구성을 표시하려면 다음을 실행합니다.

$ tsh mcp config everything
Found MCP servers:
everything

Here is a sample JSON configuration for launching Teleport MCP servers:
{
  "mcpServers": {
    "teleport-mcp-everything": {
      "command": "/path/to/tsh",
      "args": ["mcp", "connect", "everything"]
    }
  }
}

Tip: You can use this command to update your MCP servers configuration file automatically.
- For Claude Desktop, use --client-config=claude to update the default configuration.
- For Cursor, use --client-config=cursor to update the global MCP servers configuration.
In addition, you can use --client-config=<path> to specify a config file location that is compatible with the "mcpServers" mapping.
For example, you can update a Cursor project using --client-config=<path-to-project>/.cursor/mcp.json

MCP 클라이언트 구성이 업데이트되면, MCP 클라이언트에 허용된 도구와 함께 teleport-mcp-everything MCP 서버가 나타나는 것을 확인할 수 있습니다.

다음 단계#

다음 주제에서 Teleport로 MCP 서버를 보호하는 방법에 대해 자세히 알아보세요:

SSE MCP 서버로 MCP 접근하기

Teleport v18.9
원문 보기
요약

Teleport는 SSE 전송 방식을 사용하는 MCP 서버에 대해 안전한 접근을 제공할 수 있습니다. 이 가이드에서는 다음 방법을 다룹니다: 사용자는 Claude Desktop과 같은 MCP 클라이언트를 구성하여 tsh를 사용해 MCP 서버를 시작할 수 있습니다.

Teleport는 SSE 전송 방식을 사용하는 MCP 서버에 대해 안전한 접근을 제공할 수 있습니다.

이 가이드에서는 다음 방법을 다룹니다:

  • SSE 전송 방식을 사용하는 MCP 서버를 Teleport 클러스터에 등록하는 방법.
  • Teleport를 통해 SSE MCP 서버에 연결하는 방법.

작동 방식#

작동 방식

사용자는 Claude Desktop과 같은 MCP 클라이언트를 구성하여 tsh를 사용해 MCP 서버를 시작할 수 있습니다. 인가에 성공하면 tsh는 Application Service와 세션을 수립합니다.

Teleport Application Service는 먼저 애플리케이션 정의에 지정된 원격 MCP 서버로 SSE 연결을 시작합니다. 이후 Teleport는 클라이언트와 원격 MCP 서버 간의 MCP 프로토콜을 프록시하면서, 사용자에게 제공되는 도구를 필터링하는 등 역할 기반 접근 제어를 추가로 적용합니다. 프록시하는 동안 Teleport는 MCP 프로토콜 요청을 감사 이벤트로도 기록하여 사용자 활동에 대한 가시성을 제공합니다.

Warning

HTTP를 통한 SSE 전송 방식은 MCP 사양 버전 2025-03-26에서 지원 중단 (deprecated)되었습니다. MCP 서버를 streamable-HTTP 전송 방식을 사용하도록 업데이트하는 것이 권장됩니다.

사전 요구 사항#

  • 실행 중인 Teleport (v18.3.0 or higher) 클러스터. Teleport를 시작하려면 무료 체험판에 가입하거나 데모 환경을 구성하세요.

  • tctl and tsh clients.

    Installing `tctl` and `tsh` clients
    1. Teleport 클러스터의 버전을 확인합니다. tctl and tsh clients는 Teleport 클러스터 버전보다 최대 한 개의 메이저 버전까지만 뒤처질 수 있습니다. Proxy Service의 /v1/webapi/find로 GET 요청을 보내고 JSON 쿼리 도구를 사용하여 클러스터 버전을 확인합니다. teleport.example.com:443를 Teleport Proxy Service의 웹 주소로 바꿉니다:

      $ TELEPORT_DOMAIN=teleport.example.com:443
      $ TELEPORT_VERSION="$(curl -s https://$TELEPORT_DOMAIN/v1/webapi/find | jq -r '.server_version')"
      
    2. 사용 중인 플랫폼에 대한 지침에 따라 tctl and tsh clients를 설치합니다:

Mac

     `tctl` and `tsh` clients가 포함된, 서명된 Teleport macOS .pkg 설치 프로그램을 다운로드합니다:
 
     ```code
     $ curl -O https://cdn.teleport.dev/teleport-${TELEPORT_VERSION?}.pkg
     ```

     Finder에서 `pkg` 파일을 더블 클릭하여 설치를 시작합니다.
 
     
Warning
       Homebrew를 사용하여 Teleport를 설치하는 것은 지원되지 않습니다. Homebrew의
       Teleport 패키지는 Teleport에서 유지 관리하지 않으므로 신뢰성이나 보안을
       보장할 수 없습니다.
     

Windows - Powershell

     ```code
     $ curl.exe -O https://cdn.teleport.dev/teleport-v${TELEPORT_VERSION?}-windows-amd64-bin.zip
     # Unzip the archive and move the `tctl` and `tsh` clients to your %PATH%
     # NOTE: Do not place the `tctl` and `tsh` clients in the System32 directory, as this can cause issues when using WinSCP.
     # Use %SystemRoot% (C:\Windows) or %USERPROFILE% (C:\Users\<username>) instead.
     ```


Linux

     Linux 설치판의 모든 Teleport 바이너리에는 `tctl` and `tsh` clients가 포함되어 있습니다.  RPM/DEB
     패키지 및 i386/ARM/ARM64용 다운로드를 포함한 더 많은 옵션은
     [설치 페이지](../installation/installation.mdx)를 참조하세요.
 
     ```code
     $ curl -O https://cdn.teleport.dev/teleport-v${TELEPORT_VERSION?}-linux-amd64-bin.tar.gz
     $ tar -xzf teleport-v${TELEPORT_VERSION?}-linux-amd64-bin.tar.gz
     $ cd teleport
     $ sudo ./install
     # Teleport binaries have been copied to /usr/local/bin
     ```


  • Teleport Application Service를 실행할 호스트(예: EC2 인스턴스).
  • SSE MCP 서버의 엔드포인트 http://my-sse-server/sse.

1/3단계. Teleport Application Service 구성#

MCP 서버를 활성화하려면 기존 Application Service를 업데이트하거나 새로 생성할 수 있습니다.

Update an existing service

이미 실행 중인 Application Service가 있는 경우, YAML 구성에 MCP 서버를 추가할 수 있습니다:

app_service:
  enabled: true
  apps:
  - name: "everything"
    uri: "mcp+sse+MCP endpoint"
    labels:
      env: dev
    description:

Create a new service

Join Token 가져오기#

Application Service가 Teleport 클러스터에 조인하려면 유효한 조인 토큰이 필요합니다. 다음 tctl 명령을 실행하고 Application Service를 실행할 서버에서 토큰 출력을 /tmp/token에 저장합니다:

$ tctl tokens add --type=app --format=text
(=presets.tokens.first=)
대체 방법

AWS에 많은 인프라를 보유하고 있거나 많은 인스턴스를 생성 또는 재생성할 수 있는 사용자의 경우, Teleport를 실행하는 새 EC2 인스턴스를 조인하는 대체 방법을 고려하십시오:

Teleport Application Service 설치#

Teleport Application Service를 실행할 호스트에 Teleport를 설치합니다:

Linux 서버에 Teleport Agent를 설치하려면:

권장 설치 방법은 클러스터 설치 스크립트입니다. 이 스크립트는 클러스터에 맞는 올바른 버전, 에디션, 설치 모드를 선택합니다.

  1. teleport.example.com:443에 Teleport 클러스터의 호스트명과 포트를 할당하되, 스킴(https://)은 포함하지 마십시오.

  2. 클러스터의 설치 스크립트를 실행하십시오:

    $ curl "https://teleport.example.com:443/scripts/install.sh" | sudo bash
    

Teleport Application Service 구성#

Teleport Application Service를 실행할 호스트에서 다음 내용으로 /etc/teleport.yaml 파일을 생성합니다:

version: v3
teleport:
  join_params:
    token_name: "/tmp/token"
    method: token
  proxy_server: "teleport.example.com:443"
auth_service:
  enabled: false
proxy_service:
  enabled: false
ssh_service:
  enabled: false
app_service:
  enabled: true
  apps:
  - name: "everything"
    uri: "mcp+sse+MCP endpoint"
    labels:
      env: dev
    description:

teleport.example.com:443를 Teleport Proxy Service 또는 Teleport Cloud 테넌트의 호스트와 포트로 바꾸고, MCP 세부 정보를 실행하려는 MCP 서버로 바꿉니다.

Teleport Application Service 시작#

systemd 서비스를 생성하여 호스트가 부팅될 때 the Application Service이 자동으로 시작되도록 구성합니다. 지침은 the Application Service을 어떻게 설치했는지에 따라 다릅니다.

Package Manager

the Application Service을 실행할 호스트에서 Teleport를 활성화하고 시작합니다:

$ sudo systemctl enable teleport
$ sudo systemctl start teleport

TAR Archive

the Application Service을 실행할 호스트에서 Teleport용 systemd 서비스 구성을 생성하고, Teleport 서비스를 활성화한 후 Teleport를 시작합니다:

$ sudo teleport install systemd -o /etc/systemd/system/teleport.service
$ sudo systemctl enable teleport
$ sudo systemctl start teleport

systemctl status teleport로 the Application Service의 상태를 확인하고 journalctl -fu teleport로 로그를 볼 수 있습니다.

2/3단계. Teleport 사용자 구성#

이 단계에서는 Teleport 사용자에게 모든 MCP 서버와 그 MCP 도구에 대한 액세스 권한을 부여합니다.

Configure an existing user

기존 Teleport 사용자가 있다면 해당 사용자에게 사전 설정 role인 mcp-user를 할당합니다. mcp-user role은 모든 MCP 서버와 그 도구에 대한 액세스를 허용합니다:

kind: role
version: v8
metadata:
  description: Access to MCP servers
  labels:
    teleport.internal/resource-type: preset
  name: mcp-user
spec:
  allow:
    app_labels:
      'teleport.internal/app-sub-kind': 'mcp'
    mcp:
      tools:
      - '*'

또는 위의 allow 권한을 기존 Teleport role에 추가할 수도 있습니다.

Create a new user

MCP 액세스 권한을 가진 my_user라는 새 로컬 사용자를 생성합니다:

$ tctl users add my_user --roles=mcp-user
Tip

Web UI를 사용하여 역할을 생성하고 편집할 수도 있습니다. Access -> Roles로 이동하여 Create New Role을 클릭하거나 편집할 기존 역할을 선택하십시오.

3/3단계. 연결#

방금 생성한 사용자 my_user로 Teleport에 로그인합니다:

$ tsh login --proxy=teleport.example.com:443 --user=my_user

이제 사용 가능한 MCP 서버를 확인할 수 있습니다:

$ tsh mcp ls
Name       Description           Type  Labels
---------- --------------------- ----- ----------
everything everything MCP server SSE   env=dev

MCP 클라이언트가 연결할 수 있도록 구성을 표시하려면 다음을 실행합니다.

$ tsh mcp config everything
Found MCP servers:
everything

Here is a sample JSON configuration for launching Teleport MCP servers:
{
  "mcpServers": {
    "teleport-mcp-everything": {
      "command": "/path/to/tsh",
      "args": ["mcp", "connect", "everything"]
    }
  }
}

Tip: You can use this command to update your MCP servers configuration file automatically.
- For Claude Desktop, use --client-config=claude to update the default configuration.
- For Cursor, use --client-config=cursor to update the global MCP servers configuration.
In addition, you can use --client-config=<path> to specify a config file location that is compatible with the "mcpServers" mapping.
For example, you can update a Cursor project using --client-config=<path-to-project>/.cursor/mcp.json

MCP 클라이언트 구성이 업데이트되면, MCP 클라이언트에 허용된 도구와 함께 teleport-mcp-everything MCP 서버가 나타나는 것을 확인할 수 있습니다.

다음 단계#

다음 주제에서 Teleport로 MCP 서버를 보호하는 방법에 대해 자세히 알아보세요: