





Grafana MCP 서버를 Teleport에 연결
Teleport v18.10요약
Teleport는 Teleport Application Service를 통해 MCP 서버에 대한 보안 액세스를 제공할 수 있습니다. Grafana MCP 서버는 Teleport가 서명한 JWT 토큰을 전달하여 Grafana에 접근하고 Teleport 애플리케이션 서비스가 접근할 수 있는 로컬 엔드포인트에서 실행됩니다.
Teleport는 Teleport Application Service를 통해 MCP 서버에 대한 보안 액세스를 제공할 수 있습니다.
이 가이드에서는 다음을 수행합니다:
- MCP 서버가 액세스할 수 있도록 Grafana 서비스를 구성합니다.
- Grafana MCP Server를 실행합니다.
- MCP 서버를 Teleport 클러스터에 등록하고 연결합니다.
작동 방식#
Grafana MCP 서버는 Teleport가 서명한 JWT 토큰을 전달하여 Grafana에 접근하고 Teleport 애플리케이션 서비스가 접근할 수 있는 로컬 엔드포인트에서 실행됩니다. Teleport는 모든 클라이언트 요청을 서버로 프록시하며, 서버는 JWT 인증으로 매핑된 권한을 사용하여 Grafana와 상호작용합니다.
사전 요구사항#
-
실행 중인 Teleport (v18.3.0 or higher) 클러스터. Teleport를 시작하려면 무료 체험판에 가입하거나 데모 환경을 구성하세요.
-
`tsh` client.
Installing \`tsh\` client
-
Teleport 클러스터의 버전을 확인합니다. `tsh` client는 Teleport 클러스터 버전보다 최대 한 개의 메이저 버전까지만 뒤처질 수 있습니다. Proxy Service의
/v1/webapi/find로 GET 요청을 보내고 JSON 쿼리 도구를 사용하여 클러스터 버전을 확인합니다.teleport.example.com:443를 Teleport Proxy Service의 웹 주소로 바꿉니다:$ TELEPORT_DOMAIN=teleport.example.com:443 $ TELEPORT_VERSION="$(curl -s https://$TELEPORT_DOMAIN/v1/webapi/find | jq -r '.server_version')" -
사용 중인 플랫폼에 대한 지침에 따라 `tsh` client를 설치합니다:
-
Mac
     \`tsh\` client가 포함된, 서명된 Teleport macOS .pkg 설치 프로그램을 다운로드합니다:

     ```code
     $ curl -O https://cdn.teleport.dev/teleport-${TELEPORT_VERSION?}.pkg
     ```

     Finder에서 `pkg` 파일을 더블 클릭하여 설치를 시작합니다.
       Homebrew를 사용하여 Teleport를 설치하는 것은 지원되지 않습니다. Homebrew의
       Teleport 패키지는 Teleport에서 유지 관리하지 않으므로 신뢰성이나 보안을
       보장할 수 없습니다.
Windows - Powershell
     ```code
     $ curl.exe -O https://cdn.teleport.dev/teleport-v${TELEPORT_VERSION?}-windows-amd64-bin.zip
     # Unzip the archive and move the \`tsh\` client to your %PATH%
     # NOTE: Do not place the \`tsh\` client in the System32 directory, as this can cause issues when using WinSCP.
     # Use %SystemRoot% (C:\Windows) or %USERPROFILE% (C:\Users\<username>) instead.
     ```
Linux
     Linux 설치판의 모든 Teleport 바이너리에는 \`tsh\` client가 포함되어 있습니다.  RPM/DEB
     패키지 및 i386/ARM/ARM64용 다운로드를 포함한 더 많은 옵션은
     [설치 페이지](../installation/installation.mdx)를 참조하세요.

     ```code
     $ curl -O https://cdn.teleport.dev/teleport-v${TELEPORT_VERSION?}-linux-amd64-bin.tar.gz
     $ tar -xzf teleport-v${TELEPORT_VERSION?}-linux-amd64-bin.tar.gz
     $ cd teleport
     $ sudo ./install
     # Teleport binaries have been copied to /usr/local/bin
     ```
- Grafana 인스턴스를 구성할 수 있는 권한.
- MCP 서버를 실행할 Teleport 애플리케이션 서비스가 접근할 수 있는 호스트.
- 실행 중인 Teleport 애플리케이션 서비스. 아직 설정하지 않았다면 시작하기 가이드를 따르세요.
- MCP 서버에 접근할 수 있는 충분한 권한을 가진 Teleport 사용자(예:
mcp-user역할).
1/3단계. Grafana에서 JWT 인증 구성#
Grafana의 기본 구성 파일에 auth.jwt 섹션을 추가합니다. teleport.example.com를 Teleport 클러스터의 도메인 이름으로 교체하세요:
[auth.jwt]
enabled = true

# HTTP header to look into to get a JWT token.
header_name = Authorization

# JSON Web Key Set (JWKS) URL from your Teleport cluster.
jwk_set_url = https://teleport.example.com/.well-known/jwks.json

# Teleport username can be found in "sub" or "username" claims.
username_claim = sub

# Map Teleport users to Grafana organization roles based on their Teleport
# roles. Adjust accordingly.
#
# In this example, if the user's Teleport role list (the "roles" claim) contains
# "editor", assign them the Grafana "Editor" role. All other users get the
# "Viewer" role.
#
# Teleport user traits are also available in the "traits" claim and can be
# used in expressions in the same way as roles.
role_attribute_path = contains(roles[*], 'editor') && 'Editor' || 'Viewer'

# auto-create users if they are not already matched.
auto_sign_up = true
구성을 업데이트한 후 Grafana 인스턴스를 재시작하세요.
2/3단계. Grafana MCP 서버 실행#
Grafana MCP 서버는 컴파일된 바이너리나 공식 Docker 이미지로 실행할 수 있습니다:
streamable-HTTP 전송 방식으로 MCP 서버를 실행합니다. GRAFANA_URL에 Grafana 인스턴스 URL을 할당하고 MCP_HOST에 MCP 서버를 실행하는 호스트 머신의 호스트명을 할당합니다:
$ export GRAFANA_URL=GRAFANA_URL
$ ./mcp-grafana --transport streamable-http --address MCP_HOST:8000
streamable-HTTP 전송 방식으로 MCP 서버를 실행합니다. GRAFANA_URL에 Grafana 인스턴스 URL을 할당합니다:
$ docker run -d -p 8000:8000 \
  -e GRAFANA_URL=GRAFANA_URL \
  mcp/grafana --transport streamable-http
이제 Grafana MCP 서버는 http://<code>MCP_HOST</code>:8000/mcp에 streamable-HTTP 엔드포인트를 노출합니다.
3/3단계. Teleport를 통한 연결#
Teleport Application Service 구성에서 MCP 애플리케이션을 정의하거나, tctl
또는 Terraform을 사용한 동적 등록을 통해 Teleport에 MCP 애플리케이션을
등록할 수 있습니다:
Static configuration
MCP_HOST를 Grafana MCP 서버를 실행하는 호스트로 교체합니다:
app_service:
  enabled: "yes"
  apps:
  - name: "grafana-mcp"
    uri: "mcp+http://MCP_HOST:8000/mcp"
    labels:
      env: dev
      service: grafana
    rewrite:
      headers:
      - "X-Grafana-API-Key: {{internal.jwt}}"
Application Service를 재시작합니다.
tctl
app-grafana-mcp.yaml라는 이름의 app 리소스 정의 파일을 생성합니다.
MCP_HOST를 Grafana MCP 서버를 실행하는 호스트로 교체합니다:
# app-grafana-mcp.yaml
kind: app
version: v3
metadata:
  name: grafana-mcp
  labels:
    env: dev
    service: grafana
spec:
  uri: "mcp+http://MCP_HOST:8000/mcp"
  rewrite:
    headers:
    - name: "X-Grafana-API-Key"
      value: "{{internal.jwt}}"
다음으로 app 리소스를 생성합니다:
$ tctl create -f app-grafana-app.yaml
Terraform
terraform에서 teleport_app 리소스를 생성합니다. MCP_HOST를
Grafana MCP 서버를 실행하는 호스트로 교체합니다:
resource "teleport_app" "grafana" {
  version = "v3"
  metadata = {
    name = "grafana"
    labels = {
      "teleport.dev/origin" = "dynamic"
      "env"                 = "dev"
      "service"             = "grafana"
    }
  }

  spec = {
    uri = "mcp+http://MCP_HOST:8000/mcp"
    rewrite = {
      headers = [{
        name  = "X-Grafana-API-Key"
        value = "{{internal.jwt}}"
      }]
    }
  }
}
구성을 적용합니다:
$ terraform apply
위의 헤더 재작성 구성은 각 요청에서 {{internal.jwt}} 템플릿 변수를 Teleport가 서명한 JWT 토큰으로 교체합니다. Grafana MCP 서버는 이 토큰을 Grafana에 연결할 때 "Authorization" 헤더의 bearer 토큰으로 사용합니다.
MCP 서버와 모든 도구에 대한 액세스를 부여하려면 사전 설정된
mcp-user 역할을 Teleport 사용자에게 할당합니다.
선택적으로, 역할의 mcp.tools 목록을 조정하여 사용자가 액세스할 수 있는 MCP
도구를 제한할 수 있습니다. 예를 들어:
kind: role
version: v8
metadata:
  name: grafana-mcp-readonly
spec:
  allow:
    app_labels:
      'service': 'grafana'
    mcp:
      tools:
      - ^(get|query|list|search|find)_.*$
이제 애플리케이션이 tsh mcp ls에 나타날 때까지 기다린 다음, MCP 서버에
접근하도록 MCP 클라이언트를 구성하십시오. 예를 들면:
$ tsh mcp config grafana-mcp --client-config claude
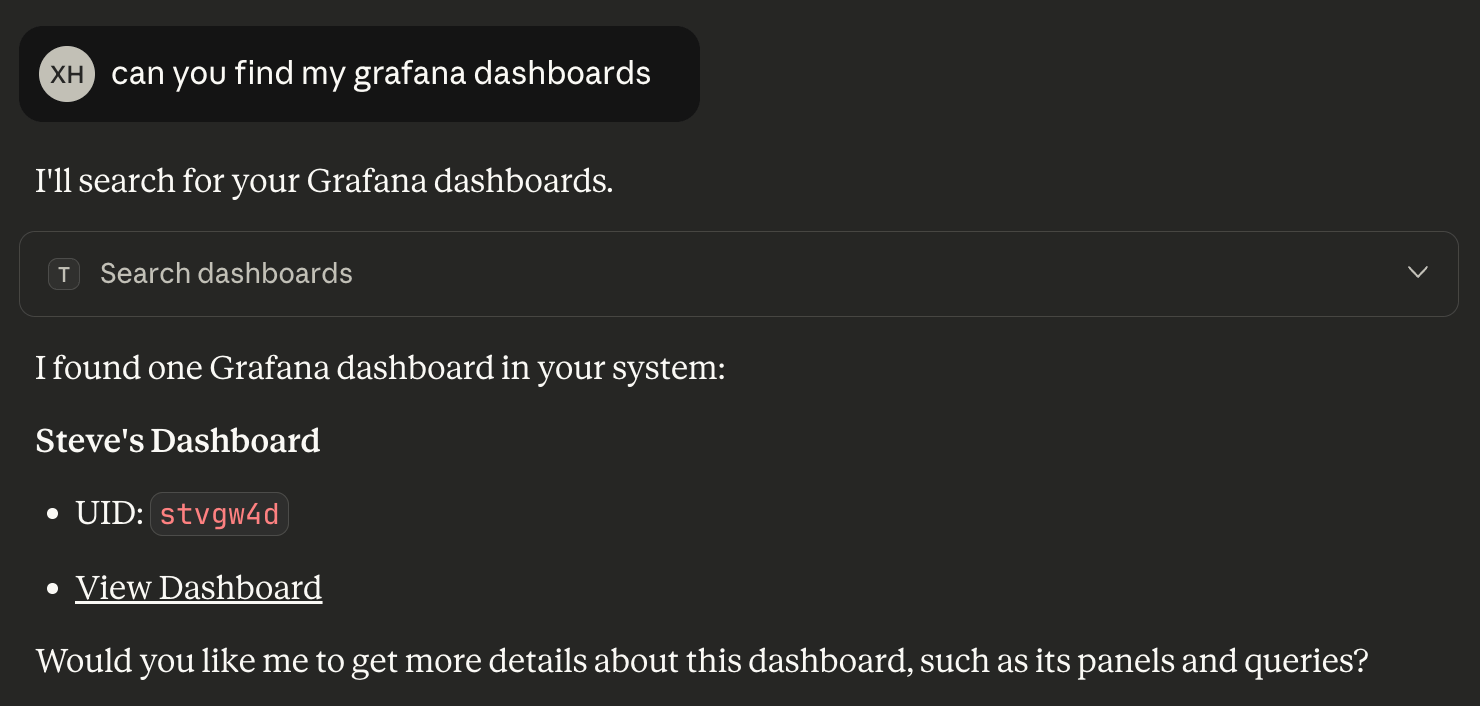
MCP 클라이언트를 구성한 후에는 teleport-mcp-grafana-mcp에서
Grafana 관련 도구를 찾을 수 있습니다. 이제 이 도구들을 사용하여 MCP
클라이언트에서 Teleport를 통해 Grafana와 상호작용할 수 있습니다:
서비스 계정을 사용하여 Grafana에 연결#
JWT 인증으로 Grafana에 접근하는 대신 서비스 계정을 사용할 수도 있습니다.
관리자 > 사용자 및 계정 > 서비스 계정으로 이동한 다음 서비스 계정 생성을 클릭합니다:
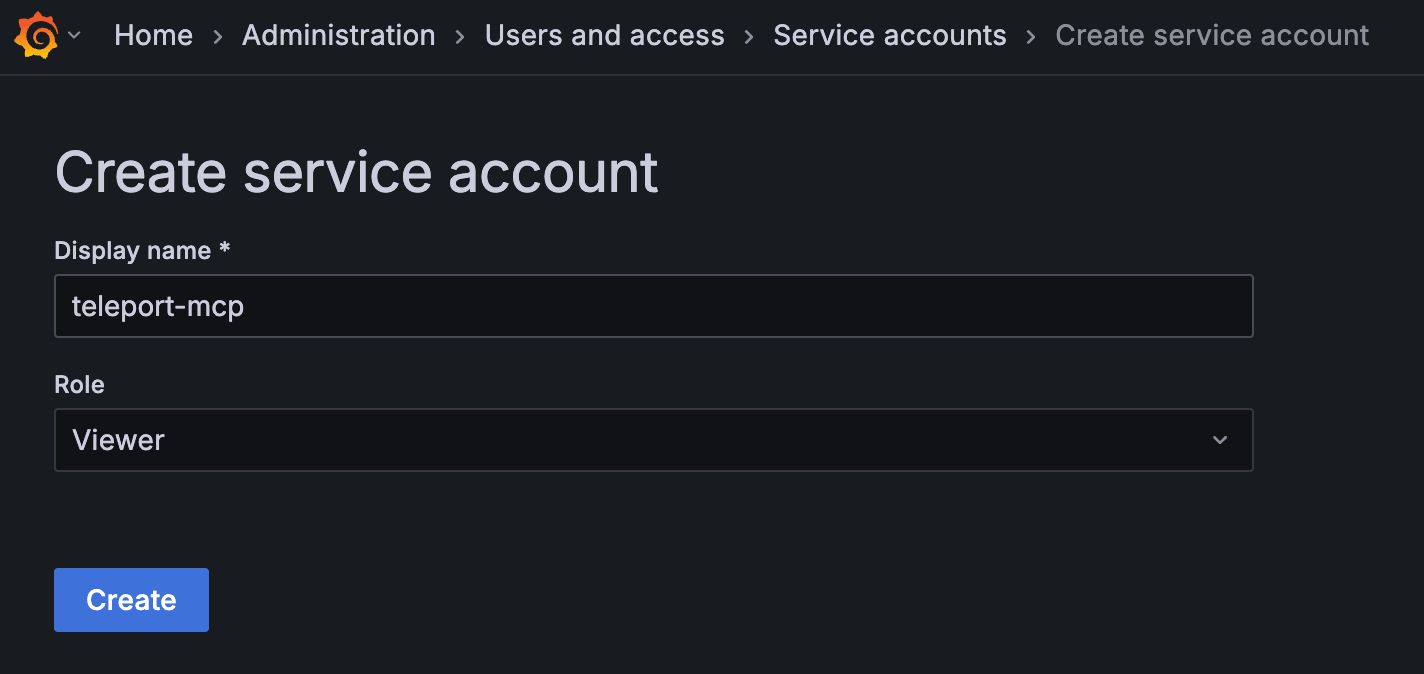
서비스 계정을 읽기 전용 접근으로 제한하기 위해 Viewer 역할을 할당합니다.
서비스 계정이 생성된 후 서비스 계정 토큰 추가를 클릭하여 새 토큰을 생성합니다. Grafana MCP 서버를 시작할 때 이 토큰 SERVICE_ACCOUNT_TOKEN을 사용합니다:
$ docker run -d -p 8000:8000 \
  -e GRAFANA_URL=GRAFANA_URL \
  -e GRAFANA_SERVICE_ACCOUNT_TOKEN=SERVICE_ACCOUNT_TOKEN \
  mcp/grafana --transport streamable-http
마지막으로 Teleport 애플리케이션에서 헤더 재작성을 구성할 필요가 없습니다:
app_service:
  enabled: "yes"
  apps:
  - name: "grafana-mcp"
    uri: "mcp+http://MCP_HOST:8000/mcp"
    labels:
      env: dev
      service: grafana
다음 단계#
- JWT 인증으로 Teleport를 통해 Grafana에 접근하는 방법 자세히 읽기.
- Streamable-HTTP MCP 서버 등록 검토.
- 동적 등록 가이드 참조.
- mcp-grafana에 대해 자세히 알아보기.
- MCP 클라이언트 연결.