





접근 목록 시작하기
Teleport v18.10요약
이 가이드는 Teleport Web UI를 통해 다음을 수행하는 방법을 안내합니다: Access List를 코드로 관리하고 싶다면 Terraform 및 Kubernetes 오퍼레이터로 접근 목록 관리하기 가이드를 대신 따르세요.
이 가이드는 Teleport Web UI를 통해 다음을 수행하는 방법을 안내합니다:
- 접근 목록 만들기
- 멤버 할당하기
- 목록 멤버십을 통해 부여된 권한 확인하기
Access List를 코드로 관리하고 싶다면 Terraform 및 Kubernetes 오퍼레이터로 접근 목록 관리하기 가이드를 대신 따르세요.
전제 조건#
- 실행 중인 Teleport Enterprise(v18.8.0 이상) 클러스터. 아직 클러스터가 없다면 무료 체험판을 신청하세요.
이 섹션의 내용은 원문 문서를 참조하세요. (acl-permissions.mdx)
1/4단계. 테스트 리소스 등록#
접근 권한을 부여할 리소스가 클러스터에 최소 하나는 있어야 합니다. 이미 테스트에 사용할 수 있는 리소스가 등록되어 있다면 다음 단계로 건너뜁니다.
그렇지 않다면 인프라 연결 가이드를 따라 Web UI의 가이드 설정을 통해 호스트를 등록하세요. 연결된 페이지는 예시로 Ubuntu 서버를 사용하지만, 여러분 자신의 머신(Linux 또는 macOS)에서도 동일한 흐름이 작동합니다 — 가이드 설정 중 자신의 OS를 선택하고 안내되는 설치 명령을 실행하기만 하면 됩니다.
가이드 설정에서 라벨을 추가하라고 요청하면 최소 하나 이상 추가하세요 — 예를 들어
env: test와 같이 말이죠. 이 라벨은 3단계에서 호스트를 선택하는 데 사용합니다.
(* 와일드카드로 모든 호스트를 매칭할 수도 있지만, 실제 라벨을 사용하는 것이
실무에서 접근 목록을 구성하는 방식에 더 가깝습니다.)
이 가이드의 나머지 부분은 여러분이 SSH 서버를 등록했다고 가정합니다.
2/4단계. 테스트 사용자 만들기#
클러스터 내 어떤 것에도 기본 접근 권한이 없는 requester 역할만 가진 간단한
테스트 사용자를 만들어야 합니다. 이 사용자는 이 가이드 목적으로만 사용되므로,
원한다면 다른 사용자를 사용할 수도 있습니다. 자체 사용자를 사용하고 싶다면
다음 단계로 건너뜁니다.
사이드바 메뉴에서 Zero Trust Access > Users > Enroll Users를
클릭합니다. 이름으로 test-user를 입력하고 역할로 requester를 선택합니다.
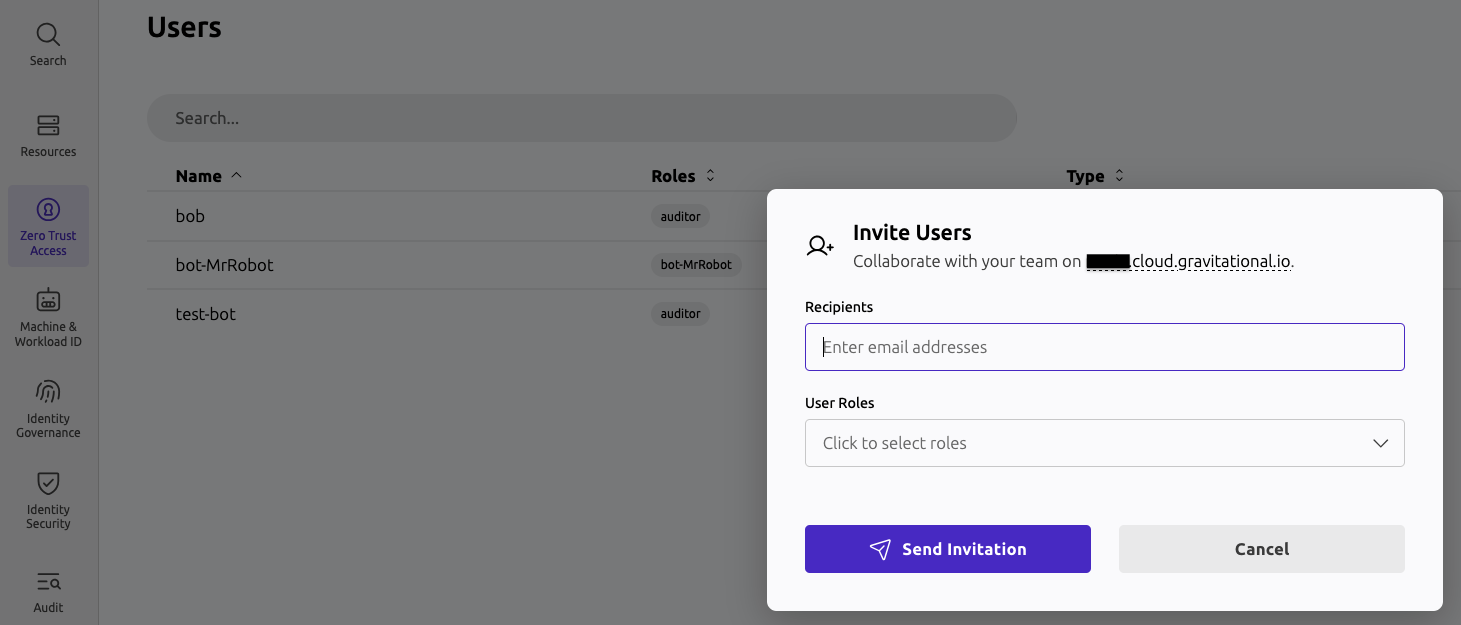
폼을 제출하여 사용자를 만든 다음, 제공된 URL로 이동하여 테스트 사용자의 자격 증명을 설정합니다. 테스트 사용자로 클러스터에 로그인하여 리소스 페이지에 아무 리소스도 표시되지 않는지 확인해 보세요.
3/4단계. 접근 목록 만들기#
다음으로, 1단계에서 등록한 SSH 호스트에 대한 접근 권한을 멤버에게 부여하는 접근 목록을 만들어 보겠습니다. 전제 조건에서 언급한 관리자 사용자로 로그인하세요.
사이드바 메뉴에서 Add New에 마우스를 올린 다음 Access List를 클릭합니다.
접근 목록 이름으로 test-list를 입력하고, 필요하다면 설명을 추가한 다음
Standing Access Guide를 선택하세요 — 이는 로그인 시 멤버에게 접근 권한을
부여하는 흐름으로, 이 튜토리얼에서 원하는 방식입니다. (다른 옵션으로는
Just-in-Time Access가 있으며, 이는 자동으로
부여하는 대신 리소스를 요청 가능하게 만들고,
Custom Form은 가이드 흐름 없이 기존 역할을
직접 할당할 수 있게 해줍니다.)
Start Guide를 클릭합니다.
가이드 흐름을 작성하는 동안, 옆에 있는 Terraform 패널이 여러분의 입력을 실시간으로 반영합니다. 마지막 Deployment 단계에서 Teleport로 목록을 직접 적용하거나, UI 내 안내에 따라 Terraform으로 적용할 수 있습니다.
1. 리소스에 대한 접근 정의#
- 왼쪽의 리소스 유형 열에서 Server를 클릭합니다.
- 호스트 옆에 있는
env: test라벨(또는 1단계에서 설정한 라벨)을 클릭하여 선택합니다. - 라벨을 추가하지 않았다면, 라벨 입력란에
*를 입력하고 Enter를 눌러 모든 서버를 매칭시킵니다.
이렇게 하면 목록의 멤버가 env: test 라벨과 일치하는 SSH 서버(또는 *를
사용한 경우 모든 SSH 서버)에 접근할 수 있게 됩니다.
이 섹션의 내용은 원문 문서를 참조하세요. (preview-resources-warning.mdx)
2. 리소스 아이덴티티 또는 프린시펄 정의#
- Server Identities의 Logins 항목에, 멤버가 호스트에 로그인할 때 사용할
OS 사용자를 추가합니다(예: Linux 서버라면
ubuntu, macOS라면 로컬 사용자 이름).
참고: 이 화면은 이전 단계에서 선택한 리소스 유형이 Server뿐이었기 때문에 SSH 로그인만 요청합니다.
3. 기본 정보#
- 제목과 설명을 확인합니다.
- 다음 검토 날짜로 미래 날짜를 선택합니다.
4. 멤버십 정의#
- 테스트 사용자를 멤버로 추가합니다.
- 선택적으로 Optional Advanced Settings를 펼쳐 필수 역할로
requester를 선택합니다. 필수 역할을 설정하면 목록의 모든 멤버가 접근 권한을 부여받기 위해 반드시requester를 가져야 합니다. 멤버가 나중에 이 역할을 잃으면 목록에 설명된 접근 권한을 부여받지 못합니다.
5. 소유권 정의#
- 관리자 사용자를 적격 소유자로 추가합니다.
- 선택적으로 Optional Advanced Settings를 펼쳐 필수 역할로
editor를 선택합니다. 필수 역할을 설정하면 목록을 관리하기 위해 모든 소유자가 반드시editor를 가져야 합니다. 소유자가 나중에 이 역할을 잃으면 소유자로는 계속 표시되지만 목록을 관리할 수 없게 됩니다.
6. 배포#
- 요약 내용을 검토한 다음 Create Access List Now를 클릭합니다.
이 섹션의 내용은 원문 문서를 참조하세요. (editing-roles-warning.mdx)
4/4단계. 테스트 사용자로 로그인#
Web UI에서 테스트 사용자로 로그인합니다. Resources 목록에 1단계에서 등록한 SSH 서버가 표시되어야 합니다. Connect를 클릭한 다음, Define Resource Identities or Principals 단계에서 허용한 로그인 중 하나를 클릭하여 서버에 SSH로 접속합니다.
정리(선택 사항)#
1단계에서 등록한 SSH 서버를 제거하고 싶다면 Teleport 제거하기를 따르세요.
에이전트가 중지되면 Teleport는 몇 분 후 리소스 목록에서 해당 서버를 자동으로 제거합니다.
다음 단계#
- 방금 사용한 흐름에 대해 상시 접근 목록(Standing Access Lists)에서 더 자세히 알아보세요.
- 멤버가 로그인 시 접근 권한을 받는 대신 리소스에 대한 임시 접근을 요청할 수 있는 접근 목록을 만들어 보세요.
- Custom Form을 사용해 기존 역할을 직접 할당하는 방식으로 접근 목록을 만들어 보세요.
- Teleport Terraform 공급자 및 Kubernetes 오퍼레이터로 접근 목록을 관리하는 방법은 IaC로 접근 목록 만들기를 읽어보세요.
- 레퍼런스에서 접근 목록 관리에 사용 가능한 CLI 도구를 익혀 보세요.
- 중첩된 접근 목록 가이드에서 중첩된 접근 목록으로 작업하는 방법을 알아보세요.