





PagerDuty Access Request 플러그인 실행
Teleport v18.10요약
Teleport의 PagerDuty 통합을 사용하면, 엔지니어들은 공격 벡터가 될 수 있는 영구적인 관리자 권한 없이도 인시던트를 신속하게 해결하는 데 필요한 인프라에 접근할 수 있습니다. Teleport의 PagerDuty 통합을 사용하면 Teleport Role Access Request를 PagerDuty 인시던트로 처리하고, 적절한 온콜 팀에 알리고, Teleport를 통해 요청을 승인하거나 거부할 수 있습니다.
Teleport의 PagerDuty 통합을 사용하면, 엔지니어들은 공격 벡터가 될 수 있는 영구적인 관리자 권한 없이도 인시던트를 신속하게 해결하는 데 필요한 인프라에 접근할 수 있습니다. 이 가이드는 PagerDuty용 Teleport Access Request 플러그인 설정 방법을 설명합니다.
작동 방식#
Teleport의 PagerDuty 통합을 사용하면 Teleport Role Access Request를 PagerDuty 인시던트로 처리하고, 적절한 온콜 팀에 알리고, Teleport를 통해 요청을 승인하거나 거부할 수 있습니다. 또한 요청을 하는 사용자가 인시던트에 영향을 받는 서비스의 온콜 팀에 있는 경우 Role Access Request를 자동으로 승인하도록 플러그인을 설정할 수 있습니다.
이 통합은 Teleport Cloud에서 호스팅됩니다
Teleport Enterprise Cloud에서는 Teleport가 the PagerDuty integration를 대신 관리하며, Teleport 웹 UI에서 the PagerDuty integration를 등록할 수 있습니다.
Teleport 웹 UI로 이동하여 왼쪽 사이드바에서 Add New를 클릭한 다음 Integration을 클릭하십시오:
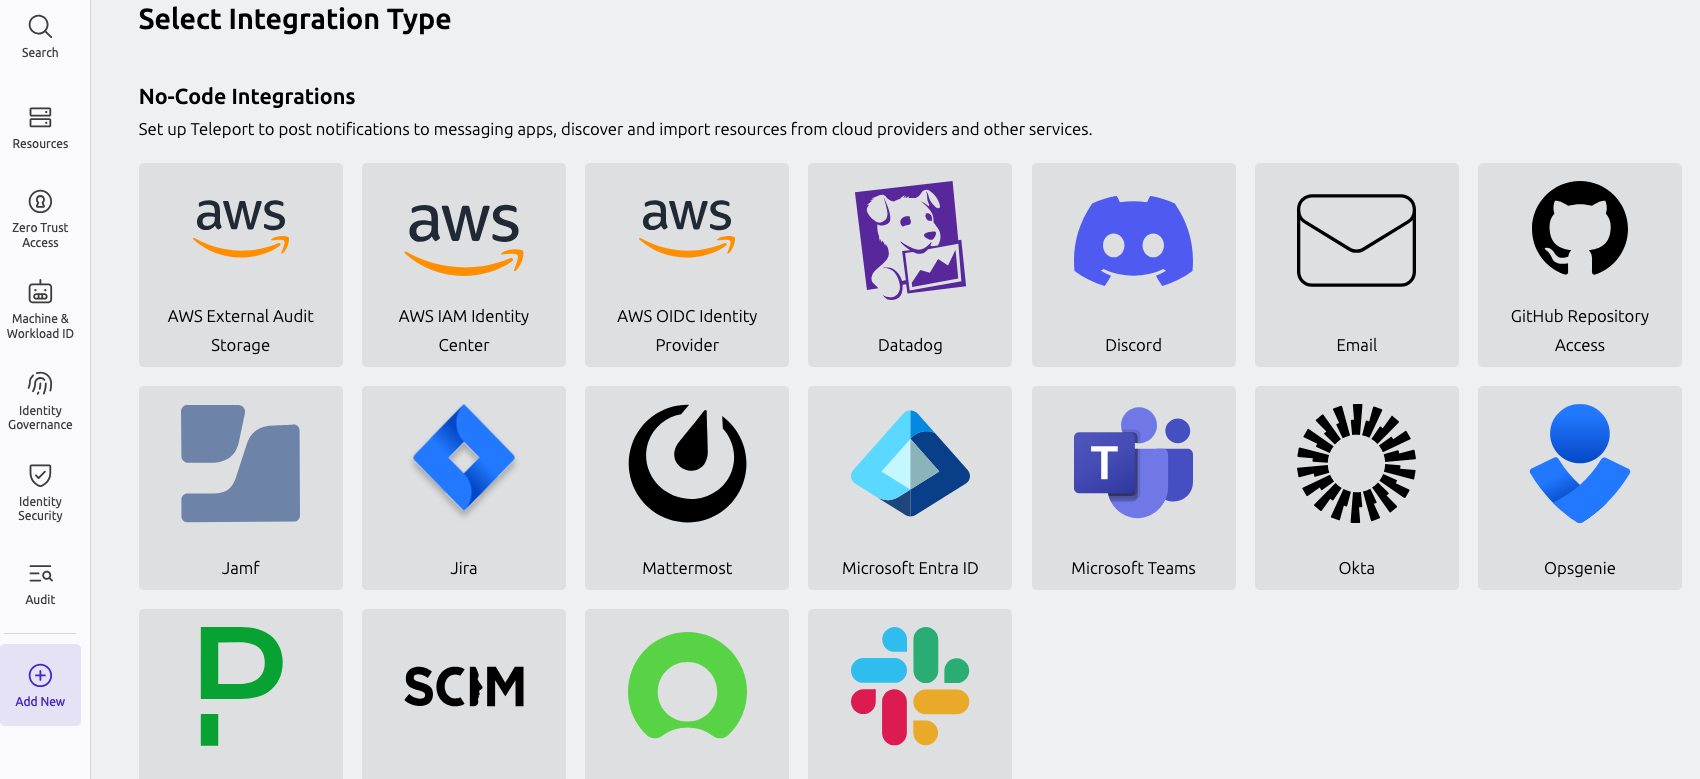
"Select Integration Type" 메뉴에서 사용할 통합의 타일을 클릭하십시오. 통합을 설정하는 방법에 대한 지침과 함께 통합을 구성하는 데 사용할 수 있는 양식이 있는 페이지가 표시됩니다.
사전 요구사항#
-
실행 중인 Teleport Enterprise 클러스터. Teleport를 시작하려면 무료 체험판에 가입하거나 데모 환경을 구성하세요.
-
tctlandtshclients.Installing `tctl` and `tsh` clients
-
Teleport 클러스터의 버전을 확인합니다.
tctlandtshclients는 Teleport 클러스터 버전보다 최대 한 개의 메이저 버전까지만 뒤처질 수 있습니다. Proxy Service의/v1/webapi/find로 GET 요청을 보내고 JSON 쿼리 도구를 사용하여 클러스터 버전을 확인합니다.teleport.example.com:443를 Teleport Proxy Service의 웹 주소로 바꿉니다:$ TELEPORT_DOMAIN=teleport.example.com:443 $ TELEPORT_VERSION="$(curl -s https://$TELEPORT_DOMAIN/v1/webapi/find | jq -r '.server_version')" -
사용 중인 플랫폼에 대한 지침에 따라
tctlandtshclients를 설치합니다:
-
Mac
     `tctl` and `tsh` clients가 포함된, 서명된 Teleport macOS .pkg 설치 프로그램을 다운로드합니다:

     ```code
     $ curl -O https://cdn.teleport.dev/teleport-${TELEPORT_VERSION?}.pkg
     ```

     Finder에서 `pkg` 파일을 더블 클릭하여 설치를 시작합니다.
       Homebrew를 사용하여 Teleport를 설치하는 것은 지원되지 않습니다. Homebrew의
       Teleport 패키지는 Teleport에서 유지 관리하지 않으므로 신뢰성이나 보안을
       보장할 수 없습니다.
Windows - Powershell
     ```code
     $ curl.exe -O https://cdn.teleport.dev/teleport-v${TELEPORT_VERSION?}-windows-amd64-bin.zip
     # Unzip the archive and move the `tctl` and `tsh` clients to your %PATH%
     # NOTE: Do not place the `tctl` and `tsh` clients in the System32 directory, as this can cause issues when using WinSCP.
     # Use %SystemRoot% (C:\Windows) or %USERPROFILE% (C:\Users\<username>) instead.
     ```
Linux
     Linux 설치판의 모든 Teleport 바이너리에는 `tctl` and `tsh` clients가 포함되어 있습니다.  RPM/DEB
     패키지 및 i386/ARM/ARM64용 다운로드를 포함한 더 많은 옵션은
     [설치 페이지](../installation/installation.mdx)를 참조하세요.

     ```code
     $ curl -O https://cdn.teleport.dev/teleport-v${TELEPORT_VERSION?}-linux-amd64-bin.tar.gz
     $ tar -xzf teleport-v${TELEPORT_VERSION?}-linux-amd64-bin.tar.gz
     $ cd teleport
     $ sudo ./install
     # Teleport binaries have been copied to /usr/local/bin
     ```
권장: Machine & Workload Identity를 구성하여 플러그인에 수명이 짧은
Teleport 자격 증명을 제공하십시오. 이 가이드를 따르기 전에, 인프라에서
tbot 바이너리를 실행하도록 Machine & Workload Identity
배포 가이드를 먼저 따르십시오.
-
"Admin", "Global Admin" 또는 "Account Owner" 역할이 있는 PagerDuty 계정. 이 역할은 사용자 프로필을 나열하고 조회할 수 있는 API 토큰 생성에 필요합니다.
PagerDuty의 사용자 페이지를 방문하고 "권한 및 팀" 탭으로 이동하여 "기본 역할" 필드의 값을 확인하여 역할을 확인할 수 있습니다.
-
PagerDuty 플러그인을 실행할 Linux 호스트 또는 Kubernetes 클러스터.
Teleport cluster에 연결할 수 있는지 확인하려면 tsh login으로 로그인한 다음,
현재 자격 증명으로 tctl 명령을 실행할 수 있는지 확인합니다.
예를 들어, teleport.example.com에 cluster 내 Teleport Proxy Service의
도메인 이름을, email@example.com에 Teleport 사용자 이름을 지정하여
다음 명령을 실행합니다:
$ tsh login --proxy=teleport.example.com --user=email@example.com
$ tctl status
# Cluster  (=teleport.url=)
# Version  (=teleport.version=)
# CA pin   (=presets.ca_pin=)
cluster에 연결하여 tctl status 명령을 실행할 수 있다면, 현재 자격 증명을 사용하여
워크스테이션에서 이후의 tctl 명령을 실행할 수 있습니다.
자체 Teleport cluster를 호스팅하는 경우, 전체 권한을 얻기 위해 Teleport Auth Service를
호스팅하는 컴퓨터에서 tctl 명령을 실행할 수도 있습니다.
1/8단계. 서비스 생성#
PagerDuty 플러그인을 시연하기 위해 PagerDuty에서 두 개의 서비스를 생성합니다. 각 서비스에 대해 "이름" 필드만 채우고 다른 모든 설정 화면은 건너뛰어 기본값을 유지합니다:
Teleport Access Request NotificationsMy Critical Service
특정 사용자가 Access Request를 생성할 때 Teleport Access Request Notifications 서비스에서 인시던트를 생성하도록 PagerDuty 플러그인을 설정합니다.
My Critical Service의 온콜 팀에 있는 사용자(이 경우 PagerDuty 사용자)의 경우, 서비스의 인시던트를 신속하게 조사할 수 있도록 Access Request를 자동으로 승인하도록 PagerDuty 플러그인을 설정합니다.
2/8단계. RBAC 리소스 정의#
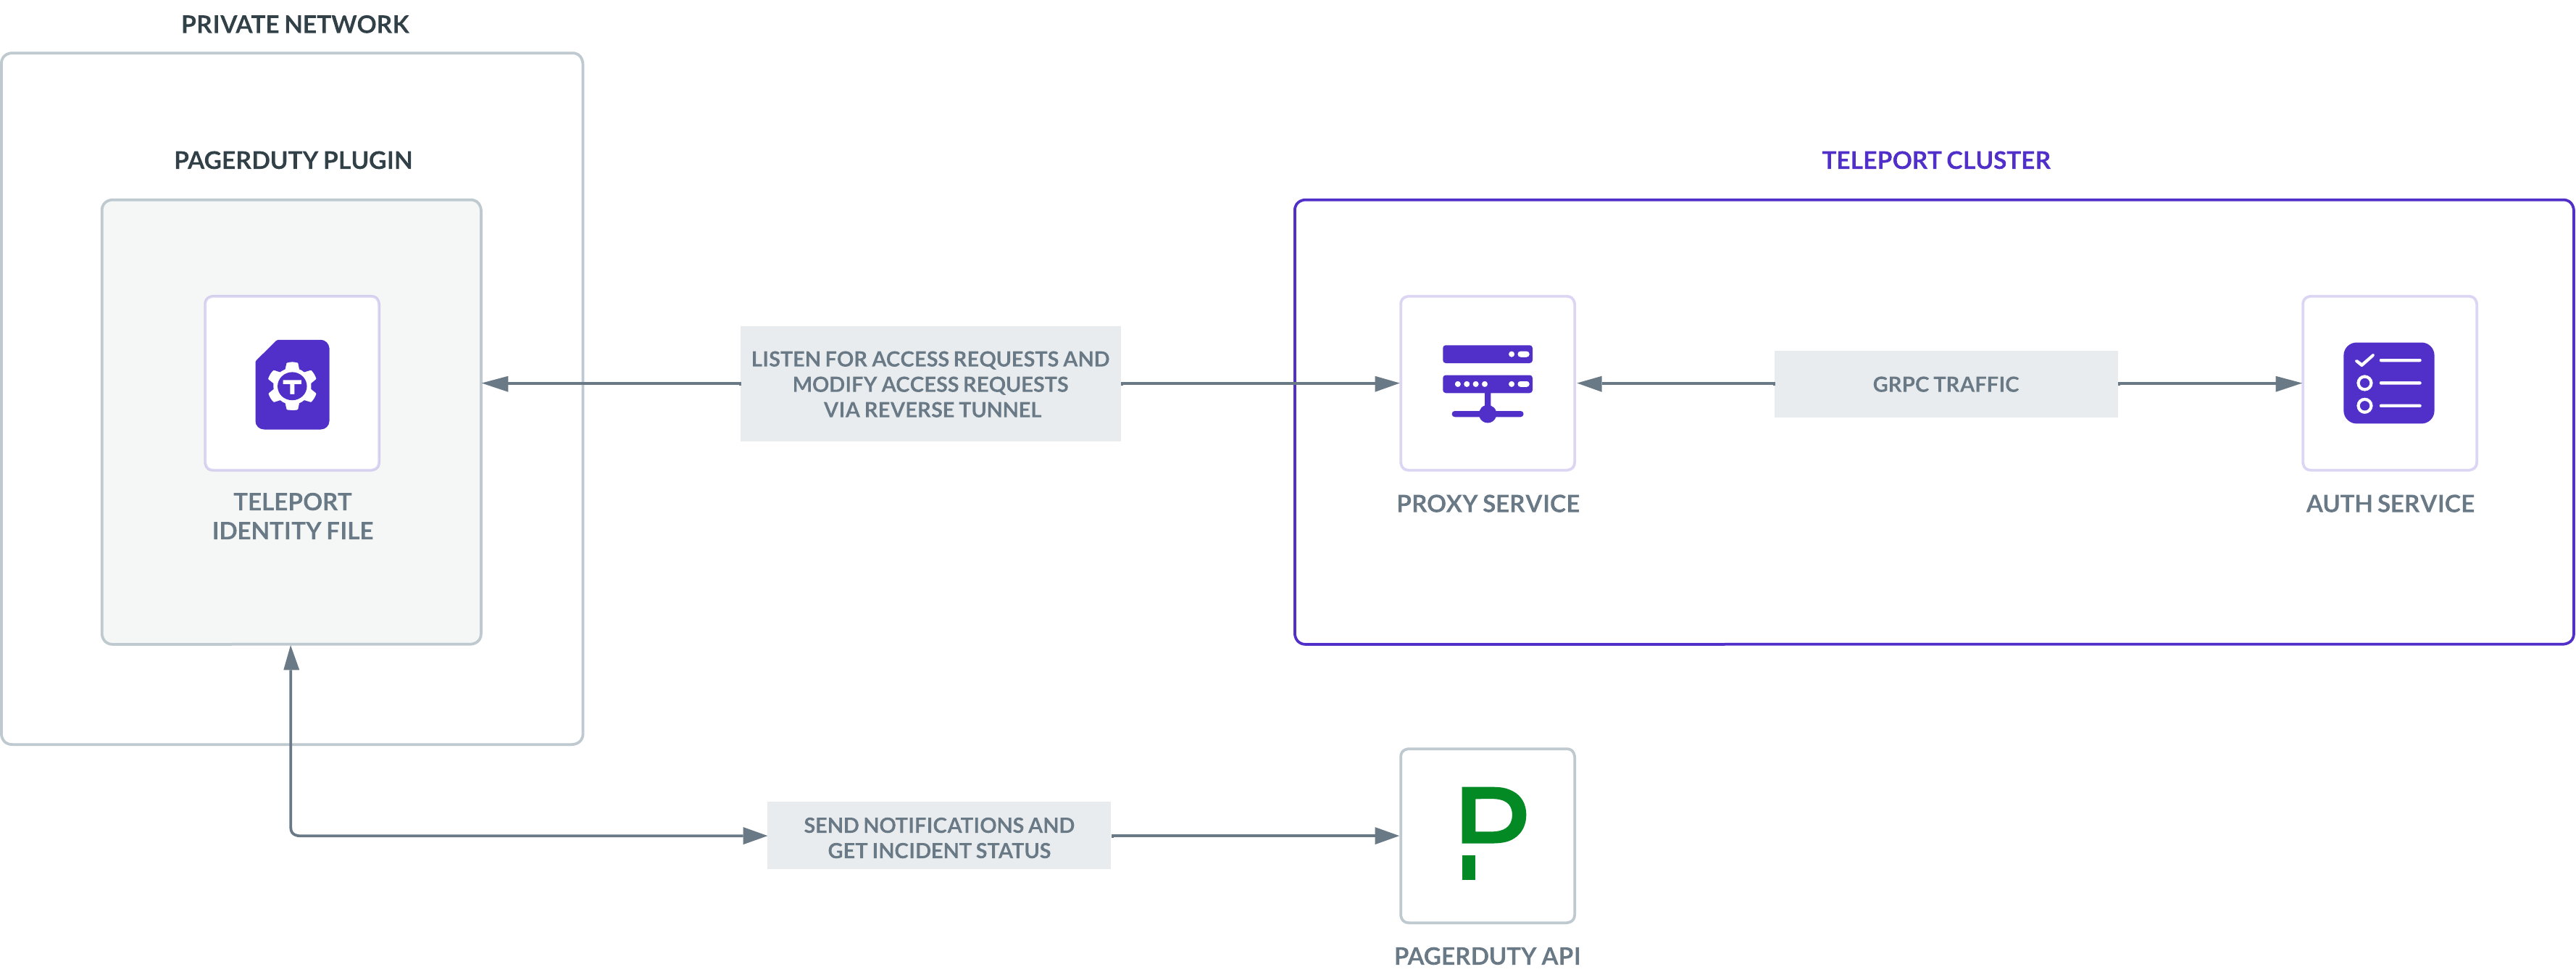
Teleport PagerDuty 플러그인은 Teleport Auth Service에서 Access Request 이벤트를 수신하고, 이 이벤트를 기반으로 PagerDuty API와 상호작용합니다.
이 섹션에서는 다음 RBAC 리소스를 정의하여 PagerDuty 플러그인을 설정하는 방법을 보여줍니다:
- 내장된
editor역할을 요청할 수 있는editor-requester역할. 사용자가 이 역할을 요청할 때마다 PagerDuty 인시던트를 열어Teleport Access Request Notifications서비스의 온콜 팀에 알리도록 이 역할을 설정합니다. demo-role이라는 역할을 요청할 수 있는demo-role-requester역할. 요청을 하는 사용자가My Critical Service의 온콜 팀에 있을 때마다 이 요청을 자동 승인하도록 PagerDuty 플러그인을 설정합니다.- PagerDuty 플러그인이 Teleport Auth Service에 인증하기 위해 가정하는
access-plugin이라는 사용자 및 역할. 이 역할은My Critical Service의 온콜 팀에 있는 사용자의 Access Request를 자동으로 승인할 권한을 갖게 됩니다. - PagerDuty 플러그인이 Teleport 클러스터에 인증하는 데 사용할 수 있는 서명된 자격 증명을 생성할 수 있는
access-plugin-impersonator역할.
editor-requester#
다음 내용으로 editor-request-rbac.yaml 파일을 생성합니다. 이 내용은 editor 역할에 대한 요청을 검토할 수 있는 editor-reviewer 역할과 이 역할을 요청할 수 있는 editor-requester 역할을 정의합니다.
kind: role
version: v5
metadata:
  name: editor-reviewer
spec:
  allow:
    review_requests:
      roles: ['editor']
---
kind: role
version: v5
metadata:
  name: editor-requester
spec:
  allow:
    request:
      roles: ['editor']
      thresholds:
        - approve: 1
          deny: 1
      annotations:
        pagerduty_notify_service: ["Teleport Access Request Notifications"]
Teleport Auth Service는 Access Request를 제출하는 Teleport 사용자의 역할을 기반으로 Access Request 이벤트에 메타데이터로 어노테이션을 붙입니다. PagerDuty 플러그인은 이 어노테이션을 읽어 새 Access Request 이벤트에 어떻게 응답할지 결정합니다.
editor-requester 역할을 가진 사용자가 editor 역할을 요청할 때마다, PagerDuty 플러그인은 pagerduty_notify_service 어노테이션을 읽고 지정된 서비스인 Teleport Access Request Notifications에서 인시던트를 열도록 PagerDuty에 알리며, editor-reviewer 역할을 가진 누군가가 요청을 승인하거나 거부할 때까지 유지됩니다.
정의한 역할을 생성합니다:
$ tctl create -f editor-request-rbac.yaml
role 'editor-reviewer' has been created
role 'editor-requester' has been created
Web UI를 사용하여 역할을 생성하고 편집할 수도 있습니다. Access -> Roles로 이동하여 Create New Role을 클릭하거나 편집할 기존 역할을 선택하십시오.
demo-role-requester#
다음 내용으로 demo-role-requester.yaml 파일을 생성합니다:
kind: role
version: v5
metadata:
  name: demo-role
---
kind: role
version: v5
metadata:
  name: demo-role-requester
spec:
  allow:
    request:
      roles: ['demo-role']
      thresholds:
        - approve: 1
          deny: 1
      annotations:
        pagerduty_services: ["My Critical Service"]
demo-role-requester 역할을 가진 사용자는 demo-role 역할을 요청할 수 있습니다. 이런 사용자가 이 요청을 할 때, PagerDuty 플러그인은 pagerduty_services 어노테이션을 읽습니다. 요청을 하는 사용자가 어노테이션의 값으로 나열된 서비스의 온콜 팀에 있으면, 플러그인은 자동으로 Access Request를 승인합니다.
이 경우 PagerDuty 플러그인은 My Critical Service의 온콜 팀에 있는 모든 사용자의 요청을 승인합니다.
리소스를 생성합니다:
$ tctl create -f demo-role-requester.yaml;
자동 승인이 작동하려면 Access Request를 생성하는 사용자의 Teleport 사용자 이름이 PagerDuty 계정과 연결된 이메일 주소이기도 해야 합니다. 이 가이드에서는 자신의 Teleport 계정(PagerDuty의 이메일 주소이기도 하다고 가정)에 demo-role-requester 역할을 추가하여 demo-role 역할을 요청할 수 있도록 합니다.
access-plugin#
Teleport의 Access Request 플러그인은 Access Request를 나열, 읽기, 업데이트할 권한이 있는 사용자로 Teleport 클러스터에 인증합니다. 이를 통해 플러그인은 Teleport Auth Service에서 Access Request를 가져오고, 검토자에게 제시하고, 검토 후 수정할 수 있습니다.
다음 내용을 access-plugin.yaml 파일에 추가하여 access-plugin이라는 사용자 및 역할을 정의합니다:
kind: role
version: v5
metadata:
  name: access-plugin
spec:
  allow:
    rules:
      - resources: ['access_request']
        verbs: ['list', 'read']
      - resources: ['access_plugin_data']
        verbs: ['update']
    review_requests:
      roles: ['demo-role']
      where: 'contains(request.system_annotations["pagerduty_services"], "My Critical Service")'
---
kind: user
metadata:
  name: access-plugin
spec:
  roles: ['access-plugin']
version: v2
access-plugin 역할에는 demo-role이 값으로 있는 allow.review_requests.roles 필드가 포함되어 있습니다. 이렇게 하면 플러그인이 demo-role 역할에 대한 요청을 검토할 수 있습니다.
또한 access-plugin 역할을 My Critical Service와 연결된 Access Request만 검토하도록 제한하고 있습니다. 이를 위해 review_requests.where 필드에 조건식을 정의했습니다. 이 식은 플러그인이 pagerduty_services 키와 My Critical Service 값이 있는 어노테이션이 요청에 포함되지 않으면 demo-role 요청을 검토할 수 없다는 것을 나타냅니다.
"where" 조건 작동 방식
where 필드에는 검토자가 특정 요청을 검토할 수 있는지를 결정하는 조건식이 포함됩니다. 조건식에 두 가지 함수를 포함할 수 있습니다:
| 함수 | 설명 | 예시 |
|---|---|---|
equals |
필드가 값과 동일함. | equals(request.reason, "resolve an incident") |
contains |
문자열 목록에 값이 포함됨. | contains(reviewer.traits["team"], "devops") |
where 필드를 사용할 때, 조건식에 다음 필드를 포함할 수 있습니다:
| 필드 | 타입 | 설명 |
|---|---|---|
reviewer.roles |
[]string |
검토자의 Teleport 역할 이름 목록 |
reviewer.traits |
map[string][]string |
트레이트 이름별 검토자의 Teleport 트레이트 맵 |
request.roles |
[]string |
사용자가 요청하는 Teleport 역할 목록 |
request.reason |
string |
요청에 첨부된 이유 |
request.system_annotations |
map[string][]string |
어노테이션 키별 요청 어노테이션 맵, 예: pagerduty_services |
다음 연산자를 사용하여 함수를 결합할 수 있습니다:
| 연산자 | 형식 | 설명 |
|---|---|---|
&& |
function && function |
두 함수 모두 true로 평가되면 true |
|| |
function || function |
하나 또는 두 함수 모두 true로 평가되면 true |
! |
!function |
함수가 false로 평가되면 true |
함수의 예는 equals(request.reason, "resolve an incident")입니다. "resolve an incident" 이유를 포함하지 않는 모든 Access Request와 일치하도록 allow 조건을 설정하려면 !equals(request.reason, "resolve an incident") 함수를 사용할 수 있습니다.
사용자 및 역할을 생성합니다:
$ tctl create -f access-plugin.yaml
access-plugin-impersonator#
모든 Teleport 사용자와 마찬가지로, Teleport Auth Service는 단기 TLS 자격 증명을 발급하여 access-plugin 사용자를 인증합니다. 이 경우 access-plugin 역할 및 사용자를 가장하여 자격 증명을 수동으로 요청해야 합니다.
자체 호스팅 Teleport Enterprise 클러스터를 실행 중이고 Auth Service 호스트에서 tctl을 사용하는 경우, 이미 가장 권한을 갖고 있습니다.
access-plugin에 대한 가장 권한을 사용자에게 부여하려면, 다음 YAML 문서를 access-plugin-impersonator.yaml 파일에 붙여넣어 access-plugin-impersonator 역할을 정의합니다:
kind: role
version: v5
metadata:
  name: access-plugin-impersonator
spec:
  allow:
    impersonate:
      roles:
      - access-plugin
      users:
      - access-plugin
access-plugin-impersonator 역할을 생성합니다:
$ tctl create -f access-plugin-impersonator.yaml
사용자에게 역할 추가#
이 가이드의 뒷부분에서 Teleport 사용자는 추가 권한이 필요한 세 가지 작업을 수행합니다:
- PagerDuty 플러그인이 Teleport 클러스터에 연결하는 데 사용할 서명된 자격 증명 생성
editor역할에 대한 Access Request 수동 검토demo-role역할에 대한 Access Request 생성
이 권한을 사용자에게 부여하려면, 앞서 정의한 editor-reviewer, access-plugin-impersonator, demo-role-requester 역할을 사용자에게 부여합니다.
편집기에서 사용자 정의를 엽니다:
$ TELEPORT_USER=$(tsh status --format=json | jq -r .active.username)
$ tctl edit users/${TELEPORT_USER?}
방금 생성한 역할을 포함하도록 사용자를 편집합니다:
  roles:
   - access
   - auditor
   - editor
+  - editor-reviewer
+  - access-plugin-impersonator
+  - demo-role-requester
편집기에서 파일을 저장하고 닫아 변경 사항을 적용합니다.
Teleport 클러스터에서 로그아웃하고 다시 로그인합니다. 이제 editor 역할에 대한 요청을 검토하고, demo-role 역할을 요청하고, access-plugin 역할 및 사용자에 대한 서명된 인증서를 생성할 수 있습니다.
액세스를 요청할 사용자 생성#
editor-requester 역할을 가진 myuser라는 사용자를 생성합니다. 이 가이드의 뒷부분에서 PagerDuty 플러그인을 테스트하기 위해 이 사용자로 Access Request를 생성합니다:
$ tctl users add myuser --roles=editor-requester
tctl은 초대 URL을 터미널에 출력합니다. URL을 방문하여 처음으로 myuser로 로그인하여 Teleport 클러스터에 설정된 대로 자격 증명을 등록합니다.
3/8단계. Teleport PagerDuty 플러그인 설치#
Download
Access Request Plugin은 amd64 및 arm64 Linux 바이너리로 다운로드할 수 있습니다.
ARCH를 필요한 버전으로 교체하세요.
$ curl -L -O https://cdn.teleport.dev/teleport-access-pagerduty-v(=teleport.plugin.version=)-linux-ARCH-bin.tar.gz
$ tar -xzf teleport-access-pagerduty-v(=teleport.plugin.version=)-linux-ARCH-bin.tar.gz
$ cd teleport-access-pagerduty
$ sudo ./install
바이너리가 설치되었는지 확인합니다:
$ teleport-pagerduty version
teleport-pagerduty v(=teleport.plugin.version=) git:teleport-pagerduty-v(=teleport.plugin.version=)-fffffffff go(=teleport.golang=)
Docker Image
$ docker pull public.ecr.aws/gravitational/teleport-plugin-pagerduty:(=teleport.plugin.version=)
다음 명령을 실행하여 플러그인이 설치되었는지 확인합니다:
$ docker run public.ecr.aws/gravitational/teleport-plugin-pagerduty:(=teleport.plugin.version=) version
teleport-pagerduty v(=teleport.plugin.version=) (=teleport.golang=)
사용 가능한 태그 목록은 Amazon ECR Public Gallery를 참조하세요.
From Source
소스에서 설치하려면 git과 go가 설치되어 있어야 합니다. Go가 설치되어 있지
않다면 Go downloads page를 방문하세요.
$ git clone https://github.com/gravitational/teleport -b branch/v(=teleport.major_version=)
$ cd teleport/integrations/access/pagerduty
$ git checkout v(=teleport.plugin.version=)
$ make build/teleport-pagerduty
teleport-pagerduty 바이너리를 PATH로 이동합니다.
바이너리가 설치되었는지 확인합니다:
$ teleport-pagerduty version
teleport-pagerduty v(=teleport.plugin.version=) git:teleport-pagerduty-v(=teleport.plugin.version=)-fffffffff go(=teleport.golang=)
Helm Chart
Helm이 Teleport Helm 리포지토리에 호스팅된 차트를 설치할 수 있도록 허용합니다:
$ helm repo add teleport (=teleport.helm_repo_url=)
원격 리포지토리에서 차트 캐시를 업데이트합니다:
$ helm repo update
4/8단계. 액세스 플러그인 ID 내보내기#
플러그인에 Teleport ID 파일 접근 권한을 부여합니다. 유출 시 위험도가 낮은 단기 ID 파일을 생성하기 위해 Machine ID를 사용하는 것을 권장하지만, 데모 배포에서는 tctl로 장기 ID 파일을 생성할 수 있습니다:
the plugin에서 필요로 하는 자격 증명을 생성하는 output으로 tbot을
구성하세요. the plugin가 Teleport API에 접근하므로, 사용해야 할 올바른
output 유형은 identity입니다.
이 가이드에서는 directory destination을 사용합니다. 이는 이러한
자격 증명을 디스크의 지정된 디렉터리에 기록합니다. 이 디렉터리가 tbot이
실행되는 Linux 사용자에 의해 쓰기 가능하고, the plugin가 실행되는
Linux 사용자에 의해 읽기 가능한지 확인하세요.
identity output을 추가하도록 tbot 구성을 수정하세요.
Linux 서버에서 tbot을 실행하는 경우, directory output을 사용하여
identity 파일을 /opt/machine-id 디렉터리에 기록하세요:
services:
- type: identity
  destination:
    type: directory
    # For this guide, /opt/machine-id is used as the destination directory.
    # You may wish to customize this. Multiple outputs cannot share the same
    # destination.
    path: /opt/machine-id
Kubernetes에서 tbot을 실행하는 경우, identity 파일을 대신 Kubernetes secret에
기록하세요:
services:
  - type: identity
    destination:
      type: kubernetes_secret
      name: teleport-plugin-pagerduty-identity
tbot을 백그라운드 서비스로 운영하는 경우, 재시작하세요. tbot을
one-shot 모드로 실행하는 경우, 지금 실행하세요.
이제 /opt/machine-id 아래에 identity 파일 또는 teleport-plugin-pagerduty-identity이라는
이름의 Kubernetes secret이 보일 것입니다. 여기에는 the plugin가 Teleport Auth
Service에 인증하는 데 필요한 개인 키와 서명된 인증서가 담겨 있습니다.
모든 Teleport 사용자와 마찬가지로, access-plugin가 Teleport 클러스터에 연결하려면
서명된 자격 증명이 필요합니다. tctl auth sign 명령을 사용하여 이러한 자격 증명을
요청합니다.
다음 tctl auth sign 명령은 access-plugin 사용자를 impersonate하여 서명된 자격
증명을 생성하고, 로컬 디렉터리에 identity 파일을 작성합니다:
$ tctl auth sign --user=access-plugin --out=identity
plugin는 TLS를 통해 Teleport Auth Service의 gRPC 엔드포인트에 연결합니다.
identity 파일 identity에는 TLS 자격 증명과 SSH 자격 증명이 모두 포함됩니다.
plugin는 SSH 자격 증명을 사용하여 Proxy Service에 연결하며, Proxy Service는
Auth Service로의 리버스 터널 연결을 설정합니다. plugin는 이 리버스 터널과
TLS 자격 증명을 함께 사용하여 Auth Service의 gRPC 엔드포인트에 연결합니다.
Certificate Lifetime
기본적으로 tctl auth sign은 비교적 짧은 수명을 가진 인증서를 생성합니다.
프로덕션 배포의 경우, 플러그인의 인증서를 프로그래밍 방식으로 발급하고 갱신하기
위해 Machine
& Workload Identity를 사용하는 것을 권장합니다.
자세히 알아보려면 Machine & Workload Identity 시작
가이드를 참조하세요.
기존 자격 증명보다 더 오래 유효한 인증서는 발급할 수 없다는 점에 유의하세요.
예를 들어, 1000시간 TTL을 가진 인증서를 발급하려면 최소 1000시간 동안 유효한
세션으로 로그인되어 있어야 합니다. 즉, 사용자는 최소 1000시간(60000분)의
max_session_ttl을 허용하는 역할을 가지고 있어야 하며, 로그인 시 --ttl을
지정해야 합니다:
$ tsh login --proxy=teleport.example.com --ttl=60060
Linux 서버에서 plugin를 실행하는 경우, plugin의 인증서 파일을 저장할 데이터 디렉터리를 생성합니다:
$ sudo mkdir -p /var/lib/teleport/plugins/api-credentials
$ sudo mv identity /var/lib/teleport/plugins/api-credentials
Kubernetes에서 plugin를 실행하는 경우, Teleport identity 파일이 포함된 Kubernetes secret을 생성합니다:
$ kubectl -n teleport create secret generic --from-file=identity teleport-plugin-pagerduty-identity
Teleport 자격 증명이 만료되면 tctl auth sign 명령을 다시 실행하여 갱신해야
합니다.
5/8단계. PagerDuty API 키 설정#
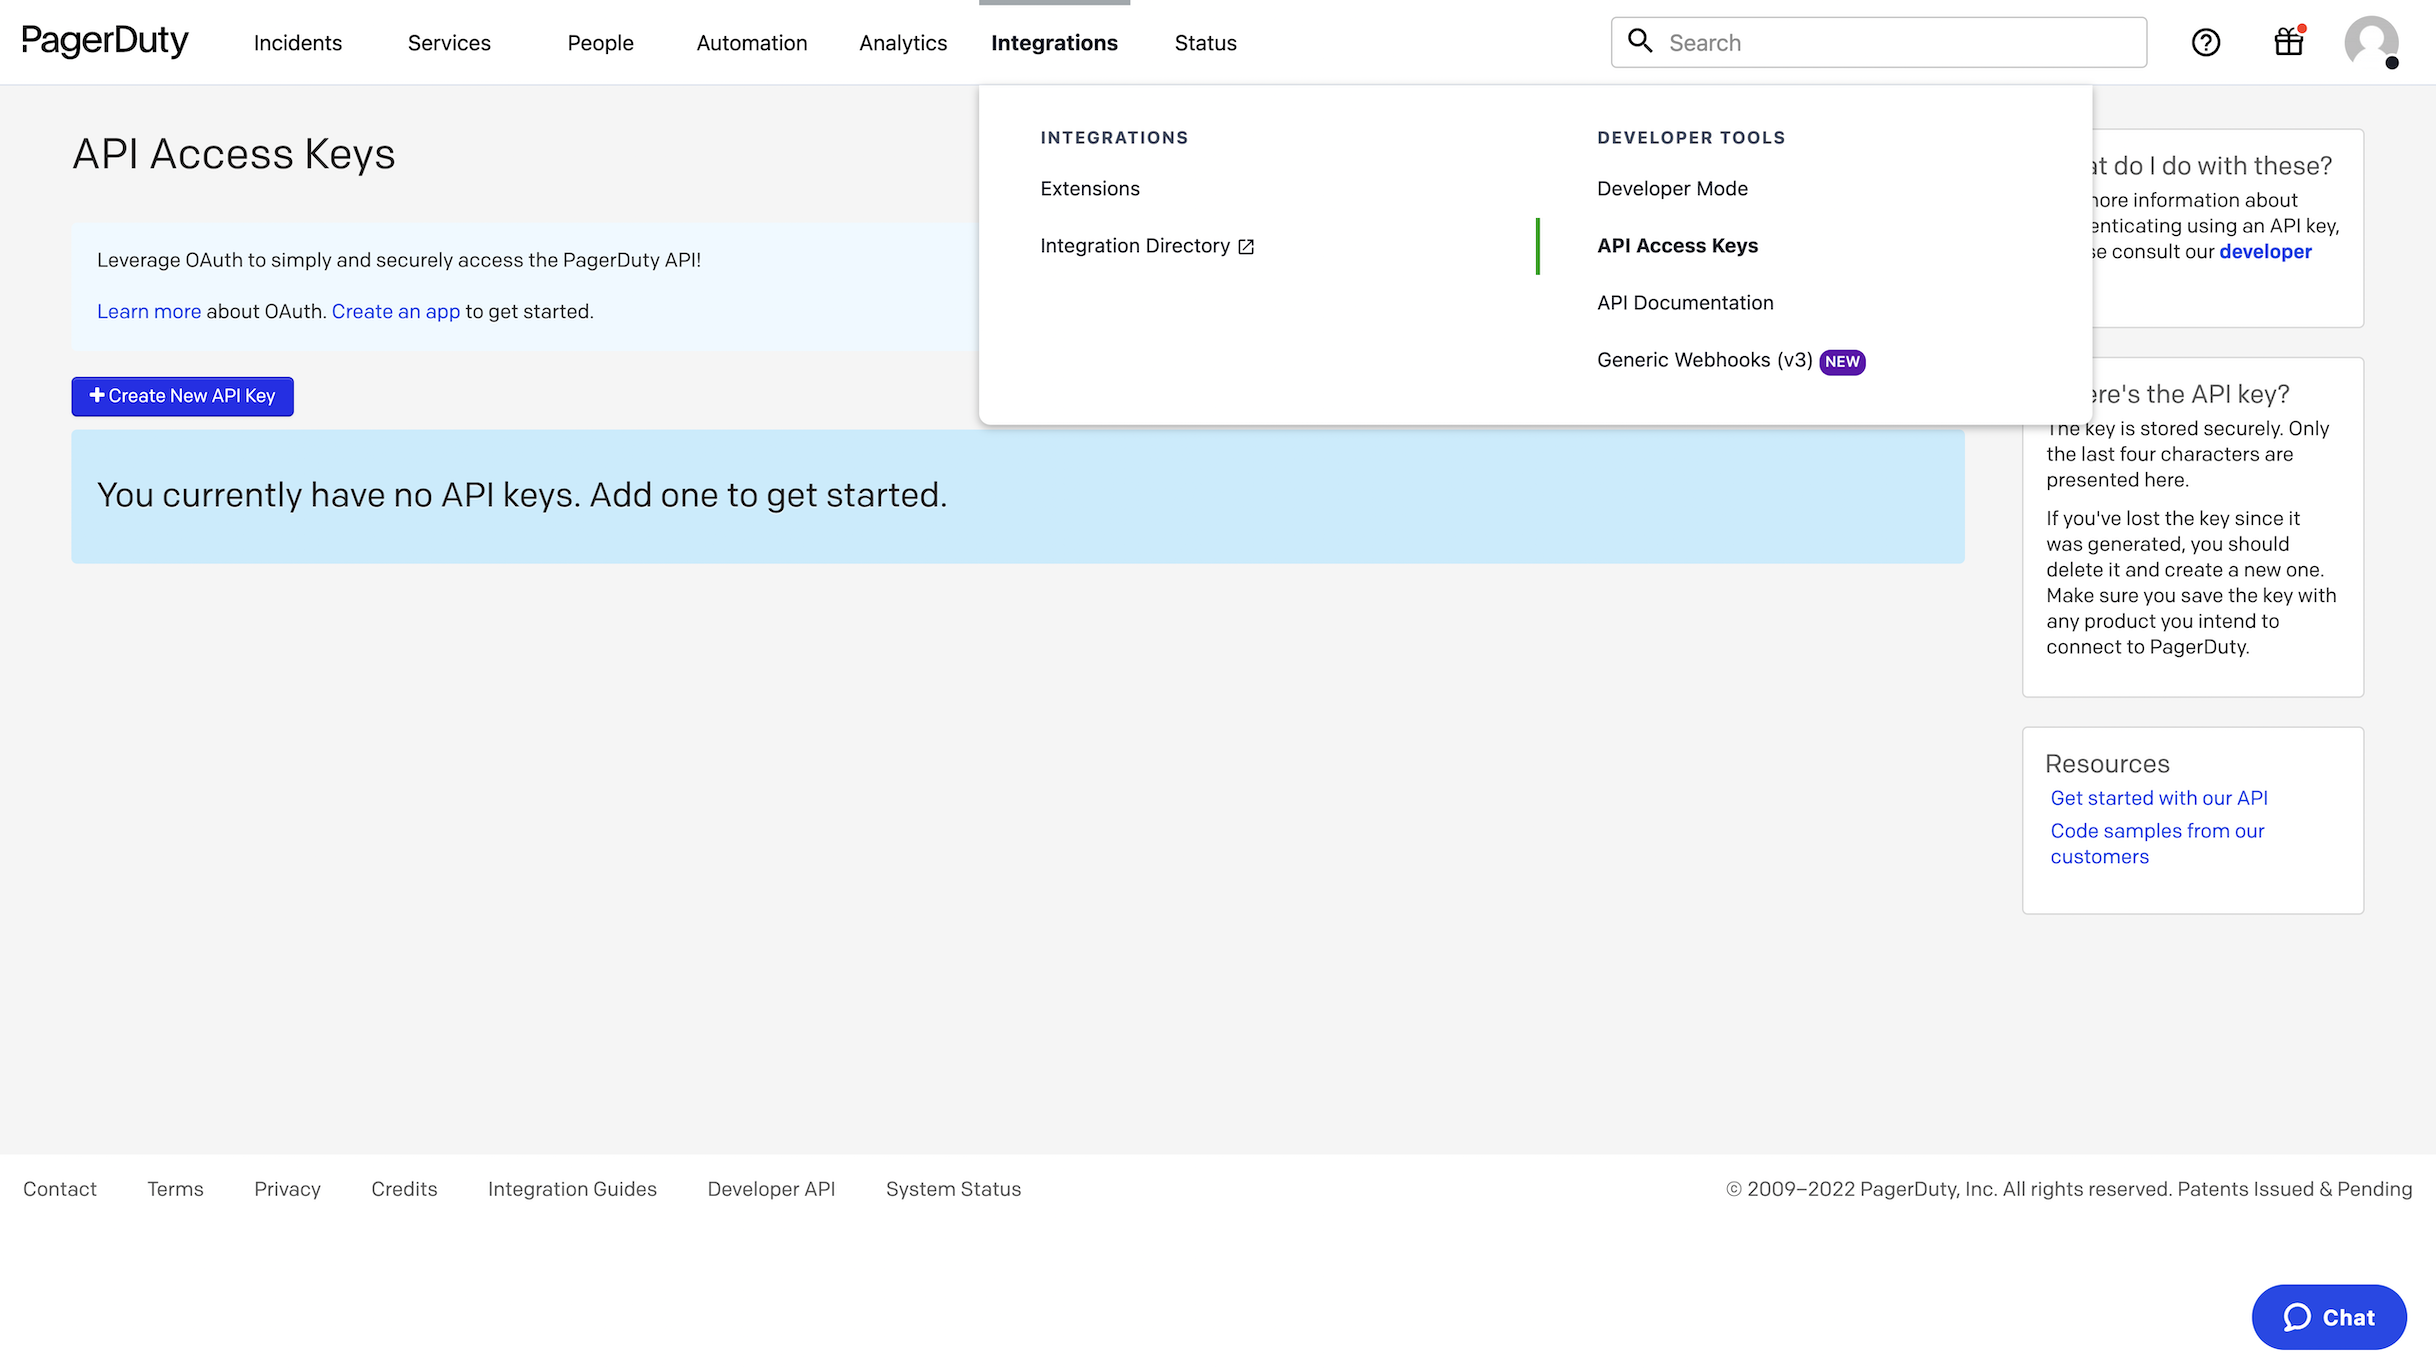
PagerDuty 플러그인이 인시던트를 생성 및 수정하고 사용자, 서비스, 온콜 정책을 나열하는 데 사용할 API 키를 생성합니다.
PagerDuty 대시보드에서 통합 → API 액세스 키로 이동하여 새 API 키 생성을 클릭합니다. 키 설명(예: "Teleport integration")을 추가합니다. "읽기 전용 API 키"의 체크를 해제합니다. 로컬 머신의 파일에 키를 복사합니다. 나중에 플러그인 설정 파일에서 이 키를 사용합니다.
6/8단계. PagerDuty 플러그인 설정#
이 시점에서 PagerDuty 플러그인이 Teleport와 PagerDuty API에 연결하는 데 사용할 자격 증명을 생성했습니다. 이제 이 자격 증명을 사용하고 환경에 필요한 설정을 조정하도록 PagerDuty 플러그인을 설정합니다.
Teleport의 PagerDuty 플러그인은 TOML 형식의 자체 설정 파일을 갖습니다. PagerDuty 플러그인을 실행할 호스트에서 다음 명령을 실행하여 기본 설정을 생성합니다:
$ teleport-pagerduty configure > teleport-pagerduty.toml
$ sudo mv teleport-pagerduty.toml /etc
PagerDuty Helm Chart는 플러그인을 설정하기 위해 YAML 값 파일을 사용합니다. Helm이 설치된 호스트에서 다음 예시를 기반으로 teleport-pagerduty-values.yaml 파일을 생성합니다:
teleport:
  address: ""                 # Teleport Auth Service GRPC API 주소
  identitySecretName: ""      # ID 시크릿 이름
  identitySecretPath: ""      # ID 시크릿 경로

pagerduty:
  apiKey: ""                  # PagerDuty API 키
  userEmail: ""               # PagerDuty 봇 사용자 이메일 (관리자 이메일일 수 있음)
다른 위치에 설정 저장
PagerDuty 플러그인은 설정이 /etc/teleport-pagerduty.toml에 있을 것으로 예상하지만, 이 가이드의 뒷부분에서 플러그인 바이너리를 실행할 때 --config 플래그로 이를 재정의할 수 있습니다.
아래 설명에 따라 /etc/teleport-pagerduty.toml의 설정 파일을 편집합니다:
[teleport]#
PagerDuty 플러그인은 이 섹션을 사용하여 Teleport 클러스터에 연결합니다:
Executable or Docker
addr: Teleport Proxy Service 또는 Teleport Enterprise Cloud 계정의 호스트명과
HTTPS 포트를 입력합니다(예: teleport.example.com:443 또는
mytenant.teleport.sh:443).
identity: 앞서 내보낸 identity 파일의 경로를 입력합니다.
client_key, client_crt, root_cas: 이 구성에서는 사용하지 않으므로
주석 처리합니다.
Helm Chart
address: Teleport Proxy Service 또는 Teleport Enterprise Cloud 테넌트의 호스트명과
HTTPS 포트를 입력합니다(예: teleport.example.com:443 또는
mytenant.teleport.sh:443).
identitySecretName: identitySecretName 필드에 앞서 생성한 Kubernetes secret의
이름을 입력합니다.
identitySecretPath: identitySecretPath 필드에 Kubernetes secret 내 identity
파일의 경로를 입력합니다. 위 지침을 따랐다면 identity가 됩니다.
Linux 서버에서 실행되는 tbot 바이너리를 사용하여 플러그인에 자격 증명을
제공하는 경우, identity 값이 tbot이 생성하도록 구성한 신원 파일의 경로인
/opt/machine-id/identity와 동일한지 확인하십시오.
플러그인이 만료된 자격 증명으로 Teleport Auth Service에 연결을 시도하지 않도록 신원 파일을 주기적으로 다시 로드하도록 플러그인을 구성하십시오.
구성의 teleport 섹션에 다음을 추가하십시오:
refresh_identity = true
[pagerduty]#
api_key를 이전에 생성한 PagerDuty API 키로 지정합니다.
user_email을 API 키와 연결된 PagerDuty 계정의 사용자 이메일 주소로 지정합니다. PagerDuty 플러그인이 새 인시던트를 생성하면, PagerDuty는 이 인시던트를 해당 사용자가 생성한 것으로 표시합니다.
어노테이션 이름 재정의
이 가이드에서는 Teleport PagerDuty 플러그인이 새 Access Request 이벤트를 알릴 서비스를 결정하는 데 pagerduty_notify_service 어노테이션을, 자동 승인을 설정하는 데 pagerduty_services 어노테이션을 사용한다고 가정했습니다.
Teleport 역할에서 이 어노테이션에 다른 이름을 사용하려면, pagerduty.notify_service와 pagerduty.services 필드를 지정할 수 있습니다.
최종 설정은 다음과 유사해야 합니다:
<div class="admonition note"><div class="admonition-title">Note</div><p>이 섹션의 내용은 원문 문서를 참조하세요. (<code>teleport-pagerduty-cloud.toml</code>)</p></div>
<div class="admonition note"><div class="admonition-title">Note</div><p>이 섹션의 내용은 원문 문서를 참조하세요. (<code>teleport-pagerduty-helm-cloud.yaml</code>)</p></div>
7/8단계. PagerDuty 플러그인 테스트#
PagerDuty 플러그인을 설정한 후, 다음 명령을 실행하여 시작합니다. -d 플래그는 플러그인이 PagerDuty와 Teleport 클러스터에 연결할 수 있는지 확인하기 위한 디버그 정보를 제공합니다:
$ teleport-pagerduty start -d
# DEBU   DEBUG logging enabled logrus/exported.go:117
# INFO   Starting Teleport Access PagerDuty extension 0.1.0-dev.1: pagerduty/main.go:124
# DEBU   Checking Teleport server version pagerduty/main.go:226
# DEBU   Starting a request watcher... pagerduty/main.go:288
# DEBU   Starting PagerDuty API health check... pagerduty/main.go:170
# DEBU   Starting secure HTTPS server on :8081 utils/http.go:146
# DEBU   Watcher connected pagerduty/main.go:252
# DEBU   PagerDuty API health check finished ok pagerduty/main.go:176
# DEBU   Setting up the webhook extensions pagerduty/main.go:178
플러그인 실행:
$ docker run -v <path-to-config>:/etc/teleport-pagerduty.toml public.ecr.aws/gravitational/teleport-plugin-pagerduty:(=teleport.version=) start
설정을 수정한 후, 다음 명령으로 봇을 실행합니다:
$ helm upgrade --install teleport-plugin-pagerduty teleport/teleport-plugin-pagerduty --values teleport-pagerduty-values.yaml
플러그인의 로그를 검사하려면, 다음 명령을 사용합니다:
$ kubectl logs deploy/teleport-plugin-pagerduty
teleport-pagerduty-values.yaml에서 log.severity를 DEBUG로 설정하고 위의 helm upgrade ... 명령을 다시 실행하여 디버그 로그를 활성화할 수 있습니다. 그런 다음 다음 명령으로 플러그인을 재시작할 수 있습니다:
$ kubectl rollout restart deployment teleport-plugin-pagerduty
Access Request 생성#
Teleport 사용자 myuser로 editor 역할에 대한 Access Request를 생성합니다:
As an Admin
Teleport 관리자는 tctl을 사용하여 다른 사용자를 위한 Access Request를 생성할 수 있습니다:
$ tctl request create myuser --roles=editor
As a User
사용자는 tsh를 사용하여 Access Request를 생성하고 승인된 역할로 로그인할 수 있습니다:
$ tsh request create --roles=editor
Seeking request approval... (id: 8f77d2d1-2bbf-4031-a300-58926237a807)
From the Web UI
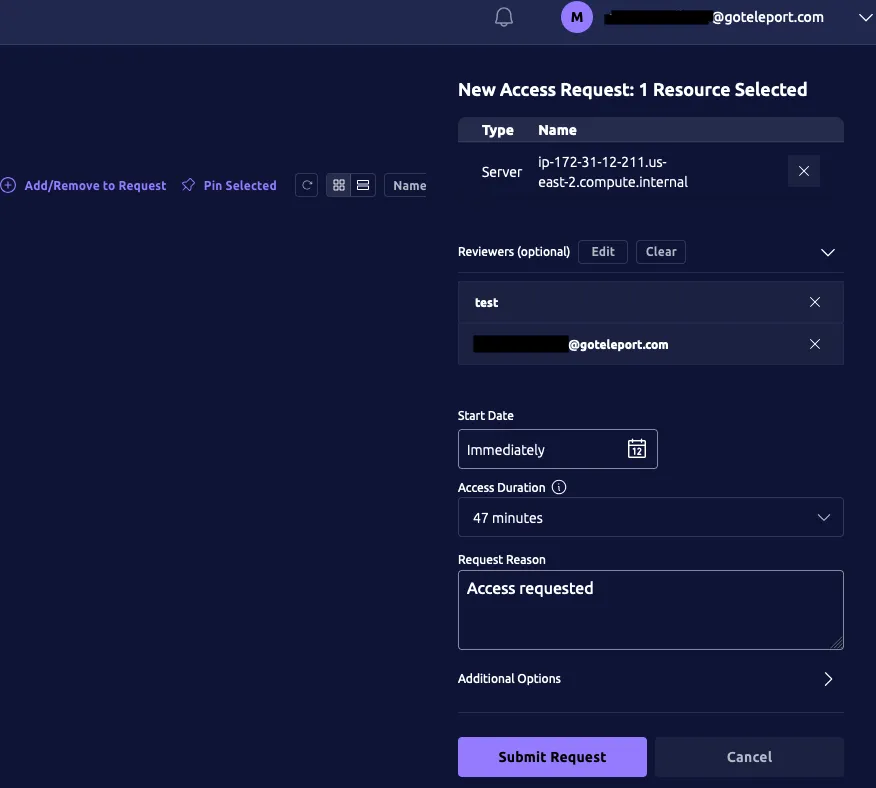
사용자는 Web UI에서 "Identity"로 이동하여 "Access Requests"를 클릭한 다음 "New Request"를 클릭하여 액세스를 요청할 수 있습니다:
PagerDuty 플러그인 호스트에서 다음과 유사한 로그를 확인해야 합니다:
INFO   Successfully created PagerDuty incident pd_incident_id:00000000000000
pd_service_name:Teleport Access Request Notifications
request_id:00000000-0000-0000-0000-000000000000 request_op:put
request_state:PENDING pagerduty/app.go:366
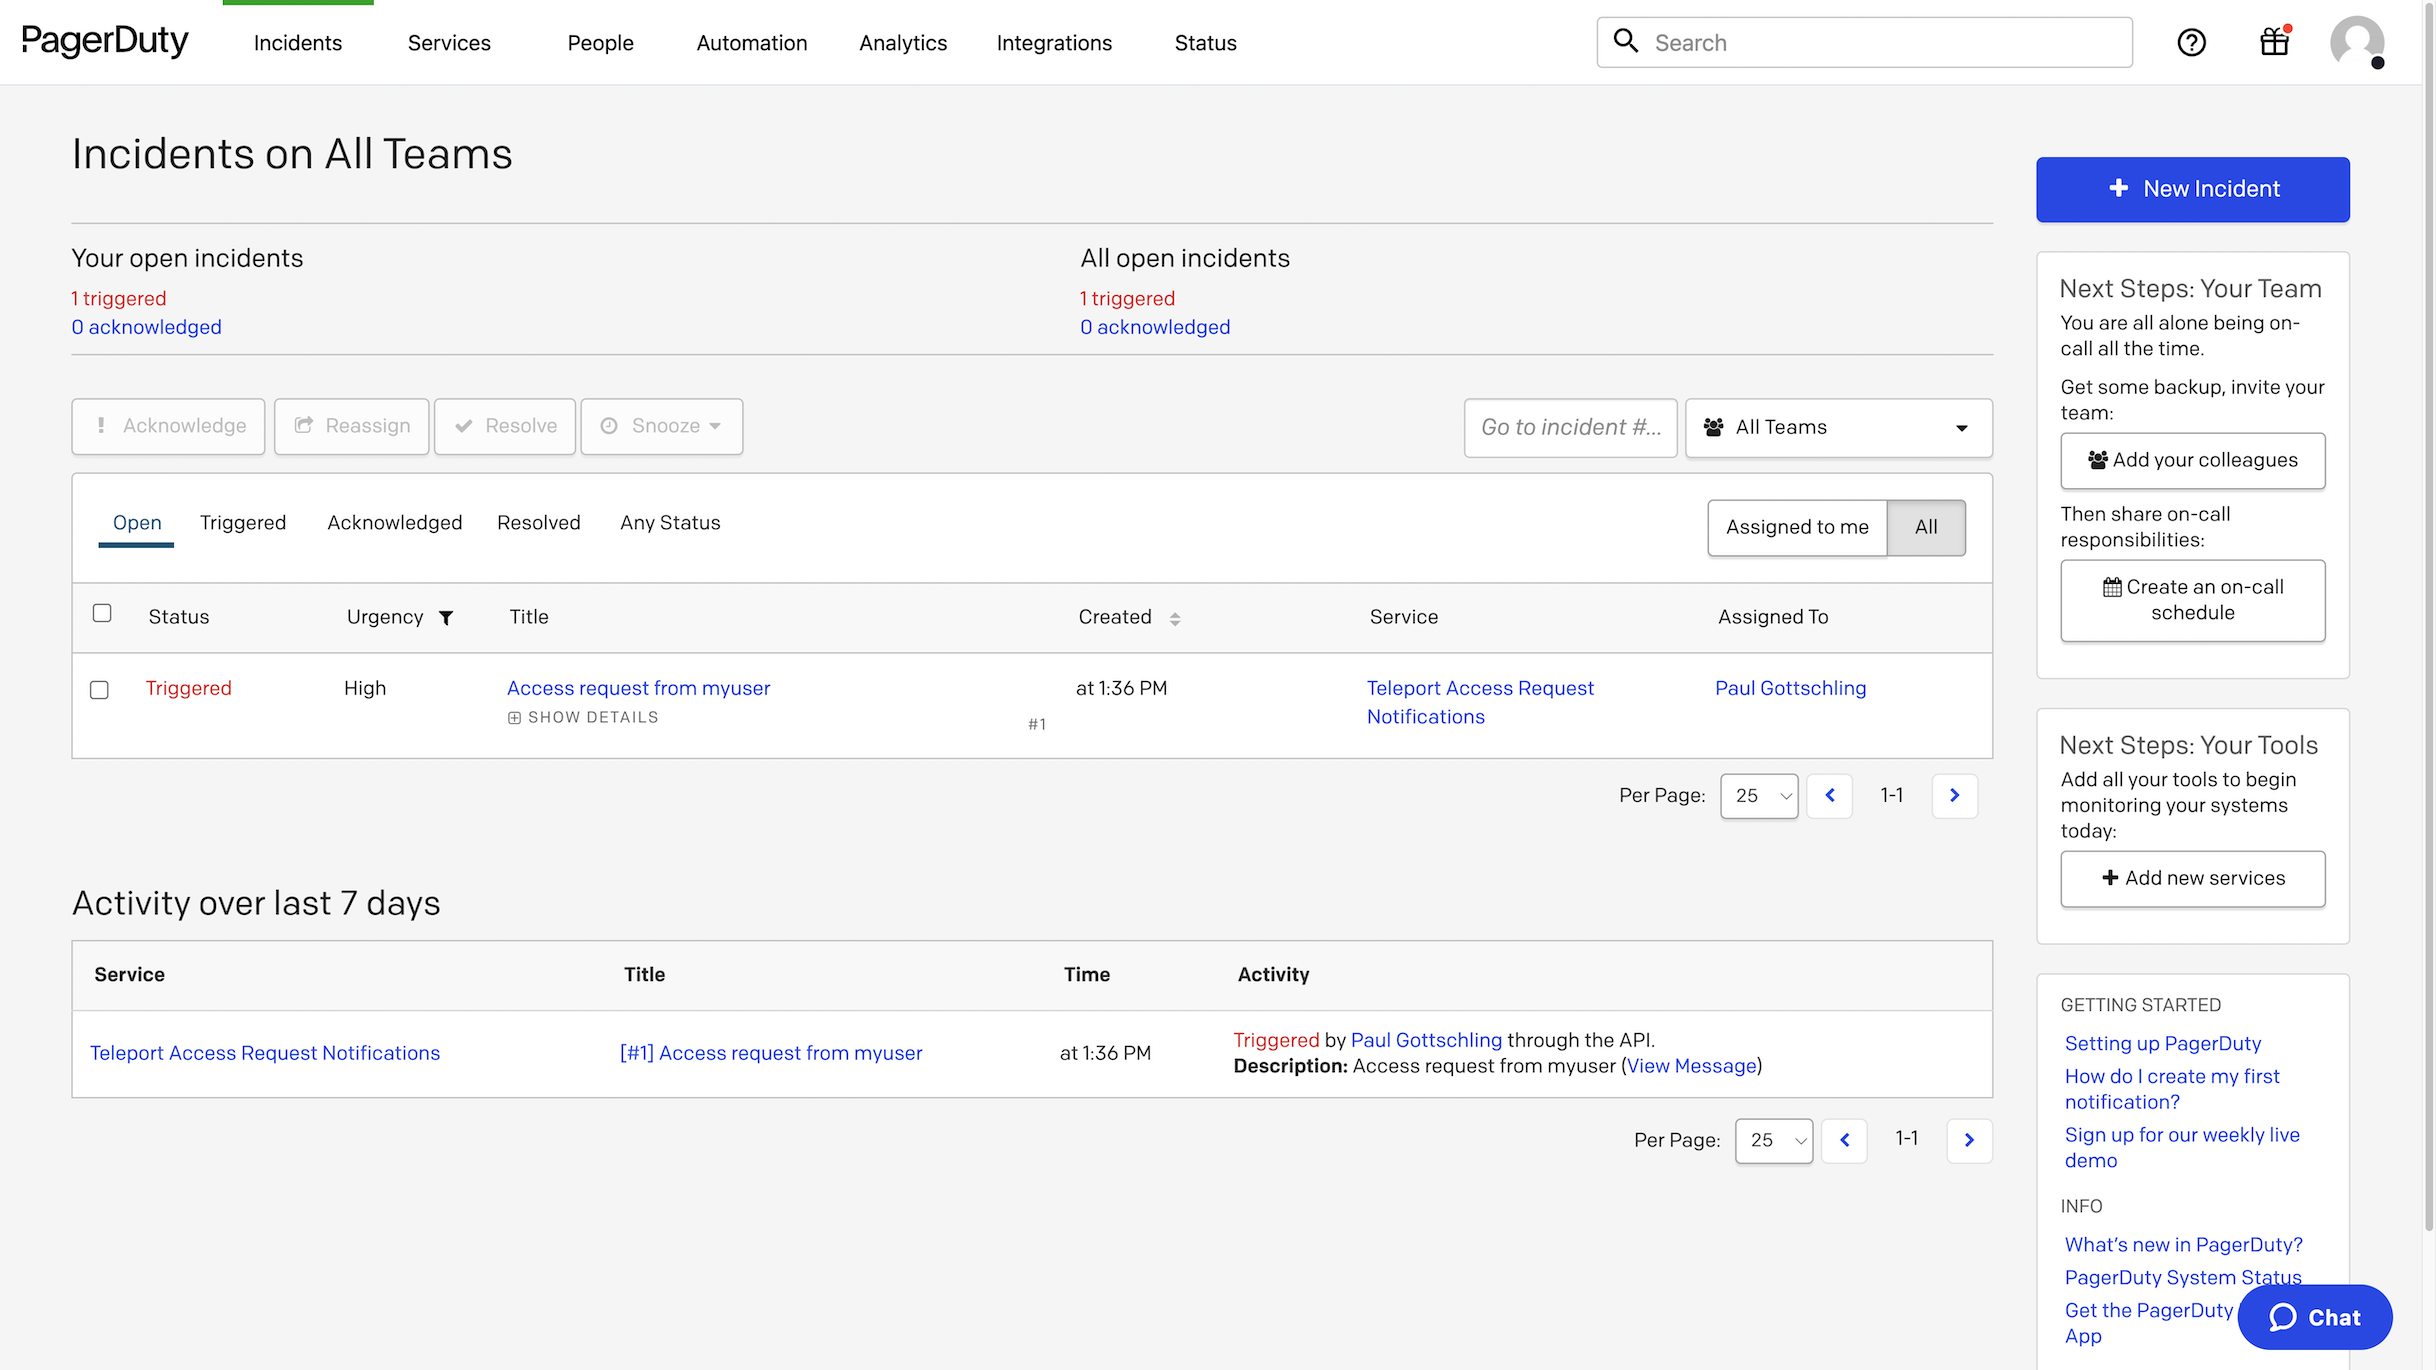
PagerDuty에서 Access Request에 대한 정보가 포함된 새 인시던트가 표시됩니다:
요청 해결#
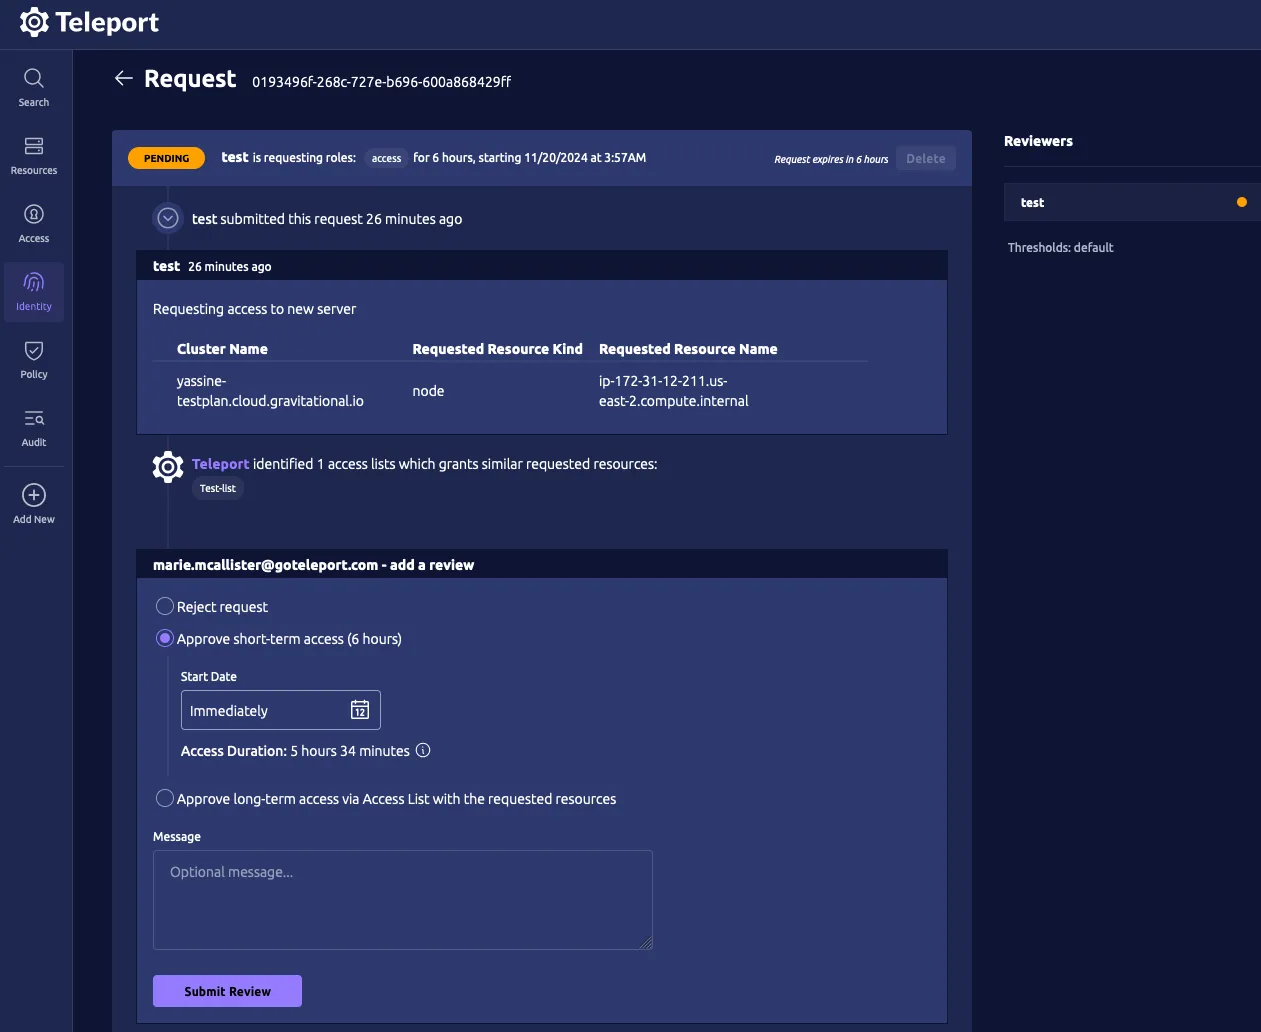
Access Request 메시지를 받으면 링크를 클릭하여 Teleport로 이동한 후 요청을 승인하거나 거부하십시오:
명령줄에서 검토하기
명령줄에서도 Access Request를 검토할 수 있습니다:
As an Admin
# Replace REQUEST_ID with the id of the request
$ tctl request approve REQUEST_ID
$ tctl request deny REQUEST_ID
As a User
# Replace REQUEST_ID with the id of the request
$ tsh request review --approve REQUEST_ID
$ tsh request review --deny REQUEST_ID
PagerDuty 플러그인이 알림을 보낼 때, 알림을 받은 모든 사람이 포함된 링크를 따라 Access Request URL에 접근할 수 있습니다. 사용자가 Teleport 역할을 통해 Access Request를 검토하도록 권한을 받아야 하지만, 올바른 사용자가 올바른 요청을 검토하고 있는지 확인하기 위해 Teleport 감사 로그를 확인해야 합니다.
Access Request 검토를 감사할 때, Teleport Web UI에서 Access Request Reviewed 유형의 이벤트를 확인합니다.
자동 승인 트리거#
Teleport 사용자로 demo-role 역할에 대한 Access Request를 생성합니다.
PagerDuty 플러그인 호스트에서 다음과 유사한 로그를 확인할 수 있습니다:
INFO   Successfully submitted a request approval
pd_user_email:myuser@example.com pd_user_name:My User
request_id:00000000-0000-0000-0000-000000000000 request_op:put
request_state:PENDING pagerduty/app.go:511
Access Request가 APPROVED로 표시됩니다:
$ tsh requests ls
ID                                   User               Roles     Created (UTC)       Status
------------------------------------ ------------------ --------- ------------------- --------
00000000-0000-0000-0000-000000000000 myuser@example.com demo-role 12 Aug 22 18:30 UTC APPROVED
8/8단계. systemd 설정#
이 섹션은 Linux 호스트에서 Teleport PagerDuty 플러그인을 실행하는 경우에만 해당됩니다.
프로덕션 환경에서는 systemd와 같은 init 시스템을 통해 Teleport 플러그인 데몬을 시작하는 것을 권장합니다. systemd를 위한 권장 Teleport 플러그인 서비스 유닛 파일은 다음과 같습니다:
<div class="admonition note"><div class="admonition-title">Note</div><p>이 섹션의 내용은 원문 문서를 참조하세요. (<code>teleport-pagerduty.service</code>)</p></div>
이를 /usr/lib/systemd/system/ 또는 systemd가 지원하는 다른 유닛 파일 로드 경로에 teleport-pagerduty.service로 저장합니다.
플러그인을 활성화하고 시작합니다:
$ sudo systemctl enable teleport-pagerduty
$ sudo systemctl start teleport-pagerduty
문제 해결#
이 섹션의 내용은 원문 문서를 참조하세요. (access-plugin-troubleshooting.mdx)