





Jamf Pro 연동
Teleport v18.10요약
Device Trust Jamf Pro 연동을 통해 Jamf Pro 컴퓨터 인벤토리를 Teleport에 자동으로 동기화할 수 있습니다. Teleport Jamf Pro 서비스는 별도의 teleport 프로세스로, Jamf Pro에서 컴퓨터 인벤토리를 주기적으로 읽어 Teleport에 동기화합니다.
Device Trust Jamf Pro 연동을 통해 Jamf Pro 컴퓨터 인벤토리를 Teleport에 자동으로 동기화할 수 있습니다.
작동 방식#
Teleport Jamf Pro 서비스는 별도의 teleport 프로세스로, Jamf Pro에서 컴퓨터 인벤토리를 주기적으로 읽어 Teleport에 동기화합니다. 증분("부분") 동기화와 전체 동기화를 모두 수행하며, Jamf Pro에서 컴퓨터가 제거되면 Teleport에서도 제거합니다.
Jamf Pro에서 디바이스를 동기화하는 것은 인벤토리 관리 단계로, 해당하는 tctl devices add 명령을 자동으로 실행하는 것과 동일합니다.
기본적인 Device Trust 개념과 동작에 대해서는 Device Trust 가이드를 참조하세요.
이 연동은 Teleport Cloud에서 호스팅됩니다
Teleport Enterprise Cloud에서는 Teleport가 the Jamf Pro integration를 대신 관리하며, Teleport 웹 UI에서 the Jamf Pro integration를 등록할 수 있습니다.
Teleport 웹 UI로 이동하여 왼쪽 사이드바에서 Add New를 클릭한 다음 Integration을 클릭하십시오:
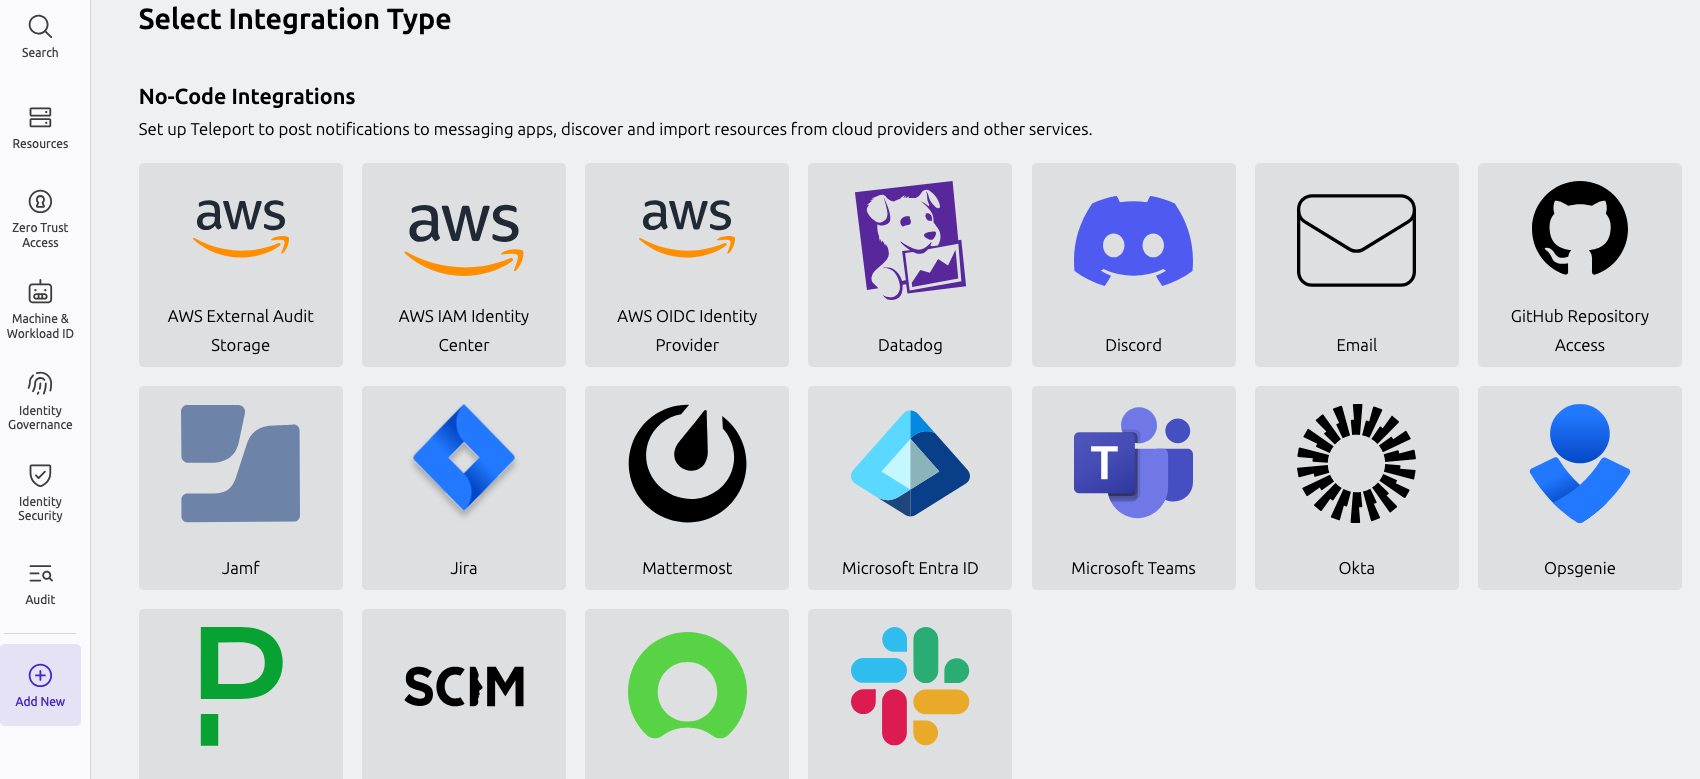
"Select Integration Type" 메뉴에서 사용할 통합의 타일을 클릭하십시오. 통합을 설정하는 방법에 대한 지침과 함께 통합을 구성하는 데 사용할 수 있는 양식이 있는 페이지가 표시됩니다.
사전 요구 사항#
-
실행 중인 Teleport Enterprise 클러스터. Teleport를 시작하려면 무료 체험판에 가입하거나 데모 환경을 구성하세요.
-
tctlandtshclients.Installing `tctl` and `tsh` clients
-
Teleport 클러스터의 버전을 확인합니다.
tctlandtshclients는 Teleport 클러스터 버전보다 최대 한 개의 메이저 버전까지만 뒤처질 수 있습니다. Proxy Service의/v1/webapi/find로 GET 요청을 보내고 JSON 쿼리 도구를 사용하여 클러스터 버전을 확인합니다.teleport.example.com:443를 Teleport Proxy Service의 웹 주소로 바꿉니다:$ TELEPORT_DOMAIN=teleport.example.com:443 $ TELEPORT_VERSION="$(curl -s https://$TELEPORT_DOMAIN/v1/webapi/find | jq -r '.server_version')" -
사용 중인 플랫폼에 대한 지침에 따라
tctlandtshclients를 설치합니다:
-
Mac
     `tctl` and `tsh` clients가 포함된, 서명된 Teleport macOS .pkg 설치 프로그램을 다운로드합니다:

     ```code
     $ curl -O https://cdn.teleport.dev/teleport-${TELEPORT_VERSION?}.pkg
     ```

     Finder에서 `pkg` 파일을 더블 클릭하여 설치를 시작합니다.
       Homebrew를 사용하여 Teleport를 설치하는 것은 지원되지 않습니다. Homebrew의
       Teleport 패키지는 Teleport에서 유지 관리하지 않으므로 신뢰성이나 보안을
       보장할 수 없습니다.
Windows - Powershell
     ```code
     $ curl.exe -O https://cdn.teleport.dev/teleport-v${TELEPORT_VERSION?}-windows-amd64-bin.zip
     # Unzip the archive and move the `tctl` and `tsh` clients to your %PATH%
     # NOTE: Do not place the `tctl` and `tsh` clients in the System32 directory, as this can cause issues when using WinSCP.
     # Use %SystemRoot% (C:\Windows) or %USERPROFILE% (C:\Users\<username>) instead.
     ```
Linux
     Linux 설치판의 모든 Teleport 바이너리에는 `tctl` and `tsh` clients가 포함되어 있습니다.  RPM/DEB
     패키지 및 i386/ARM/ARM64용 다운로드를 포함한 더 많은 옵션은
     [설치 페이지](../installation/installation.mdx)를 참조하세요.

     ```code
     $ curl -O https://cdn.teleport.dev/teleport-v${TELEPORT_VERSION?}-linux-amd64-bin.tar.gz
     $ tar -xzf teleport-v${TELEPORT_VERSION?}-linux-amd64-bin.tar.gz
     $ cd teleport
     $ sudo ./install
     # Teleport binaries have been copied to /usr/local/bin
     ```
-
macOS 디바이스를 등록하려면 다음이 필요합니다:
- 서명 및 공증된
tsh바이너리. macOS tsh 설치 프로그램 다운로드.
- 서명 및 공증된
-
Windows 디바이스를 등록하려면 다음이 필요합니다:
- TPM 2.0을 갖춘 디바이스.
- 관리자 권한을 가진 사용자. 이는 등록 중에만 필요합니다.
tsh클라이언트. Windows tsh 설치 프로그램 다운로드.
-
Linux 디바이스를 등록하려면 다음이 필요합니다:
-
TPM 2.0을 갖춘 디바이스.
-
/dev/tpmrm0 디바이스를 사용할 권한을 가진 사용자(일반적으로 사용자에게
tss그룹을 할당하여 처리). -
tsh클라이언트. Linux용 tsh 설치.WSL 사용자는 대신 Windows 바이너리를 사용해야 합니다. Windows tsh 설치 프로그램 다운로드.
-
-
Web UI 세션을 인증하려면 Teleport Connect가 필요합니다
-
Teleport 배포로의 올바른 최종 사용자 IP 전파: X-Forwarded-For 헤더(L7 로드 밸런서) 또는 PROXY 프로토콜(L4 로드 밸런서)
1/4단계. Jamf API 자격 증명 생성#
Teleport v16.0.0 이하 버전은 Jamf API 자격 증명을 지원하지 않습니다. 대신 Jamf 사용자 이름 및 비밀번호 인증 사용의 지침을 따르세요.
역할 및 API 클라이언트를 생성하려면 Jamf API 역할 및 클라이언트의 지침을 따르세요. Teleport 전용으로 역할과 API 클라이언트를 생성하는 것을 권장합니다.
Jamf 역할에 "Read Computers" 권한이 있는지 확인하세요.
다음 Jamf 쿼리를 사용하여 클라이언트 자격 증명을 테스트할 수 있습니다. [jamf.api_endpoint]" description="Jamf API URL" />을 Jamf API 엔드포인트로, [jamf.client_id]" description="Jamf API client ID" />를 클라이언트 ID로, [jamf.client_secret]" description="Jamf API client secret" />을 클라이언트 시크릿으로 교체하세요:
$ URL='(=jamf.api_endpoint=)'
$ CLIENT_ID='(=jamf.client_id=)'
$ CLIENT_SECRET='(=jamf.client_secret=)'

## Acquire access token from Jamf.
$ TOKEN_RESP="$(curl -X POST "$URL/api/oauth/token" \
  -H 'Content-Type: application/x-www-form-urlencoded' \
  --data-urlencode 'grant_type=client_credentials' \
  --data-urlencode "client_id=$CLIENT_ID" \
  --data-urlencode "client_secret=$CLIENT_SECRET" -s)"
$ echo "$TOKEN_RESP"
$ ACCESS_TOKEN="$(echo "$TOKEN_RESP" | jq -r .access_token)"

## Test access token privileges.
$ curl -H "Authorization: Bearer $ACCESS_TOKEN" "$URL/api/v1/computers-inventory?page-size=1"
위 쿼리는 Jamf에서 인벤토리 항목을 출력해야 합니다. 권한 오류(401 또는 403)가 발생하면 클라이언트 자격 증명, 역할 권한을 다시 확인하고 API 클라이언트를 재생성해 보세요.
2/4단계. Jamf 서비스 구성#
Teleport Cloud 사용자는 웹 UI에서 호스팅 Jamf 플러그인을 사용하여 Jamf 연동을 빠르게 시작할 수 있습니다.
Jamf 호스팅 플러그인 구성
Jamf 플러그인 선택:  필요한 정보를 입력하고 "Connect Jamf" 버튼을 클릭합니다: Jamf 인벤토리 동기화는 별도의 teleport 프로세스에 의해 수행되며, jamf_service 키를 사용하여 구성됩니다. 위 단계에서 생성된 Jamf 자격 증명이 필요하므로 다른 Teleport 프로세스와 분리하여 서비스를 실행하는 것을 권장합니다.
다음 파일을 /var/lib/teleport.yaml로 저장하고 필요에 따라 편집하세요:
version: v3
teleport:
  # Necessary to write devices back to Teleport.
  proxy_server: (=clusterDefaults.clusterName=):443 # CHANGEME
  join_params:
    method: "token"
    token_name: "/tmp/token"

jamf_service:
  enabled: true
  name: jamf
  api_endpoint: (=jamf.api_endpoint=) #CHANGEME
  client_id:    (=jamf.client_id=) #CHANGEME
  client_secret_file: /var/lib/teleport/jamf_client_secret.txt

auth_service:
  enabled: false

proxy_service:
  enabled: false

ssh_service:
  enabled: false
적절히 다음 설정을 변경하세요:
- teleport.proxy_server
- jamf_service.api_endpoint
- jamf_service.client_id
마지막으로, /var/lib/teleport/jamf_client_secret 파일에 Jamf 클라이언트 시크릿을 작성하세요:
$ sudo nano /var/lib/teleport/jamf_client_secret # or use your favorite editor

# Only the OS user that runs `teleport` should have access to the secret file.
$ sudo chmod 400 /var/lib/teleport/jamf_client_secret
$ sudo chown teleport /var/lib/teleport/jamf_client_secret
3/4단계. 조인 토큰 생성#
Jamf 서비스는 Teleport에 디바이스를 기록하기 위해 MDM 토큰이 필요합니다. 로컬 워크스테이션에서 다음과 같이 토큰을 생성하세요:
$ tctl tokens add --type=mdm
The invite token: (=presets.tokens.second=)
This token will expire in 30 minutes.

From the Jamf service host, use this token to add an MDM service to Teleport.

> teleport start \
   --token=(=presets.tokens.second=) \
   --ca-pin=(=presets.ca_pin=)\
   --config=/path/to/teleport.yaml
Jamf 서비스 호스트에서 토큰을 /tmp/token 파일에 기록하세요.
4/4단계. Jamf 서비스 시작#
위에서 생성한 토큰을 사용하여 서비스를 시작하세요:
systemd 서비스를 생성하여 호스트가 부팅될 때 your Teleport instance이 자동으로 시작되도록 구성합니다. 지침은 your Teleport instance을 어떻게 설치했는지에 따라 다릅니다.
Package Manager
your Teleport instance을 실행할 호스트에서 Teleport를 활성화하고 시작합니다:
$ sudo systemctl enable teleport
$ sudo systemctl start teleport
TAR Archive
your Teleport instance을 실행할 호스트에서 Teleport용 systemd 서비스 구성을 생성하고, Teleport 서비스를 활성화한 후 Teleport를 시작합니다:
$ sudo teleport install systemd -o /etc/systemd/system/teleport.service
$ sudo systemctl enable teleport
$ sudo systemctl start teleport
systemctl status teleport로 your Teleport instance의 상태를 확인하고 journalctl -fu teleport로
로그를 볼 수 있습니다.
초기 동기화는 몇 분 안에 발생합니다. Teleport 서비스 로그에서 확인할 수 있습니다:
2023-06-21T17:26:40-03:00 INFO [JAMF:1]    Jamf service successfully started pid:25757.1 service/service.go:228
2023-06-21T17:26:40-03:00 INFO [JAMF:1]    Starting sync CutTime:0001-01-01 00:00:00 +0000 UTC FilterRSQL: Mode:1 OnMissing:DELETE pid:25757.1 service/service.go:261
2023-06-21T17:26:40-03:00 INFO [JAMF:1]    Device sync report, page #0 deletes:0 failures:0 pid:25757.1 upserts:1 service/service.go:666
2023-06-21T17:26:40-03:00 INFO [JAMF:1]    Sync complete pid:25757.1 service/service.go:277
기본 구성을 사용하면 서비스가 몇 시간마다 Jamf에서 디바이스를 동기화합니다. 하루에 한 번 전체 인벤토리 동기화가 수행되어 Jamf의 모든 디바이스를 열거하고 Teleport에서 추가 또는 제거를 반영합니다.
초기 동기화 후 tctl devices ls를 사용하여 동기화된 디바이스를 확인할 수 있습니다:
$ tctl devices ls
Asset Tag    OS    Source Enroll Status Owner Device ID
------------ ----- ------ ------------- ----- ------------------------------------
CXXXXXXXXX17 macOS Jamf   not enrolled        20ec6373-9e8e-46e0-8f1c-47ad6b06a768
CXXXXXXXXX2T macOS Jamf   not enrolled        79755778-7cbe-4e2c-83ec-7eaa3d4d7e36
CXXXXXXXXX3T macOS Jamf   not enrolled        665e59d5-393a-4894-841d-edad06329717
CXXXXXXXXX4T macOS Jamf   not enrolled        dd032e90-bfb0-47d5-bce5-e57545f6788f
CXXXXXXXXX5T macOS Jamf   not enrolled        bf189863-a94a-40dc-9013-d96f8dada2f1
(...)
선택 사항: 동기화 일정 사용자 지정#
위 단계에서 설명한 최소 구성을 사용할 때 Jamf 서비스는 기본 동기화 일정을 사용합니다. Jamf Pro API에서 제공하는 RSQL 필터를 적용하여 동기화 간격 및 Jamf에서 동기화되는 디바이스 집합을 사용자 지정할 수 있습니다. Jamf는 24시간에 한 번 이하의 전체 동기화를 권장합니다.
기본 "인벤토리" 구성은 대략 아래와 동일합니다:
jamf_service:
  enabled: true
  # ...
  inventory:
  - sync_period_partial: 6h
    sync_period_full: 24h
    on_missing: DELETE
    filter_rsql: general.remoteManagement.managed==true
구성을 분석하면 다음 키가 있습니다:
sync_period_*#
sync_period_partial: 부분 동기화 주기. 부분 동기화는 새 디바이스와 수정된 디바이스를 가져오려 하지만 전체 Jamf 인벤토리를 스캔하지 않습니다.sync_period_full: 전체 동기화 주기. 전체 동기화는 전체 Jamf 인벤토리를 스캔하여 새 디바이스/수정된 디바이스와 Jamf에서의 제거를 처리합니다.
두 동기화 주기 모두 주기를 0 또는 -1로 설정하여 비활성화할 수 있습니다. Teleport가 두 인벤토리를 완전히 동기화할 기회를 갖도록 정기적으로 전체 동기화를 수행하는 것이 권장됩니다.
on_missing#
on_missing 키는 Jamf에서 삭제되었지만 Teleport에 존재하는 디바이스를 어떻게 처리할지 결정합니다. 가능한 동작은 다음과 같습니다:
DELETE: Jamf에서 제거된 디바이스는 결국 Teleport에서도 제거됩니다. (전체 동기화가 필요합니다.)NOOP: Jamf에서 제거된 디바이스가 Teleport 인벤토리에 남아 있을 수 있습니다.
이 방식으로 삭제될 수 있는 디바이스는 Jamf로 동기화된 디바이스뿐입니다. tctl devices add를 통해 수동으로 기록하거나 다른 소스에서 기록된 디바이스는 삭제되지 않습니다.
원하지 않는 디바이스를 즉시 제거하려면 먼저 Teleport에서 디바이스를 잠근 다음 Jamf에서 제거하세요:
$ tctl devices lock --asset-tag=SERIAL_NUMBER --message='reason for locking'
Created a lock with name "a2f1491c-4a3e-4daf-9c83-2fe931668076".
tctl devices rm을 통한 수동 제거가 가능하지만, 디바이스가 여전히 Jamf 인벤토리에 있는 경우 다음 동기화 중에 다시 생성됩니다.
filter_rsql#
filter_rsql 키는 디바이스 쿼리 시 Jamf Pro API 필터를 적용합니다.
가능한 필터 값은 https://developer.jamf.com/jamf-pro/reference/get_v1-computers-inventory를 참조하세요.
선택 사항: 여러 소스 동기화#
인벤토리를 동기화할 때 Jamf 서비스는 동기화된 모든 디바이스의 소유권을 주장합니다. 디바이스의 source 필드를 검사하여 확인할 수 있습니다:
# tctl get device/mydevice
kind: device
metadata:
  name: 20ec6373-9e8e-46e0-8f1c-47ad6b06a768
spec:
  asset_tag: mydevice
  os_type: macos
  # ...
  source:         # Set during inventory sync
    name: jamf    # Copied from jamf_service.name
    origin: jamf  # Always "jamf" for Jamf service
  update_time: "2023-06-21T19:44:40.40601Z"
version: v1
디바이스 소유권은 몇 가지 상황에서 중요하지만, "on_missing=DELETE" 동기화를 실행할 때 특히 중요합니다. 동기화 소스가 소유한 디바이스만 삭제 대상으로 간주되기 때문입니다.
여러 Jamf 소스를 실행하려면 각각 자체 구성과 자격 증명을 가진 여러 Jamf 서비스를 실행할 수 있습니다. 각 서비스의 "jamf_service.name"이 다른지 확인하세요. 예를 들어:
teleport.yaml - 서비스 #1:
version: v3
teleport:
  proxy_server: (=clusterDefaults.clusterName=):443

jamf_service:
  enabled: true
+ name: jamf1
+ api_endpoint: https://tenant1.jamfcloud.com
+ client_id: tenant1-id
+ client_secret_file: /var/lib/teleport/jamf1_client_secret.txt

auth_service:
  enabled: false

proxy_service:
  enabled: false

ssh_service:
  enabled: false
teleport.yaml - 서비스 #2:
version: v3
teleport:
  proxy_server: teleport.example.com:443

jamf_service:
  enabled: true
+ name: jamf2
+ api_endpoint: https://tenant2.jamfcloud.com
+ client_id: tenant2-id
+ client_secret_file: /var/lib/teleport/jamf2_client_secret.txt

auth_service:
  enabled: false

proxy_service:
  enabled: false

ssh_service:
  enabled: false
선택 사항: Jamf 사용자 이름 및 비밀번호 인증 사용#
Teleport v16.1.0 이상 버전은 Jamf API 자격 증명을 지원합니다. 사용자 이름과 비밀번호 인증 대신 API 자격 증명을 사용하는 것을 권장합니다.
인벤토리 동기화를 위한 읽기 전용 Jamf 사용자를 생성하세요.
-
<code>[jamf.api_endpoint]</code>/accounts.html에 액세스하여yourtenant를 Jamf Pro 계정으로 교체하세요. -
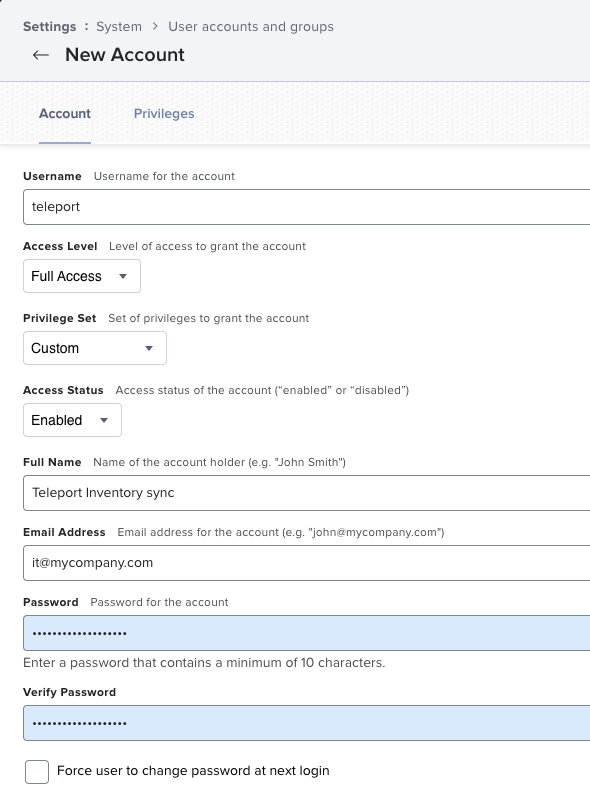
다음 설정으로 새 표준 계정을 생성하세요:
- 사용자 이름: teleport (원하는 대로 변경)
- 액세스 레벨: 전체 액세스
- 권한 집합: 사용자 지정
- 액세스 상태: 활성화됨
- 비밀번호: (원하는 강력한 비밀번호)
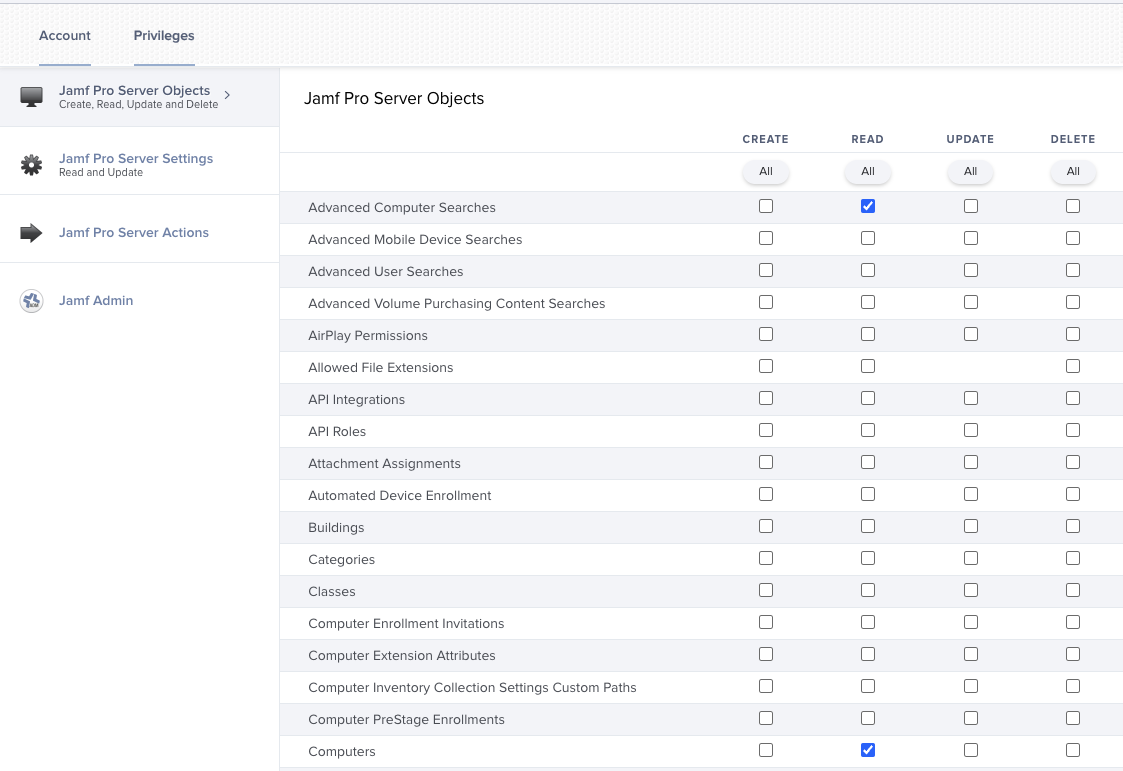
- 권한:
- 고급 컴퓨터 검색: 읽기
- 컴퓨터: 읽기
사용자와 비밀번호를 기록해 두세요.
사용자 계정 설정:
권한 설정:
다음 단계#
자동 등록을 사용하여 사용자 로그인 시 동기화된 디바이스를 자동으로 등록하세요.