





Entra ID 통합 시작하기
Teleport v18.10요약
이 가이드는 가이드 설정으로 Entra ID 통합을 설정하는 방법을 보여줍니다. Teleport는 Teleport Entra ID 통합에 필요한 속성으로 Entra ID 테넌트를 설정하는 스크립트를 생성합니다. Teleport as OIDC provider (Web UI)
이 가이드는 가이드 설정으로 Entra ID 통합을 설정하는 방법을 보여줍니다.
Teleport는 Teleport Entra ID 통합에 필요한 속성으로 Entra ID 테넌트를 설정하는 스크립트를 생성합니다.
사전 요구 사항#
- 사용자는 Microsoft Entra ID 테넌트에서 특권 관리자 권한이 있어야 합니다.
- Microsoft Graph API 인증 방법을 선택합니다.
1/3단계: 설정 스크립트 생성#
Teleport as OIDC provider (Web UI)
Teleport 웹 UI의 사이드 내비게이션에서 "Add New > Integration"을 선택합니다.
다음으로, "Microsoft Entra ID" 타일을 선택합니다.
Teleport Microsoft Entra ID 설정 UI에서 기본 통합 이름 "entra-id"가 이미 입력되어 있는 것을 확인할 수 있습니다. Entra ID 그룹에 대해 생성되는 Access List의 기본 소유자로 할당될 Teleport 사용자를 선택해야 합니다.
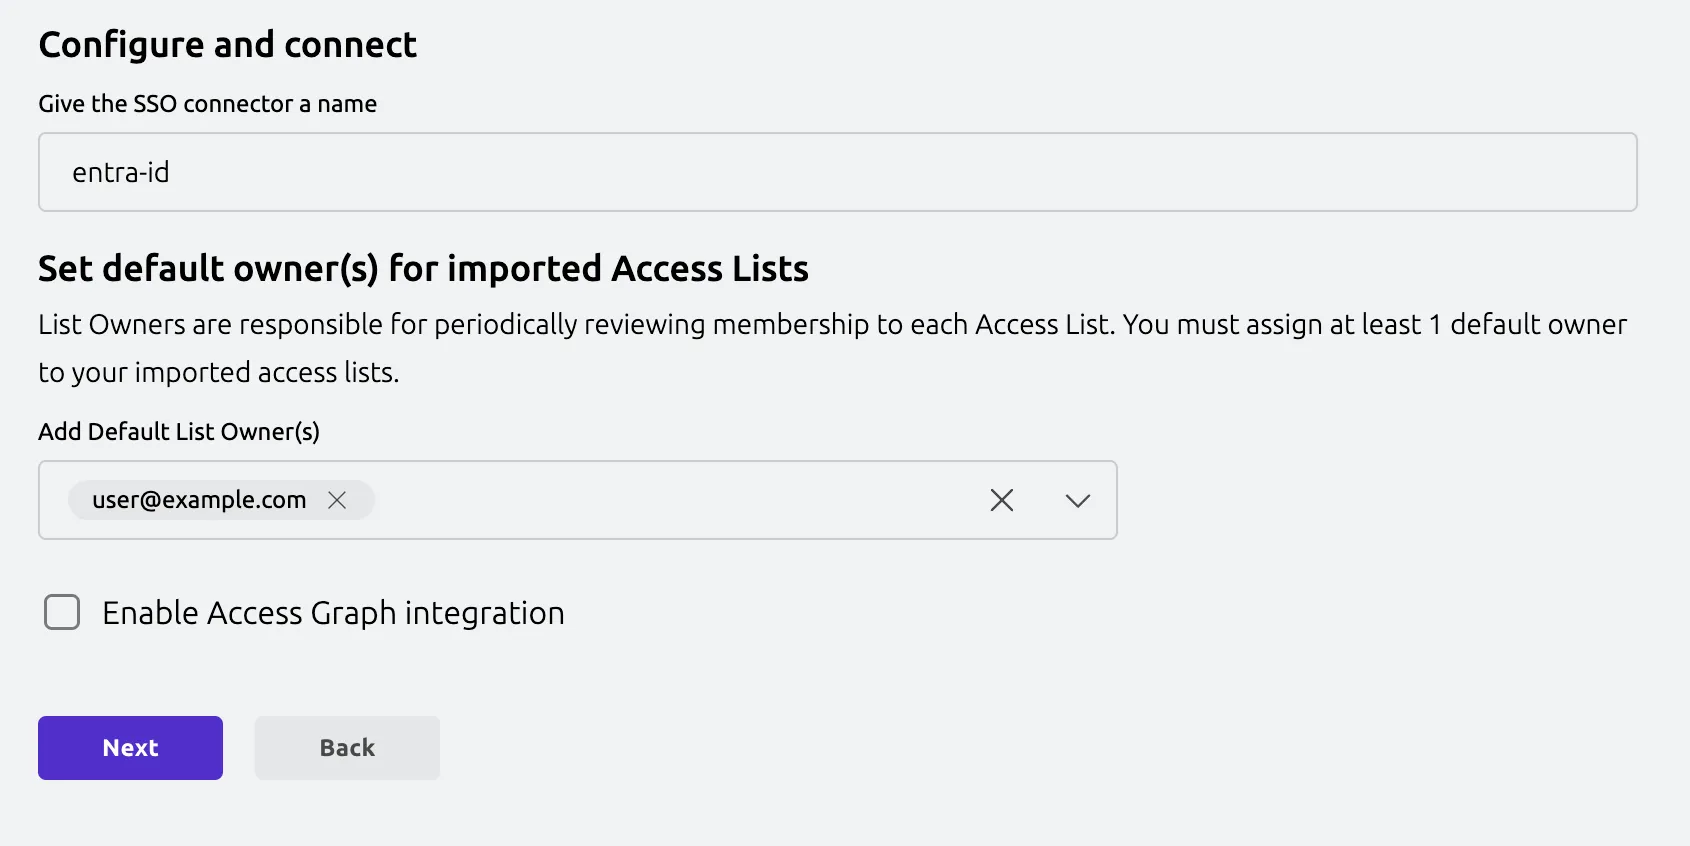
다음 단계에서는 Entra ID 설정 스크립트가 제공됩니다.
Teleport as OIDC provider (tctl)
통합을 시작하려면 tctl plugins install entraid 명령을 실행합니다.
$ tctl plugins install entraid \
    --name entra-id-default \
    --auth-connector-name entra-id \
    --default-owner=Access List Owner \
    --auth-server example.teleport.sh:443
--name 플래그는 Entra ID 플러그인의 리소스 이름을 지정합니다.
--auth-connector-name 플래그는 이 통합이 생성할 인증 커넥터의 이름을 지정합니다.
--default-owner 플래그는 Entra ID에서 가져온 그룹을 기반으로 Teleport에서 생성될 Access List의 기본 소유자를 지정합니다.
이 명령은 tctl이 호출되는 현재 디렉터리에 설정 스크립트를 생성합니다.
System credential (tctl)
Entra ID 통합에 필요한 권한으로 Azure Identity에 권한을 부여해야 합니다.
Azure Portal에서 Teleport Auth Service에 연결된 아이덴티티를 찾고, 새 권한으로 업데이트하려는 아이덴티티의 Principal ID를 복사합니다.
Principal ID를 얻은 후 PowerShell 모드로 Azure Cloud Shell을 열고 다음 스크립트를 실행하여 <code>Principal ID</code>에 필요한 권한을 할당합니다.
Assign required permissions to Azure Identity
# Connect to Microsoft Graph with the required scopes for directory and app role assignment permissions.
Connect-MgGraph -Scopes 'Directory.ReadWrite.All', 'AppRoleAssignment.ReadWrite.All'

# Retrieve the managed identity's service principal object using its unique principal ID (UUID).
$managedIdentity = Get-MgServicePrincipal -ServicePrincipalId 'Principal ID'

# Set the Microsoft Graph enterprise application object.
# This is a service principal object representing Microsoft Graph in Entra ID with a specific app ID.
$graphSPN = Get-MgServicePrincipal -Filter "AppId eq '00000003-0000-0000-c000-000000000000'"

# Define the permission scopes that we want to assign to the managed identity.
# These are Microsoft Graph API permissions required by the managed identity.
$permissions = @(
  "Application.ReadWrite.OwnedBy"   # Permission to read application
  "Group.Read.All"     # Permission to read groups
  "User.Read.All"        # Permission to read users
)

# Filter and find the app roles in the Microsoft Graph service principal that match the defined permissions.
# Only include roles where "AllowedMemberTypes" includes "Application" (suitable for managed identities).
$appRoles = $graphSPN.AppRoles |
    Where-Object Value -in $permissions |
    Where-Object AllowedMemberTypes -contains "Application"

# Iterate over each app role to assign it to the managed identity.
foreach ($appRole in $appRoles) {
    # Define the parameters for the role assignment, including the managed identity's principal ID,
    # the Microsoft Graph service principal's resource ID, and the specific app role ID.
    $bodyParam = @{
        PrincipalId = $managedIdentity.Id  # The ID of the managed identity (service principal)
        ResourceId  = $graphSPN.Id         # The ID of the Microsoft Graph service principal
        AppRoleId   = $appRole.Id          # The ID of the app role being assigned
    }

    # Create a new app role assignment for the managed identity, granting it the specified permissions.
    New-MgServicePrincipalAppRoleAssignment -ServicePrincipalId $managedIdentity.Id -BodyParameter $bodyParam
}
이제 아이덴티티 Principal <code>Principal ID</code>에 Applications, Directories, Policies를 나열하는 데 필요한 권한이 있습니다.
이제 통합을 시작하려면 tctl plugins install entraid 명령을 실행합니다.
$ tctl plugins install entraid \
    --name entra-id-default \
    --auth-connector-name entra-id \
    --default-owner=Access List Owner \
    --auth-server example.teleport.sh:443 \
    --use-system-credentials
--name 플래그는 Entra ID 플러그인의 리소스 이름을 지정합니다.
--auth-connector-name 플래그는 이 통합이 생성할 인증 커넥터의 이름을 지정합니다.
--default-owner 플래그는 Entra ID에서 가져온 그룹을 기반으로 Teleport에서 생성될 Access List의 기본 소유자를 지정합니다.
--use-system-credentials 플래그는 플러그인이 Auth Service에 설정된 시스템 자격 증명을 사용한다는 것을 지정합니다.
이 명령은 tctl이 호출되는 현재 디렉터리에 설정 스크립트를 생성합니다.
2/3단계: Entra ID 설정#
shell.azure.com으로 이동하거나 Azure Portal에서
Cloud Shell 아이콘을 클릭하여 Azure Cloud Shell을 엽니다. 반드시 bash 버전의 Cloud Shell을 사용하십시오.
Cloud Shell 인스턴스가 열리면, Teleport 바이너리를 다운로드하는 Teleport 생성 bash 스크립트를 Azure
Shell에 붙여넣고 teleport integration configure azure-oidc 명령을 실행하십시오.
이 명령은 다음 작업을 수행합니다:
- 엔터프라이즈 애플리케이션을 생성합니다.
- 해당 애플리케이션에 대해 Teleport를 OIDC IdP로 구성합니다.
- 디렉터리 데이터(예: 사용자 및 그룹)를 읽을 수 있는 읽기 전용 Microsoft Graph API 권한을 할당합니다.
- Teleport SAML 서비스 프로바이더를 설정하여 인증을 구성합니다.
# Azure Shell
$ bash -c "$(curl 'https://example.teleport.sh/webapi/scripts/integrations/configure/azureoidc.sh?authConnectorName=entra-id')"

> teleport integration configure azure-oidc --proxy-public-addr=https://example.teleport.sh --auth-connector-name=entra-id
...
Success! Use the following information to finish the integration onboarding in Teleport:
Tenant ID: entra-tenant-id
Client ID: enterprise-app-id
Success! You can now go back to the Teleport Web UI to use the integration with Azure.
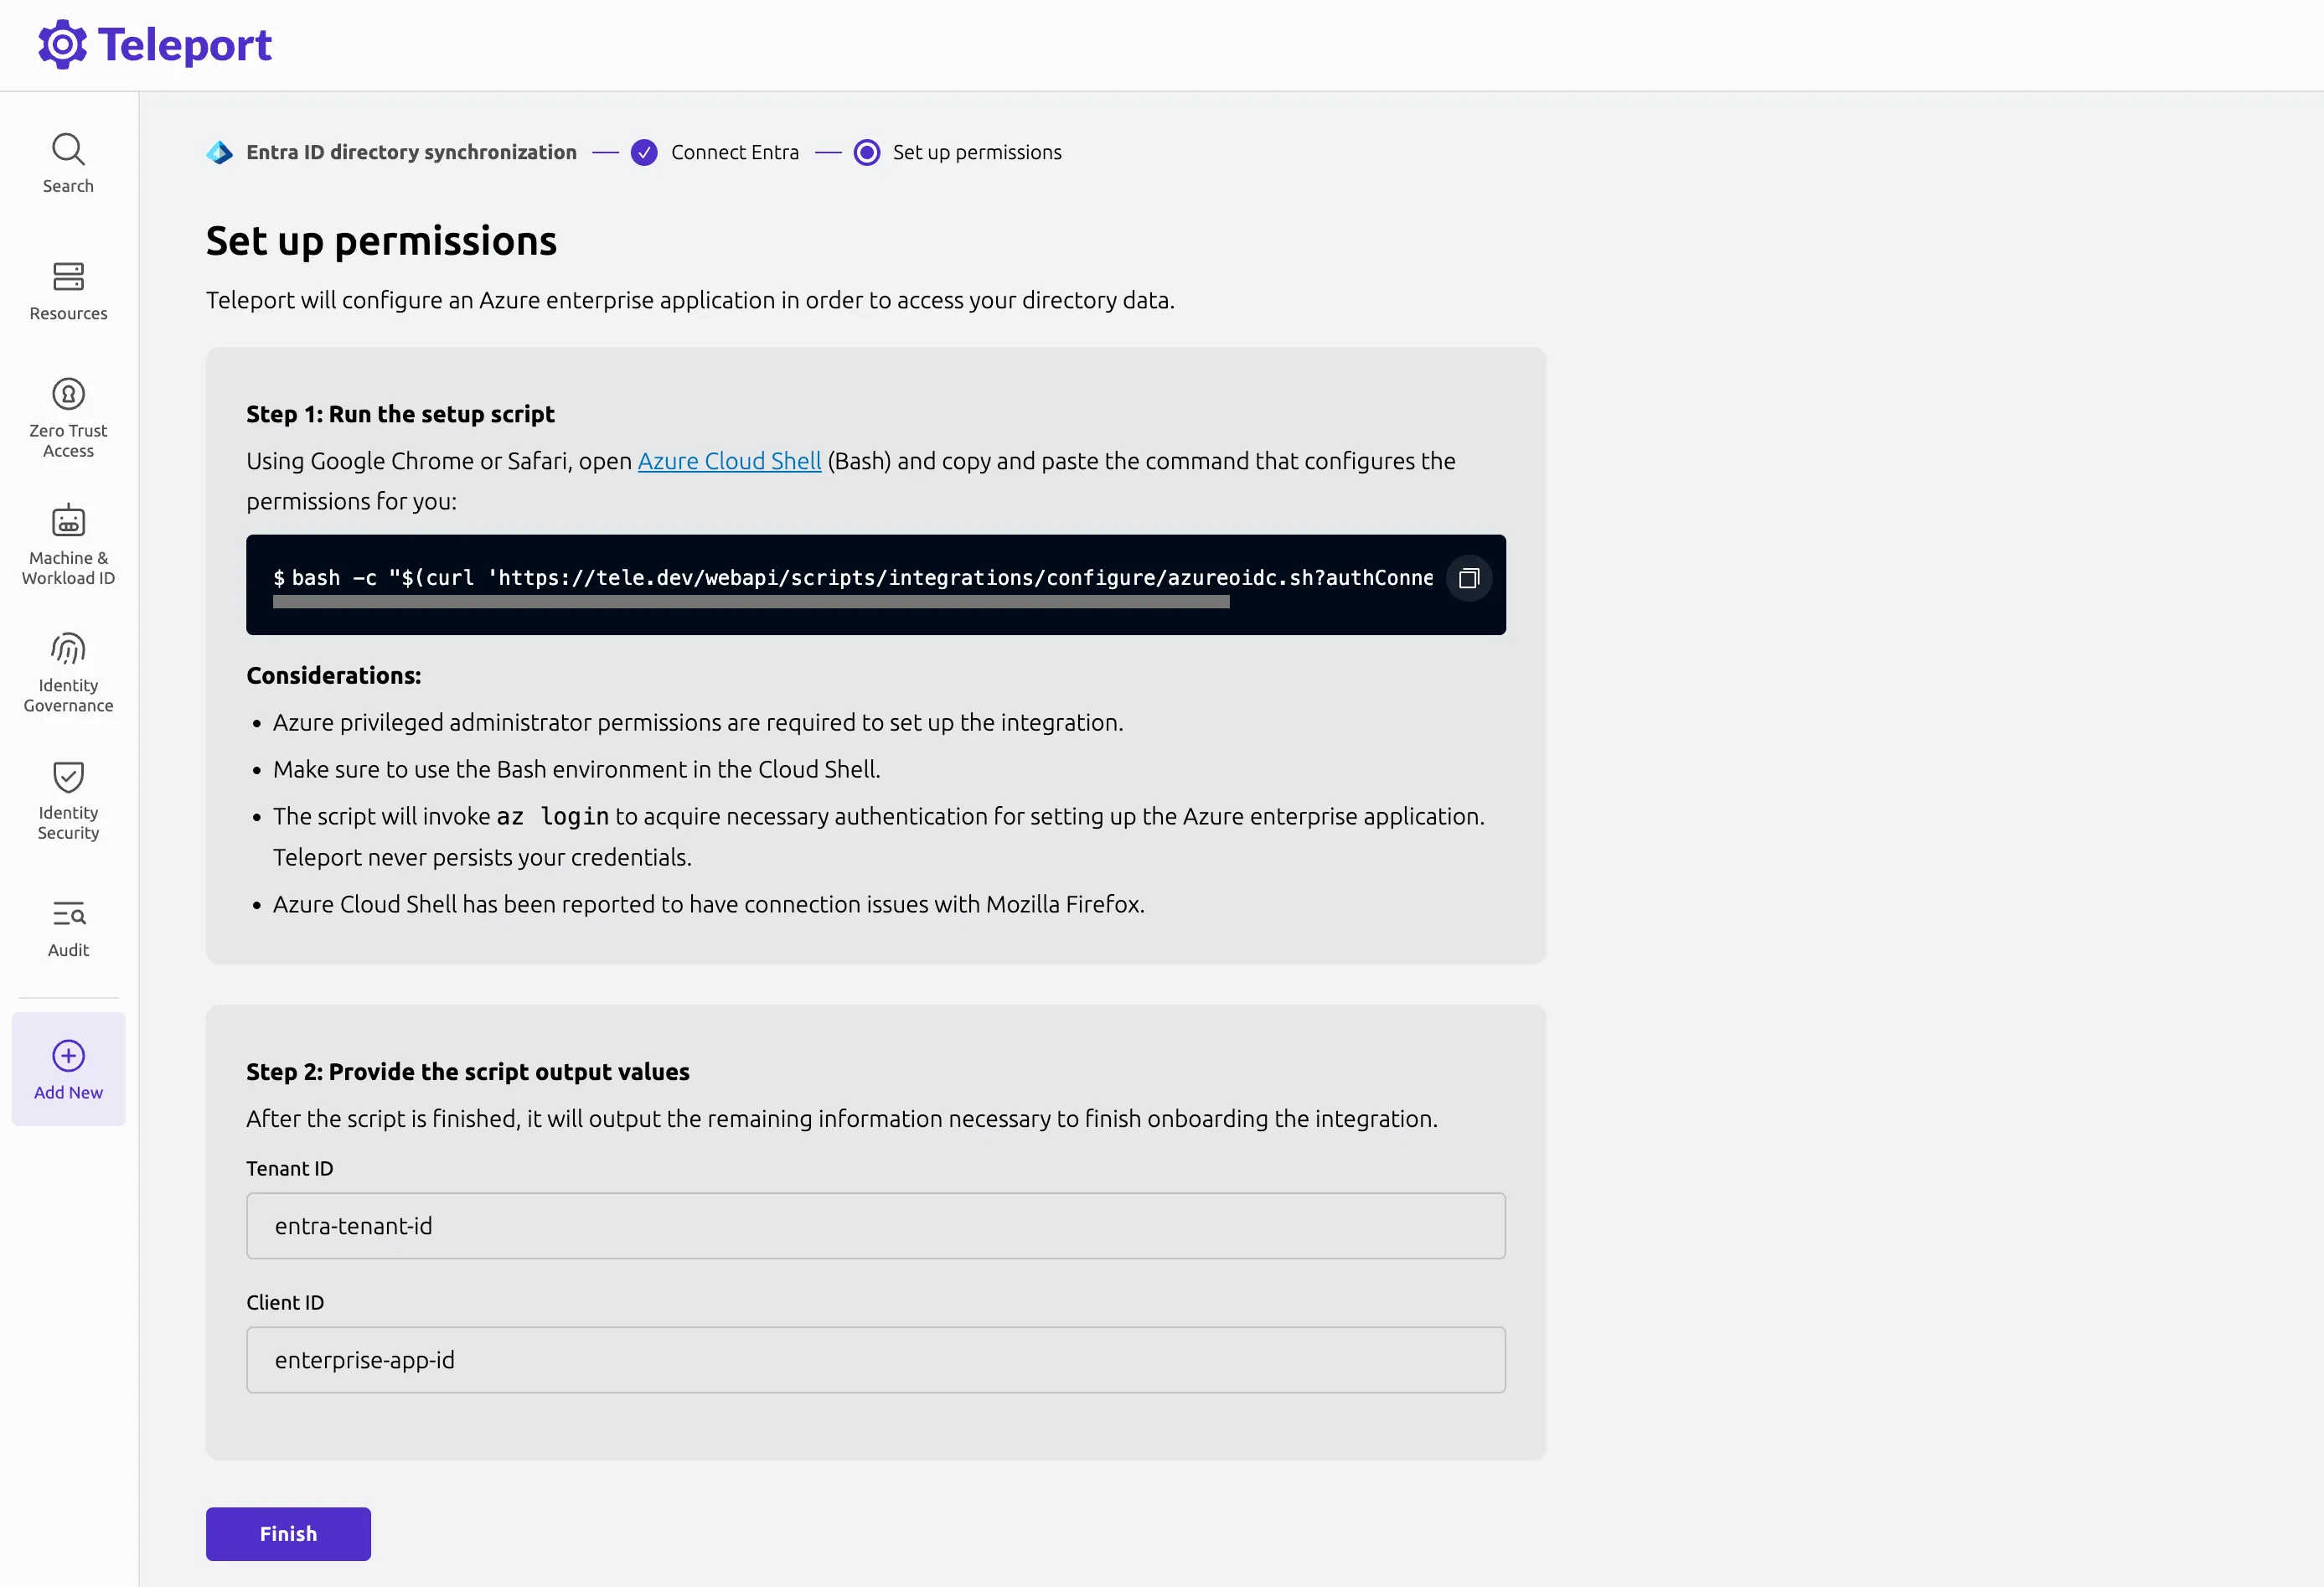
스크립트가 Teleport Entra ID 통합에 필요한 속성으로 Entra ID 테넌트 설정을 완료하면, Entra ID 테넌트 ID와 스크립트가 설정한 엔터프라이즈 애플리케이션의 클라이언트 ID를 출력합니다.
3/3단계: 플러그인 설치 완료#
Teleport as OIDC provider (Web UI)
스크립트 출력에서 Entra ID 테넌트 ID와 엔터프라이즈 애플리케이션 클라이언트 ID를 복사하여 통합을 완료하기 위해 웹 UI에 입력합니다.
Teleport as OIDC provider (tctl)
스크립트 출력에서 Entra ID 테넌트 ID와 엔터프라이즈 애플리케이션 클라이언트 ID를 복사하여 통합을 완료하기 위해 tctl에 입력합니다.
System credential (tctl)
스크립트 출력에서 Entra ID 테넌트 ID와 엔터프라이즈 애플리케이션 클라이언트 ID를 복사하여 통합을 완료하기 위해 tctl에 입력합니다.
통합이 이제 설정되었으며 Teleport Entra ID 서비스가 Entra ID에서 Teleport로 리소스를 가져오기 시작합니다.
다음 단계#
- Entra ID 사용자를 위한 액세스 설정.
- 그룹 필터 설정.
- Access List 관리에 대해 자세히 알아봅니다.
- Entra ID 인증 커넥터 설정을 더 자세히 살펴봅니다.
- Entra ID와의 Identity Security 통합 작동 방식을 알아봅니다.
- Teleport Entra ID 통합 관련 FAQ를 확인합니다.