





InfoGrab DocsInfoGrab Docs

Teleport Identity Security로 Azure 접근 패턴 탐색

요약

Identity Security는 전체 인프라에 걸친 접근 관리를 간소화하고 중앙화합니다. Access Graph를 사용하는 Identity Security는 Azure 구독 내 접근 패턴에 대한 인사이트를 제공합니다.

Identity Security는 전체 인프라에 걸친 접근 관리를 간소화하고 중앙화합니다. 모든 사용자, 그룹, 컴퓨팅 리소스 간의 통합되고 최신 관계 및 정책을 확인하여 몇 초 만에 접근 관계를 파악할 수 있습니다.

Access Graph를 사용하는 Identity Security는 Azure 구독 내 접근 패턴에 대한 인사이트를 제공합니다. 사용자, 그룹, 서비스 주체, 역할 정의를 스캔하여 시각적 표현을 제공하고 Azure 환경 내 권한 모델을 개선하는 데 도움을 줍니다. 이 기능을 통해 다음과 같은 질문에 답할 수 있습니다:

  • Azure 사용자와 역할이 접근할 수 있는 리소스는 무엇인가?
  • 어떤 그룹이 다른 그룹에 속하며 이것이 리소스 접근에 어떤 영향을 미치는가?
  • 사용자와 그룹에 역할을 할당할 때 구독 전반의 범위가 얼마나 넓거나 좁은가?

Access Graph를 활용하여 Azure 구독 내 권한을 분석하려면 Access Graph 서비스, Discovery Service를 설정하고 Azure 구독과 통합해야 합니다.

이 가이드에서는 Teleport Access Graph를 사용하여 Azure 동기화를 설정합니다.

Access Graph은 Teleport Enterprise 에디션 고객이 사용할 수 있는 Teleport Identity Security 제품의 기능입니다.

클러스터에 Access Graph이 올바르게 설정되었는지 확인하려면 Teleport Web UI에 로그인하고 Identity Security 사이드바 버튼을 클릭한 다음 Browse 메뉴 항목을 클릭합니다. 아이덴티티, 리소스 등이 나열되어야 합니다.

작동 방식#

Access Graph는 Azure 접근 패턴을 검색하고 사용자, 그룹, 서비스 주체, 역할 정의를 포함한 다양한 Azure 리소스를 동기화합니다. 이러한 리소스는 Identity Security 사용 페이지에서 자세히 설명하는 그래프 표현을 사용하여 시각화됩니다.

가져오기 프로세스는 두 가지 주요 단계로 구성됩니다:

클라우드 API 폴링#

Teleport Discovery Service는 구성된 Azure 구독을 지속적으로 스캔합니다. 최소 15분 간격으로 구성 가능한 주기마다, Azure 계정에서 다음 리소스를 가져옵니다:

  • 사용자
  • 그룹
  • 서비스 주체
  • 역할 정의
  • 역할 할당
  • 가상 머신

필요한 모든 리소스를 가져온 후, Teleport Discovery Service는 이를 Access Graph로 전송하여 Azure 환경의 최신 정보로 항상 업데이트되도록 합니다.

리소스 가져오기#

Identity Security의 Access Graph 기능은 Azure 구독에서 가져온 리소스를 시각화합니다.

사전 요구 사항#

  • 실행 중인 Teleport Enterprise 클러스터 v17.2.1 이상.
  • 계정에 Identity Security가 활성화되어 있어야 합니다.
  • 자체 호스팅 클러스터의 경우:
    • Auth Service 구성에 최신 license.pem이 사용되고 있는지 확인하세요.
    • 실행 중인 Access Graph 노드 v1.27.0 이상. Access Graph 설정 방법에 대한 자세한 내용은 Identity Security 페이지를 확인하세요.
    • Access Graph 서비스를 실행 중인 노드는 Teleport Auth Service에서 접근 가능해야 합니다.
Warning

클라우드 호스팅 Teleport Enterprise 클러스터를 사용하는 경우, 클라우드 호스팅 Teleport Enterprise가 이미 클러스터 내에서 올바르게 구성된 Discovery Service를 운영하고 있으므로 이 단계를 건너뛸 수 있습니다.

1/4단계. Discovery Service 설치#

Tip

Discovery Service를 다른 Teleport 서비스(예: Auth 또는 Proxy)가 이미 실행 중인 호스트에서 실행할 계획이라면 이 단계를 건너뛸 수 있습니다.

Discovery Service를 실행할 Azure 가상 머신에 Teleport를 설치합니다. 이렇게 하면 VM에 연결된 관리 아이덴티티에 필요한 Azure 리소스를 가져오기 위한 올바른 권한을 할당할 수 있습니다. 또는 Teleport를 Azure OIDC 통합으로 구성된 Auth 서비스에 연결되어 있는 한 다른 환경에도 설치할 수 있습니다. 아래에는 1) Azure 가상 머신을 사용하거나 2) Entra ID 통합을 통한 Azure OIDC 자격 증명을 사용하는 두 가지 옵션이 제공됩니다.

Linux 서버에 Teleport Agent를 설치하려면:

권장 설치 방법은 클러스터 설치 스크립트입니다. 이 스크립트는 클러스터에 맞는 올바른 버전, 에디션, 설치 모드를 선택합니다.

  1. teleport.example.com:443에 Teleport 클러스터의 호스트명과 포트를 할당하되, 스킴(https://)은 포함하지 마십시오.

  2. 클러스터의 설치 스크립트를 실행하십시오:

    $ curl "https://teleport.example.com:443/scripts/install.sh" | sudo bash
    

2/4단계. Discovery Service 구성#

Teleport Discovery Service를 활성화하려면 teleport.yaml 구성 파일에 최상위 discovery_service 섹션을 추가하세요. 이 서비스는 discovery_group이 일치하는 동적 discovery_config 리소스를 모니터링합니다.

discovery-group.

discovery_service:
  enabled: true
  discovery_group: discovery-group

이미 클러스터 내에서 Discovery Service를 운영 중이라면, 다음 요구 사항이 충족되는 한 이를 재사용할 수 있다는 점을 유의하세요:

  • 2단계에서 기존 Discovery Service의 discovery_groupdiscovery_group을 일치시킵니다.
  • Access Graph 서비스는 Discovery Service가 실행되는 머신에서 접근 가능해야 합니다.

Auth Service가 구성되면, Azure 리소스를 가져오기 위해 활성화하려면 다음을 Discovery Service 구성 파일에 추가하세요:

discovery_service:
  access_graph:
    azure:
      - subscription_id: azure-subscription-id

구성 파일을 수정한 머신에서 Teleport 프로세스를 재시작하세요:

$ sudo systemctl reload teleport

이제 Discovery Service가 Azure 구독에서 주기적으로 리소스를 가져옵니다.

3/4단계. Discovery Service 활성화#

Azure 리소스를 가져오기 위해 Discovery Service를 활성화하려면, Discovery Service를 실행하는 아이덴티티를 인가해야 합니다. 인가를 위한 두 가지 옵션을 사용할 수 있습니다.

Discovery Service를 실행하기 위해 Azure VM을 인가하는 것이 가장 간단한 옵션입니다. Azure VM에는 관리 아이덴티티를 할당할 수 있으며, 이를 통해 VM에서 실행되는 Discovery Service는 해당 아이덴티티와 연결된 권한을 사용할 수 있습니다. 아래 단계는 Azure VM에 대한 관리 아이덴티티를 구성하는 방법을 보여줍니다. 이후 단계에서는 ./teleport integration configure access-graph azure 명령을 사용하여 관리 아이덴티티의 ID에 역할이 할당됩니다.

Manually create identity

사용자 지정 역할 생성#

Azure Portal 검색 상자에 Azure 리소스 그룹의 이름을 입력한 뒤 해당 리소스 그룹의 페이지로 이동합니다. 왼쪽 탐색 사이드바에서 Access control (IAM) 탭을 클릭합니다. Access control (IAM) 패널 상단의 버튼 행에서 Add > Add custom role을 클릭합니다.

Custom role name 필드에 teleport-read-vm을 입력합니다.
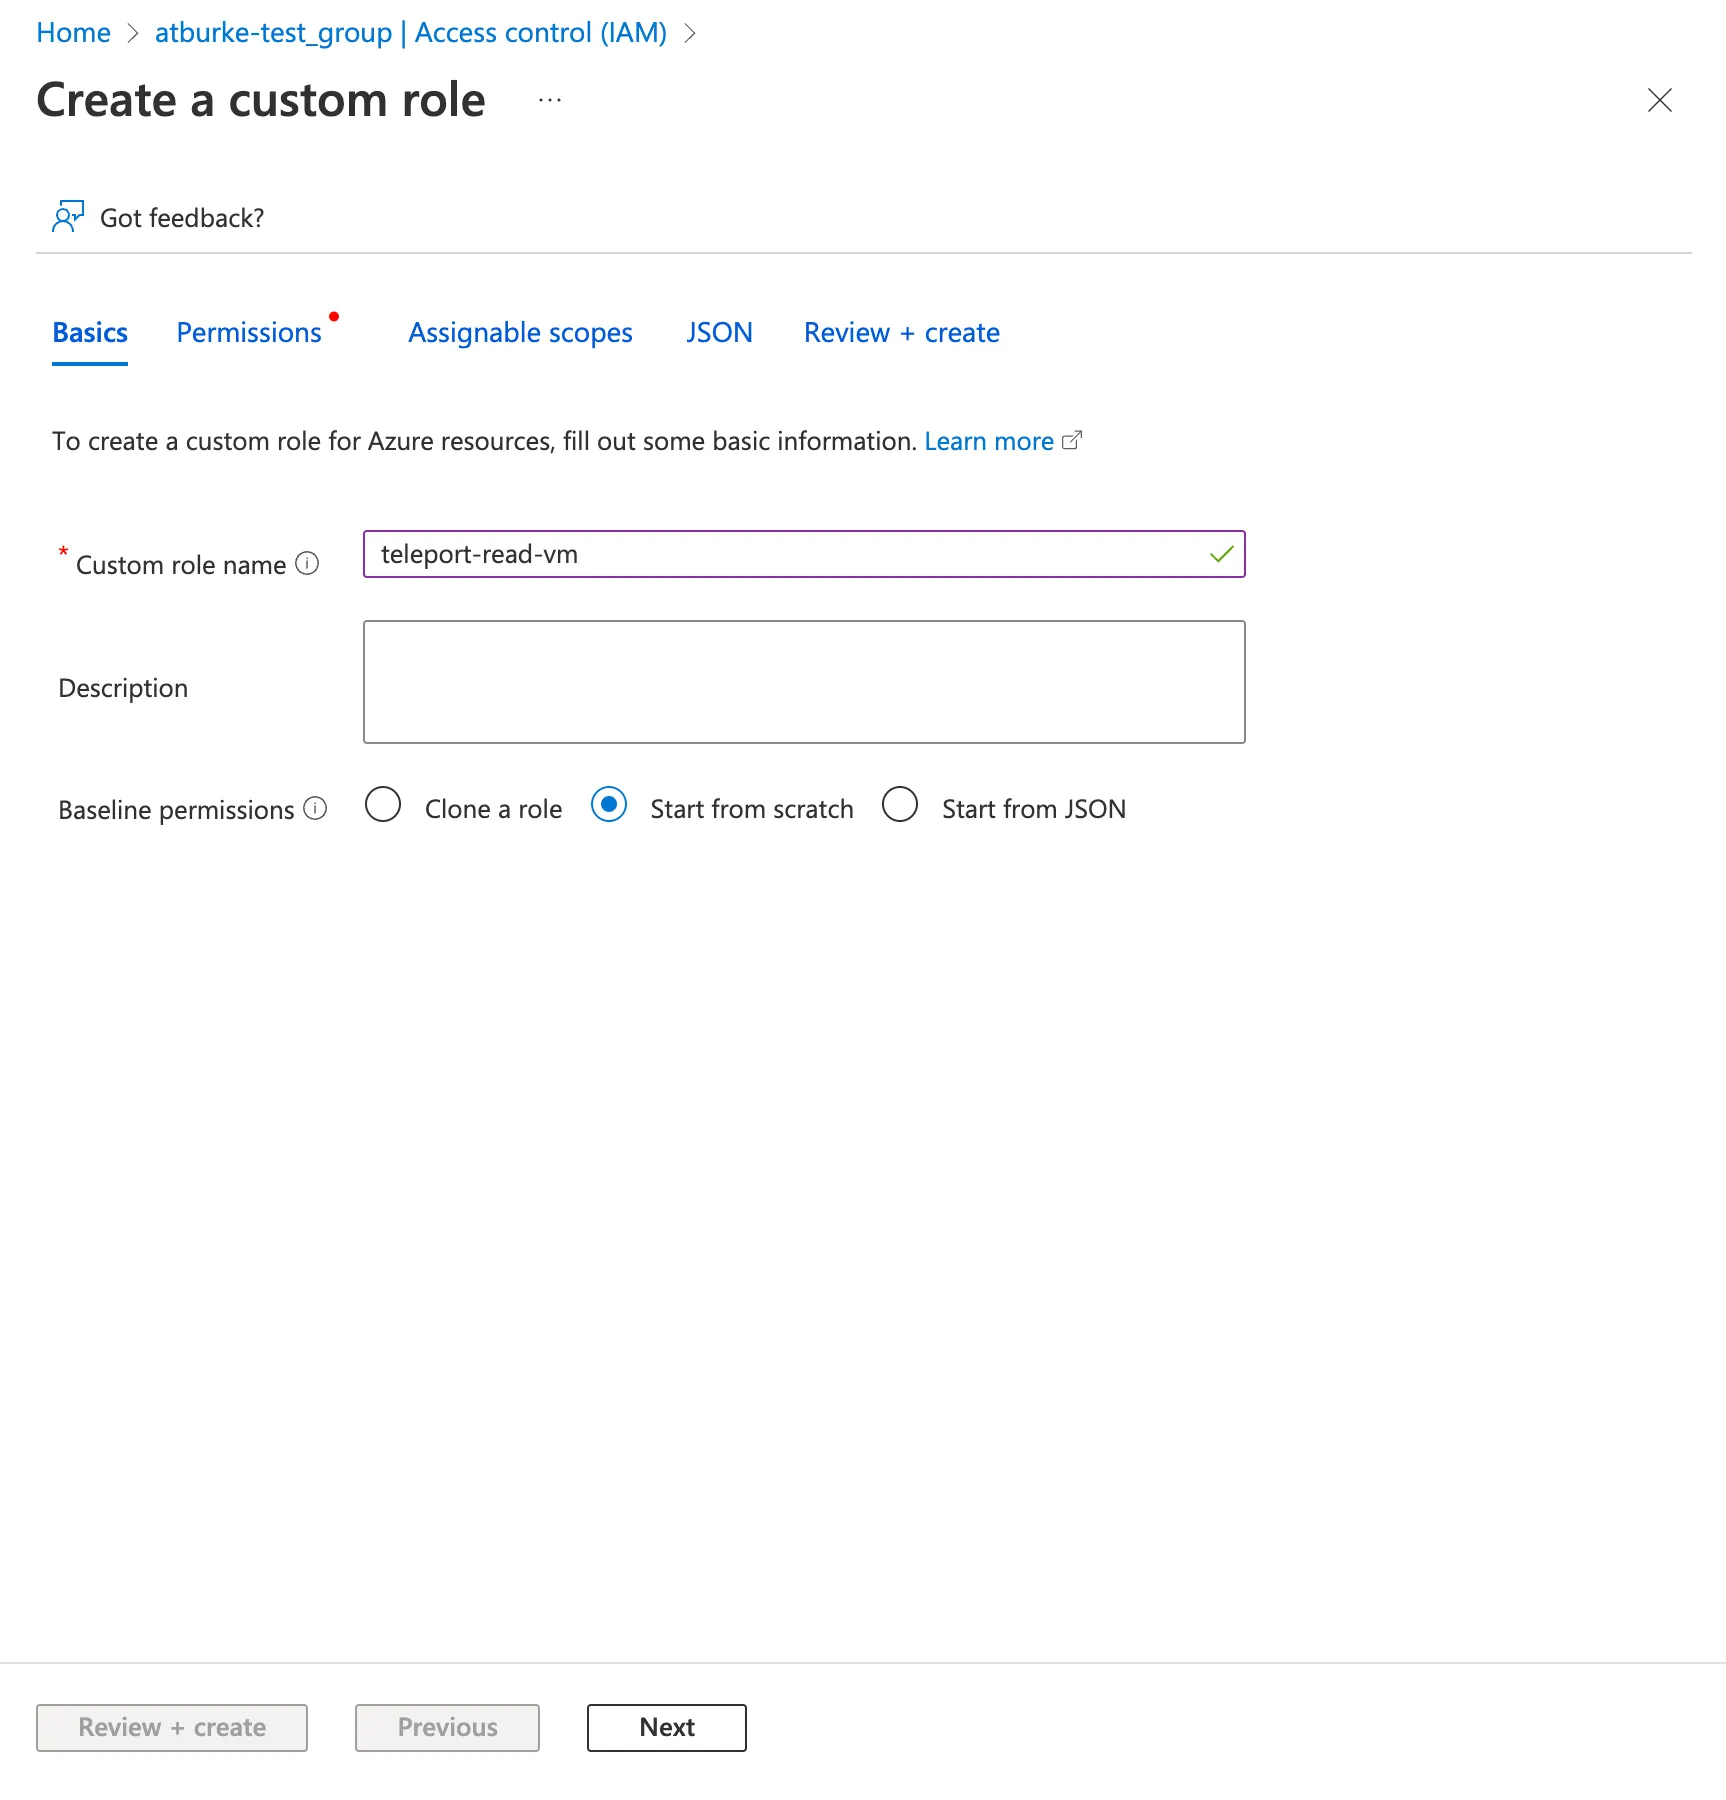
Create custom
role

Permissions 탭을 클릭한 다음 Permissions 뷰에서 +Add permissions를 클릭합니다.

검색 상자에 Microsoft.Compute/virtualMachines/read을 입력합니다. Microsoft Compute 상자를 클릭한 다음 Read: Get Virtual Machine을 활성화합니다. Add를 클릭합니다.
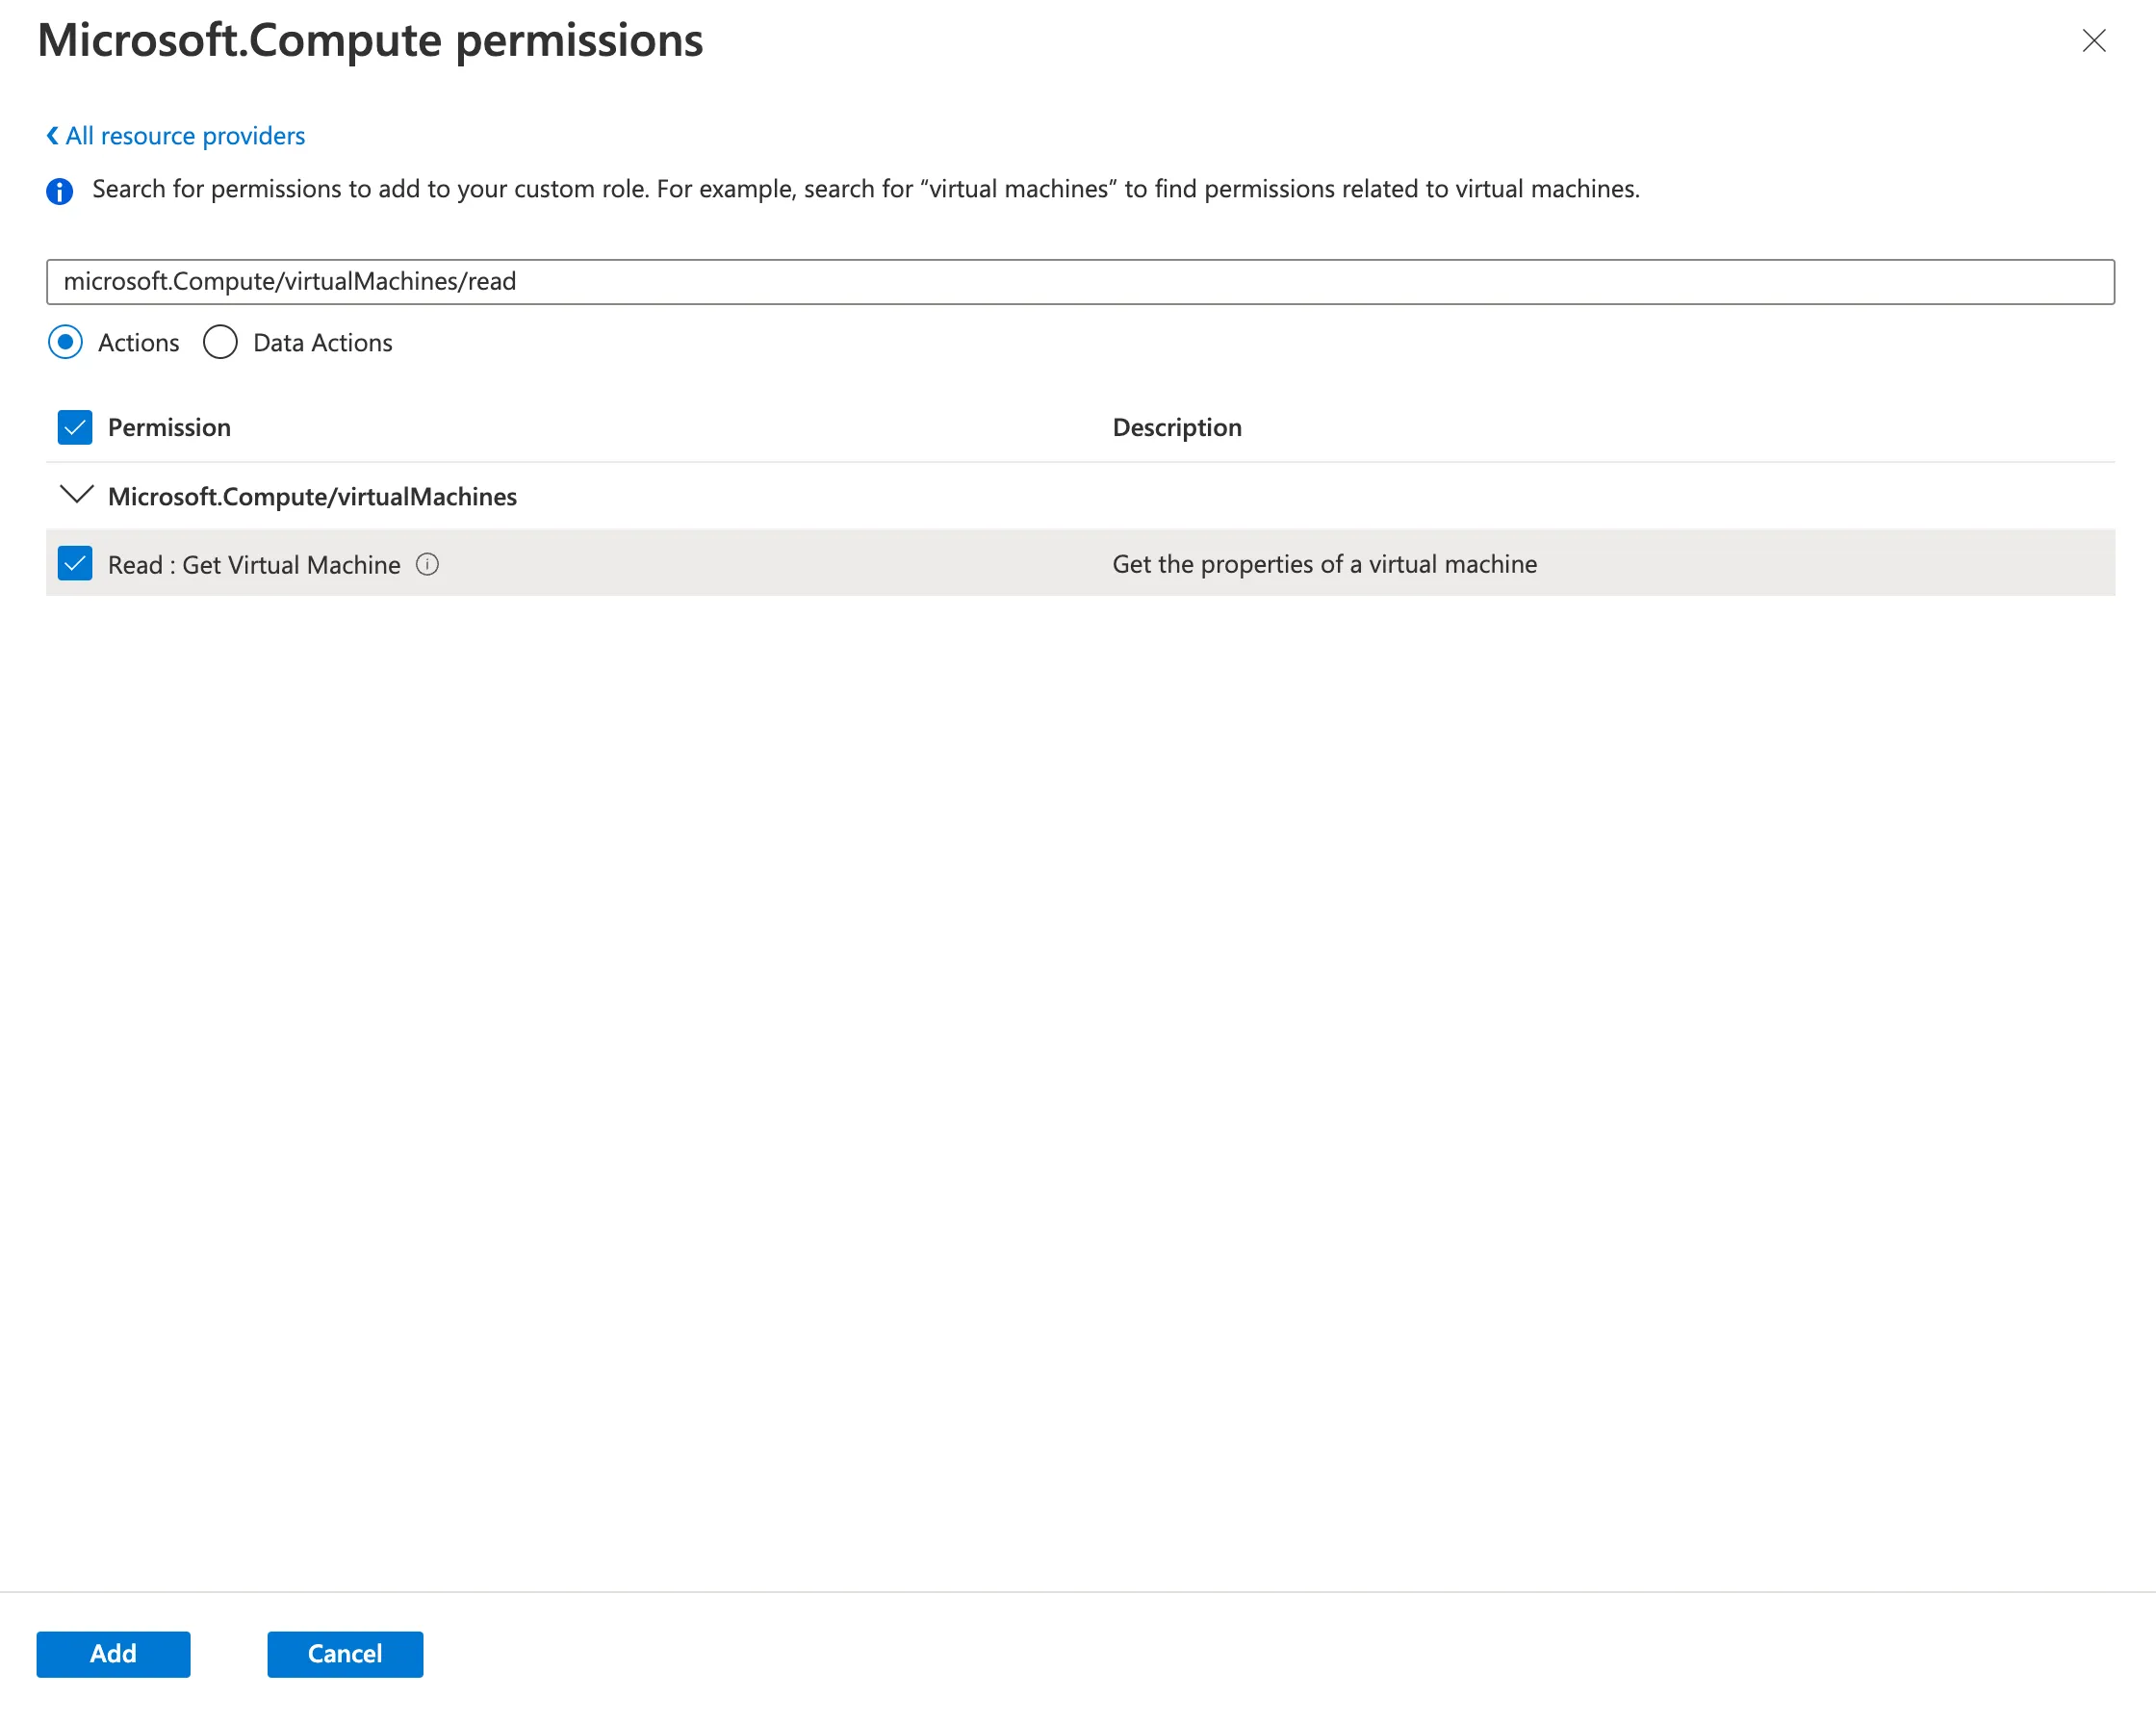
Add virtual machine read
permission

Review + create를 클릭한 다음 Create를 클릭합니다.

Azure 관리 ID 생성#

Azure Portal에서 Managed Identities 뷰로 이동합니다.

Create를 클릭합니다.

Subscription, Resource group, Region 아래에서 VM이 속한 것을 선택합니다.

Name 필드에 teleport-azure를 입력합니다.
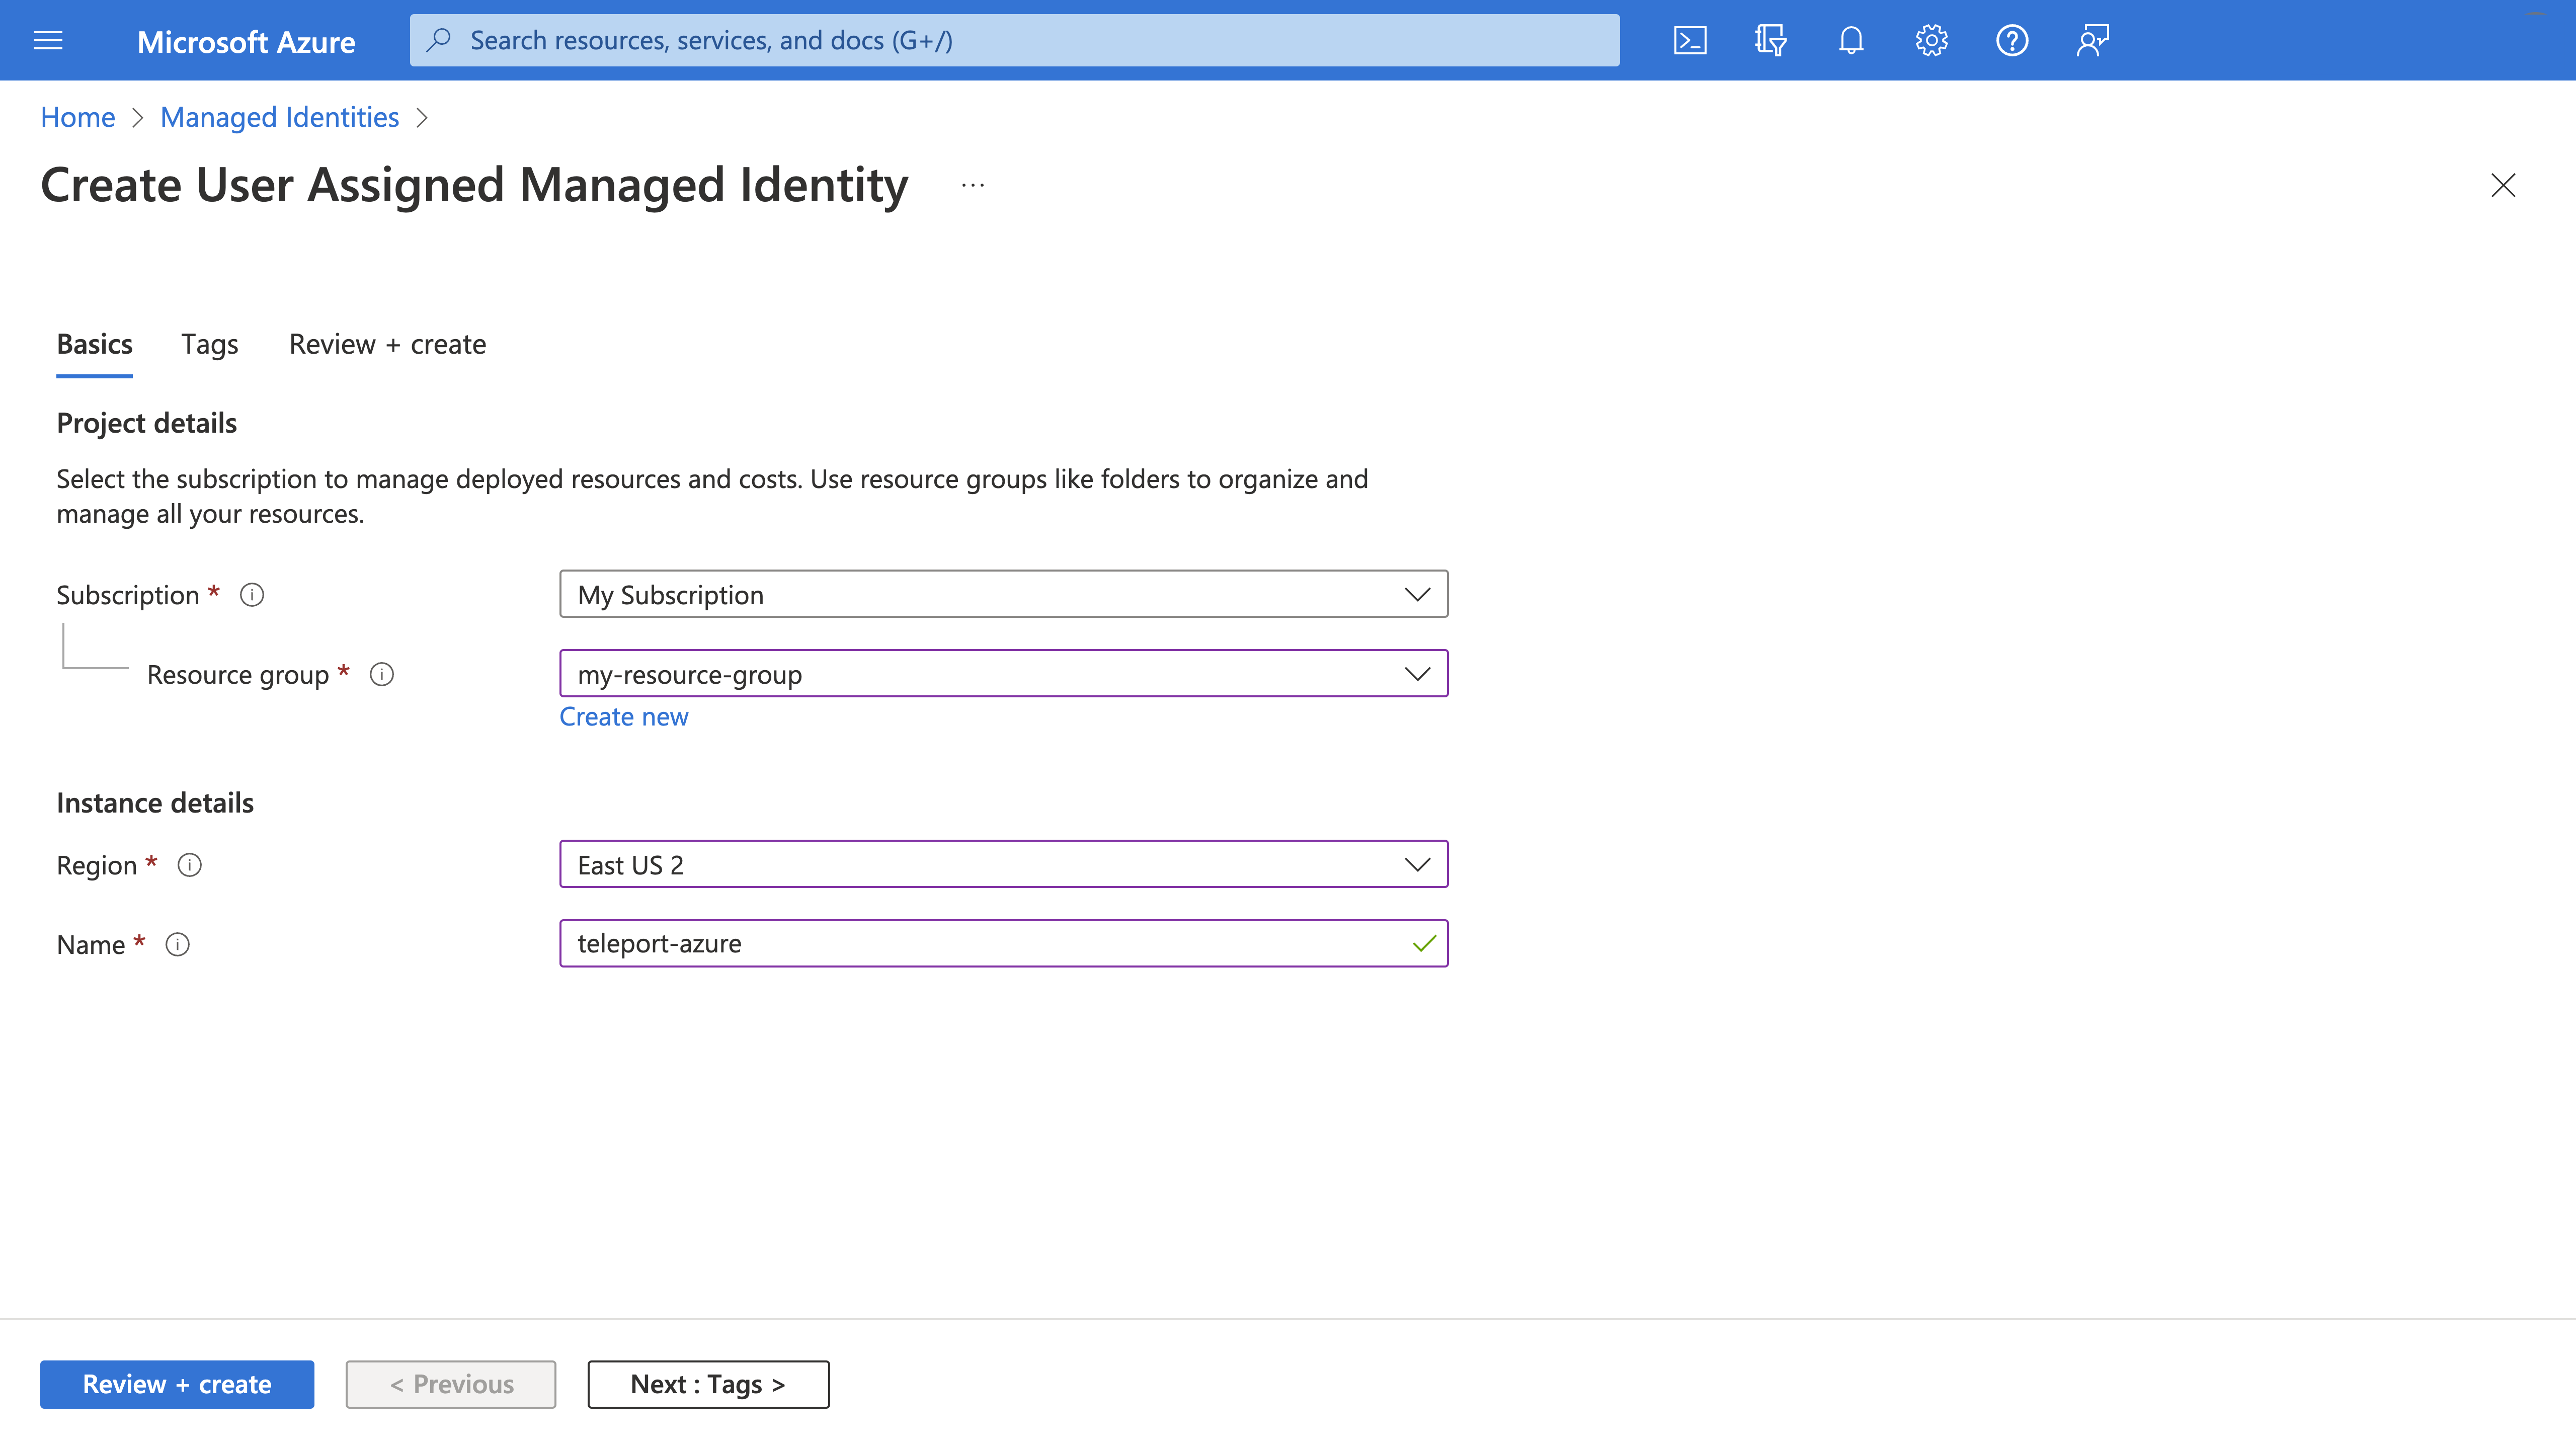
Creating an Azure managed
identity

Review + create를 클릭한 다음 Create를 클릭합니다.

생성이 완료되면 Go to resource를 클릭합니다. 새 ID의 페이지에서 이 가이드 뒷부분에서 사용할 수 있도록 Client ID 값을 복사합니다.

teleport-read-vm 역할을 teleport-azure ID에 할당#

Azure Portal 검색 상자에 Azure 리소스 그룹의 이름을 입력한 뒤 해당 리소스 그룹의 페이지로 이동합니다. 왼쪽 탐색 사이드바에서 Access control (IAM) 탭을 클릭합니다. Access control (IAM) 패널 상단의 버튼 행에서 Add > Add role assignment를 클릭합니다.

Add role assignment 화면에서 teleport-read-vm을 클릭합니다.
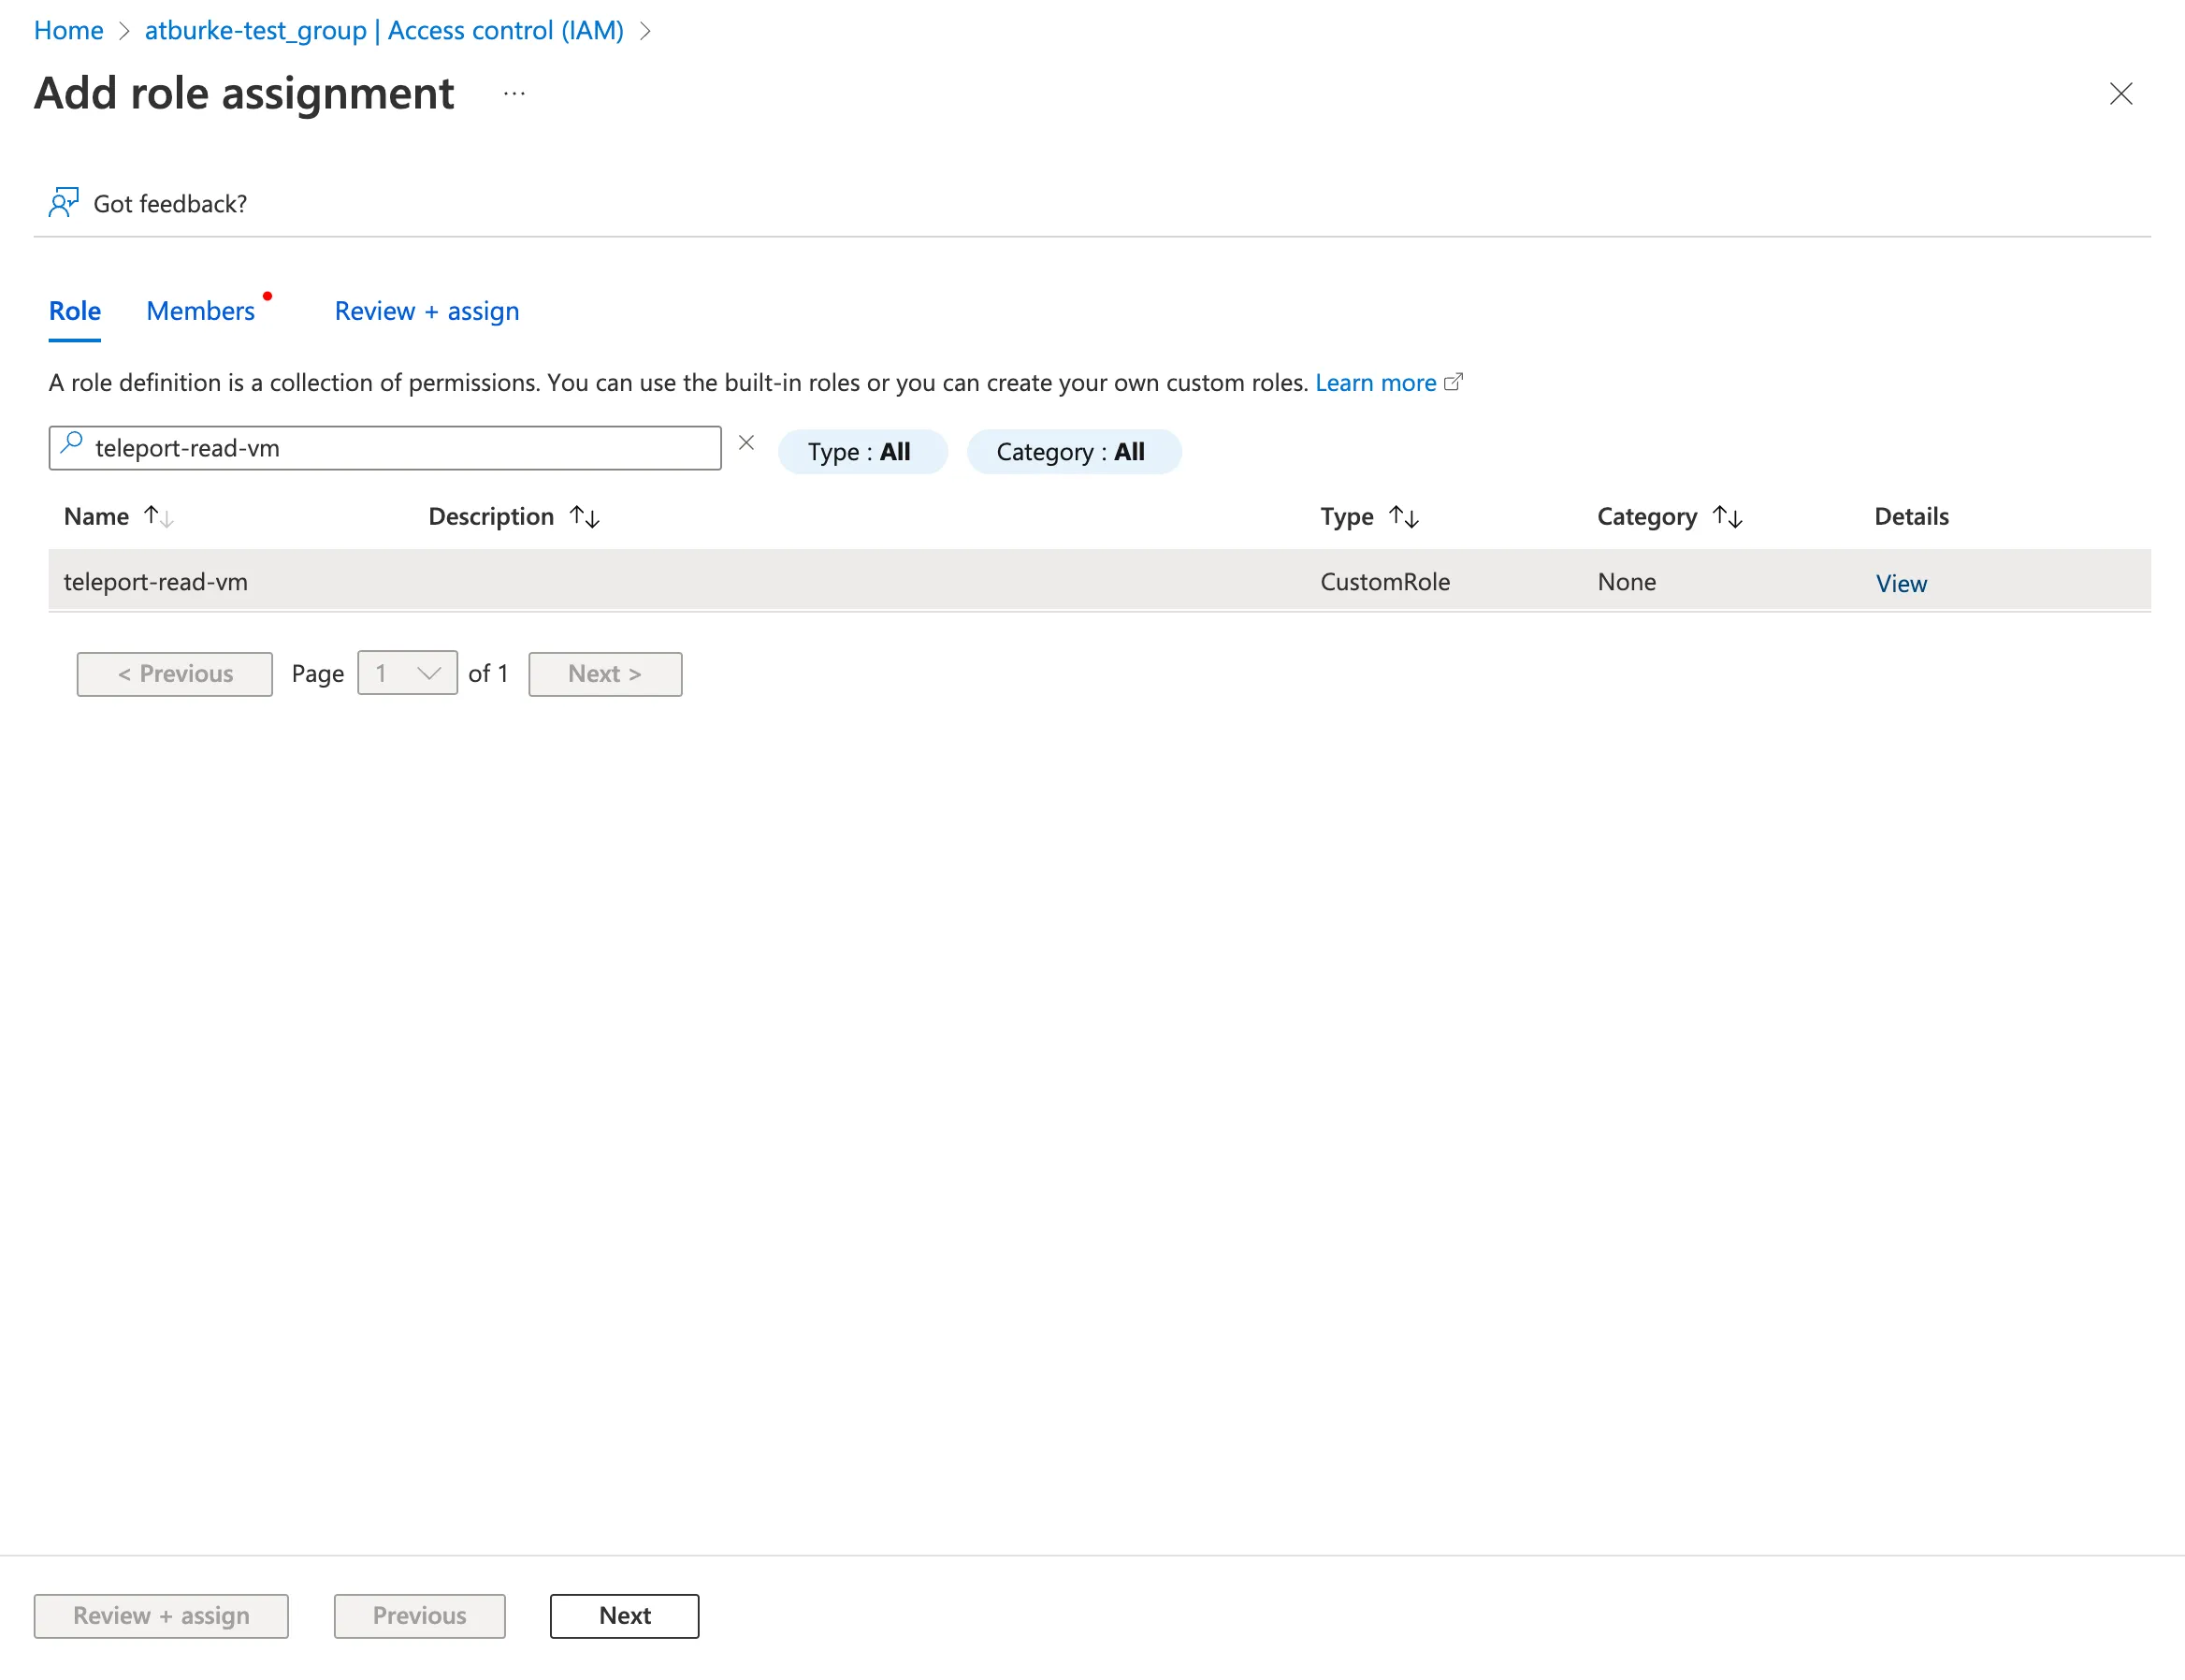
Add a role
assignment

화면 하단으로 스크롤한 다음 Next를 클릭합니다.

Members 탭의 Assign access to 필드에서 Managed identity를 선택합니다. Select members를 클릭합니다.

오른쪽 사이드바에서 Managed identity 드롭다운 메뉴를 찾아 User-assigned managed identity를 선택합니다. 앞서 생성한 teleport-azure ID를 선택합니다.
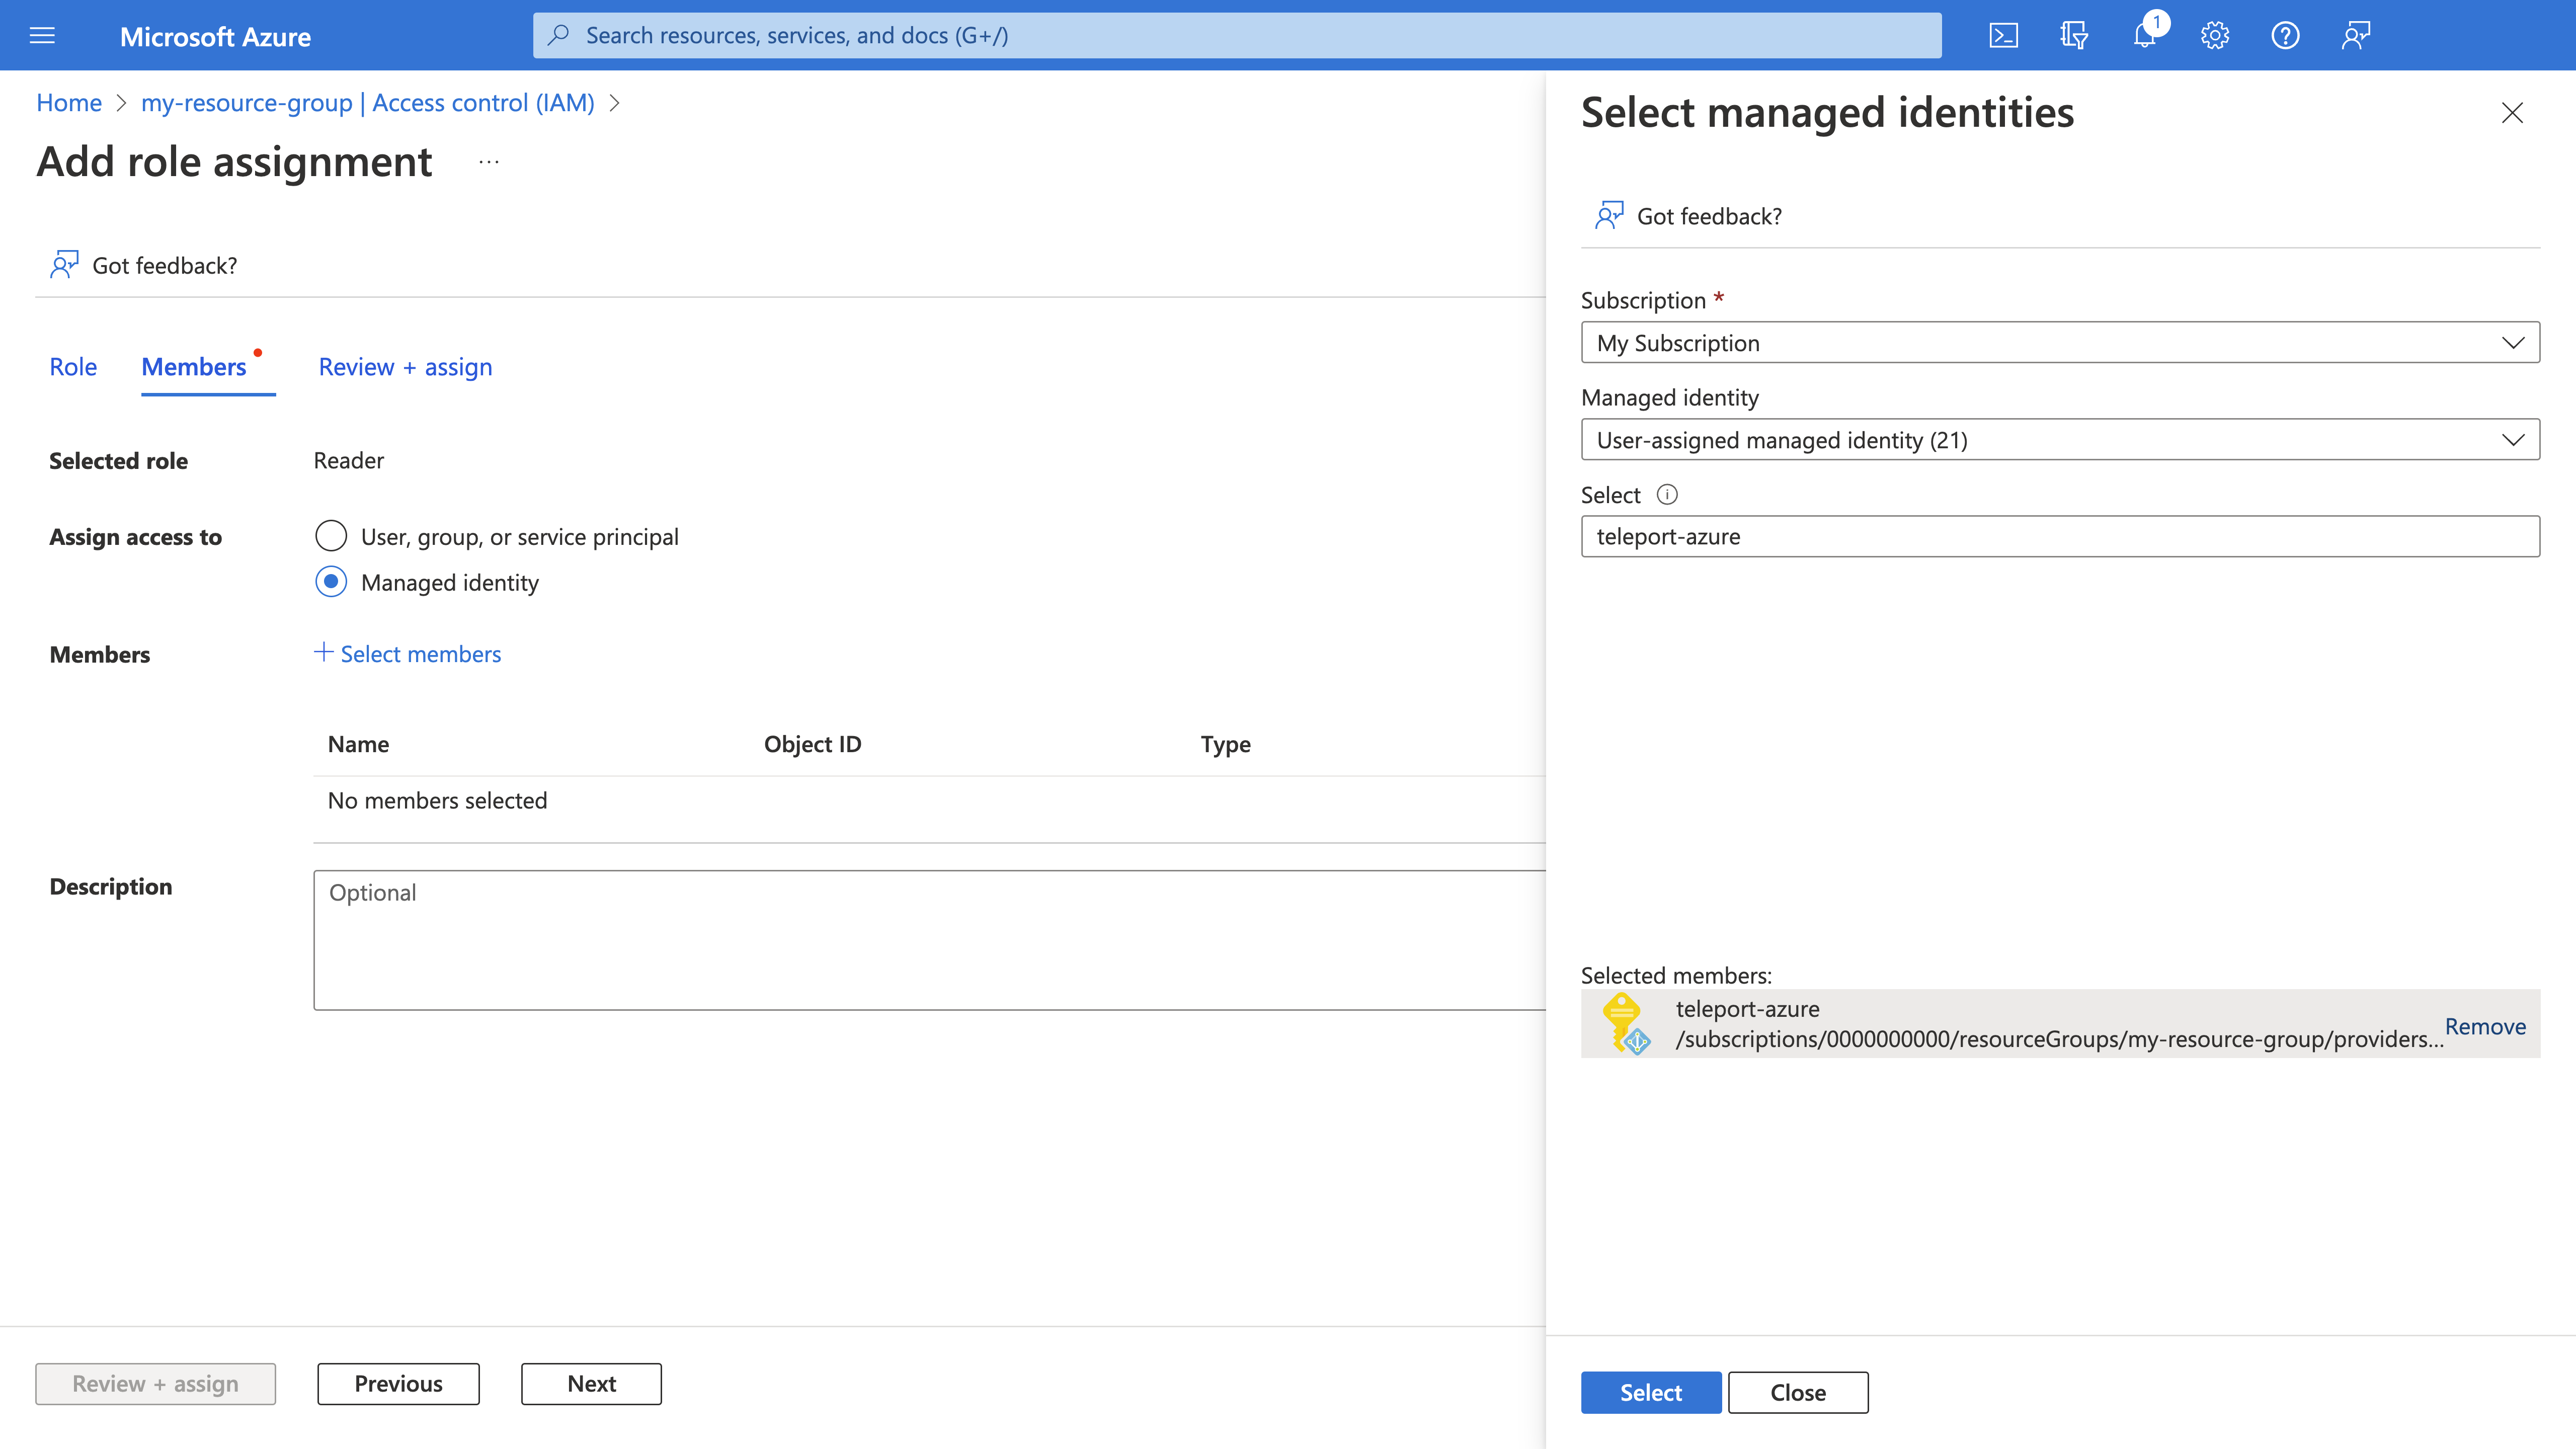
Select managed
identities

Select을 클릭한 다음 Review + assign을 클릭합니다.

Roleteleport-read-vm이고, Scope가 선택한 리소스 그룹과 일치하며, Members 필드에 앞서 생성한 teleport-azure 관리 ID가 포함되어 있는지 확인합니다.

다시 Review + assign을 클릭합니다.

Azure VM에 ID 연결#

Azure Portal의 Virtual machines view 에서 Teleport Service를 호스팅하는 데 사용하는 VM의 이름을 클릭합니다.

오른쪽 측면 패널에서 Security/Identity 탭을 클릭한 다음 Identity 뷰에서 User assigned 탭을 클릭합니다. +Add를 클릭한 다음 teleport-azure ID를 선택합니다. Add를 클릭합니다.
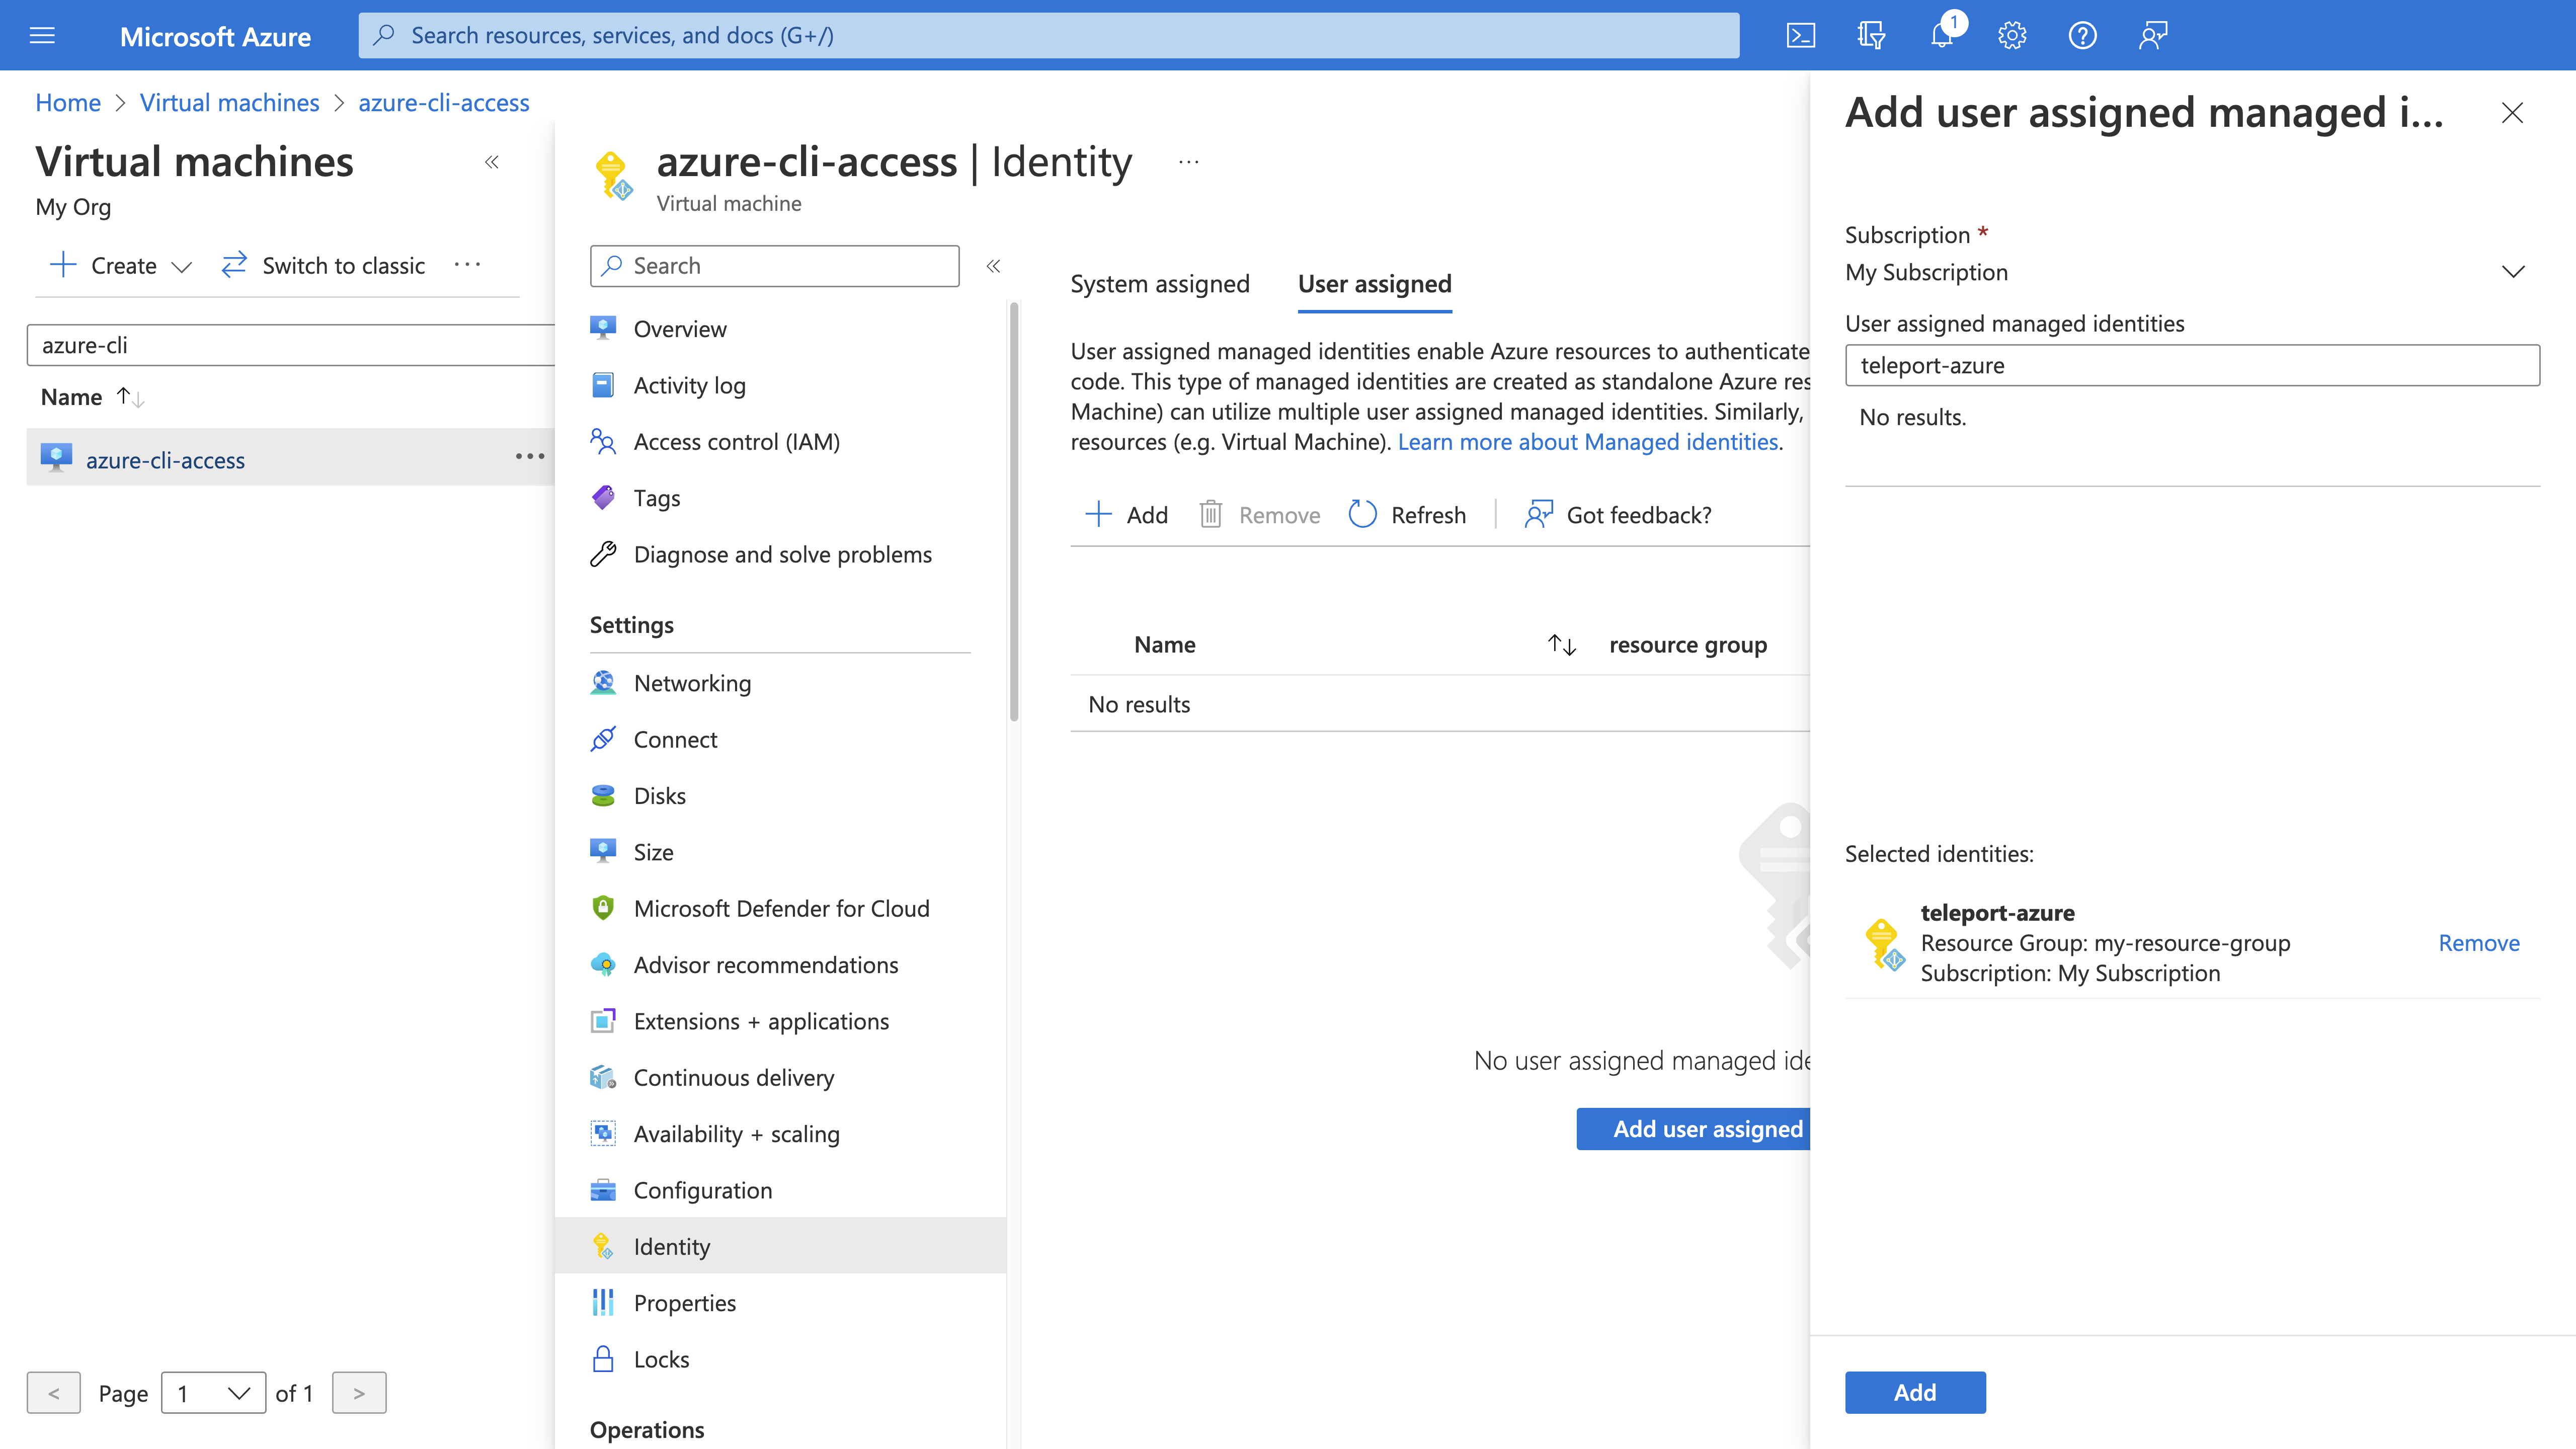
Add an identity to a
VM

Azure VM 페이지의 Identity 탭으로 다시 이동합니다. User assigned 하위 탭에 새 ID가 나열되어 있어야 합니다:
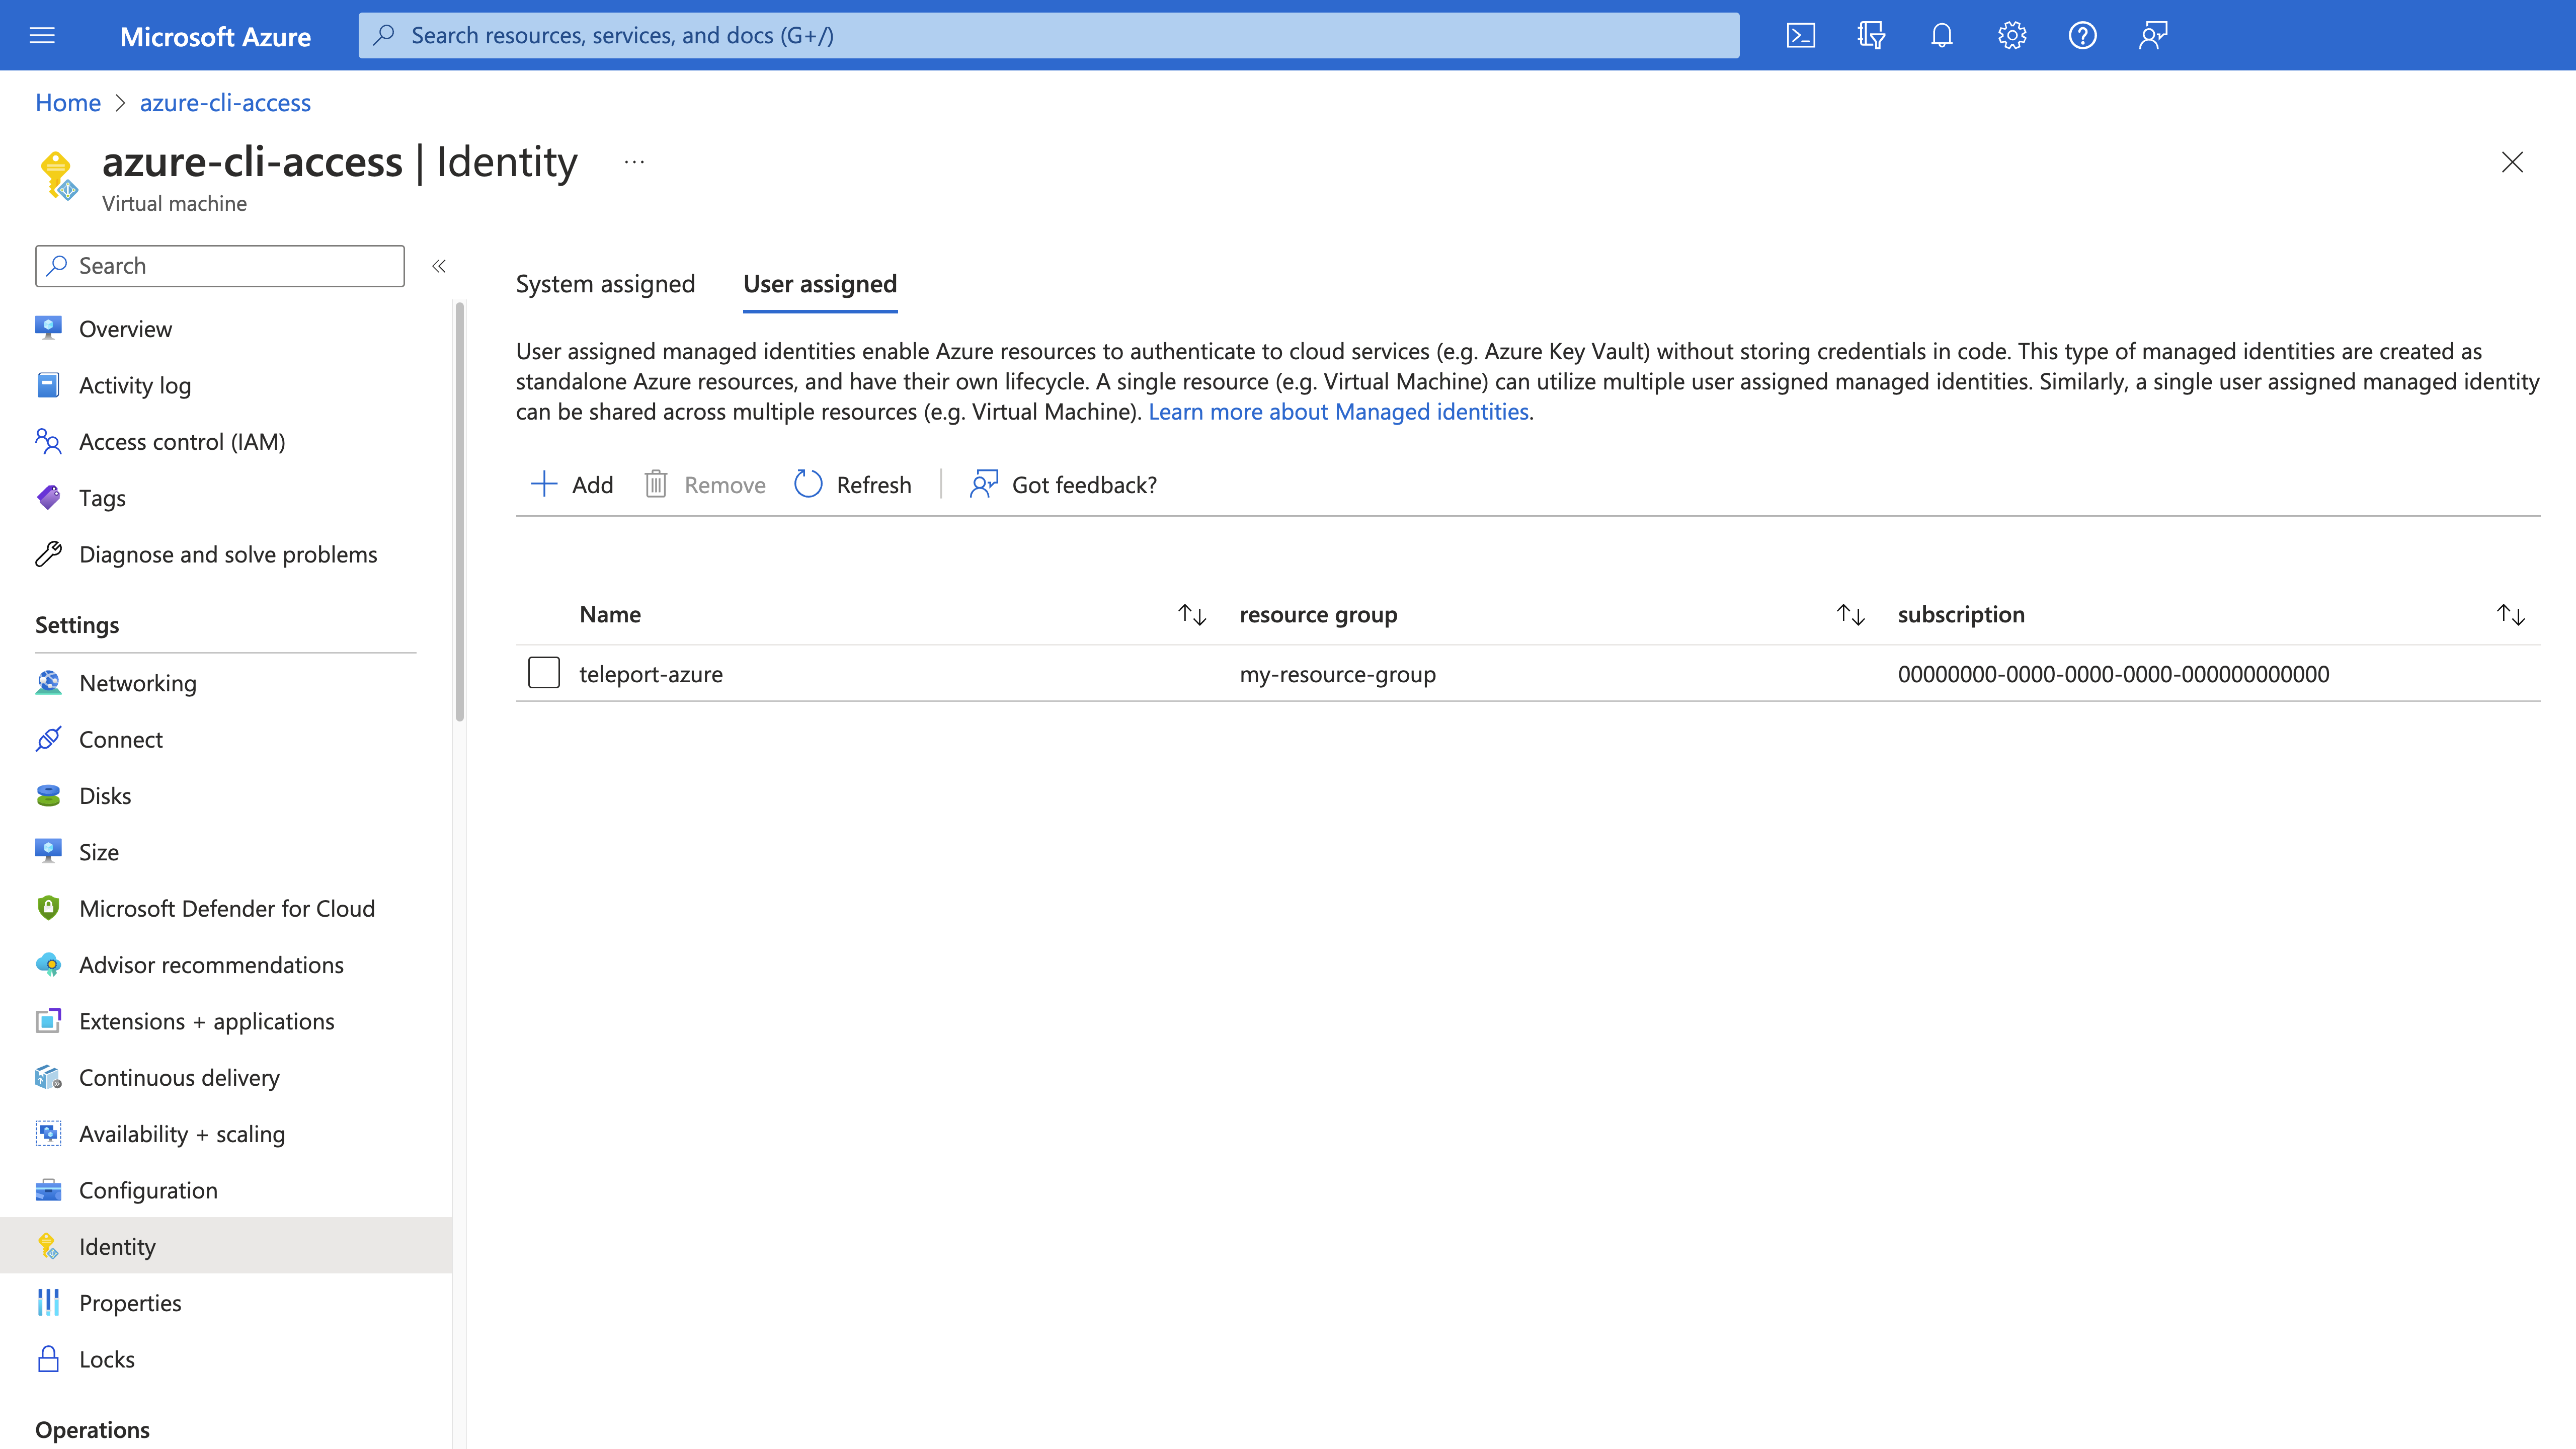
Verifying that you added the
identity

Warning

인증 과정의 일부로, Teleport는 해당 ID가 허용하는 모든 작업을 수행할 수 있게 됩니다. 이 가이드에서 생성한 ID가 아닌 다른 관리 ID를 사용하는 경우, 해당 ID의 권한과 범위를 제한할 것을 강력히 권장합니다.

ARM Template

teleport-create-identity.json이라는 이름의 파일을 생성하고 다음 내용을 그 안에 복사합니다:

{
  "$schema": "https://schema.management.azure.com/schemas/2019-04-01/deploymentTemplate.json#",
  "contentVersion": "1.0.0.0",
  "metadata": {
    "_generator": {
      "name": "bicep",
      "version": "0.5.6.12127",
      "templateHash": "2227781763411200690"
    }
  },
  "parameters": {
    "roleName": {
      "type": "string",
      "defaultValue": "teleport-read-vm",
      "metadata": {
        "description": "Friendly name of the role definition"
      }
    },
    "identityName": {
      "type": "string",
      "defaultValue": "teleport-azure",
      "metadata": {
        "description": "Name of the managed identity"
      }
    }
  },
  "variables": {
    "roleDefName": "[guid(resourceGroup().id, string('Microsoft.Compute/virtualMachines/read'))]"
  },
  "resources": [
    {
      "type": "Microsoft.Authorization/roleDefinitions",
      "apiVersion": "2022-04-01",
      "name": "[variables('roleDefName')]",
      "properties": {
        "roleName": "[parameters('roleName')]",
        "description": "A role to allow reading information about Virtual Machines, to be used for Teleport.",
        "type": "customRole",
        "permissions": [
          {
            "actions": [
              "Microsoft.Compute/virtualMachines/read"
            ],
            "notActions": []
          }
        ],
        "assignableScopes": [
          "[resourceGroup().id]"
        ]
      }
    },
    {
      "type": "Microsoft.ManagedIdentity/userAssignedIdentities",
      "name": "[parameters('identityName')]",
      "apiVersion": "2018-11-30",
      "location": "[resourceGroup().location]"
    }
  ],
  "outputs": {
    "principalID": {
      "type": "string",
      "value": "[reference(resourceId('Microsoft.ManagedIdentity/userAssignedIdentities', parameters('identityName'))).principalId]"
    },
    "clientID": {
      "type": "string",
      "value": "[reference(resourceId('Microsoft.ManagedIdentity/userAssignedIdentities', parameters('identityName'))).clientId]"
    },
    "roleName": {
      "type": "string",
      "value": "[variables('roleDefName')]"
    }
  }
}

그런 다음 다음 명령을 실행하여 사용자 지정 역할과 관리 ID를 생성합니다:

$ DEPLOY_OUTPUT=$(az deployment group create \
--resource-group <your-resource-group> \
--template-file teleport-create-identity.json)
$ PRINCIPAL_ID=$(echo $DEPLOY_OUTPUT | jq -r '.properties.outputs.principalID.value')
$ CLIENT_ID=$(echo $DEPLOY_OUTPUT | jq -r '.properties.outputs.principalID.value')
$ ROLE_NAME=$(echo $DEPLOY_OUTPUT | jq -r '.properties.outputs.roleName.value')
"command not found" 오류가 발생하나요? 이 명령을 실행하려면 워크스테이션에 `jq`가 설치되어 있어야 하며, [`jq` download page](https://stedolan.github.io/jq/download/)를 통해 설치할 수 있습니다.

다음으로, teleport-assign-identity.json이라는 이름의 다른 파일을 생성하고 다음 내용을 그 안에 복사합니다:

{
  "$schema": "https://schema.management.azure.com/schemas/2019-04-01/deploymentTemplate.json#",
  "contentVersion": "1.0.0.0",
  "metadata": {
    "_generator": {
      "name": "bicep",
      "version": "0.5.6.12127",
      "templateHash": "2227781763411200690"
    }
  },
  "parameters": {
    "identityName": {
      "type": "string",
      "defaultValue": "teleport-azure"
    },
    "principalId": {
      "type": "string"
    },
    "roleName": {
      "type": "string"
    },
    "vmNames": {
      "type": "array"
    }
  },
  "resources": [
    {
      "type": "Microsoft.Authorization/roleAssignments",
      "apiVersion": "2022-04-01",
      "name": "[guid(resourceGroup().id)]",
      "properties": {
        "roleDefinitionId": "[concat('/subscriptions/', subscription().subscriptionId, '/providers/Microsoft.Authorization/roleDefinitions/', parameters('roleName'))]",
        "principalId": "[parameters('principalId')]"
      }
    },
    {
      "apiVersion": "2018-06-01",
      "type": "Microsoft.Compute/virtualMachines",
      "name": "[parameters('vmNames')[copyIndex('vmcopy')]]",
      "location": "[resourceGroup().location]",
      "identity": {
        "type": "userAssigned",
        "userAssignedIdentities": {
          "[resourceID('Microsoft.ManagedIdentity/userAssignedIdentities/',parameters('identityName'))]": {}
        }
      },
      "copy": {
        "name": "vmcopy",
        "count": "[length(parameters('vmNames'))]"
      }
    }
  ]
}

다음 명령을 실행하여 사용자 지정 역할을 관리 ID에 할당하고 해당 ID를 가상 머신에 할당합니다:

$ az deployment group create \
--resource-group <your-resource-group> \
--template-file teleport-assign-identity.json \
-- parameters principalId="$PRINCIPAL_ID" roleName="$ROLE_NAME" \
vmNames='<list-of-vm-names>'

Step 3에서 CLIENT_ID 값을 사용합니다.

이 옵션에서 얻은 관리 아이덴티티 ID를 통합 명령의 2단계에서 주체(principal) ID로 사용하세요.

이 옵션은 Azure 외부에서 Discovery Service를 실행하는 경우를 위한 것입니다. 이를 위해서는 Entra ID 통합을 통해 구성된 Entra OIDC 자격 증명이 필요합니다. Entra ID 통합이 구성되면, ./teleport integration configure access-graph azure 명령을 사용하여 Azure 애플리케이션에 역할이 할당됩니다.

<div class="admonition tip"><div class="admonition-title">Tip</div>

통합 명령의 2단계에서 애플리케이션 객체 ID를 주체(principal) ID로 사용하세요.

마지막으로, 구성에 <code>azure-integration</code>의 이름을 추가하세요. 일반적으로 이는 `entra-id`입니다:

```yaml
discovery_service:
  access_graph:
    azure:
    - subscription_id: azure-subscription-id
      integration: azure-integration
```

4/4단계. Access Graph Azure 동기화 설정#

Teleport Discovery Service를 구성하려면, Azure 내에서 Discovery Service를 실행하는 Azure 관리 아이덴티티에 Azure 리소스를 가져올 수 있는 올바른 권한이 부여되어야 합니다. Azure Cloud Shell 내에서 .tar.gz 형식의 Teleport 바이너리를 다운로드하여 통합 명령을 실행하는 데 사용하세요.

아래 명령/구성에서 다음을 지정해야 합니다:

Teleport 바이너리를 다운로드하고 압축을 해제하세요:

$ curl -L https://cdn.teleport.dev/teleport-vteleport-version-linux-amd64-bin.tar.gz | tar xz

통합 명령을 실행하세요:

$ ./teleport integration configure access-graph azure --principal-id azure-principal-id --role-name azure-discovery-role --subscription-id azure-subscription-id

Teleport Identity Security로 Azure 접근 패턴 탐색

Teleport v18.9
원문 보기
요약

Identity Security는 전체 인프라에 걸친 접근 관리를 간소화하고 중앙화합니다. Access Graph를 사용하는 Identity Security는 Azure 구독 내 접근 패턴에 대한 인사이트를 제공합니다.

Identity Security는 전체 인프라에 걸친 접근 관리를 간소화하고 중앙화합니다. 모든 사용자, 그룹, 컴퓨팅 리소스 간의 통합되고 최신 관계 및 정책을 확인하여 몇 초 만에 접근 관계를 파악할 수 있습니다.

Access Graph를 사용하는 Identity Security는 Azure 구독 내 접근 패턴에 대한 인사이트를 제공합니다. 사용자, 그룹, 서비스 주체, 역할 정의를 스캔하여 시각적 표현을 제공하고 Azure 환경 내 권한 모델을 개선하는 데 도움을 줍니다. 이 기능을 통해 다음과 같은 질문에 답할 수 있습니다:

  • Azure 사용자와 역할이 접근할 수 있는 리소스는 무엇인가?
  • 어떤 그룹이 다른 그룹에 속하며 이것이 리소스 접근에 어떤 영향을 미치는가?
  • 사용자와 그룹에 역할을 할당할 때 구독 전반의 범위가 얼마나 넓거나 좁은가?

Access Graph를 활용하여 Azure 구독 내 권한을 분석하려면 Access Graph 서비스, Discovery Service를 설정하고 Azure 구독과 통합해야 합니다.

이 가이드에서는 Teleport Access Graph를 사용하여 Azure 동기화를 설정합니다.

Access Graph은 Teleport Enterprise 에디션 고객이 사용할 수 있는 Teleport Identity Security 제품의 기능입니다.

클러스터에 Access Graph이 올바르게 설정되었는지 확인하려면 Teleport Web UI에 로그인하고 Identity Security 사이드바 버튼을 클릭한 다음 Browse 메뉴 항목을 클릭합니다. 아이덴티티, 리소스 등이 나열되어야 합니다.

작동 방식#

Access Graph는 Azure 접근 패턴을 검색하고 사용자, 그룹, 서비스 주체, 역할 정의를 포함한 다양한 Azure 리소스를 동기화합니다. 이러한 리소스는 Identity Security 사용 페이지에서 자세히 설명하는 그래프 표현을 사용하여 시각화됩니다.

가져오기 프로세스는 두 가지 주요 단계로 구성됩니다:

클라우드 API 폴링#

Teleport Discovery Service는 구성된 Azure 구독을 지속적으로 스캔합니다. 최소 15분 간격으로 구성 가능한 주기마다, Azure 계정에서 다음 리소스를 가져옵니다:

  • 사용자
  • 그룹
  • 서비스 주체
  • 역할 정의
  • 역할 할당
  • 가상 머신

필요한 모든 리소스를 가져온 후, Teleport Discovery Service는 이를 Access Graph로 전송하여 Azure 환경의 최신 정보로 항상 업데이트되도록 합니다.

리소스 가져오기#

Identity Security의 Access Graph 기능은 Azure 구독에서 가져온 리소스를 시각화합니다.

사전 요구 사항#

  • 실행 중인 Teleport Enterprise 클러스터 v17.2.1 이상.
  • 계정에 Identity Security가 활성화되어 있어야 합니다.
  • 자체 호스팅 클러스터의 경우:
    • Auth Service 구성에 최신 license.pem이 사용되고 있는지 확인하세요.
    • 실행 중인 Access Graph 노드 v1.27.0 이상. Access Graph 설정 방법에 대한 자세한 내용은 Identity Security 페이지를 확인하세요.
    • Access Graph 서비스를 실행 중인 노드는 Teleport Auth Service에서 접근 가능해야 합니다.
Warning

클라우드 호스팅 Teleport Enterprise 클러스터를 사용하는 경우, 클라우드 호스팅 Teleport Enterprise가 이미 클러스터 내에서 올바르게 구성된 Discovery Service를 운영하고 있으므로 이 단계를 건너뛸 수 있습니다.

1/4단계. Discovery Service 설치#

Tip

Discovery Service를 다른 Teleport 서비스(예: Auth 또는 Proxy)가 이미 실행 중인 호스트에서 실행할 계획이라면 이 단계를 건너뛸 수 있습니다.

Discovery Service를 실행할 Azure 가상 머신에 Teleport를 설치합니다. 이렇게 하면 VM에 연결된 관리 아이덴티티에 필요한 Azure 리소스를 가져오기 위한 올바른 권한을 할당할 수 있습니다. 또는 Teleport를 Azure OIDC 통합으로 구성된 Auth 서비스에 연결되어 있는 한 다른 환경에도 설치할 수 있습니다. 아래에는 1) Azure 가상 머신을 사용하거나 2) Entra ID 통합을 통한 Azure OIDC 자격 증명을 사용하는 두 가지 옵션이 제공됩니다.

Linux 서버에 Teleport Agent를 설치하려면:

권장 설치 방법은 클러스터 설치 스크립트입니다. 이 스크립트는 클러스터에 맞는 올바른 버전, 에디션, 설치 모드를 선택합니다.

  1. teleport.example.com:443에 Teleport 클러스터의 호스트명과 포트를 할당하되, 스킴(https://)은 포함하지 마십시오.

  2. 클러스터의 설치 스크립트를 실행하십시오:

    $ curl "https://teleport.example.com:443/scripts/install.sh" | sudo bash
    

2/4단계. Discovery Service 구성#

Teleport Discovery Service를 활성화하려면 teleport.yaml 구성 파일에 최상위 discovery_service 섹션을 추가하세요. 이 서비스는 discovery_group이 일치하는 동적 discovery_config 리소스를 모니터링합니다.

discovery-group.

discovery_service:
  enabled: true
  discovery_group: discovery-group

이미 클러스터 내에서 Discovery Service를 운영 중이라면, 다음 요구 사항이 충족되는 한 이를 재사용할 수 있다는 점을 유의하세요:

  • 2단계에서 기존 Discovery Service의 discovery_groupdiscovery_group을 일치시킵니다.
  • Access Graph 서비스는 Discovery Service가 실행되는 머신에서 접근 가능해야 합니다.

Auth Service가 구성되면, Azure 리소스를 가져오기 위해 활성화하려면 다음을 Discovery Service 구성 파일에 추가하세요:

discovery_service:
  access_graph:
    azure:
      - subscription_id: azure-subscription-id

구성 파일을 수정한 머신에서 Teleport 프로세스를 재시작하세요:

$ sudo systemctl reload teleport

이제 Discovery Service가 Azure 구독에서 주기적으로 리소스를 가져옵니다.

3/4단계. Discovery Service 활성화#

Azure 리소스를 가져오기 위해 Discovery Service를 활성화하려면, Discovery Service를 실행하는 아이덴티티를 인가해야 합니다. 인가를 위한 두 가지 옵션을 사용할 수 있습니다.

Discovery Service를 실행하기 위해 Azure VM을 인가하는 것이 가장 간단한 옵션입니다. Azure VM에는 관리 아이덴티티를 할당할 수 있으며, 이를 통해 VM에서 실행되는 Discovery Service는 해당 아이덴티티와 연결된 권한을 사용할 수 있습니다. 아래 단계는 Azure VM에 대한 관리 아이덴티티를 구성하는 방법을 보여줍니다. 이후 단계에서는 ./teleport integration configure access-graph azure 명령을 사용하여 관리 아이덴티티의 ID에 역할이 할당됩니다.

Manually create identity

사용자 지정 역할 생성#

Azure Portal 검색 상자에 Azure 리소스 그룹의 이름을 입력한 뒤 해당 리소스 그룹의 페이지로 이동합니다. 왼쪽 탐색 사이드바에서 Access control (IAM) 탭을 클릭합니다. Access control (IAM) 패널 상단의 버튼 행에서 Add > Add custom role을 클릭합니다.

Custom role name 필드에 teleport-read-vm을 입력합니다.

Create custom
role

Permissions 탭을 클릭한 다음 Permissions 뷰에서 +Add permissions를 클릭합니다.

검색 상자에 Microsoft.Compute/virtualMachines/read을 입력합니다. Microsoft Compute 상자를 클릭한 다음 Read: Get Virtual Machine을 활성화합니다. Add를 클릭합니다.

Add virtual machine read
permission

Review + create를 클릭한 다음 Create를 클릭합니다.

Azure 관리 ID 생성#

Azure Portal에서 Managed Identities 뷰로 이동합니다.

Create를 클릭합니다.

Subscription, Resource group, Region 아래에서 VM이 속한 것을 선택합니다.

Name 필드에 teleport-azure를 입력합니다.

Creating an Azure managed
identity

Review + create를 클릭한 다음 Create를 클릭합니다.

생성이 완료되면 Go to resource를 클릭합니다. 새 ID의 페이지에서 이 가이드 뒷부분에서 사용할 수 있도록 Client ID 값을 복사합니다.

teleport-read-vm 역할을 teleport-azure ID에 할당#

Azure Portal 검색 상자에 Azure 리소스 그룹의 이름을 입력한 뒤 해당 리소스 그룹의 페이지로 이동합니다. 왼쪽 탐색 사이드바에서 Access control (IAM) 탭을 클릭합니다. Access control (IAM) 패널 상단의 버튼 행에서 Add > Add role assignment를 클릭합니다.

Add role assignment 화면에서 teleport-read-vm을 클릭합니다.

Add a role
assignment

화면 하단으로 스크롤한 다음 Next를 클릭합니다.

Members 탭의 Assign access to 필드에서 Managed identity를 선택합니다. Select members를 클릭합니다.

오른쪽 사이드바에서 Managed identity 드롭다운 메뉴를 찾아 User-assigned managed identity를 선택합니다. 앞서 생성한 teleport-azure ID를 선택합니다.

Select managed
identities

Select을 클릭한 다음 Review + assign을 클릭합니다.

Roleteleport-read-vm이고, Scope가 선택한 리소스 그룹과 일치하며, Members 필드에 앞서 생성한 teleport-azure 관리 ID가 포함되어 있는지 확인합니다.

다시 Review + assign을 클릭합니다.

Azure VM에 ID 연결#

Azure Portal의 Virtual machines view 에서 Teleport Service를 호스팅하는 데 사용하는 VM의 이름을 클릭합니다.

오른쪽 측면 패널에서 Security/Identity 탭을 클릭한 다음 Identity 뷰에서 User assigned 탭을 클릭합니다. +Add를 클릭한 다음 teleport-azure ID를 선택합니다. Add를 클릭합니다.

Add an identity to a
VM

Azure VM 페이지의 Identity 탭으로 다시 이동합니다. User assigned 하위 탭에 새 ID가 나열되어 있어야 합니다:

Verifying that you added the
identity

Warning

인증 과정의 일부로, Teleport는 해당 ID가 허용하는 모든 작업을 수행할 수 있게 됩니다. 이 가이드에서 생성한 ID가 아닌 다른 관리 ID를 사용하는 경우, 해당 ID의 권한과 범위를 제한할 것을 강력히 권장합니다.

ARM Template

teleport-create-identity.json이라는 이름의 파일을 생성하고 다음 내용을 그 안에 복사합니다:

{
  "$schema": "https://schema.management.azure.com/schemas/2019-04-01/deploymentTemplate.json#",
  "contentVersion": "1.0.0.0",
  "metadata": {
    "_generator": {
      "name": "bicep",
      "version": "0.5.6.12127",
      "templateHash": "2227781763411200690"
    }
  },
  "parameters": {
    "roleName": {
      "type": "string",
      "defaultValue": "teleport-read-vm",
      "metadata": {
        "description": "Friendly name of the role definition"
      }
    },
    "identityName": {
      "type": "string",
      "defaultValue": "teleport-azure",
      "metadata": {
        "description": "Name of the managed identity"
      }
    }
  },
  "variables": {
    "roleDefName": "[guid(resourceGroup().id, string('Microsoft.Compute/virtualMachines/read'))]"
  },
  "resources": [
    {
      "type": "Microsoft.Authorization/roleDefinitions",
      "apiVersion": "2022-04-01",
      "name": "[variables('roleDefName')]",
      "properties": {
        "roleName": "[parameters('roleName')]",
        "description": "A role to allow reading information about Virtual Machines, to be used for Teleport.",
        "type": "customRole",
        "permissions": [
          {
            "actions": [
              "Microsoft.Compute/virtualMachines/read"
            ],
            "notActions": []
          }
        ],
        "assignableScopes": [
          "[resourceGroup().id]"
        ]
      }
    },
    {
      "type": "Microsoft.ManagedIdentity/userAssignedIdentities",
      "name": "[parameters('identityName')]",
      "apiVersion": "2018-11-30",
      "location": "[resourceGroup().location]"
    }
  ],
  "outputs": {
    "principalID": {
      "type": "string",
      "value": "[reference(resourceId('Microsoft.ManagedIdentity/userAssignedIdentities', parameters('identityName'))).principalId]"
    },
    "clientID": {
      "type": "string",
      "value": "[reference(resourceId('Microsoft.ManagedIdentity/userAssignedIdentities', parameters('identityName'))).clientId]"
    },
    "roleName": {
      "type": "string",
      "value": "[variables('roleDefName')]"
    }
  }
}

그런 다음 다음 명령을 실행하여 사용자 지정 역할과 관리 ID를 생성합니다:

$ DEPLOY_OUTPUT=$(az deployment group create \
--resource-group <your-resource-group> \
--template-file teleport-create-identity.json)
$ PRINCIPAL_ID=$(echo $DEPLOY_OUTPUT | jq -r '.properties.outputs.principalID.value')
$ CLIENT_ID=$(echo $DEPLOY_OUTPUT | jq -r '.properties.outputs.principalID.value')
$ ROLE_NAME=$(echo $DEPLOY_OUTPUT | jq -r '.properties.outputs.roleName.value')
"command not found" 오류가 발생하나요? 이 명령을 실행하려면 워크스테이션에 `jq`가 설치되어 있어야 하며, [`jq` download page](https://stedolan.github.io/jq/download/)를 통해 설치할 수 있습니다.

다음으로, teleport-assign-identity.json이라는 이름의 다른 파일을 생성하고 다음 내용을 그 안에 복사합니다:

{
  "$schema": "https://schema.management.azure.com/schemas/2019-04-01/deploymentTemplate.json#",
  "contentVersion": "1.0.0.0",
  "metadata": {
    "_generator": {
      "name": "bicep",
      "version": "0.5.6.12127",
      "templateHash": "2227781763411200690"
    }
  },
  "parameters": {
    "identityName": {
      "type": "string",
      "defaultValue": "teleport-azure"
    },
    "principalId": {
      "type": "string"
    },
    "roleName": {
      "type": "string"
    },
    "vmNames": {
      "type": "array"
    }
  },
  "resources": [
    {
      "type": "Microsoft.Authorization/roleAssignments",
      "apiVersion": "2022-04-01",
      "name": "[guid(resourceGroup().id)]",
      "properties": {
        "roleDefinitionId": "[concat('/subscriptions/', subscription().subscriptionId, '/providers/Microsoft.Authorization/roleDefinitions/', parameters('roleName'))]",
        "principalId": "[parameters('principalId')]"
      }
    },
    {
      "apiVersion": "2018-06-01",
      "type": "Microsoft.Compute/virtualMachines",
      "name": "[parameters('vmNames')[copyIndex('vmcopy')]]",
      "location": "[resourceGroup().location]",
      "identity": {
        "type": "userAssigned",
        "userAssignedIdentities": {
          "[resourceID('Microsoft.ManagedIdentity/userAssignedIdentities/',parameters('identityName'))]": {}
        }
      },
      "copy": {
        "name": "vmcopy",
        "count": "[length(parameters('vmNames'))]"
      }
    }
  ]
}

다음 명령을 실행하여 사용자 지정 역할을 관리 ID에 할당하고 해당 ID를 가상 머신에 할당합니다:

$ az deployment group create \
--resource-group <your-resource-group> \
--template-file teleport-assign-identity.json \
-- parameters principalId="$PRINCIPAL_ID" roleName="$ROLE_NAME" \
vmNames='<list-of-vm-names>'

Step 3에서 CLIENT_ID 값을 사용합니다.

이 옵션에서 얻은 관리 아이덴티티 ID를 통합 명령의 2단계에서 주체(principal) ID로 사용하세요.

이 옵션은 Azure 외부에서 Discovery Service를 실행하는 경우를 위한 것입니다. 이를 위해서는 Entra ID 통합을 통해 구성된 Entra OIDC 자격 증명이 필요합니다. Entra ID 통합이 구성되면, ./teleport integration configure access-graph azure 명령을 사용하여 Azure 애플리케이션에 역할이 할당됩니다.

<div class="admonition tip"><div class="admonition-title">Tip</div>

통합 명령의 2단계에서 애플리케이션 객체 ID를 주체(principal) ID로 사용하세요.

마지막으로, 구성에 <code>azure-integration</code>의 이름을 추가하세요. 일반적으로 이는 `entra-id`입니다:

```yaml
discovery_service:
  access_graph:
    azure:
    - subscription_id: azure-subscription-id
      integration: azure-integration
```

4/4단계. Access Graph Azure 동기화 설정#

Teleport Discovery Service를 구성하려면, Azure 내에서 Discovery Service를 실행하는 Azure 관리 아이덴티티에 Azure 리소스를 가져올 수 있는 올바른 권한이 부여되어야 합니다. Azure Cloud Shell 내에서 .tar.gz 형식의 Teleport 바이너리를 다운로드하여 통합 명령을 실행하는 데 사용하세요.

아래 명령/구성에서 다음을 지정해야 합니다:

Teleport 바이너리를 다운로드하고 압축을 해제하세요:

$ curl -L https://cdn.teleport.dev/teleport-vteleport-version-linux-amd64-bin.tar.gz | tar xz

통합 명령을 실행하세요:

$ ./teleport integration configure access-graph azure --principal-id azure-principal-id --role-name azure-discovery-role --subscription-id azure-subscription-id