Teleport Identity Security로 Entra ID 정책 분석
Teleport v18.10요약
Teleport Identity Governance의 Microsoft Entra ID 통합은 Entra ID 디렉터리를 Teleport 클러스터에 동기화하고 Entra ID 디렉터리의 관계에 대한 인사이트를 제공합니다.
Teleport Identity Governance의 Microsoft Entra ID 통합은 Entra ID 디렉터리를 Teleport 클러스터에 동기화하고 Entra ID 디렉터리의 관계에 대한 인사이트를 제공합니다. 또한 Entra ID가 SSO 아이덴티티 제공자로 사용되는 경우 Identity Security는 서비스 전반의 SSO 권한 부여를 시각화합니다.
SSO 권한 부여 분석은 현재 Entra ID가 아이덴티티 제공자 역할을 하고, AWS 계정이 AWS IAM 역할 페더레이션을 사용하여 신뢰 당사자(relying party)로 설정된 상황에서만 지원됩니다.
향후 추가적인 신뢰 당사자에 대한 지원이 추가될 예정입니다.
이 가이드에서는 Microsoft Entra ID 통합을 Teleport Access Graph와 함께 설정하고 Entra ID 디렉터리 내의 접근 패턴을 분석합니다.
작동 방식#
Teleport는 연결된 Entra ID 디렉터리를 지속적으로 스캔합니다. 5분 간격으로 Entra ID 디렉터리에서 다음 리소스를 가져옵니다:
- 사용자
- 그룹
- 그룹 내 사용자의 멤버십
- 엔터프라이즈 애플리케이션
Entra ID 사용자와 그룹은 각각 Teleport의 사용자 및 접근 목록(Access List)으로 가져와집니다. 필요한 모든 리소스를 가져온 후, Teleport는 이를 Graph Explorer로 전송하여 최신 정보로 유지되도록 합니다. 이러한 리소스는 Identity Security 사용 페이지에 설명된 그래프 표현을 사용하여 시각화됩니다.
사전 요구사항#
- 실행 중인 Teleport Enterprise 클러스터 v15.4.2/v16.0.0 이상.
- 계정에 Teleport Identity Governance와 Identity Security가 활성화되어 있어야 합니다.
- 자체 호스팅 클러스터의 경우:
- Auth 서비스 설정에서 최신
license.pem을 사용하고 있는지 확인하세요. - 실행 중인 Graph Explorer 노드 v1.21.3 이상. Graph Explorer를 설정하는 방법에 대한 자세한 내용은 Identity Security 페이지를 확인하세요.
- Graph Explorer 서비스를 실행하는 노드는 Teleport Auth 서비스에서 접근 가능해야 합니다.
- Auth 서비스 설정에서 최신
- 사용자는 Azure 계정에서 권한이 있는 관리자 권한을 보유해야 합니다.
- OIDC 설정의 경우, Teleport 클러스터가 인터넷에서 공개적으로 접근 가능해야 합니다.
- 에어 갭 클러스터의 경우,
tctl은 v16.4.7 이상이어야 합니다.
Access Graph은 Teleport Enterprise 에디션 고객이 사용할 수 있는 Teleport Identity Security 제품의 기능입니다.
클러스터에 Access Graph이 올바르게 설정되었는지 확인하려면 Teleport Web UI에 로그인하고 Identity Security 사이드바 버튼을 클릭한 다음 Browse 메뉴 항목을 클릭합니다. 아이덴티티, 리소스 등이 나열되어야 합니다.
1/3단계. 설정 방법 선택#
온보딩을 시작하려면 원하는 설정 방법을 선택하세요. Teleport는 클러스터 구성 및 사용자 요구사항에 따라 다양한 방법을 제공합니다.
Entra ID용 OIDC 제공자로서 Teleport를 사용한 자동 설정#
이 방법은 권장되며, Teleport Enterprise(Cloud) 고객이라면 반드시 사용해야 합니다.
이 방법은 공개적으로 접근 가능하며 Auth 서비스 노드 또는 파드에 Azure 자격 증명이 없는 Teleport 클러스터에 적합합니다.
이 설정에서는 Teleport가 OpenID Connect(OIDC) 아이덴티티 제공자로 구성되어, 설정 중 생성된 Entra ID 애플리케이션과 신뢰 연결을 구축합니다. 이러한 신뢰를 통해 Teleport는 Entra ID 애플리케이션을 사용하여 인증하고, 추가 자격 증명이나 관리형 아이덴티티 없이도 해당 애플리케이션에 연결된 권한에 접근할 수 있습니다.
요구사항:
- Azure가 Teleport에서 발급한 OIDC 토큰을 검증하려면 Teleport와 Azure 간의 직접적인 양방향 연결이 필요합니다.
Entra ID 인증을 위한 시스템 자격 증명을 사용한 자동 설정#
공개적으로 접근할 수 없는 에어 갭 Teleport 클러스터를 위해 설계된 이 설정은 Azure가 Teleport에서 발급한 OIDC 토큰을 검증할 수 없는 환경을 지원합니다.
대신 Teleport는 Teleport Auth 서비스가 실행되는 VM에서 사용 가능한 Azure 자격 증명에 의존합니다. 이 자격 증명에는 다음 Entra ID 권한이 있어야 합니다:
Application.Read.AllDirectory.Read.AllPolicy.Read.All
요구사항:
- Teleport에서 Azure 인프라로의 단방향 연결.
수동 설정#
이 설정은 Entra ID 애플리케이션을 설정하기 위한 자동화 스크립트에 의존하지 않고 Entra ID 통합을 수동으로 구성하는 방법을 설명합니다.
이 가이드는 Entra ID용 OIDC 제공자로서 Teleport를 사용한 자동 설정과 시스템 자격 증명을 사용한 자동 설정 설정을 다루지만 Identity Security 통합을 활성화할 수 없다는 제한이 있습니다.
2/3단계. Entra ID 통합 구성#
통합 온보딩 시작#
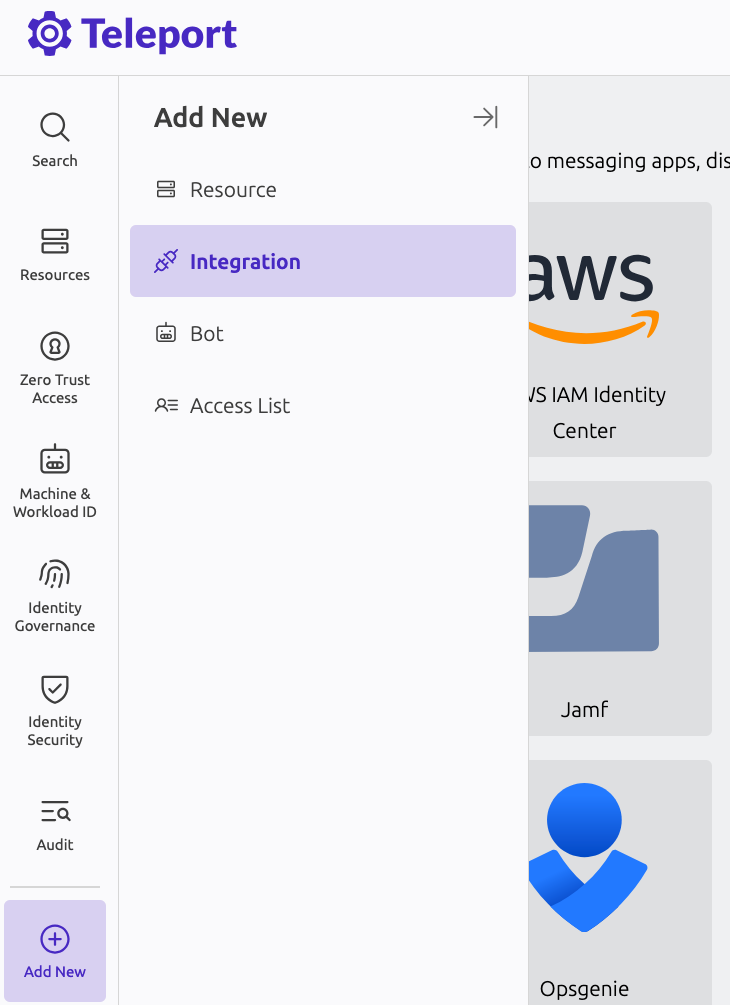
온보딩 프로세스를 시작하려면 Teleport Web UI에 접속하여 왼쪽 패널에서 "Add New"를 선택하고, "Integration"을 선택한 다음 "Microsoft Entra ID"를 선택하세요.
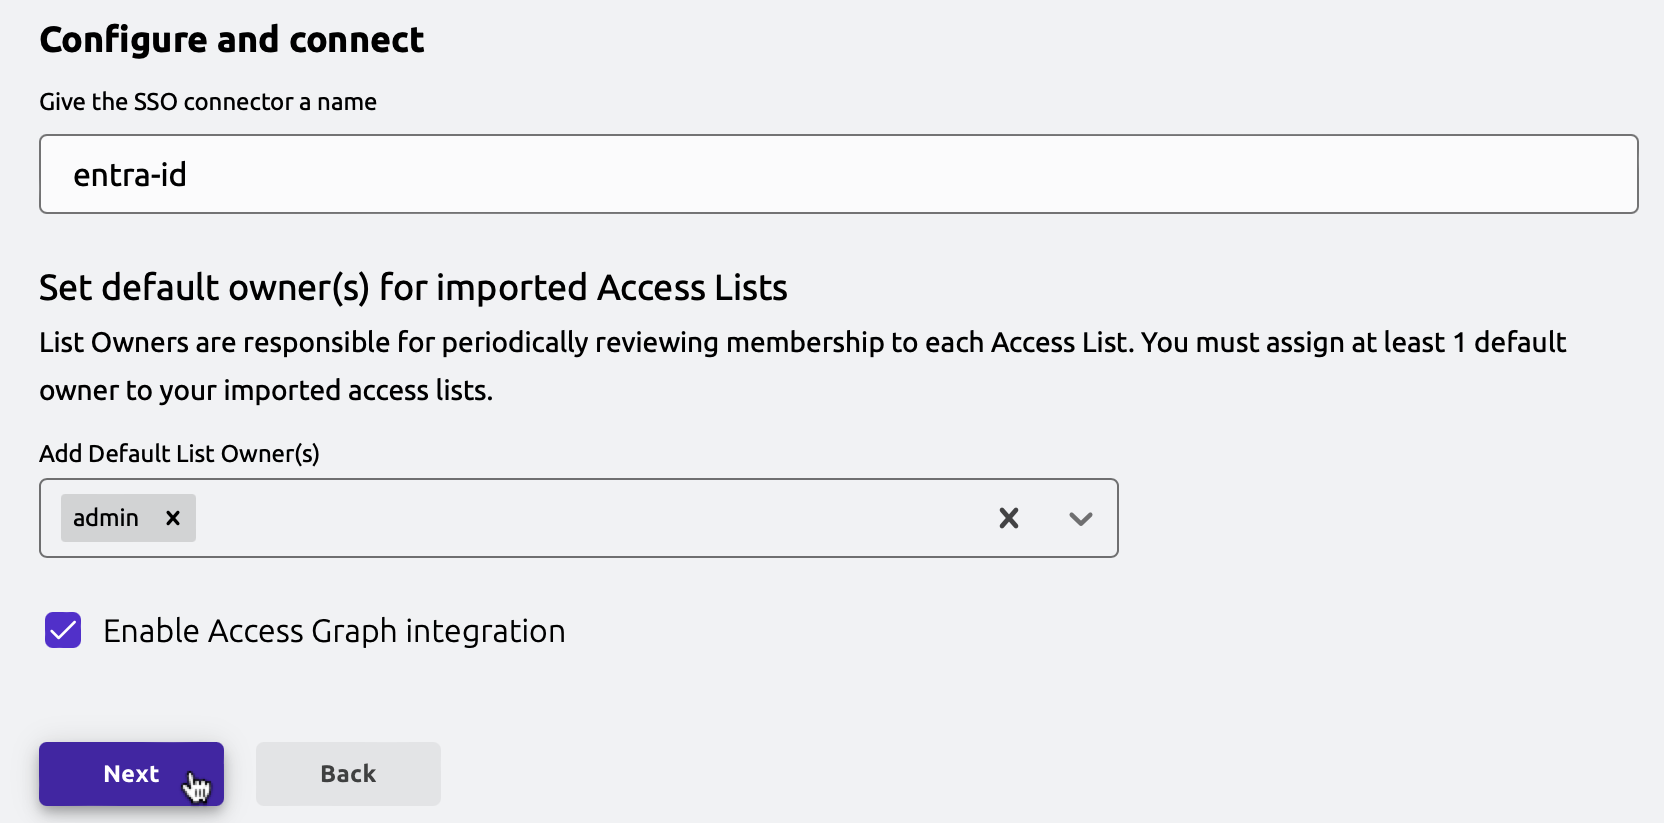
온보딩 마법사에서 Entra 그룹에 대해 생성되는 접근 목록의 기본 소유자로 지정될 Teleport 사용자를 선택하고 "Next"를 클릭하세요.
Azure에서 권한 부여 및 온보딩 완료#
이제 마법사는 Azure에서 필요한 권한을 설정하는 스크립트를 제공합니다.
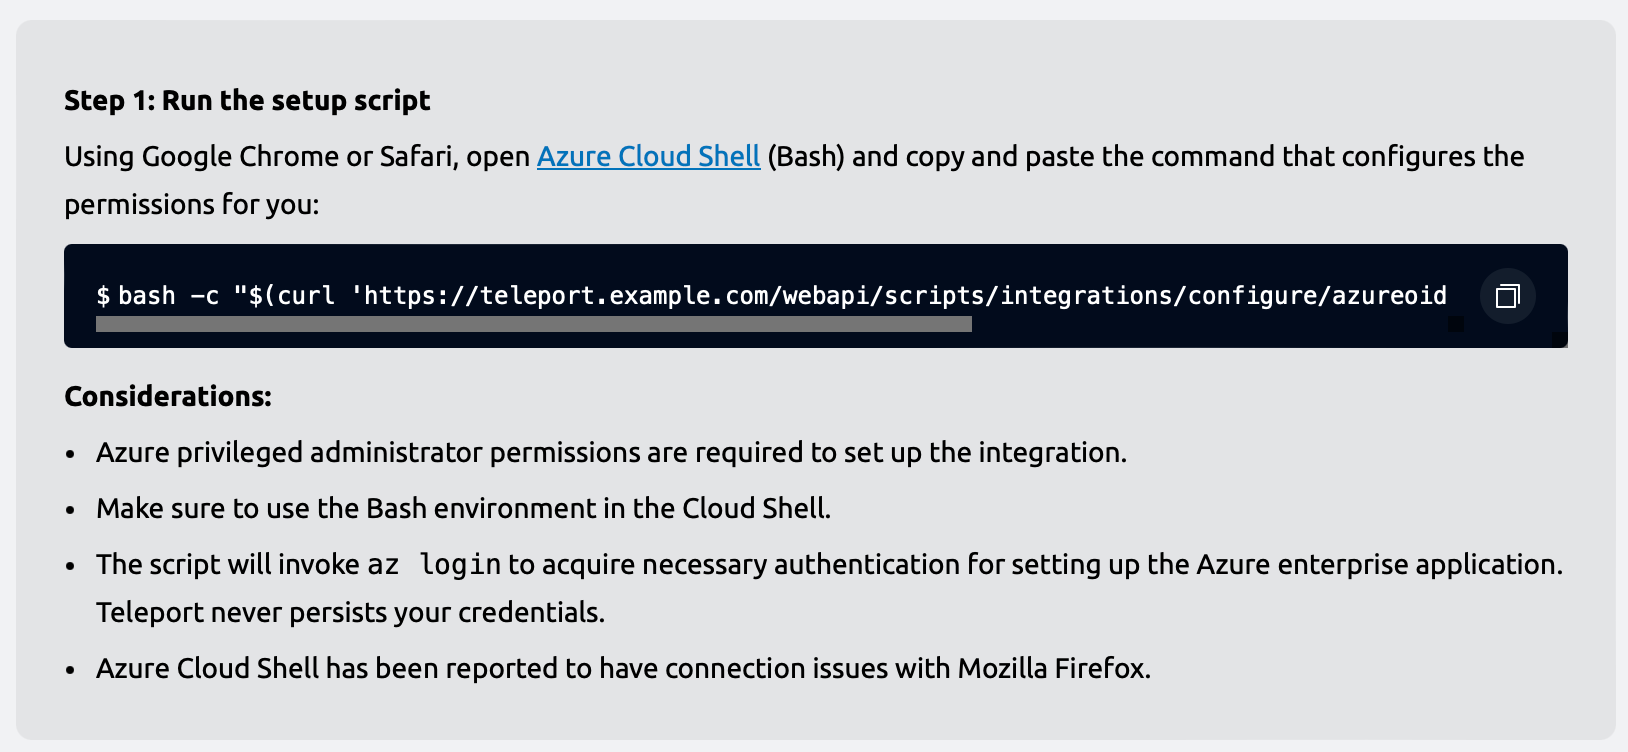
shell.azure.com으로 이동하거나 Azure 포털에서 Cloud Shell 아이콘을 클릭하여 Azure Cloud Shell을 여세요.
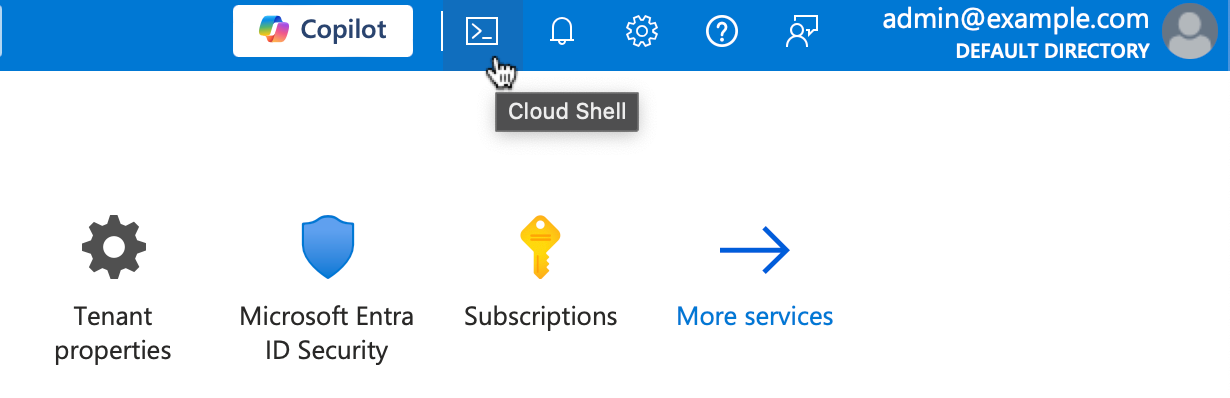
반드시 Cloud Shell의 Bash 버전을 사용하세요. Cloud Shell 인스턴스가 열리면 생성된 명령을 붙여넣으세요. 이 명령은 Teleport 클러스터를 Entra ID 디렉터리 내의 엔터프라이즈 애플리케이션으로 설정하고, Teleport에 디렉터리 데이터(디렉터리 내 사용자 및 그룹 등)를 읽을 수 있는 읽기 전용 권한을 부여합니다.
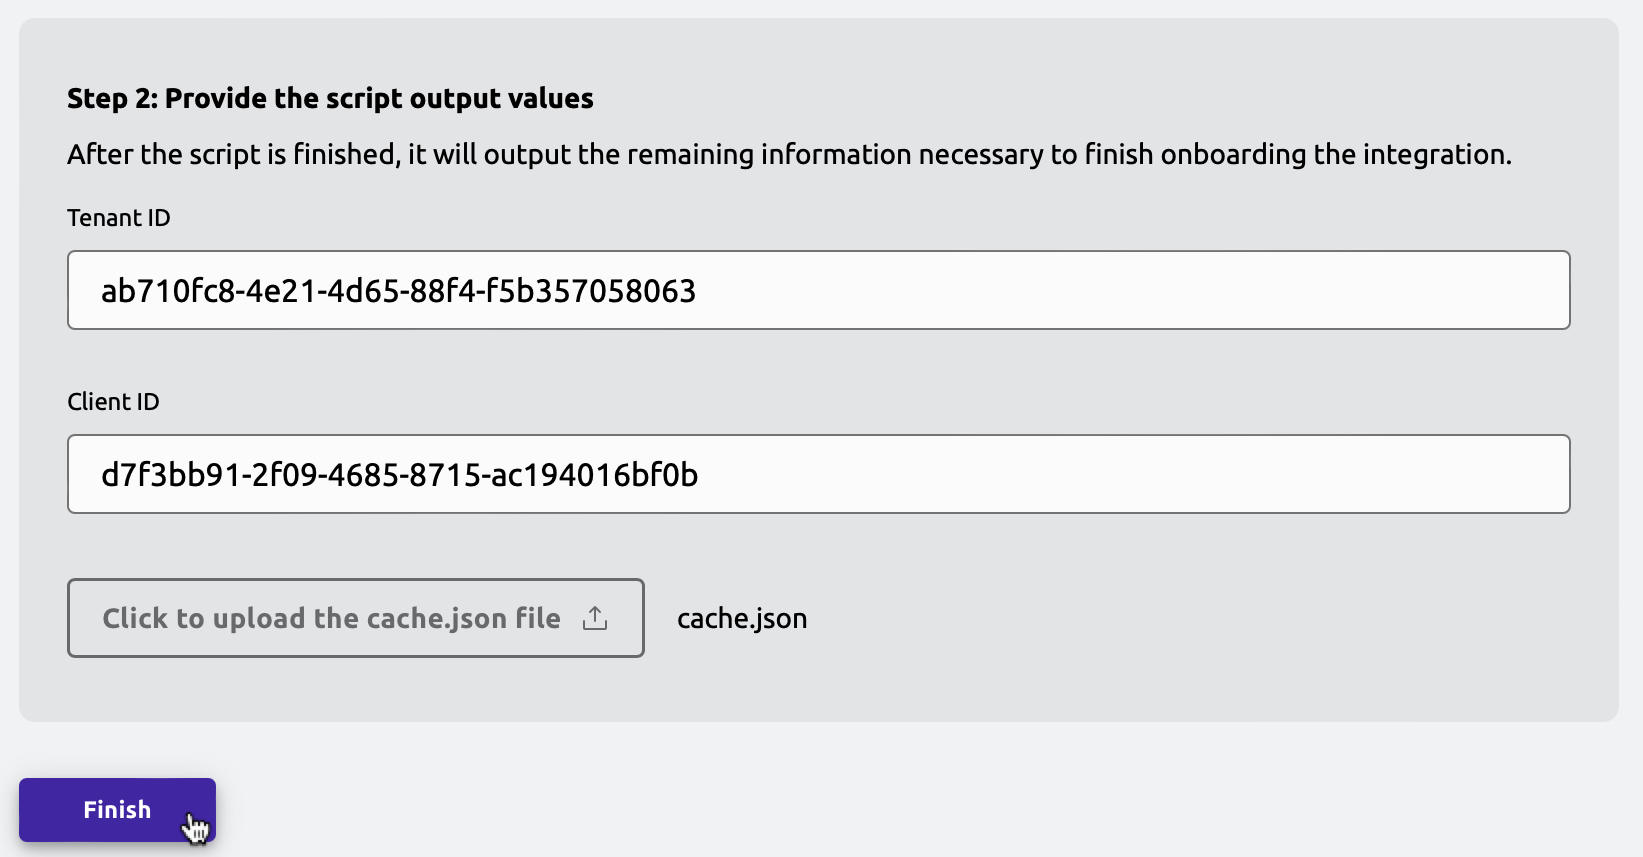
스크립트가 필요한 권한 설정을 완료하면, 통합 온보딩을 완료하는 데 필요한 데이터를 출력합니다.

Teleport Web UI로 돌아가서 필요한 데이터를 입력하고 "Finish"를 클릭하세요.
Auth 서비스 VM의 Azure 아이덴티티에 권한 할당#
필요한 권한으로 Azure 아이덴티티를 설정하려면:
Application.Read.AllDirectory.Read.AllPolicy.Read.All
Azure 대시보드로 이동하여 Teleport Auth 서비스 VM에 연결된 아이덴티티를 찾고,
Object (principal) ID를 복사하세요. 이 값을 <code>Principal ID</code>에 붙여넣으세요.
Principal ID를 얻은 후, PowerShell 모드에서 Azure Cloud Shell을
열고 다음 스크립트를 실행하여 <code>Principal ID</code>에 필요한 권한을 할당하세요.
Azure 아이덴티티에 필요한 권한 할당
# 디렉터리 및 앱 역할 할당 권한에 필요한 범위로 Microsoft Graph에 연결합니다.
Connect-MgGraph -Scopes 'Directory.ReadWrite.All', 'AppRoleAssignment.ReadWrite.All'

# 고유한 principal ID(UUID)를 사용하여 관리형 아이덴티티의 서비스 프린시펄 객체를 검색합니다.
$managedIdentity = Get-MgServicePrincipal -ServicePrincipalId 'Principal ID'

# Microsoft Graph 엔터프라이즈 애플리케이션 객체를 설정합니다.
# 이는 특정 앱 ID를 가진 Entra ID 내 Microsoft Graph를 나타내는 서비스 프린시펄 객체입니다.
$graphSPN = Get-MgServicePrincipal -Filter "AppId eq '00000003-0000-0000-c000-000000000000'"

# 관리형 아이덴티티에 할당할 권한 범위를 정의합니다.
# 이는 관리형 아이덴티티에 필요한 Microsoft Graph API 권한입니다.
$permissions = @(
  "Application.Read.All"   # 디렉터리 내 애플리케이션을 읽을 수 있는 권한
  "Directory.Read.All"     # 디렉터리 데이터를 읽을 수 있는 권한
  "Policy.Read.All"        # 디렉터리 내 정책을 읽을 수 있는 권한
)

# 정의된 권한과 일치하는 Microsoft Graph 서비스 프린시펄의 앱 역할을 필터링하고 찾습니다.
# "AllowedMemberTypes"에 "Application"이 포함된 역할만 포함합니다(관리형 아이덴티티에 적합).
$appRoles = $graphSPN.AppRoles |
    Where-Object Value -in $permissions |
    Where-Object AllowedMemberTypes -contains "Application"

# 각 앱 역할을 순회하며 관리형 아이덴티티에 할당합니다.
foreach ($appRole in $appRoles) {
    # 관리형 아이덴티티의 principal ID, Microsoft Graph 서비스 프린시펄의 리소스 ID,
    # 특정 앱 역할 ID를 포함하여 역할 할당 매개변수를 정의합니다.
    $bodyParam = @{
        PrincipalId = $managedIdentity.Id  # 관리형 아이덴티티(서비스 프린시펄)의 ID
        ResourceId  = $graphSPN.Id         # Microsoft Graph 서비스 프린시펄의 ID
        AppRoleId   = $appRole.Id          # 할당되는 앱 역할의 ID
    }

    # 관리형 아이덴티티에 대해 지정된 권한을 부여하는 새 앱 역할 할당을 생성합니다.
    New-MgServicePrincipalAppRoleAssignment -ServicePrincipalId $managedIdentity.Id -BodyParameter $bodyParam
}
이제 아이덴티티 principal <code>Principal ID</code>은 애플리케이션, 디렉터리, 정책을
나열하는 데 필요한 권한을 갖게 됩니다.
Entra ID 및 Teleport 리소스 설정#
Teleport tctl 명령은 에어 갭 클러스터를 위한 Entra ID 통합을 설정하고 구성하는 대화형 가이드를 제공합니다.
이를 사용하려면 tctl 버전 v16.4.7 이상을 확인하고 접근 목록 소유자의 기본 목록을 선택하세요.
지정된 이 Teleport 사용자들은 Entra ID 통합으로 가져온 접근 목록의 소유자가 됩니다.
<code>Access List Owner</code>는 기존 Teleport 사용자여야 합니다.
여러 명의 접근 목록 소유자를 지정하려면 각 사용자에 대해 플래그를 반복하세요. 예: --default-owner=owner1 --default-owner=owner2.
또한 Teleport Auth 서비스 주소를 <code>example.teleport.sh:443</code>로 제공해야 합니다.
멀티플렉스 모드로 실행 중인 클러스터의 경우, 이 주소는 프록시 주소와 동일합니다.
Teleport 라이선스에 Identity Security가 포함되어 있지 않은 경우, --no-access-graph 플래그를 포함하세요.
$ tctl plugins install entraid \
    --default-owner=Access List Owner \
    --default-owner=someOtherOwner@teleport.sh  \
    --use-system-credentials \
    --auth-server example.teleport.sh:443
Graph Explorer 통합을 비활성화하려면 --no-access-graph 플래그를 추가하세요.
tctl plugins install entraid 가이드에서 제공하는 자세한 지침에 따라 Entra ID 플러그인을 설치하고 구성하세요.
이 가이드는 Teleport 환경에서 Entra ID 통합을 활성화하는 데 필요한 각 단계를 안내합니다.
tctl plugins install entraid 가이드의 각 단계를 신중하게 따라 설치 및 구성을 완료하세요.
Auth 서비스 VM의 Azure 아이덴티티에 권한 할당#
이 단계는 Auth 서비스 머신에서 필요한 Entra ID 권한으로 Azure 아이덴티티를 구성합니다.
시스템에서 사용 가능한 자격 증명을 사용하여 Teleport를 Entra ID로 인증하려는 경우에만 이 단계를 따르세요. Teleport를 Entra ID용 OIDC 제공자로 사용하려는 경우, 이 단계를 건너뛸 수 있습니다.
Application.Read.AllDirectory.Read.AllPolicy.Read.All
Azure 대시보드로 이동하여 Teleport Auth 서비스 VM에 연결된 아이덴티티를 찾고,
Object (principal) ID를 복사하세요. 이 값을 <code>Principal ID</code>에 붙여넣으세요.
Principal ID를 얻은 후, PowerShell 모드에서 Azure Cloud Shell을
열고 다음 스크립트를 실행하여 <code>Principal ID</code>에 필요한 권한을 할당하세요.
Azure 아이덴티티에 필요한 권한 할당
# 디렉터리 및 앱 역할 할당 권한에 필요한 범위로 Microsoft Graph에 연결합니다.
Connect-MgGraph -Scopes 'Directory.ReadWrite.All', 'AppRoleAssignment.ReadWrite.All'

# 고유한 principal ID(UUID)를 사용하여 관리형 아이덴티티의 서비스 프린시펄 객체를 검색합니다.
$managedIdentity = Get-MgServicePrincipal -ServicePrincipalId 'Principal ID'

# Microsoft Graph 엔터프라이즈 애플리케이션 객체를 설정합니다.
# 이는 특정 앱 ID를 가진 Entra ID 내 Microsoft Graph를 나타내는 서비스 프린시펄 객체입니다.
$graphSPN = Get-MgServicePrincipal -Filter "AppId eq '00000003-0000-0000-c000-000000000000'"

# 관리형 아이덴티티에 할당할 권한 범위를 정의합니다.
# 이는 관리형 아이덴티티에 필요한 Microsoft Graph API 권한입니다.
$permissions = @(
  "Application.Read.All"   # 디렉터리 내 애플리케이션을 읽을 수 있는 권한
  "Directory.Read.All"     # 디렉터리 데이터를 읽을 수 있는 권한
  "Policy.Read.All"        # 디렉터리 내 정책을 읽을 수 있는 권한
)

# 정의된 권한과 일치하는 Microsoft Graph 서비스 프린시펄의 앱 역할을 필터링하고 찾습니다.
# "AllowedMemberTypes"에 "Application"이 포함된 역할만 포함합니다(관리형 아이덴티티에 적합).
$appRoles = $graphSPN.AppRoles |
    Where-Object Value -in $permissions |
    Where-Object AllowedMemberTypes -contains "Application"

# 각 앱 역할을 순회하며 관리형 아이덴티티에 할당합니다.
foreach ($appRole in $appRoles) {
    # 관리형 아이덴티티의 principal ID, Microsoft Graph 서비스 프린시펄의 리소스 ID,
    # 특정 앱 역할 ID를 포함하여 역할 할당 매개변수를 정의합니다.
    $bodyParam = @{
        PrincipalId = $managedIdentity.Id  # 관리형 아이덴티티(서비스 프린시펄)의 ID
        ResourceId  = $graphSPN.Id         # Microsoft Graph 서비스 프린시펄의 ID
        AppRoleId   = $appRole.Id          # 할당되는 앱 역할의 ID
    }

    # 관리형 아이덴티티에 대해 지정된 권한을 부여하는 새 앱 역할 할당을 생성합니다.
    New-MgServicePrincipalAppRoleAssignment -ServicePrincipalId $managedIdentity.Id -BodyParameter $bodyParam
}
이제 아이덴티티 principal <code>Principal ID</code>은 애플리케이션, 디렉터리, 정책을
나열하는 데 필요한 권한을 갖게 됩니다.
Entra ID 애플리케이션 설정#
이 단계에서는 Teleport Auth Connector가 사용할 Entra ID 엔터프라이즈 애플리케이션을 수동으로 구성합니다.
지정된 애플리케이션을 생성하고, 토큰 서명 요청을 할당하며, 필요한 SAML 매개변수를 설정하는 PowerShell 스크립트를 제공합니다.
계속하려면 다음 매개변수를 정의해야 합니다:
<code>Application name</code>: Entra ID 애플리케이션 이름으로, 일반적으로Teleport your.cluster.address로 설정합니다.<code>example.teleport.sh:443</code>: Teleport 프록시 주소.<code>Auth Connector Name</code>: Teleport Auth Connector 이름으로, 일반적으로entra-id로 설정합니다.
이 매개변수를 정의한 후, PowerShell 모드에서 Azure Cloud Shell을 열거나 이전 단계에서 생성한 세션을 사용하세요.
Entra ID 애플리케이션 생성
# 애플리케이션 생성 및 앱 역할 할당 권한에 필요한 범위로 Microsoft Graph에 연결합니다.
Connect-MgGraph -Scopes "Application.ReadWrite.All", "AppRoleAssignment.ReadWrite.All"

# 애플리케이션을 관리하기 위한 Microsoft Graph 모듈을 가져옵니다.
Import-Module Microsoft.Graph.Applications

# 표시 이름을 포함한 애플리케이션 매개변수를 정의합니다.
$params = @{
	displayName = 'Application name'  # 새 애플리케이션의 표시 이름을 설정합니다.
}

# SAML 애플리케이션 템플릿 ID를 설정합니다.
# 이 ID는 갤러리에 없는 SAML 애플리케이션 템플릿에 해당합니다.
$applicationTemplateId = "8adf8e6e-67b2-4cf2-a259-e3dc5476c621"

# 애플리케이션 템플릿을 인스턴스화하여 새 애플리케이션과 그 서비스 프린시펄을 생성합니다.
$app = Invoke-MgInstantiateApplicationTemplate -ApplicationTemplateId $applicationTemplateId -BodyParameter $params

# 새로 생성된 애플리케이션의 애플리케이션 ID, 객체 ID, 서비스 프린시펄 ID를 추출합니다.
$appId = $app.Application.AppId       # 애플리케이션의 고유 식별자(클라이언트 ID).
$objectId = $app.Application.Id       # Entra ID 내 애플리케이션의 고유 객체 ID.
$servicePrincipal = $app.ServicePrincipal.Id  # 서비스 프린시펄의 고유 객체 ID.

# SAML에 사용되는 토큰 서명 인증서에 대한 매개변수를 정의합니다.
$principalTokenSigningCertificateParams = @{
	displayName = "CN=azure-sso"  # SAML 토큰 서명 인증서의 일반 이름(CN).
}

# SAML 인증에 필요한 토큰 서명 인증서를 서비스 프린시펄에 추가합니다.
$cert = Add-MgServicePrincipalTokenSigningCertificate -ServicePrincipalId $servicePrincipal -BodyParameter $principalTokenSigningCertificateParams

# SAML을 구성하는 데 사용될 인증서의 지문(thumbprint)을 추출합니다.
$thumbprint = $cert.Thumbprint

# 서비스 프린시펄에 대한 추가 SAML 관련 속성을 설정합니다.
$updateServicePrincipalParams = @{
	preferredSingleSignOnMode = "saml"                    # SAML을 싱글 사인온 모드로 설정합니다.
	preferredTokenSigningKeyThumbprint = $thumbprint      # 추가된 인증서의 지문을 토큰 서명에 사용합니다.
	appRoleAssignmentRequired = $false                    # 명시적인 앱 역할 할당 없이도 앱 접근을 허용합니다.
}

# SAML 구성으로 서비스 프린시펄을 업데이트합니다.
Update-MgServicePrincipal -ServicePrincipalId $servicePrincipal -BodyParameter $updateServicePrincipalParams

# 프록시(Teleport Auth 서비스 주소)의 URL을 정의합니다.
# 이 URL은 리디렉션 URI 및 식별자 URI로 사용됩니다.
$proxyURL = 'https://example.teleport.sh:443'.TrimEnd("/").TrimEnd(":443")  # 표준 형식을 위해 기본 443 포트를 제거합니다.
$acsURL = $proxyURL+'/v1/webapi/saml/acs/Auth Connector Name'

# SAML 인증을 위한 리디렉션 URI를 포함하여 웹 속성을 정의합니다.
$web = @{
	redirectUris = @($acsURL)  # 애플리케이션의 리디렉션 URI를 설정합니다.
}

# 웹 속성과 식별자 URI로 애플리케이션을 업데이트합니다.
# 이는 SAML 기반 인증을 활성화하고 보안 그룹 클레임을 포함합니다.
Update-MgApplication -ApplicationId $objectId -Web $web -IdentifierUris @($acsURL)
# 그룹 멤버십 클레임을 포함하도록 애플리케이션의 선택적 클레임을 정의합니다.
$optionalClaims = [Microsoft.Graph.PowerShell.Models.MicrosoftGraphOptionalClaims]::DeserializeFromDictionary(@{
	AccessToken = @(
      @{ Name = 'groups' }
   )
   IdToken = @(
	  @{ Name = 'groups' }
   )
   Saml2Token = @(
      @{ Name = 'groups' }
   )
})

Update-MgApplication -ApplicationId $objectId -GroupMembershipClaims "SecurityGroup" -OptionalClaims $optionalClaims

# 표시용으로 테넌트 ID를 검색합니다.
$tenant = Get-AzTenant

# 참조용으로 애플리케이션 ID, 테넌트 ID 및 추가 정보를 출력합니다.
Write-Output "-------------------------------------------------------" "Copy and paste the following details:" "Application ID (Client ID): $appId" "Tenant ID: $tenant" "-------------------------------------------------------"
클러스터가 인터넷에서 공개적으로 접근 가능하며 Auth 서비스 시스템 자격 증명 대신 OIDC를 사용하고자 하거나 사용해야 하는 경우, Entra ID 애플리케이션용 OIDC 제공자로 Teleport를 구성할 수 있습니다. 이미 Auth 서비스의 Azure 아이덴티티에 필요한 권한을 할당했다면, 다음 섹션을 건너뛸 수 있습니다.
애플리케이션에 대한 페더레이션 자격 증명을 구성하려면, 이전에 사용한 것과 동일한 Azure Cloud Shell 터미널에서 다음 스크립트를 실행하세요.
Entra ID 애플리케이션에 대한 페더레이션 자격 증명 생성"
# 페더레이션 아이덴티티 자격 증명의 subject를 정의합니다. 이는 Teleport에서 정의된 상수입니다.
$subject = "teleport-azure"

# 자격 증명에 대해 허용되는 대상(audience)을 정의합니다. 이는 상수 값입니다.
$audiences = @("api://AzureADTokenExchange")

# 발급자(issuer)를 Teleport 클러스터 프록시 URL로 설정합니다.
$issuer = $proxyURL

# 페더레이션 아이덴티티 자격 증명에 대한 고유한 이름을 정의합니다. 이 이름은 애플리케이션 내에서 식별에 사용됩니다.
$name = "teleport-oidc"

# Microsoft Graph에서 애플리케이션에 대한 새 페더레이션 아이덴티티 자격 증명을 생성합니다.
$credential = New-MgApplicationFederatedIdentityCredential -ApplicationId $objectId -Subject $subject -Audiences $audiences -Issuer $issuer -Name $name

# 애플리케이션에 필요한 권한을 구성합니다.

# 고유한 principal ID(UUID)를 사용하여 관리형 아이덴티티의 서비스 프린시펄 객체를 검색합니다.
$managedIdentity = Get-MgServicePrincipal -ServicePrincipalId $servicePrincipal

# Microsoft Graph 엔터프라이즈 애플리케이션 객체를 설정합니다.
# 이는 특정 앱 ID를 가진 Entra ID 내 Microsoft Graph를 나타내는 서비스 프린시펄 객체입니다.
$graphSPN = Get-MgServicePrincipal -Filter "AppId eq '00000003-0000-0000-c000-000000000000'"

# 관리형 아이덴티티에 할당할 권한 범위를 정의합니다.
# 이는 관리형 아이덴티티에 필요한 Microsoft Graph API 권한입니다.
$permissions = @(
  "Application.Read.All"   # 디렉터리 내 애플리케이션을 읽을 수 있는 권한
  "Directory.Read.All"     # 디렉터리 데이터를 읽을 수 있는 권한
  "Policy.Read.All"        # 디렉터리 내 정책을 읽을 수 있는 권한
)

# 정의된 권한과 일치하는 Microsoft Graph 서비스 프린시펄의 앱 역할을 필터링하고 찾습니다.
# "AllowedMemberTypes"에 "Application"이 포함된 역할만 포함합니다(관리형 아이덴티티에 적합).
$appRoles = $graphSPN.AppRoles |
    Where-Object Value -in $permissions |
    Where-Object AllowedMemberTypes -contains "Application"

# 각 앱 역할을 순회하며 관리형 아이덴티티에 할당합니다.
foreach ($appRole in $appRoles) {
    # 관리형 아이덴티티의 principal ID, Microsoft Graph 서비스 프린시펄의 리소스 ID,
    # 특정 앱 역할 ID를 포함하여 역할 할당 매개변수를 정의합니다.
    $bodyParam = @{
        PrincipalId = $managedIdentity.Id  # 관리형 아이덴티티(서비스 프린시펄)의 ID
        ResourceId  = $graphSPN.Id         # Microsoft Graph 서비스 프린시펄의 ID
        AppRoleId   = $appRole.Id          # 할당되는 앱 역할의 ID
    }

    # 관리형 아이덴티티에 대해 지정된 권한을 부여하는 새 앱 역할 할당을 생성합니다.
    New-MgServicePrincipalAppRoleAssignment -ServicePrincipalId $managedIdentity.Id -BodyParameter $bodyParam
}
Teleport 리소스 설정#
Teleport tctl 명령은 에어 갭 클러스터를 위한 Entra ID 통합을 설정하고 구성하는 대화형 가이드를 제공합니다.
이를 사용하려면 tctl 버전 v16.4.7 이상을 확인하고 접근 목록 소유자의 기본 목록을 선택하세요.
지정된 이 Teleport 사용자들은 Entra ID 통합으로 가져온 접근 목록의 소유자가 됩니다.
<code>Access List Owner</code>는 기존 Teleport 사용자여야 합니다.
여러 명의 접근 목록 소유자를 지정하려면 각 사용자에 대해 플래그를 반복하세요. 예: --default-owner=owner1 --default-owner=owner2.
또한 Teleport Auth 서비스 주소를 <code>example.teleport.sh:443</code>로 제공해야 합니다.
멀티플렉스 모드로 실행 중인 클러스터의 경우, 이 주소는 프록시 주소와 동일합니다.
이전 단계에서 Entra ID용 OIDC 제공자로 Teleport를 사용하기로 선택했다면, 아래 명령에서 --use-system-credentials
플래그를 제거하세요.
현재 수동 모드를 사용할 때는 --no-access-graph 플래그 없이 작동할 수 없습니다.
$ tctl plugins install entraid \
    --default-owner=Access List Owner \
    --default-owner=someOtherOwner@teleport.sh  \
    --auth-connector-name="Auth Connector Name" \
    --use-system-credentials \
    --no-access-graph \
    --manual-setup \
    --auth-server example.teleport.sh:443
tctl plugins install entraid 가이드에서 제공하는 자세한 지침에 따라 Entra ID 플러그인을 설치하고 구성하세요.
3/3단계. Teleport Graph Explorer에서 Entra ID 디렉터리 분석#
통합 온보딩이 완료되면 곧 Entra ID 디렉터리가 Teleport 클러스터와 Graph Explorer로 가져와집니다.
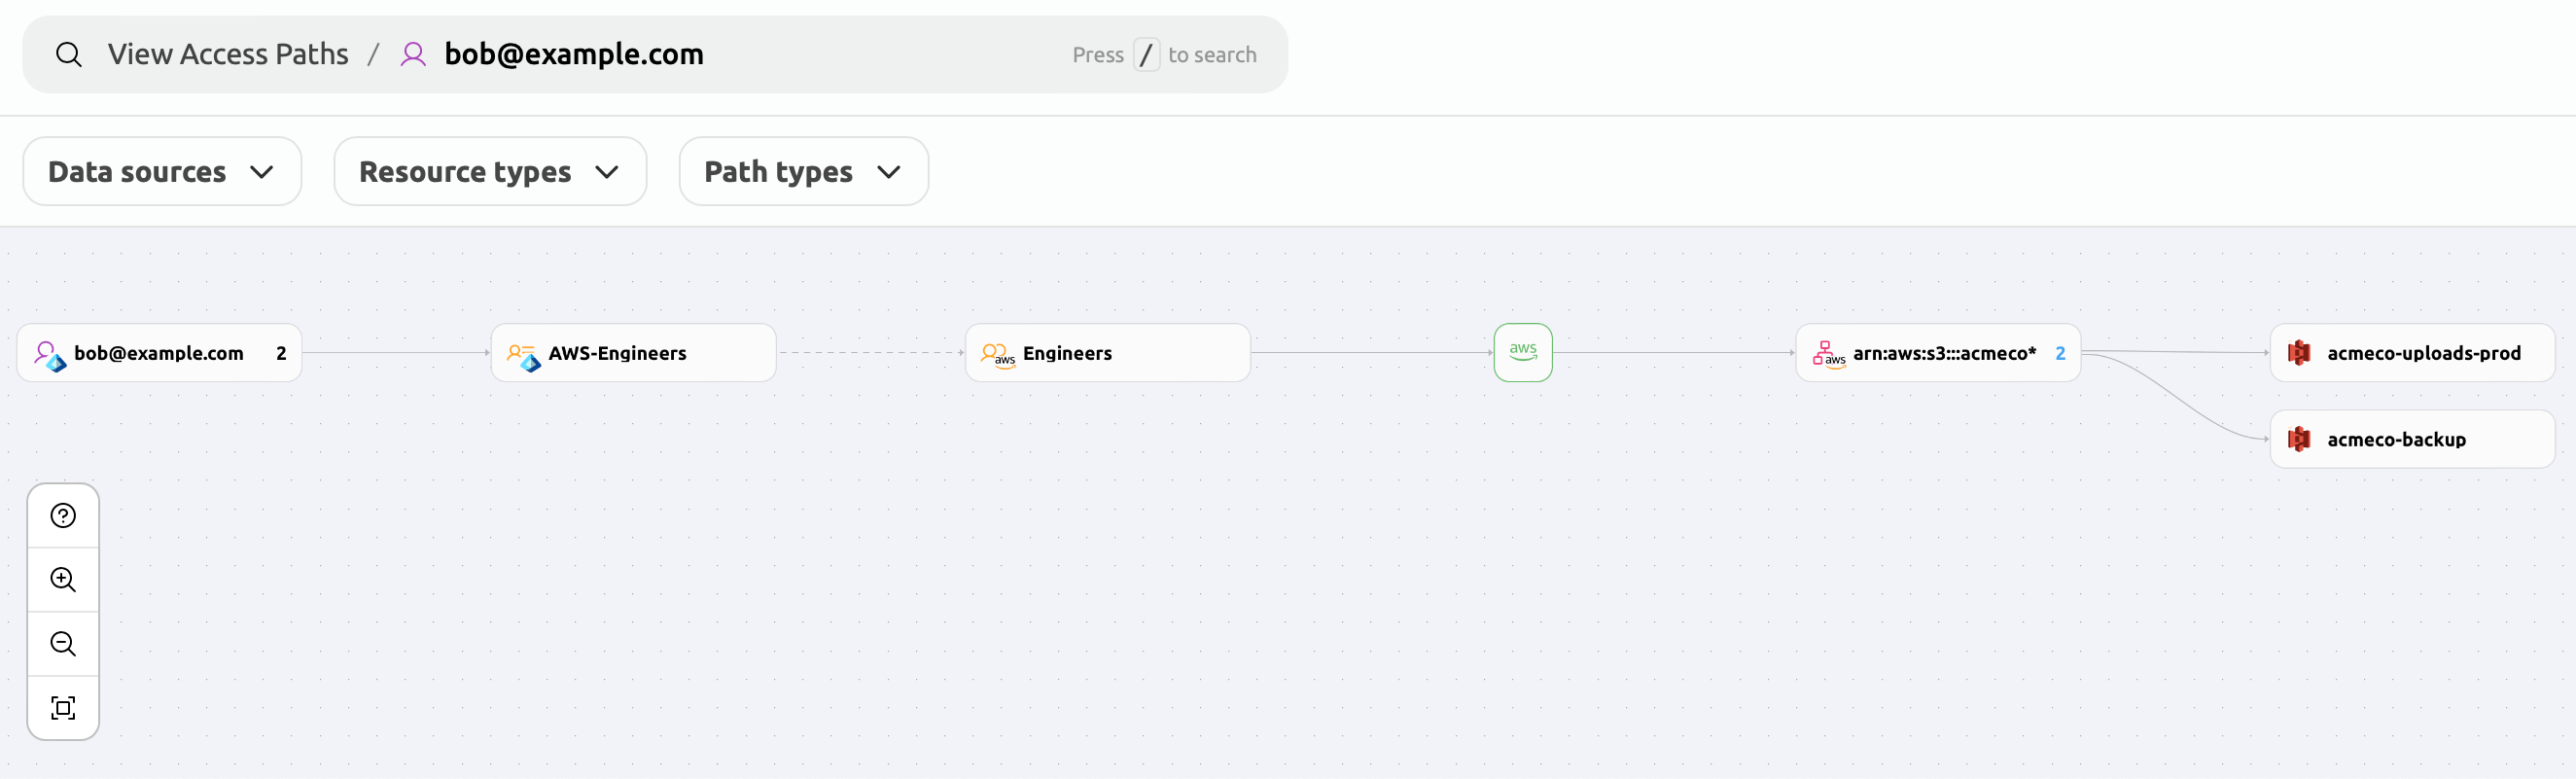
Graph Explorer UI에서 Entra ID 사용자와 그룹을 찾을 수 있습니다. AWS 계정에 대해 Entra ID SSO를 설정하고 AWS 계정이 Teleport에 연결되어 있는 경우, Graph Explorer는 Entra ID 아이덴티티에 부여된 AWS 리소스 접근 권한도 표시합니다.
다음 예제에서 Bob은 Entra ID의 AWS-Engineers 그룹에 할당되어 있습니다.
이를 통해 Bob은 SSO를 사용하여 AWS IAM 역할 Engineers를 수임할 수 있으며,
이를 통해 Bob은 S3 버킷 2개에 접근할 수 있습니다.