





GitHub Actions에 tbot 배포하기
Teleport v18.10요약
GitHub Actions는 더 넓은 GitHub 생태계의 일부로 작동하는 인기 있는 CI/CD 플랫폼입니다. Teleport는 GitHub 호스팅 및 자체 호스팅 GitHub Actions 러너뿐만 아니라 GitHub Enterprise Server에서도 안전한 조인을 지원합니다.
GitHub Actions는 더 넓은 GitHub 생태계의 일부로 작동하는 인기 있는 CI/CD 플랫폼입니다. Teleport 머신 및 워크로드 아이덴티티를 사용하면 GitHub Actions가 장기 자격 증명 없이도 Teleport로 보호된 리소스와 안전하게 상호 작용할 수 있습니다.
Teleport는 GitHub 호스팅 및 자체 호스팅 GitHub Actions 러너뿐만 아니라 GitHub Enterprise Server에서도 안전한 조인을 지원합니다.
이 가이드에서는 머신 및 워크로드 아이덴티티 봇을 생성하고, 봇이 생성한 단기 자격 증명을 사용하여 Teleport로 보호된 인프라에 접근하도록 GitHub Actions 워크플로를 설정합니다.
Teleport Web UI를 통해 제공되는 가이드 통합 중 하나를 사용하여 빠르게 시작하세요.
이 가이드는 GitHub Actions 워크플로를 Teleport에 연결하고 등록된 리소스에 접근하는 데 필요한 권한을 부여하는 과정을 안내합니다.

Web UI에서 가이드를 찾으세요;<br />
**Add New** > **Integration** > "**GitHub Actions**" 검색
사전 요구 사항#
-
실행 중인 Teleport 클러스터. Teleport를 시작하려면 무료 체험판에 가입하거나 데모 환경을 구성하세요.
-
tctlandtshclients.Installing `tctl` and `tsh` clients
-
Teleport 클러스터의 버전을 확인합니다.
tctlandtshclients는 Teleport 클러스터 버전보다 최대 한 개의 메이저 버전까지만 뒤처질 수 있습니다. Proxy Service의/v1/webapi/find로 GET 요청을 보내고 JSON 쿼리 도구를 사용하여 클러스터 버전을 확인합니다.teleport.example.com:443를 Teleport Proxy Service의 웹 주소로 바꿉니다:$ TELEPORT_DOMAIN=teleport.example.com:443 $ TELEPORT_VERSION="$(curl -s https://$TELEPORT_DOMAIN/v1/webapi/find | jq -r '.server_version')" -
사용 중인 플랫폼에 대한 지침에 따라
tctlandtshclients를 설치합니다:
-
Mac
     `tctl` and `tsh` clients가 포함된, 서명된 Teleport macOS .pkg 설치 프로그램을 다운로드합니다:

     ```code
     $ curl -O https://cdn.teleport.dev/teleport-${TELEPORT_VERSION?}.pkg
     ```

     Finder에서 `pkg` 파일을 더블 클릭하여 설치를 시작합니다.
       Homebrew를 사용하여 Teleport를 설치하는 것은 지원되지 않습니다. Homebrew의
       Teleport 패키지는 Teleport에서 유지 관리하지 않으므로 신뢰성이나 보안을
       보장할 수 없습니다.
Windows - Powershell
     ```code
     $ curl.exe -O https://cdn.teleport.dev/teleport-v${TELEPORT_VERSION?}-windows-amd64-bin.zip
     # Unzip the archive and move the `tctl` and `tsh` clients to your %PATH%
     # NOTE: Do not place the `tctl` and `tsh` clients in the System32 directory, as this can cause issues when using WinSCP.
     # Use %SystemRoot% (C:\Windows) or %USERPROFILE% (C:\Users\<username>) instead.
     ```
Linux
     Linux 설치판의 모든 Teleport 바이너리에는 `tctl` and `tsh` clients가 포함되어 있습니다.  RPM/DEB
     패키지 및 i386/ARM/ARM64용 다운로드를 포함한 더 많은 옵션은
     [설치 페이지](../installation/installation.mdx)를 참조하세요.

     ```code
     $ curl -O https://cdn.teleport.dev/teleport-v${TELEPORT_VERSION?}-linux-amd64-bin.tar.gz
     $ tar -xzf teleport-v${TELEPORT_VERSION?}-linux-amd64-bin.tar.gz
     $ cd teleport
     $ sudo ./install
     # Teleport binaries have been copied to /usr/local/bin
     ```
Teleport cluster에 연결할 수 있는지 확인하려면 tsh login으로 로그인한 다음,
현재 자격 증명으로 tctl 명령을 실행할 수 있는지 확인합니다.
예를 들어, teleport.example.com에 cluster 내 Teleport Proxy Service의
도메인 이름을, email@example.com에 Teleport 사용자 이름을 지정하여
다음 명령을 실행합니다:
$ tsh login --proxy=teleport.example.com --user=email@example.com
$ tctl status
# Cluster  (=teleport.url=)
# Version  (=teleport.version=)
# CA pin   (=presets.ca_pin=)
cluster에 연결하여 tctl status 명령을 실행할 수 있다면, 현재 자격 증명을 사용하여
워크스테이션에서 이후의 tctl 명령을 실행할 수 있습니다.
자체 Teleport cluster를 호스팅하는 경우, 전체 권한을 얻기 위해 Teleport Auth Service를
호스팅하는 컴퓨터에서 tctl 명령을 실행할 수도 있습니다.
- 사용자에게 토큰 리소스를 생성할 수 있는 권한이 있어야 합니다.
- GitHub Actions가 활성화된 GitHub 리포지터리. 이 가이드에서는 예시로
gravitational/example리포지터리를 사용하지만, 이 값은 사용자의 고유한 리포지터리로 대체해야 합니다.
1/3단계. 봇 생성#
다음으로 Bot을 생성해야 합니다. Bot은 머신 또는 머신 그룹을 위한 Teleport identity입니다. 사용자와 마찬가지로 bot에는 무엇에 액세스할 수 있는지 정의하는 role 및 trait 집합이 있습니다.
bot.yaml을 생성합니다:
kind: bot
version: v1
metadata:
  # name is a unique identifier for the Bot in the cluster.
  name: example
spec:
  # roles is a list of roles to grant to the Bot. Don't worry if you don't know
  # what roles you need to specify here, the Access Guides will walk you through
  # creating and assigning roles to the already created Bot.
  roles: []
example을 Bot에 대한 고유하고 설명적인 이름으로 반드시 교체하십시오.
tctl을 사용하여 이 파일을 적용합니다:
$ tctl create bot.yaml
2/3단계. GitHub Actions용 조인 토큰 생성#
GitHub Actions 워크플로가 Teleport 클러스터로 인증할 수 있도록 하려면 먼저 조인 토큰을 생성해야 합니다. 이 토큰은 Auth 서비스가 봇 또는 노드의 조인 허용 여부를 결정하는 기준을 설정합니다.
이 예시에서는 특정 GitHub 리포지터리 내의 모든 GitHub Actions 실행에 접근 권한을 부여하는 조인 토큰을 생성합니다. 프로덕션 환경에서는 CI가 특정 브랜치에 대해 실행 중일 때만 접근이 이루어지도록 이러한 규칙을 더 세밀하게 제한하고 싶을 수 있습니다. 사용 가능한 규칙의 전체 목록은 조인 토큰 참조 페이지에서 확인할 수 있습니다.
bot-token.yaml이라는 이름의 파일을 생성합니다:
kind: token
version: v2
metadata:
  name: example-bot
spec:
  # The Bot role indicates that this token grants access to a bot user, rather
  # than allowing a node to join. This role is built in to Teleport.
  roles: [Bot]
  join_method: github
  # The bot_name indicates which bot user this token grants access to. This
  # should match the name of the bot that you created in the previous step.
  bot_name: example
  github:
    # allow specifies rules that control which GitHub Actions runs will be
    # granted access. Those not matching any allow rule will be denied.
    allow:
    # repository should include the name of the owner of the repository.
    - repository: gravitational/example
gravitational/example을 tbot이 실행될 리포지터리의 이름으로
바꾸세요. 사용 사례를 더 정확하게 설명하도록 봇과 토큰의 이름을
변경할 수도 있습니다.
Enterprise Server
자체 호스팅 Teleport Enterprise를 사용하는 경우, GitHub Enterprise Server 인스턴스 내의 워크플로가 GitHub 조인 메서드를 사용하여 인증하도록 허용할 수 있습니다.
Teleport Auth 서비스는 GitHub Enterprise Server에 연결할 수 있어야 합니다.
이를 설정하려면 spec.github.enterprise_server_host를 GHES
인스턴스의 호스트 이름으로 설정하세요.
예시:
spec:
  github:
    enterprise_server_host: ghes.example.com
Enterprise Cloud
GitHub Enterprise Cloud 설정에서 include_enterprise_slug를
활성화한 경우, spec.github.enterprise_slug를 GitHub Enterprise
조직의 슬러그로 설정해야 합니다.
예시:
spec:
  github:
    enterprise_slug: my-enterprise
include_enterprise_slug에 대한 자세한 내용은 GitHub의
엔터프라이즈용 발급자 값 커스터마이징
가이드를 참고하세요.
리소스 파일을 작성했다면, tctl로 토큰을 생성하세요:
$ tctl create -f bot-token.yaml
다음 명령으로 example-bot 토큰이 생성되었는지 확인하세요:
$ tctl tokens ls
Token       Type Labels Expiry Time (UTC)
----------- ---- ------ ----------------------------------------------
example-bot Bot         01 Jan 00 00:00 UTC (2562047h47m16.854775807s)
3/3단계. GitHub Actions 워크플로 설정#
이제 봇이 성공적으로 생성되었으니, 이 봇으로 인증하고 tbot이
생성한 자격 증명을 사용하도록 GitHub Actions 워크플로를 설정해야
합니다. 이를 돕기 위해 Teleport는 워크플로 내에서 사용할 수 있는
사용하기 쉬운 여러 GitHub Actions를 게시합니다.
Teleport GitHub Actions 중 하나를 사용하는 대신 tbot을 수동으로
설정하는 것도 가능합니다. 이 방법은 더 많은 설정이 필요하지만
tbot을 정밀하게 제어할 수 있고 액션으로는 불가능한 구현도
가능하게 해줍니다.
다음은 사용 가능한 GitHub Actions 중 두 가지를 시연하는 예시와
GitHub Actions에서 사용할 tbot을 수동으로 설정하는 방법을
보여주는 예시입니다.
예시: teleport-actions/auth#
teleport-actions/auth 액션은 SSH 및 Teleport 클러스터에 대한
관리 작업에 사용할 수 있는 다목적 아이덴티티 출력을 생성합니다.
이 액션은 환경 변수를 설정하며, 이 환경 변수들은 tsh와 tctl이
자동으로 이 아이덴티티를 사용하도록 구성합니다.
Teleport Web UI를 통해 GitHub Action + SSH 통합 가이드를 사용할 수 있습니다?
이 가이드는 GitHub Actions 워크플로를 Teleport에 연결하고
등록된 SSH 노드에 접근하는 데 필요한 권한을 부여하는 과정을
안내합니다.

Web UI에서 가이드를 찾으세요:<br />
**Add New** > **Integration** > **MWI: GitHub Actions + SSH**
이 예시는 다음과 같은 작업에 자격 증명을 사용하는 방법을 보여줍니다:
tsh를 사용하여 사용 가능한 SSH 노드 목록 조회tctl을 사용하여 사용 가능한 SSH 노드 목록 조회tsh를 사용하여 SSH 노드에 연결- OpenSSH의
ssh를 사용하여 SSH 노드에 연결
먼저, SSH 접근 권한을 부여하도록 봇에 할당한 역할을 조정해야 합니다. 이 예시에서는 모든 노드에 대한 root 접근 권한을 부여합니다. 프로덕션 환경에서는 봇이 필요로 하는 노드로만 이를 제한하는 것이 좋습니다.
- 다음 명령을 실행하여 텍스트 편집기에서
example-bot역할을 엽니다:
$ tctl edit role/example-bot
-
역할에 다음 내용이 포함되어 있는지 확인합니다:
spec:
  allow:
    # Allow login to the Linux user 'root'.
    logins: ['root']
    # Allow connection to any node. Adjust these labels to match only nodes
    # that needed to access.
    node_labels:
      '*': '*'
이러한 권한을 부여한 후에는 GitHub Actions 워크플로를 생성할 수
있습니다. .github/workflows/example.yaml을 생성합니다:
# This is a basic workflow to help you get started.
# It will take the following action whenever a push is made to the "main" branch.
on:
  push:
    branches:
    - main
jobs:
  demo:
    permissions:
      # The "id-token: write" permission is required or tbot will not be able to
      # authenticate with the cluster.
      id-token: write
      contents: read
    # The name of the workflow, and the Linux distro to be used to perform the
    # required steps.
    name: example
    runs-on: ubuntu-latest
    steps:
    - name: Checkout repository
      uses: actions/checkout@v3
    - name: Fetch Teleport binaries
      uses: teleport-actions/setup@v1
      with:
        version: auto
        # Replace with the address of your Teleport Proxy Service.
        proxy: example.teleport.sh:443
    - name: Fetch credentials using Machine & Workload Identity
      id: auth
      uses: teleport-actions/auth@v2
      with:
        # Replace with the address of your Teleport Proxy Service.
        proxy: example.teleport.sh:443
        # Use the name of the join token resource you created in step 1.
        token: example-bot
        # Specify the length of time that the generated credentials should be
        # valid for. This is optional and defaults to "1h"
        certificate-ttl: 1h
        # Enable the submission of anonymous usage telemetry. This
        # helps us shape the future development of `tbot`. You can disable this
        # by omitting this.
        anonymous-telemetry: 1
    - name: List nodes (tsh)
      # Enters a command from the cluster, in this case "tsh ls" using Machine
      # ID credentials to list remote SSH nodes.
      run: tsh ls
    - name: List nodes (tctl)
      run: tctl nodes ls
    - name: Run hostname via SSH (tsh)
      # Ensure that `root` matches the username of a remote SSH username, and
      # that hostname matches an SSH host name that is a part of the Teleport
      # cluster configured for access.
      run: tsh ssh root@example-node hostname
    - name: Run hostname via SSH (OpenSSH)
      run: ssh -F ${{ steps.auth.outputs.ssh-config }} root@example-node.example.teleport.sh hostname
다음을 대체하세요:
example.teleport.sh:443을 Teleport 프록시 또는 클라우드 테넌트의 주소로 대체example-bot을 이전 단계에서 생성한 토큰의 이름으로 대체example-node를 연결하려는 Teleport SSH 노드의 이름으로 대체root를 연결하려는 노드의 사용자 이름이자 봇에 접근 권한을 부여한 사용자 이름으로 대체
변경 사항을 리포지터리의 main 브랜치에 추가, 커밋, 푸시하세요.
웹 브라우저에서 GitHub 리포지터리의 Actions 탭으로 이동합니다.
변경 사항으로 인해 생성되고 트리거된 Workflow를 선택하고,
example 작업을 선택합니다. GitHub Actions 워크플로는 완료하는
데 다소 시간이 걸릴 수 있으며, 성공하면 다음과 유사한 모습이 됩니다.
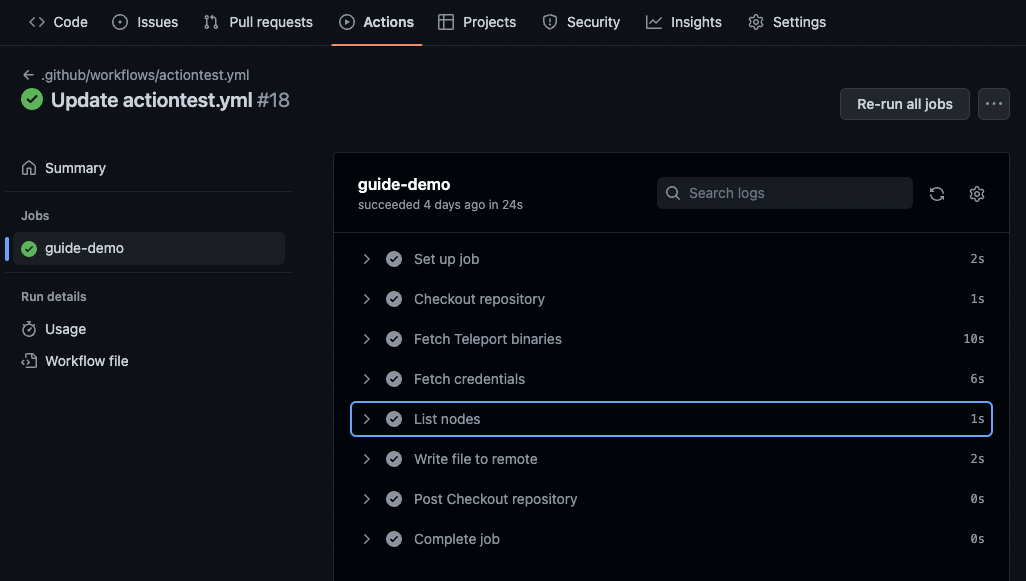
액션의 List nodes 단계를 펼치면, tsh ls 명령을 사용하여
머신 및 워크로드 아이덴티티 봇의 관점에서 클러스터의 모든 노드
목록이 출력에 표시됩니다.
예시: teleport-actions/auth-k8s#
teleport-actions/auth-k8s 액션은 Teleport에 등록된 쿠버네티스
클러스터에 연결하는 데 필요한 자격 증명과 설정이 포함된
쿠버네티스 출력 서비스를 생성합니다. 이 액션은 필요한 환경
변수를 방출하여 이러한 클라이언트를 자동으로 설정합니다.
이 예시에서는 teleport-actions/auth-k8s 액션을 사용하여
클러스터에 포함된 모든 파드의 목록을 조회하지만, 이는 kubectl
또는 helm으로 쿠버네티스 클러스터에 배포하도록 쉽게 수정할 수
있습니다.
Teleport Web UI를 통해 GitHub Action + Kubernetes 통합 가이드를 사용할 수 있습니다?
이 가이드는 GitHub Actions 워크플로를 Teleport에 연결하고
등록된 쿠버네티스 클러스터에 접근하는 데 필요한 권한을
부여하는 과정을 안내합니다.

Web UI에서 가이드를 찾으세요:<br />
**Add New** > **Integration** > **MWI: GitHub Actions + Kubernetes**
먼저, 쿠버네티스 클러스터에 대한 접근 권한을 부여하도록 봇에
할당한 역할을 조정해야 합니다. 이 예시에서는 editor 그룹으로
모든 클러스터에 대한 접근 권한을 봇에 부여합니다. 쿠버네티스
RBAC 설정에 대한 더 자세한 지침은 쿠버네티스 접근 가이드를
참고하세요.
- 다음 명령을 실행하여 텍스트 편집기에서
example-bot역할을 엽니다:
$ tctl edit role/example-bot
-
역할에 다음 내용이 포함되어 있는지 확인합니다:
spec:
  allow:
    kubernetes_labels:
      '*': '*'
    kubernetes_resources:
    - kind: pod
      namespace: "*"
      name: "*"
    kubernetes_groups:
    - editor
이 예시는 역할이 v6 버전이라고 가정합니다. v7 이상 버전의
역할을 사용하는 경우, kubernetes_resources의 kind: pod
섹션에 verbs: ["get", "list"]를 포함해야 합니다. 그렇지 않으면
예시의 kubectl get pods -A 실행이 거부됩니다.
이러한 권한을 부여한 후에는 GitHub Actions 워크플로를 생성할 수
있습니다. .github/workflows/example.yaml을 생성합니다:
# This is a basic workflow to help you get started, modify it for your needs.
on:
  push:
    branches:
    - main
jobs:
  demo:
    permissions:
      # The "id-token: write" permission is required or tbot will not be able to
      # authenticate with the cluster.
      id-token: write
      contents: read
    name: example
    runs-on: ubuntu-latest
    steps:
    - name: Checkout repository
      uses: actions/checkout@v3
    - name: Fetch kubectl
      uses: azure/setup-kubectl@v3
    - name: Fetch Teleport binaries
      uses: teleport-actions/setup@v1
      with:
        version: auto
        # Replace with the address of your Teleport Proxy Service.
        proxy: example.teleport.sh:443
    - name: Fetch credentials using Machine ID
      uses: teleport-actions/auth-k8s@v2
      with:
        # Replace with the address of your Teleport Proxy Service.
        proxy: example.teleport.sh:443
        # Use the name of the join token resource you created in step 1.
        token: example-bot
        # Use the name of your Kubernetes cluster
        kubernetes-cluster: my-kubernetes-cluster
        # Enable the submission of anonymous usage telemetry. This helps us
        # shape the future development of `tbot`. You can disable this by
        # omitting this.
        anonymous-telemetry: 1
    - name: List pods
      run: kubectl get pods -A
다음을 대체하세요:
example.teleport.sh:443을 Teleport 프록시 서비스의 주소로 대체example-bot을 이전 단계에서 생성한 토큰의 이름으로 대체my-kubernetes-cluster를 쿠버네티스 클러스터의 이름으로 대체
auth-k8s 액션은 이후 단계에서 사용할 KUBECONFIG를 Teleport에서
가져온 자격 증명으로 설정합니다. 이는 대부분의 기존 쿠버네티스
도구(예: kubectl, helm)가 추가 설정 없이 클러스터를 사용할 수
있음을 의미합니다.
이 새 워크플로 파일을 리포지터리의 기본 브랜치에 추가, 커밋, 푸시하세요.
웹 브라우저에서 GitHub 리포지터리의 Actions 탭으로 이동합니다.
변경 사항으로 인해 생성되고 트리거된 Workflow를 선택하고,
example 작업을 선택합니다.
액션의 List pods 단계를 펼치면, 출력에서 쿠버네티스 클러스터 내의 모든 파드 목록이 표시되는지 확인할 수 있습니다.
예시: teleport-actions/database-tunnel#
이 기능은 tbot 클라이언트 버전 18.6.4 이상을 사용해야 합니다.
teleport-actions/database-tunnel 액션은 백그라운드에서 tbot
클라이언트를 실행하여, 머신 및 워크로드 ID의
database-tunnel 서비스를
사용해 Teleport로 보호되는 데이터베이스에 대한 터널을 제공합니다.
이 예시에서는 psql 클라이언트를 사용하여 Postgres 데이터베이스에
간단한 쿼리를 실행하지만, 호환되는 클라이언트가 있다면 지원되는
어떤 데이터베이스 유형이든 사용할 수 있습니다. 앱에서 Teleport로
보호되는 데이터베이스에 접근하는 방법에 대한 자세한 내용은
일반 데이터베이스 가이드를
참고하세요.
- 다음 명령을 실행하여 텍스트 편집기에서
example-bot역할을 엽니다:
$ tctl edit role/example-bot
-
역할에 다음 내용이 포함되어 있는지 확인합니다:
spec:
  allow:
    db_labels:
      '*': '*'
    db_names: [demo-db]
    db_users: [demo-user]
    rules:
      - resources: [db_server, db]
        verbs: [read, list]
원하는 데이터베이스에 맞게 라벨, 이름, 사용자를 필요에 따라 조정하세요.
데이터베이스 권한을 부여한 후에는 GitHub Actions 워크플로를
생성할 수 있습니다. .github/workflows/example.yaml을 생성합니다:
# This is a basic workflow to help you get started, modify it for your needs.
on:
  push:
    branches:
    - main
jobs:
  demo:
    permissions:
      # The "id-token: write" permission is required or tbot will not be able to
      # authenticate with the cluster.
      id-token: write
      contents: read
    name: example
    runs-on: ubuntu-latest
    steps:
    - name: Checkout repository
      uses: actions/checkout@v3
    - name: Fetch Teleport binaries
      uses: teleport-actions/setup@v1
      with:
        version: auto
        # Replace with the address of your Teleport Proxy Service.
        proxy: example.teleport.sh:443
    - name: Fetch credentials using Machine ID
      uses: teleport-actions/database-tunnel@v1
      with:
        # Replace with the address of your Teleport Proxy Service.
        proxy: example.teleport.sh:443
        # Use the name of the join token resource you created in step 1.
        token: example-bot
        # Configure the listener address for the tunnel. Your native database
        # client (e.g. `psql`) will connect using this socket address.
        listen: tcp://localhost:5432
        # The database service name, usually the name of the database server as
        # shown in `tsh db ls`
        service: postgres
        # The name of the specific database to connect to.
        database: demo-db
        # The username of the database user to connect as.
        username: demo-user
        # Configure the port for tbot's diagnostics service, used to coordinate
        # with the bot in the background. If running multiple background bots
        # (app tunnel/proxy, database tunnel, etc), make sure to give each a
        # unique port. If unset, the default shown below is used.
        diag-port: 57263
        # Enable the submission of anonymous usage telemetry. This helps us
        # shape the future development of `tbot`. You can disable this by
        # omitting this.
        anonymous-telemetry: 1

    - name: Run a database command
      run: |
        psql postgres://demo-user@localhost:5432/demo-db -c 'select 1;'
다음을 대체하세요:
example.teleport.sh:443을 Teleport 프록시 서비스의 주소로 대체example-bot을 이전 단계에서 생성한 토큰의 이름으로 대체postgres를 Teleport에 설정된 데이터베이스 서버의 이름으로 대체demo-db를 접근할 데이터베이스 이름으로 대체demo-user를 연결할 데이터베이스 사용자 이름으로 대체
teleport-actions/database-tunnel 액션이 완료되면, 설정된
포트(이 경우 localhost:5432)에서 데이터베이스 터널이
실행됩니다. 그런 다음 psql 또는 데이터베이스에 맞는 다른
호환 클라이언트를 사용하여 접근할 수 있습니다.
이 새 워크플로 파일을 리포지터리의 기본 브랜치에 추가, 커밋, 푸시하세요.
웹 브라우저에서 GitHub 리포지터리의 Actions 탭으로 이동합니다.
변경 사항으로 인해 생성되고 트리거된 Workflow를 선택하고,
example 작업을 선택합니다.
액션의 Run a database command 단계를 펼치면, 데이터베이스 명령이 성공적으로 실행되었는지 확인할 수 있습니다.
예시: teleport-actions/application-tunnel#
이 기능은 tbot 클라이언트 버전 18.6.4 이상을 사용해야 합니다.
teleport-actions/application-tunnel 액션은 백그라운드에서 tbot
클라이언트를 실행하여, 머신 및 워크로드 ID의
application-tunnel 서비스를
사용해 Teleport로 보호되는 HTTP 또는 TCP 앱에 대한 터널을
제공합니다.
- 다음 명령을 실행하여 텍스트 편집기에서
example-bot역할을 엽니다:
$ tctl edit role/example-bot
-
역할에 다음 내용이 포함되어 있는지 확인합니다:
spec:
  allow:
    # Grants access to apps with the `env=dev` label.
    app_labels:
      env: dev
봇이 접근할 수 있는 애플리케이션을 제한하도록 역할의 라벨 셀렉터를 필요에 따라 조정하세요. 자세한 내용은 전용 애플리케이션 접근 가이드를 참고하세요.
권한을 부여한 후에는 GitHub Actions 워크플로를 생성할 수
있습니다. .github/workflows/example.yaml을 생성합니다:
# This is a basic workflow to help you get started, modify it for your needs.
on:
  push:
    branches:
    - main
jobs:
  demo:
    permissions:
      # The "id-token: write" permission is required or tbot will not be able to
      # authenticate with the cluster.
      id-token: write
      contents: read
    name: example
    runs-on: ubuntu-latest
    steps:
    - name: Checkout repository
      uses: actions/checkout@v3
    - name: Fetch Teleport binaries
      uses: teleport-actions/setup@v1
      with:
        version: auto
        # Replace with the address of your Teleport Proxy Service.
        proxy: example.teleport.sh:443
    - name: Fetch credentials using Machine ID
      uses: teleport-actions/application-tunnel@v1
      with:
        # Replace with the address of your Teleport Proxy Service.
        proxy: example.teleport.sh:443
        # Use the name of the join token resource you created in step 1.
        token: example-bot
        # The name of the app to access.
        app: my-application
        # Configure the listener address for the app tunnel.
        listen: tcp://localhost:1234
        # Enable the submission of anonymous usage telemetry. This helps us
        # shape the future development of `tbot`. You can disable this by
        # omitting this.
        anonymous-telemetry: 1

    - name: Access the app
      run: curl http://localhost:1234
다음을 대체하세요:
example.teleport.sh:443을 Teleport 프록시 서비스의 주소로 대체example-bot을 이전 단계에서 생성한 토큰의 이름으로 대체my-application을 Teleport에 설정된 앱의 이름으로 대체
실행되면, application-tunnel 액션은 설정된 호스트와 포트(이
경우 localhost:1234)에서 선택한 애플리케이션에 대한 터널을
엽니다.
이 새 워크플로 파일을 리포지터리의 기본 브랜치에 추가, 커밋, 푸시하세요.
웹 브라우저에서 GitHub 리포지터리의 Actions 탭으로 이동합니다.
변경 사항으로 인해 생성되고 트리거된 Workflow를 선택하고,
example 작업을 선택합니다.
액션의 Access the app 단계를 펼치고, 애플리케이션에서 유효한 응답이 출력되는지 확인하세요.
예시: teleport-actions/application-proxy#
이 기능은 tbot 클라이언트 버전 18.6.4 이상을 사용해야 합니다.
teleport-actions/application-proxy 액션은 백그라운드에서 tbot
클라이언트를 실행하여, 머신 및 워크로드 ID의
application-proxy 서비스를
사용해 Teleport로 보호되는 임의의 HTTP 앱에 접근하는 데 사용할
수 있는 로컬 HTTP 프록시 서버를 제공합니다.
이 액션은 HTTP 애플리케이션만 지원하지만, 봇에 적절한 RBAC
권한이 부여되어 있고 클라이언트 앱이 HTTP 프록시(예:
$HTTP_PROXY 환경 변수)를 사용할 수 있는 한 임의의 앱에
접근할 수 있습니다.
- 다음 명령을 실행하여 텍스트 편집기에서
example-bot역할을 엽니다:
$ tctl edit role/example-bot
-
역할에 다음 내용이 포함되어 있는지 확인합니다:
spec:
  allow:
    # Grants access to apps with the `env=dev` label.
    app_labels:
      env: dev
봇이 접근할 수 있는 애플리케이션을 제한하도록 역할의 라벨 셀렉터를 필요에 따라 조정하세요. 자세한 내용은 전용 애플리케이션 접근 가이드를 참고하세요.
권한을 부여한 후에는 GitHub Actions 워크플로를 생성할 수
있습니다. .github/workflows/example.yaml을 생성합니다:
# This is a basic workflow to help you get started, modify it for your needs.
on:
  push:
    branches:
    - main
jobs:
  demo:
    permissions:
      # The "id-token: write" permission is required or tbot will not be able to
      # authenticate with the cluster.
      id-token: write
      contents: read
    name: example
    runs-on: ubuntu-latest
    steps:
    - name: Checkout repository
      uses: actions/checkout@v3
    - name: Fetch Teleport binaries
      uses: teleport-actions/setup@v1
      with:
        version: auto
        # Replace with the address of your Teleport Proxy Service.
        proxy: example.teleport.sh:443
    - name: Fetch credentials using Machine ID
      uses: teleport-actions/application-proxy@v1
      with:
        # Replace with the address of your Teleport Proxy Service.
        proxy: example.teleport.sh:443
        # Use the name of the join token resource you created in step 1.
        token: example-bot
        # Configure the listener address for the HTTP proxy server.
        listen: tcp://localhost:1235
        # Configure the port for tbot's diagnostics service, used to coordinate
        # with the bot in the background. If running multiple background bots
        # (app tunnel/proxy, database tunnel, etc), make sure to give each a
        # unique port. If unset, the default shown below is used.
        diag-port: 57263
        # Enable the submission of anonymous usage telemetry. This helps us
        # shape the future development of `tbot`. You can disable this by
        # omitting this.
        anonymous-telemetry: 1

    - name: Perform a request over the application tunnel
      run: |
        http_proxy=http://localhost:1235 curl http://httpbin/get
다음을 대체하세요:
example.teleport.sh:443을 Teleport 프록시 서비스의 주소로 대체example-bot을 이전 단계에서 생성한 토큰의 이름으로 대체
애플리케이션 프록시에는 특정 앱 이름을 설정할 필요가 없습니다.
액션이 완료되면, 설정된 포트(이 경우 http://localhost:1235)에서
HTTP 프록시 서버가 실행됩니다. HTTP 프록시를 사용할 수 있는
모든 애플리케이션은 http://APP_NAME/에서 역할을 통해 봇에
부여된 모든 앱에 접근할 수 있습니다.
이 새 워크플로 파일을 리포지터리의 기본 브랜치에 추가, 커밋, 푸시하세요.
웹 브라우저에서 GitHub 리포지터리의 Actions 탭으로 이동합니다.
변경 사항으로 인해 생성되고 트리거된 Workflow를 선택하고,
example 작업을 선택합니다.
액션의 Perform a request... 단계를 펼치고, 프록시를 통한
curl 요청이 성공적으로 출력되는지 확인하세요.
예시: 수동 설정#
tbot을 수동으로 설정하려면 YAML 파일을 사용합니다. 이 예시에서는
이를 리포지터리에 커밋하지만, CI 파이프라인 자체에서 생성하거나
만들 수도 있습니다.
이 예시는 tbot의 "원샷(oneshot)" 모드를 사용하여 자격 증명을
출력하고 즉시 종료한다는 점에 유의하세요. 장기 실행 백그라운드
서비스를 사용해야 하는 경우,
아래를 참고하세요
— 맞춤화된 예시가 제공됩니다.
리포지터리 내에 tbot.yaml을 생성합니다:
version: v2
proxy_server: example.teleport.sh:443
onboarding:
  join_method: github
  token: example-bot
oneshot: true
storage:
  type: memory
# services will be filled in during the completion of an access guide.
services: []
다음을 대체하세요:
example.teleport.sh:443을 Teleport 프록시 서비스의 주소로 대체example-bot을 두 번째 단계에서 생성한 토큰의 이름으로 대체
이제 이 설정으로 tbot을 시작하는 GitHub Actions 워크플로를
정의할 수 있습니다.
.github/workflows/example-action.yaml을 생성합니다:
# This is a basic workflow to help you get started.
# It will take the following action whenever a push is made to the "main" branch.
on:
  push:
    branches:
    - main
jobs:
  demo:
    permissions:
      # The "id-token: write" permission is required or tbot will not be able to
      # authenticate with the cluster.
      id-token: write
      contents: read
    # The name of the workflow, and the Linux distro to be used to perform the
    # required steps.
    name: guide-demo
    runs-on: ubuntu-latest
    steps:
    - name: Checkout repository
      uses: actions/checkout@v3
    - name: Fetch Teleport binaries
      uses: teleport-actions/setup@v1
      with:
        version: auto
        # Replace with the address of your Teleport Proxy Service.
        proxy: example.teleport.sh:443
    - name: Execute Machine ID
      env:
        # TELEPORT_ANONYMOUS_TELEMETRY enables the submission of anonymous
        # usage telemetry. This helps us shape the future development of
        # tbot. You can disable this by omitting this.
        TELEPORT_ANONYMOUS_TELEMETRY: 1
      run: tbot start -c ./tbot.yaml --oneshot
이 두 파일을 리포지터리에 추가, 커밋, 푸시하세요. GitHub Actions UI에서 워크플로가 성공했는지 확인하세요.
이제 tbot의 기본 구성을 준비했습니다. 이 시점에서 tbot은
Teleport 클러스터에 자신을 식별하고 자체 자격 증명을 갱신하지만
다른 애플리케이션이 사용할 자격 증명은 출력하지 않습니다.
액세스 요구 사항을 충족하는 서비스를 구성하려면 액세스 가이드 중 하나를 따르십시오.
예시: 백그라운드 서비스를 사용한 수동 설정#
이 기능은 tbot 클라이언트 버전 18.6.4 이상을 사용해야 합니다.
전용 액션에서 직접 지원하지 않는 서비스, 예를 들어
ssh-multiplexer
또는 workload-identity-api
서비스를 제공하거나, 단순히 장기 실행 작업을 위해 인증서를
지속적으로 갱신하려면 tbot 클라이언트가 백그라운드에서
실행되어야 하는 경우, 몇 가지 추가 단계를 거쳐 tbot을
백그라운드에서 안전하게 실행할 수 있습니다.
표준 수동 설정 단계와 마찬가지로, 리포지터리 내에 tbot.yaml을
생성합니다:
version: v2
proxy_server: example.teleport.sh:443
onboarding:
  join_method: github
  token: example-bot
storage:
  type: memory
# services will be filled in during the completion of an access guide.
services: []
다음을 대체하세요:
example.teleport.sh:443을 Teleport 프록시 서비스의 주소로 대체example-bot을 첫 번째 단계에서 생성한 토큰의 이름으로 대체
이제 이 설정으로 tbot을 시작하는 GitHub Actions 워크플로를
정의할 수 있습니다.
.github/workflows/example-action.yaml을 생성합니다:
# This is a basic workflow to help you get started.
# It will take the following action whenever a push is made to the "main" branch.
on:
  push:
    branches:
    - main
jobs:
  demo:
    permissions:
      # The "id-token: write" permission is required or tbot will not be able to
      # authenticate with the cluster.
      id-token: write
      contents: read
    # The name of the workflow, and the Linux distro to be used to perform the
    # required steps.
    name: guide-demo
    runs-on: ubuntu-latest
    steps:
    - name: Checkout repository
      uses: actions/checkout@v3
    - name: Fetch Teleport binaries
      uses: teleport-actions/setup@v1
      with:
        version: auto
        # Replace with the address of your Teleport Proxy Service.
        proxy: example.teleport.sh:443
    - name: Start tbot in the background
      env:
        # TELEPORT_ANONYMOUS_TELEMETRY enables the submission of anonymous
        # usage telemetry. This helps us shape the future development of
        # tbot. You can disable this by omitting this.
        TELEPORT_ANONYMOUS_TELEMETRY: 1
      run: nohup tbot start -c ./tbot.yaml --diag-addr localhost:57264 > ./tbot.log 2>&1 &
    - name: Wait for tbot to become ready
      run: tbot wait --timeout=30s --diag-addr localhost:57264

    # Insert other steps that use tbot credentials or services here.

    # At the end of the job, this step prints recorded tbot logs for debugging
    # purposes (stored in tbot.log).
    - name: Print tbot logs
      # Logs should be printed regardless of whether or not other job steps fail.
      if: always()
      run: |
        if [ -f ./tbot.log ]; then
          cat ./tbot.log
        else
          echo "No tbot logs found"
        fi
이 두 파일을 리포지터리에 추가, 커밋, 푸시하세요. GitHub Actions UI에서 워크플로가 성공했는지 확인하세요.
이제 tbot의 기본 구성을 준비했습니다. 이 시점에서 tbot은
Teleport 클러스터에 자신을 식별하고 자체 자격 증명을 갱신하지만
다른 애플리케이션이 사용할 자격 증명은 출력하지 않습니다.
액세스 요구 사항을 충족하는 서비스를 구성하려면 액세스 가이드 중 하나를 따르십시오.
보안 영향 및 위험에 대한 참고 사항#
teleport-actions/auth가 워크플로 작업에서 사용된 후에는, 해당
작업의 이후 모든 단계에서 봇으로서 Teleport 클러스터에 접근할 수
있는 자격 증명에 접근할 수 있게 됩니다. 가능하다면 이 액션을
사용한 후에는 필요한 단계만 최소한으로 실행하세요. CI/CD
파이프라인에서 실행되는 다른 코드와 이 자격 증명을 분리하기 위해
워크플로를 여러 작업으로 나누는 것도 좋은 방법일 수 있습니다.
무엇보다도, GitHub Actions 봇에 할당한 역할이 CI/CD가 상호 작용해야 하는 Teleport 클러스터의 리소스에만 접근할 수 있도록 하세요.
다음 단계#
- 사용법에 대한 자세한 정보는 GitHub Actions를 확인하세요:
github조인 메서드에 대한 자세한 내용은 조인 토큰 참조 페이지를 읽어보세요- GitHub Actions 자체에 대해 더 알아보려면 공식 문서를 읽어보세요.
anonymous-telemetry에 대한 자세한 정보.