





GCP에서 Teleport 실행
Teleport v18.10요약
이 가이드는 고객에게 Google Cloud (GCP)에서 자체 호스팅 Teleport 클러스터를 배포하는 방법에 대한 개요를 제공하기 위해 작성되었습니다. 이 가이드는 GCP에서 Teleport를 설정, 구성 및 실행하는 방법을 다룹니다.
이 가이드는 고객에게 Google Cloud (GCP)에서 자체 호스팅 Teleport 클러스터를 배포하는 방법에 대한 개요를 제공하기 위해 작성되었습니다. 이 가이드는 프로덕션 환경에서 Teleport를 설정하고 실행하는 방법에 대한 고수준 소개를 제공합니다.
이 가이드는 다음과 같이 나뉩니다:
GCP Teleport 소개#
이 가이드는 GCP에서 Teleport를 설정, 구성 및 실행하는 방법을 다룹니다.
고가용성 모드에서 Teleport를 실행하는 데 필요한 GCP 서비스:
- Compute Engine: 인스턴스 그룹이 있는 VM 인스턴스
- Compute Engine: 상태 확인
- Storage: Cloud Firestore
- Storage: Google Cloud Storage
- Network Services: 부하 분산
- Network Services: Cloud DNS
기타 필요한 항목:
선택 사항:
- Management Tools: Cloud Deployment Manager
- Logging: Stackdriver
고가용성 모드로 Teleport를 설정하는 것을 권장합니다. 고가용성 모드에서 Firestore는 클러스터 상태 및 감사 로그에 사용되고, Google Cloud Storage는 세션 녹화에 사용됩니다.
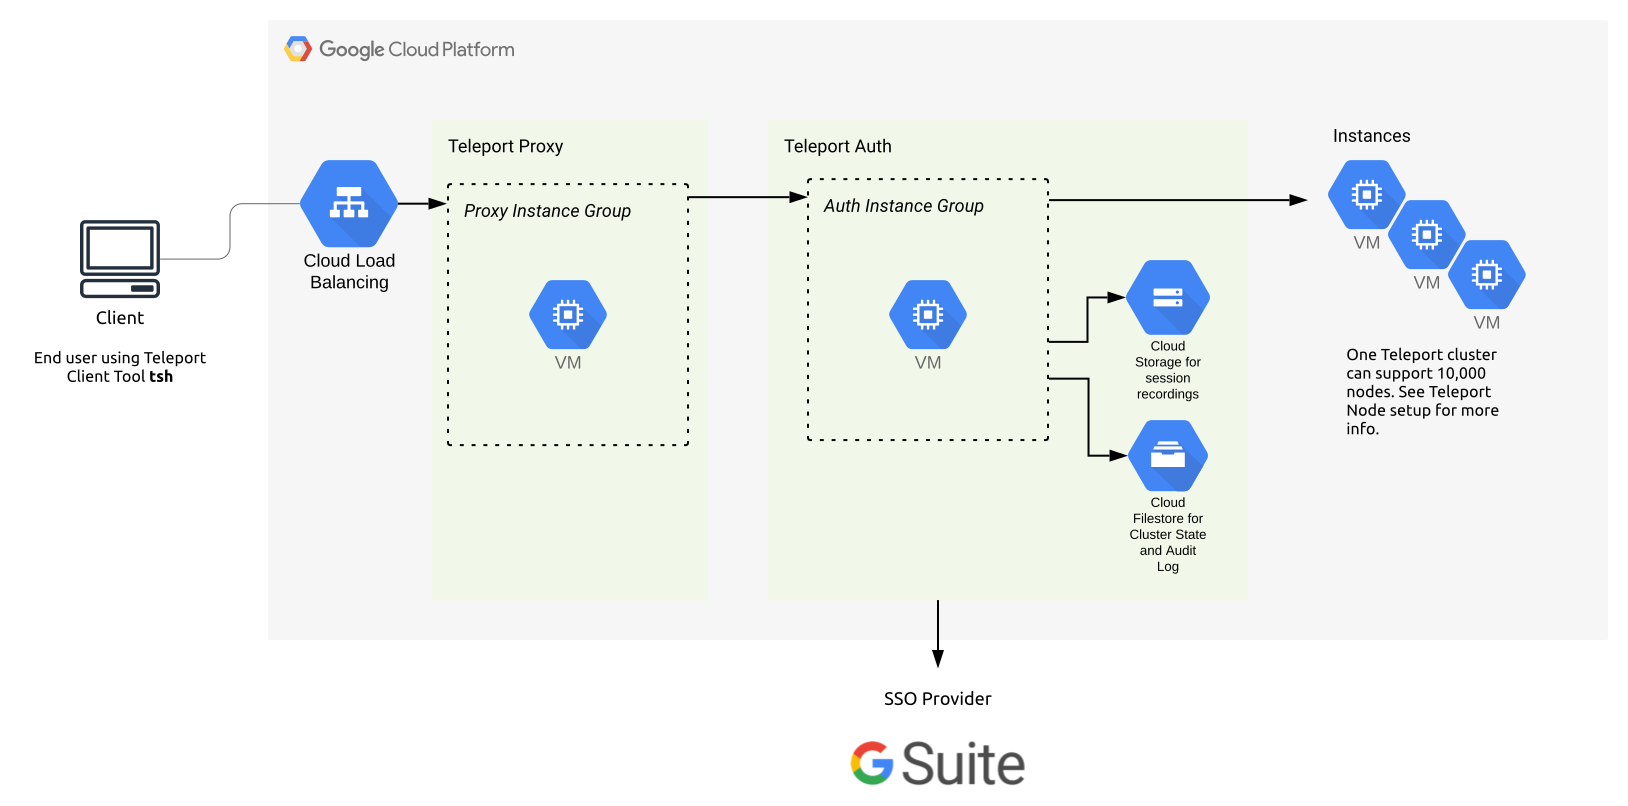
이 가이드 전체에서 다음 플레이스홀더 변수를 사용합니다. 환경에 맞는 값으로 교체하세요.
| 이름 | 예시 | 설명 |
|---|---|---|
Example_GCP_PROJECT |
teleport-project | GCP 프로젝트 ID |
Example_GCP_CREDENTIALS |
/var/lib/teleport/google.json | 서비스 계정 자격 증명 경로 |
Example_FIRESTORE_CLUSTER_STATE |
teleport-cluster-state | Teleport 클러스터 상태용 Firestore 컬렉션 이름 |
Example_FIRESTORE_AUDIT_LOGS |
teleport-audit-logs | Teleport 감사 로그용 Firestore 컬렉션 이름 |
Example_BUCKET_NAME |
teleport-session-recordings | 세션 녹화 저장용 GCS 버킷 이름 |
Compute Engine: 인스턴스 그룹이 있는 VM 인스턴스#
프로덕션 환경에서는 n1-standard-2 인스턴스를 사용하는 것을 권장합니다. Teleport Proxy Service와 Auth Service 인스턴스를 각각 별도의 인스턴스 그룹을 사용하여 분리하는 것이 좋습니다.
Compute Engine: 상태 확인#
GCP는 상태 확인에 크게 의존하며, 이는 인스턴스 그룹에 새 인스턴스를 추가할 때 유용합니다.
Teleport에서 상태 확인을 활성화하려면 teleport start --diag-addr=0.0.0.0:3000으로 시작하세요. 자세한 내용은 관리자 가이드: 문제 해결을 참조하세요.
Storage: Cloud Firestore#
Firestore 백엔드는 실시간 업데이트를 사용하여 개별 Auth Service 인스턴스를 동기화하며, 네이티브 모드로 구성된 Firestore가 필요합니다.
Teleport가 Firestore에 감사 이벤트를 저장하도록 구성하려면 Auth Service 구성 파일(기본적으로 /etc/teleport.yaml)의 teleport 섹션에 다음을 추가합니다:
teleport:
  storage:
    type: firestore
    collection_name: Example_FIRESTORE_CLUSTER_STATE
    project_id: Example_GCP_PROJECT
    credentials_path: Example_GCP_CREDENTIALS
    audit_events_uri: [ 'firestore://Example_FIRESTORE_AUDIT_LOGS?projectID=Example_GCP_PROJECT&credentialsPath=Example_GCP_CREDENTIALS' ]
경고: 테이블 이름
Example_FIRESTORE_CLUSTER_STATE와Example_FIRESTORE_AUDIT_LOGS가 서로 다른 Firestore 컬렉션을 참조하는지 반드시 확인하세요. 각각의 스키마가 다르며, 두 유형의 데이터에 동일한 컬렉션을 사용하면 오류가 발생합니다.
Storage: Google Cloud Storage#
Google Cloud Storage 백엔드는 Teleport 세션 녹화에 사용됩니다. Teleport는 버킷이 아직 존재하지 않으면 시작 시 버킷을 생성하려고 합니다. 원하는 경우 사전에 버킷을 생성할 수 있습니다. 이 경우 Teleport는 버킷을 생성하는 권한이 필요하지 않습니다.
버킷을 생성할 때는 Standard 스토리지 클래스로 Dual-region으로 설정하는 것을 권장합니다. Google 관리 키와 함께 Uniform 액세스 제어를 사용하여 접근 권한을 부여하세요.
audit_sessions_uri를 설정할 때는 gs:// 접두사를 사용합니다.
storage:
    ...
    audit_sessions_uri: 'gs://Example_BUCKET_NAME?projectID=Example_GCP_PROJECT&credentialsPath=Example_GCP_CREDENTIALS'
    ...
Network Services: 부하 분산#
부하 분산은 Proxy와 SSH 트래픽에 필요합니다. Teleport는 SSH 및 Web 트래픽에 사용자 정의 포트가 필요하므로 TCP 부하 분산을 사용하세요.
Network Services: Cloud DNS#
Cloud DNS는 Teleport Proxy의 공개 URL을 설정하는 데 사용됩니다.
접근: 서비스 계정#
Teleport Auth Service는 Firestore와 Google Cloud Storage에 읽기/쓰기가 필요합니다. 이를 위해 올바른 권한이 있는 서비스 계정이 필요합니다.
Teleport가 자체 GCS 버킷을 생성할 수 있도록 하려면 storage.buckets.create 권한을 허용하는 역할을 생성해야 합니다. Teleport 설치 전에 버킷을 생성하기로 선택한 경우 이 단계를 건너뛸 수 있습니다.
이 역할을 생성하려면 먼저 YAML 파일에 역할을 정의합니다:
# teleport_auth_role.yaml
title: teleport_auth_role
description: 'Teleport permissions for GCP'
stage: ALPHA
includedPermissions:
# Allow Teleport to create the GCS bucket for session
# recordings if it doesn't already exist.
- storage.buckets.create
이 파일을 사용하여 역할을 생성합니다:
$ gcloud iam roles create teleport_auth_role \
    --project Example_GCP_PROJECT \
    --file teleport_auth_role.yaml \
    --format yaml
출력의 name 필드를 확인하세요. 이것이 사용자 정의 역할의 완전히 정규화된 이름이며 이후 단계에서 사용해야 합니다.
$ export IAM_ROLE=<role name output from above>
Teleport Auth Service용 GCP 서비스 계정이 아직 없다면 다음 명령으로 생성하거나, 기존 서비스 계정을 사용하세요.
$ gcloud iam service-accounts create teleport-auth-server \
    --description="Service account for Teleport Auth Service" \
    --display-name="Teleport Auth Service" \
    --format=yaml
출력의 email 필드를 확인하세요. 이것이 서비스 계정의 식별자로 사용되어야 합니다.
$ export SERVICE_ACCOUNT=<email output from above command>
마지막으로 필요한 IAM 역할을 새로 생성한 서비스 계정에 바인딩합니다.
# our custom IAM role allows Teleport to create the GCS
# bucket for session recordings if it doesn't already exist
$ gcloud projects add-iam-policy-binding Example_GCP_PROJECT \
    --member=serviceAccount:$SERVICE_ACCOUNT \
    --role=$IAM_ROLE

# datastore.owner grants the required Firestore access
$ gcloud projects add-iam-policy-binding Example_GCP_PROJECT \
    --member=serviceAccount:$SERVICE_ACCOUNT \
    --role=roles/datastore.owner

# storage.objectAdmin is needed to read/write/delete storage objects
$ gcloud projects add-iam-policy-binding Example_GCP_PROJECT \
    --member=serviceAccount:$SERVICE_ACCOUNT \
    --role=roles/storage.objectAdmin
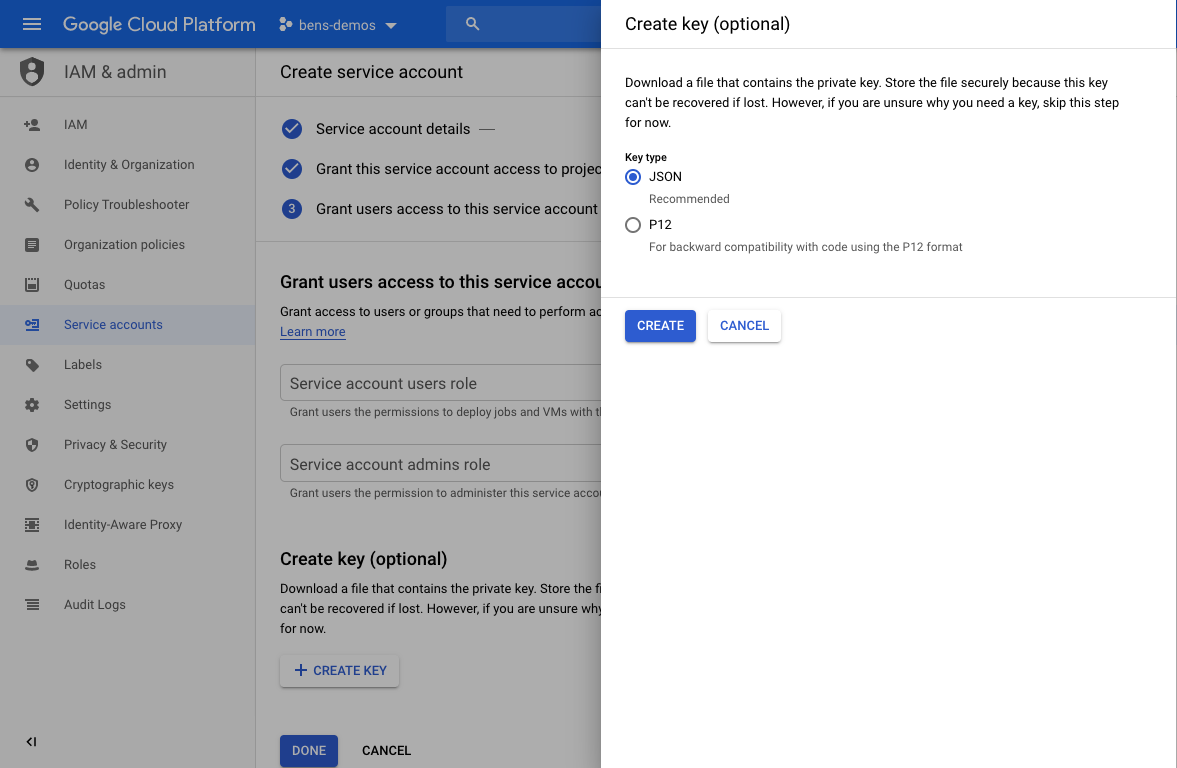
JSON 서비스 키 다운로드
이 서비스 계정의 자격 증명은 JSON 형식으로 내보내고 이 가이드의 나머지 부분에서 Teleport에 제공해야 합니다.
GCP 빠른 시작#
1. 리소스 생성#
리소스를 먼저 생성하는 것을 권장합니다. Cloud Deployment Manager 또는 Terraform과 같은 인프라 자동화 도구를 사용하는 것을 강력히 권장합니다.
2. Teleport 설치 및 구성#
설치 페이지의 설치 지침을 따르세요.
아래 단계에 따라 Teleport를 구성하는 것을 권장합니다:
Teleport Community Edition:
1. Teleport Auth Service 구성 아래 예시 teleport.yaml을 사용하고, systemd로 시작합니다. DEB/RPM 설치에는 자동으로 systemd 구성이 포함됩니다.
#
# Sample Teleport configuration teleport.yaml file for Auth Service
#
teleport:
  nodename: teleport-auth-server
  data_dir: /var/lib/teleport
  pid_file: /run/teleport.pid
  log:
    output: stderr
    severity: DEBUG
  storage:
    type: firestore
    collection_name: Example_FIRESTORE_CLUSTER_STATE
    # Credentials: Path to google service account file, used for Firestore and Google Storage.
    credentials_path: Example_GCP_CREDENTIALS
    project_id: Example_GCP_PROJECT
    audit_events_uri: 'firestore://Example_FIRESTORE_AUDIT_LOGS?projectID=Example_GCP_PROJECT&credentialsPath=Example_GCP_CREDENTIALS'
    audit_sessions_uri: 'gs://Example_BUCKET_NAME?projectID=Example_GCP_PROJECT&credentialsPath=Example_GCP_CREDENTIALS'
auth_service:
  enabled: true
  tokens:
    - "proxy:(= presets.tokens.first =)"
    - "node:(= presets.tokens.second =)"
proxy_service:
  enabled: false
ssh_service:
  enabled: false
Enterprise:
1. Teleport Auth Service 구성 아래 예시 teleport.yaml을 사용하고, systemd로 시작합니다. DEB/RPM 설치에는 자동으로 systemd 구성이 포함됩니다.
#
# Sample Teleport configuration teleport.yaml file for Auth Service
#
teleport:
  nodename: teleport-auth-server
  data_dir: /var/lib/teleport
  pid_file: /run/teleport.pid
  log:
    output: stderr
    severity: DEBUG
  storage:
    type: firestore
    collection_name: Example_FIRESTORE_CLUSTER_STATE
    # Credentials: Path to google service account file, used for Firestore and Google Storage.
    credentials_path: Example_GCP_CREDENTIALS
    project_id: Example_GCP_PROJECT
    audit_events_uri: 'firestore://Example_FIRESTORE_AUDIT_LOGS?projectID=Example_GCP_PROJECT&credentialsPath=Example_GCP_CREDENTIALS'
    audit_sessions_uri: 'gs://Example_BUCKET_NAME?projectID=Example_GCP_PROJECT&credentialsPath=Example_GCP_CREDENTIALS'
auth_service:
  enabled: true
  license_file: /var/lib/teleport/license.pem
  tokens:
    - "proxy:(= presets.tokens.first =)"
    - "node:(= presets.tokens.second =)"
proxy_service:
  enabled: false
ssh_service:
  enabled: false
라이선스 파일을 Auth Service 인스턴스의 /var/lib/teleport/license.pem 경로에 저장하세요.
2. Proxy 설정
Proxy Server의 /etc/teleport.yaml로 다음 구성 파일을 저장합니다:
# enable multiplexing all traffic on TCP port 443
version: v3
teleport:
  auth_token: (= presets.tokens.first =)
  # We recommend using a TCP load balancer pointed to the auth servers when
  # setting up in High Availability mode.
  auth_server: auth.example.com:3025
# enable proxy service, disable auth and ssh
ssh_service:
  enabled: false
auth_service:
  enabled: false
proxy_service:
  enabled: true
  web_listen_addr: 0.0.0.0:443
  public_addr: teleport.example.com:443
  # automatically get an ACME certificate for teleport.example.com (works for a single proxy)
  acme:
    enabled: true
    email: example@email.com
3. Teleport 노드 설정
노드의 /etc/teleport.yaml로 다음 구성 파일을 저장합니다:
version: v3
teleport:
  auth_token: (= presets.tokens.second =)
  # Teleport Agents can be joined to the cluster via the Proxy Service's
  # public address. This will establish a reverse tunnel between the Proxy
  # Service and the agent that is used for all traffic.
  proxy_server: teleport.example.com:443
# enable the SSH Service and disable the Auth and Proxy Services
ssh_service:
  enabled: true
auth_service:
  enabled: false
proxy_service:
  enabled: false
4. 사용자 추가
로컬 사용자 가이드를 따르거나 Google Workspace와 통합하여 SSO 접근을 제공하세요.