





GCP, GKE, Helm을 사용하여 HA Teleport 클러스터 실행
Teleport v18.10요약
이 가이드에서는 Teleport Helm 차트와 Google Cloud Platform 제품(Firestore 및 Google Cloud Storage)을 사용하여 Kubernetes에서 여러 복제본이 있는 고가용성 Teleport 클러스터를 설정합니다.
이 가이드에서는 Teleport Helm 차트와 Google Cloud Platform 제품(Firestore 및 Google Cloud Storage)을 사용하여 Kubernetes에서 여러 복제본이 있는 고가용성 Teleport 클러스터를 설정합니다.
이미 다른 플랫폼에서 Teleport를 실행 중인 경우, 기존 Teleport 배포를 사용하여 Kubernetes 클러스터에 접근할 수 있습니다. 가이드를 따라 Kubernetes 클러스터를 Teleport에 연결하세요.
작동 방식#
teleport-cluster Helm 차트는 Google Kubernetes Engine 클러스터에 Teleport Auth Service와 Teleport Proxy Service를 배포합니다. 이 차트에는 다음 리소스가 필요하며, 이 가이드에서 생성 방법을 보여줍니다:
- Teleport Auth Service의 IAM 권한. Auth Service는 백엔드에서 리소스를 관리하기 위한 권한이 필요합니다.
- cert-manager. Proxy Service가 HTTPS 서버를 실행하는 데 사용할 TLS 자격 증명을 획득하고 갱신합니다.
- cert-manager의 IAM 권한. 이 가이드에서 보여주는 설정에서
cert-manager는 도메인 소유권을 증명하고 Let's Encrypt에서 TLS 자격 증명을 받기 위해 DNS 레코드를 수정합니다. 이를 위해 Proxy Service는 ACME DNS-01 챌린지를 완료합니다. - Teleport Auth Service 백엔드 구성 요소: Google Cloud Storage 버킷과 Firestore 데이터베이스.
사전 요구사항#
1단계/6. Teleport Helm 차트 리포지토리 추가#
참고
아래 단계는 Google Cloud GKE(Google Kubernetes Engine) 표준 배포에 적용됩니다.
2단계/6. Google Cloud IAM 구성#
Teleport가 필요한 Firestore 컬렉션, 인덱스 및 Google Cloud Storage 버킷을 생성할 수 있으려면 이러한 서비스를 사용할 수 있는 권한이 있는 Google Cloud 서비스 계정을 구성해야 합니다.
storage.buckets.create 권한을 부여하는 IAM 역할 생성#
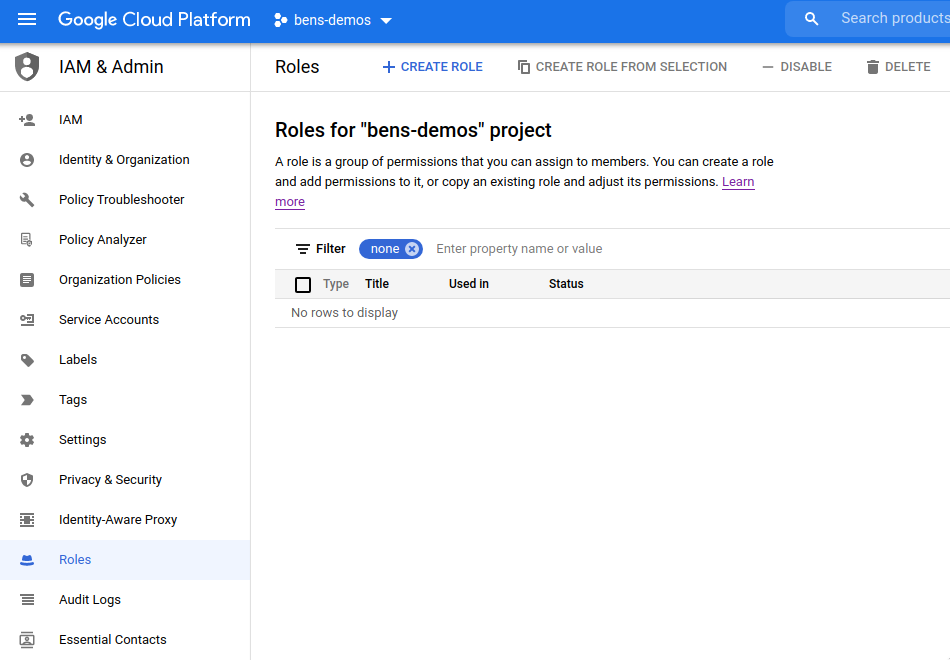
Google Cloud IAM & Admin의 "Roles" 섹션으로 이동합니다.
-
상단의 "Create Role" 버튼을 클릭합니다.
-
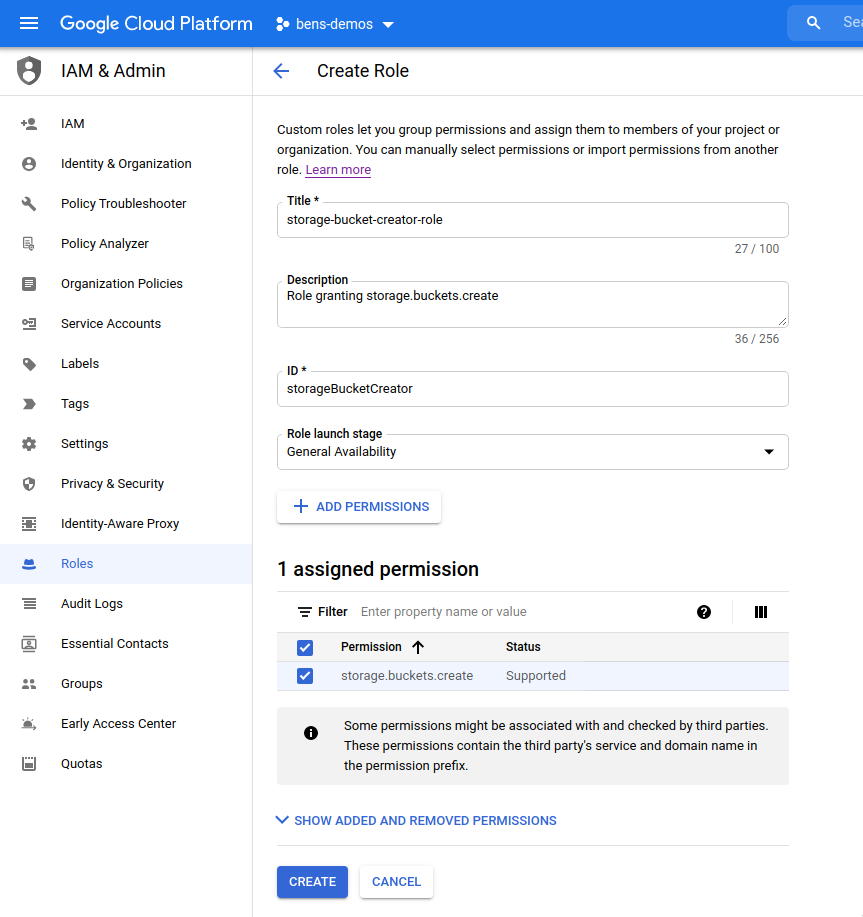
"Storage Bucket Creator" 역할의 세부 정보를 입력합니다(
storage-bucket-creator-role이라는 이름을 사용하는 것을 권장합니다).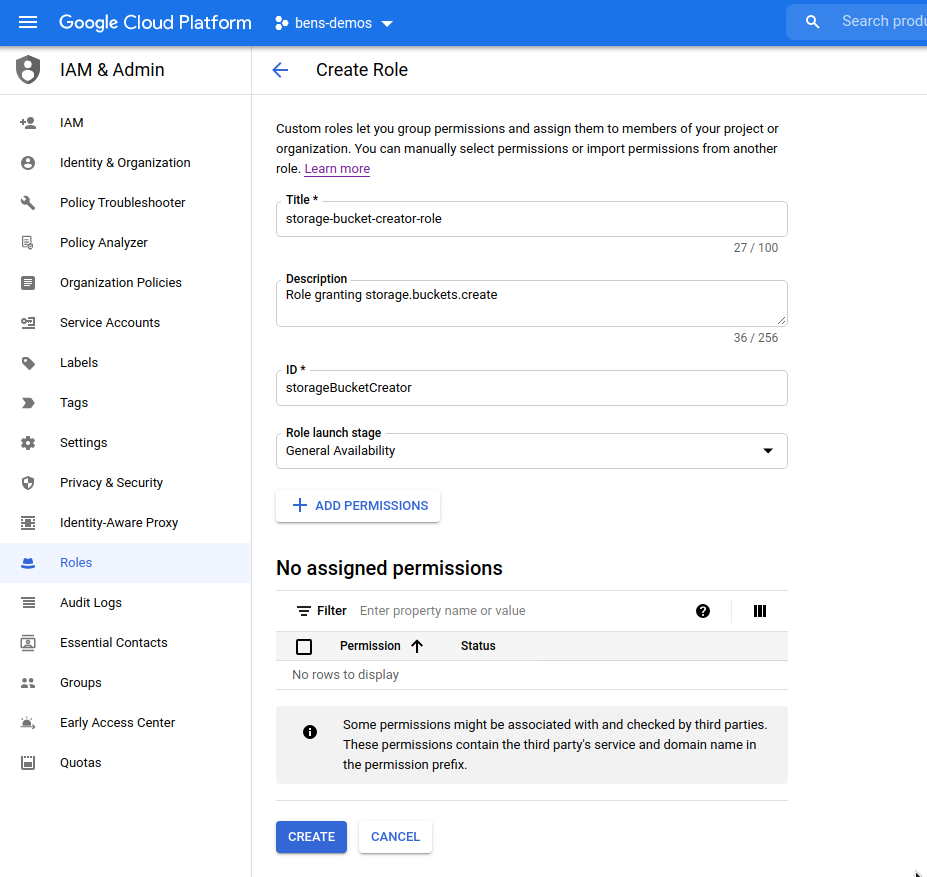
-
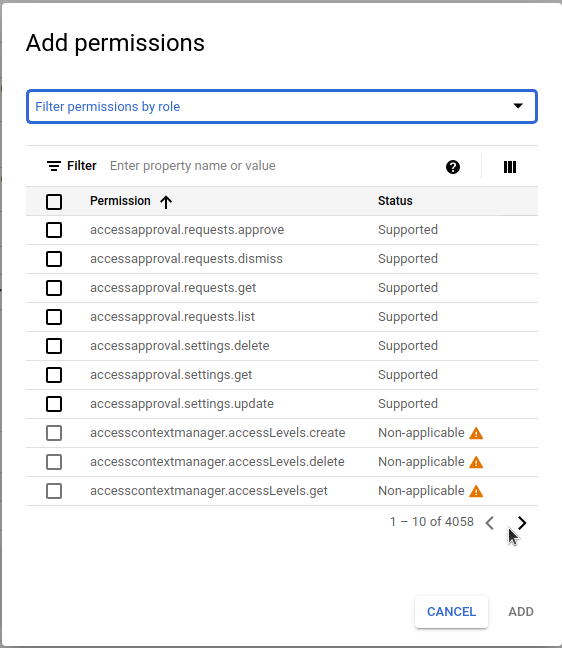
"Add Permissions" 버튼을 클릭합니다.
-
"Filter" 상자를 사용하여
storage.buckets.create를 입력하고 목록에서 선택합니다.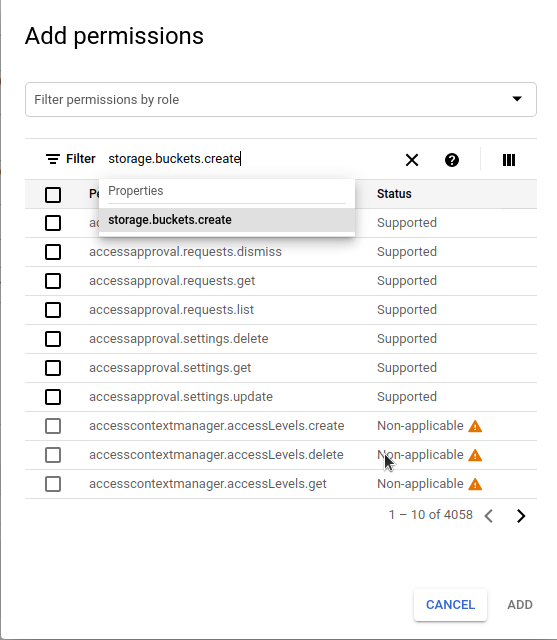
-
목록에서
storage.buckets.create권한을 체크하고 "Add" 버튼을 클릭하여 역할에 추가합니다.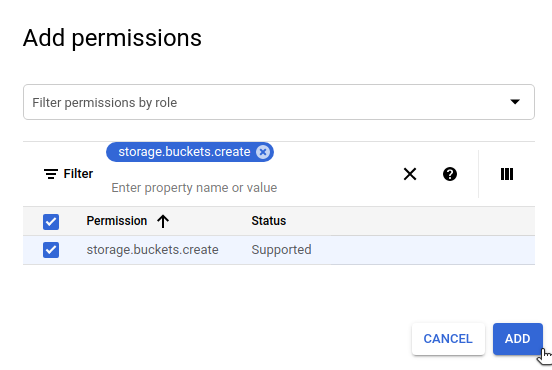
-
이러한 모든 설정이 성공적으로 입력되면 "Create" 버튼을 클릭합니다.
Cloud DNS 권한을 부여하는 IAM 역할 생성#
Google Cloud IAM & Admin의 "Roles" 섹션으로 이동합니다.
-
상단의 "Create Role" 버튼을 클릭합니다.
-
"DNS Updater" 역할의 세부 정보를 입력합니다(
dns-updater-role이라는 이름을 사용하는 것을 권장합니다).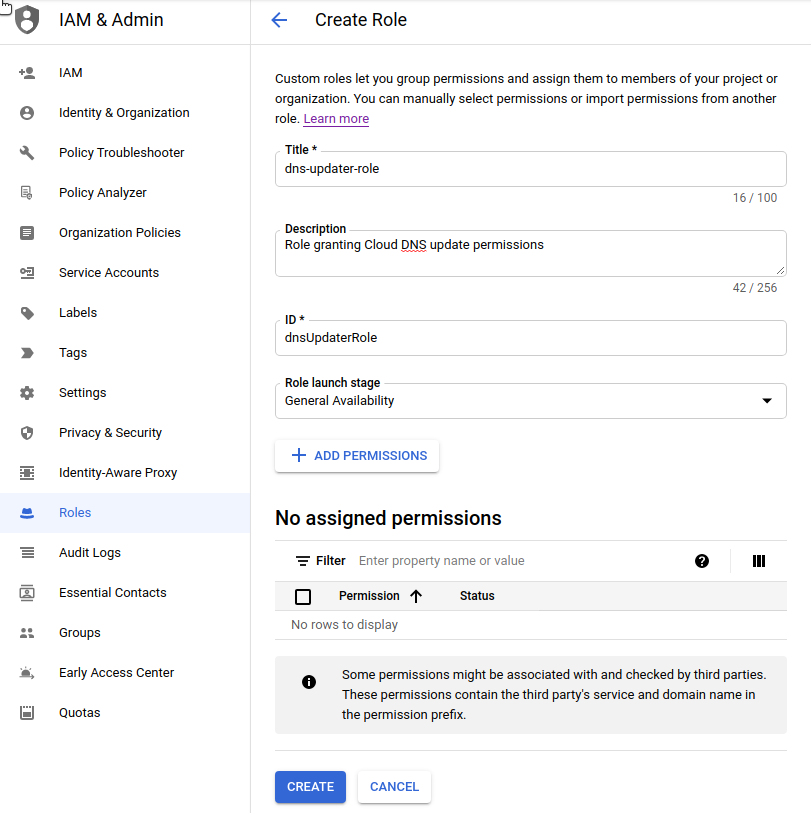
-
"Add Permissions" 버튼을 클릭합니다.
-
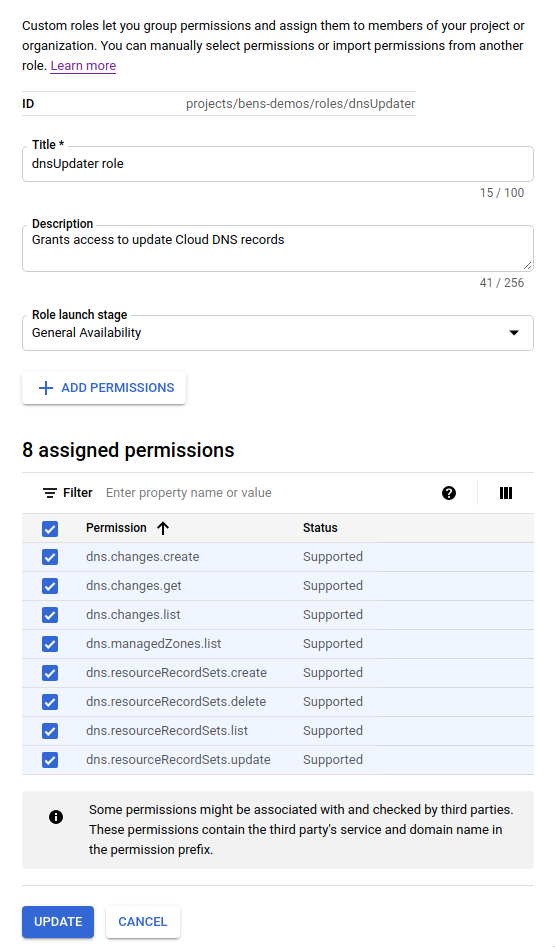
"Filter" 상자를 사용하여 목록에서 다음 각 권한을 찾아 추가합니다.
dns.resourceRecordSets.*과 같이 입력하여 목록을 빠르게 필터링할 수 있습니다.dns.resourceRecordSets.create dns.resourceRecordSets.delete dns.resourceRecordSets.list dns.resourceRecordSets.update dns.changes.create dns.changes.get dns.changes.list dns.managedZones.list -
이러한 모든 설정이 성공적으로 입력되면 "Create" 버튼을 클릭합니다.
Teleport Helm 차트에 대한 서비스 계정 생성#
참고
사용하려는 적절하게 프로비저닝된 서비스 계정에 대한 JSON 개인 키가 이미 있는 경우, 이 생성 프로세스를 건너뛰고 아래의 "서비스 계정의 JSON 개인 키가 포함된 Kubernetes 시크릿 생성" 섹션으로 이동할 수 있습니다.
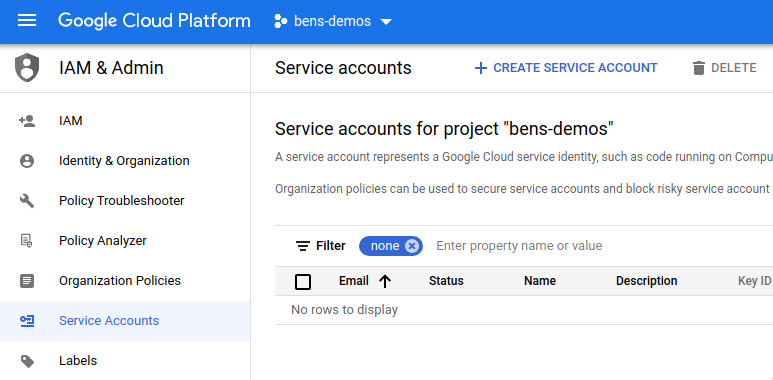
Google Cloud IAM & Admin의 "Service Accounts" 섹션으로 이동합니다.
-
상단의 "Create Service Account" 버튼을 클릭합니다.
-
서비스 계정의 세부 정보를 입력하고(
teleport-helm이라는 이름을 권장합니다) "Create" 버튼을 클릭합니다.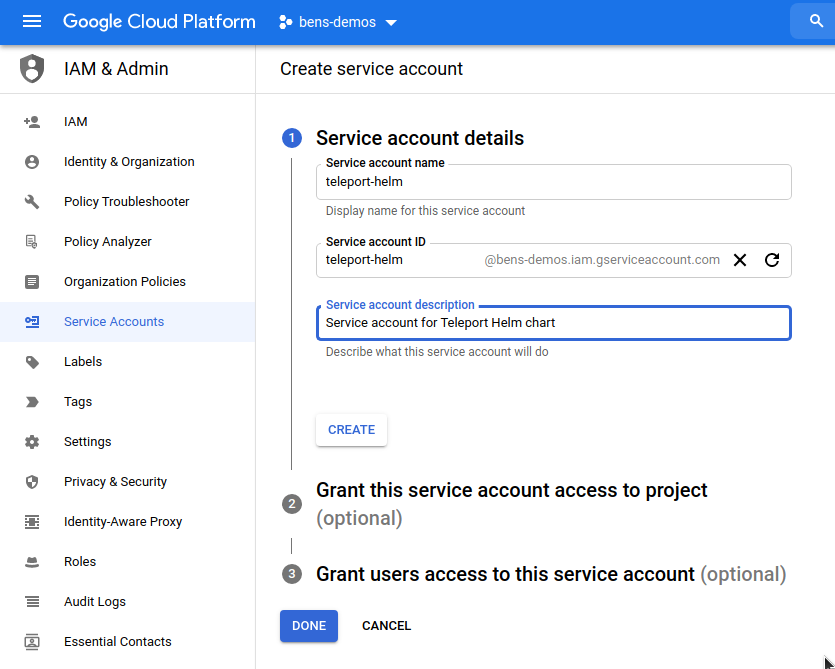
-
"Grant this service account access to project" 섹션에서 다음 네 가지 역할을 추가합니다:
| 역할 | 용도 |
|---|---|
| storage-bucket-creator-role | 방금 생성한 역할로 스토리지 버킷 생성을 허용합니다 |
| dns-updater-role | 방금 생성한 역할로 Cloud DNS 레코드 업데이트를 허용합니다 |
| Cloud Datastore Owner | Cloud Datastore 컬렉션 생성 권한을 부여합니다 |
| Storage Object Admin | Google Cloud 스토리지 오브젝트의 읽기/쓰기/삭제를 허용합니다 |
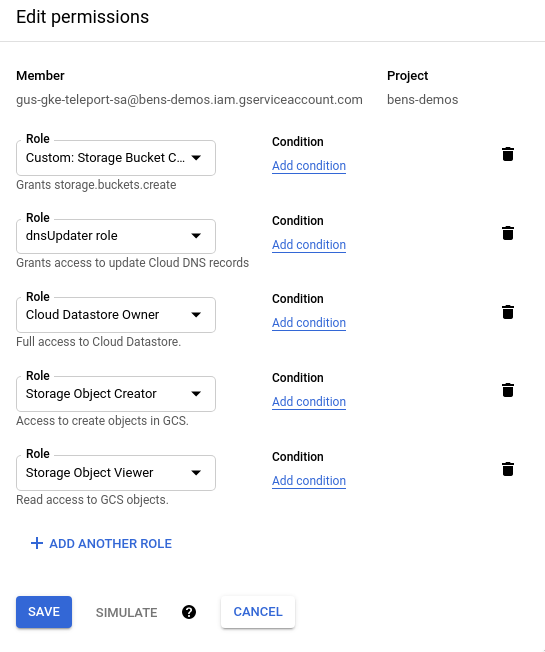
- "continue" 버튼을 클릭하여 이러한 설정을 저장한 다음 "create" 버튼을 클릭하여 서비스 계정을 생성합니다.
서비스 계정에 대한 액세스 키 생성#
Google Cloud IAM & Admin에서 "Service Accounts" 보기로 돌아갑니다.
-
방금 생성한
teleport-helm서비스 계정을 클릭합니다.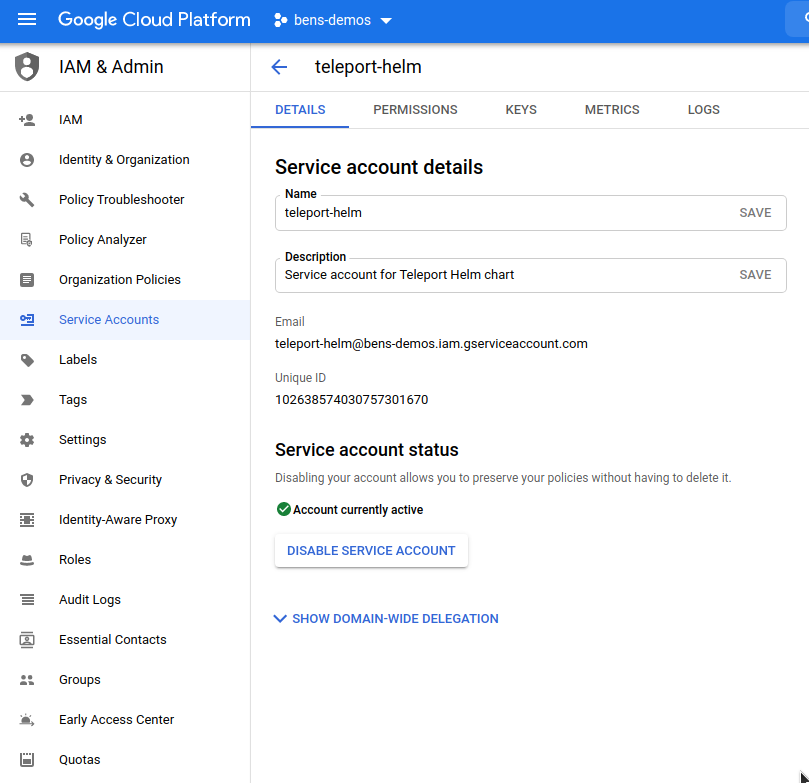
-
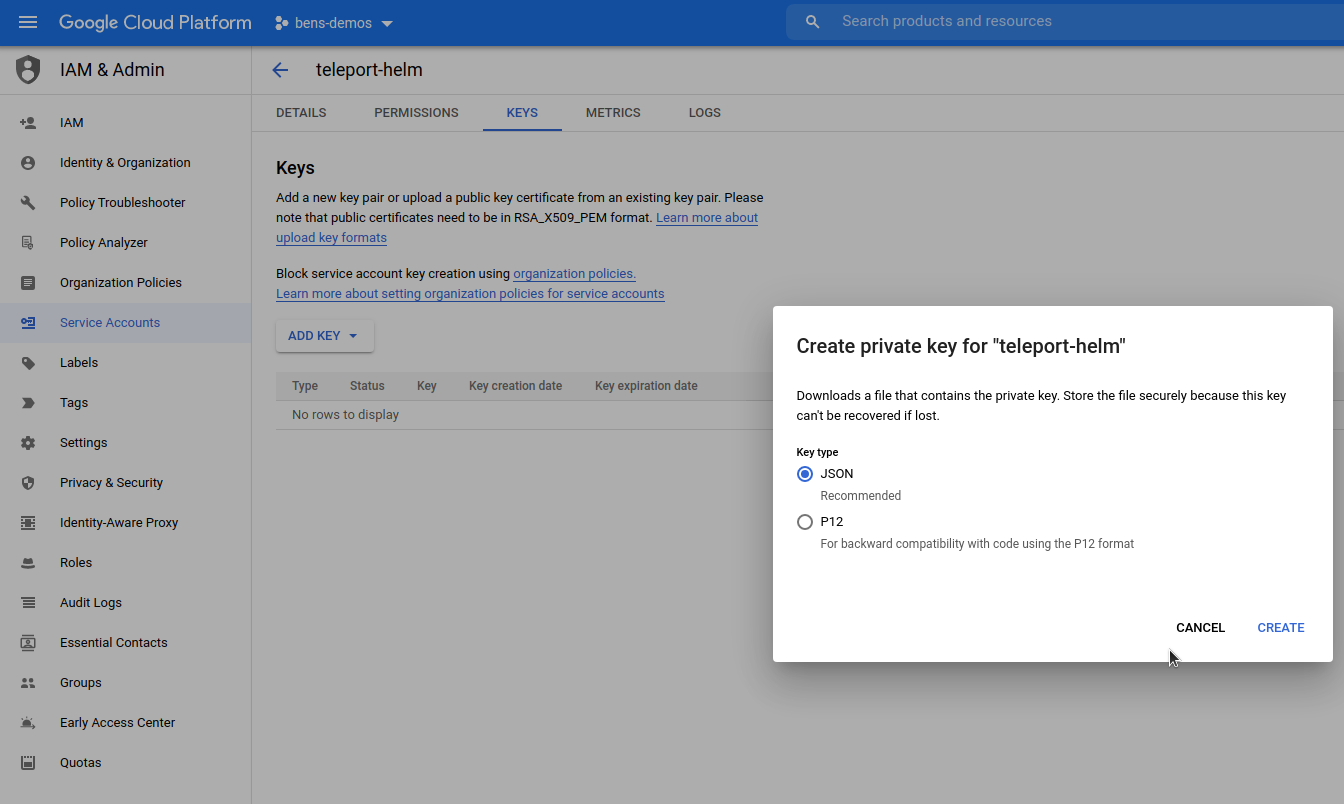
상단의 "Keys" 탭을 클릭하고 "Add Key"를 클릭합니다. "JSON"을 선택하고 "Create"를 클릭합니다.
-
JSON 개인 키가 컴퓨터에 다운로드됩니다. 이 예시에서는
bens-demos-24150b1a0a7f.json과 같이 잠시 후 필요한 파일 이름을 기록해 두세요.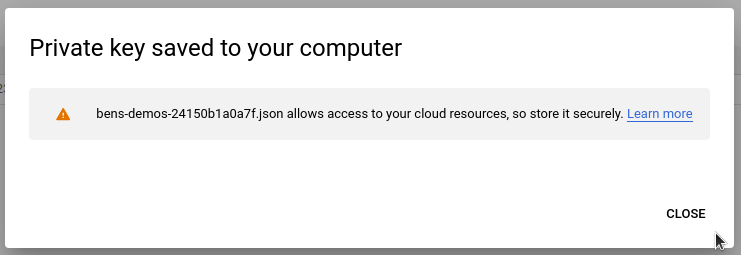
서비스 계정의 JSON 개인 키가 포함된 Kubernetes 시크릿 생성#
JSON 개인 키가 저장된 경로를 찾습니다(브라우저의 기본 "Downloads" 디렉터리일 가능성이 높습니다).
kubectl을 사용하여 teleport 네임스페이스를 생성하고, 보안 정책을 설정하고, JSON 개인 키 경로를 사용하여 시크릿을 생성합니다:
$ kubectl create namespace teleport
namespace/teleport created
$ kubectl label namespace teleport 'pod-security.kubernetes.io/enforce=baseline'
namespace/teleport labeled
$ kubectl --namespace teleport create secret generic teleport-gcp-credentials --from-file=gcp-credentials.json=/path/to/downloads/bens-demos-24150b1a0a7f.json
secret/teleport-gcp-credentials created
팁
특정 네임스페이스에 Teleport 차트를 설치한 경우, 생성하는
teleport-gcp-credentials시크릿도 동일한 네임스페이스에 추가해야 합니다.
참고
시크릿의 기본 이름은
teleport-gcp-credentials입니다.이미 생성된 시크릿이 있는 경우 이 생성 프로세스를 건너뛰고
gcp.credentialSecretName을 사용하여 시크릿 이름을 지정할 수 있습니다.사용된 시크릿에 저장된 자격 증명 파일의 키 이름은
gcp-credentials.json이어야 합니다.
3단계/6. cert-manager 설치 및 구성#
cert-manager 문서를 참조하세요.
이 예시에서는 고가용성 Teleport 클러스터를 생성하기 위해 여러 파드를 사용합니다. 따라서 Let's Encrypt를 사용하여 TLS 인증서를 중앙에서 프로비저닝하기 위해 cert-manager를 사용합니다. 이러한 인증서는 각 Teleport 파드에 마운트되고 cert-manager에 의해 자동으로 갱신되고 최신 상태로 유지됩니다.
Teleport를 설치하는 Kubernetes 클러스터에 cert-manager가 이미 구성되어 있지 않은 경우 cert-manager 차트를 호스팅하는 Jetstack Helm 차트 리포지토리를 추가하고 차트를 설치해야 합니다:
$ helm repo add jetstack https://charts.jetstack.io
$ helm repo update
$ helm install cert-manager jetstack/cert-manager \
--create-namespace \
--namespace cert-manager \
--set global.leaderElection.namespace=cert-manager \
--set installCRDs=true
cert-manager가 설치되면 Issuer를 생성하고 추가해야 합니다.
아래 Issuer 예시에서 다음 값을 교체해야 합니다:
| 플레이스홀더 값 | 교체 값 |
|---|---|
email@address.com |
Let's Encrypt에서 통신을 받을 이메일 주소 |
example.com |
Teleport 클러스터를 호스팅하는 Cloud DNS 도메인 이름 |
gcp-project-id |
Cloud DNS 도메인이 등록된 GCP 프로젝트 ID |
cat << EOF > gcp-issuer.yaml
apiVersion: cert-manager.io/v1
kind: Issuer
metadata:
  name: letsencrypt-production
  namespace: teleport
spec:
  acme:
    email: email@address.com                                # Change this
    server: https://acme-v02.api.letsencrypt.org/directory
    privateKeySecretRef:
      name: letsencrypt-production
    solvers:
    - selector:
        dnsZones:
          - "example.com"                                  # Change this
      dns01:
        cloudDNS:
          project: gcp-project-id                          # Change this
          serviceAccountSecretRef:
            name: teleport-gcp-credentials
            key: gcp-credentials.json
EOF
참고
여기
serviceAccountSecretRef아래의 시크릿 이름은 기본적으로teleport-gcp-credentials입니다.차트 values에서
gcp.credentialSecretName을 변경한 경우 여기서도 일치하는지 확인해야 합니다.
Issuer를 생성하고 값을 업데이트한 후 kubectl을 사용하여 클러스터에 추가합니다:
$ kubectl --namespace teleport create -f gcp-issuer.yaml
4단계/6. 클러스터 구성 값 설정#
라이선스 시크릿
Kubernetes 클러스터에 Teleport Enterprise를 설치하기 전에 Teleport 라이선스 정보가 포함된 시크릿을 생성해야 합니다.
license.pem 파일에서 시크릿을 생성합니다. 파일 이름이 license.pem인 한 Teleport가 자동으로 이 시크릿을 검색합니다.
$ kubectl -n teleport create secret generic license --from-file=license.pem
참고
완전히 새로운 GCP 프로젝트에 Teleport를 설치하는 경우 계속하기 전에 프로젝트에서 Cloud Firestore API를 활성화하고 Firestore 데이터베이스를 생성했는지 확인하세요.
다음으로 gcp 모드를 사용하도록 teleport-cluster Helm 차트를 구성합니다. gcp-values.yaml 파일을 생성하고 위에서 선택한 값을 작성합니다:
Teleport Community Edition:
chartMode: gcp
clusterName: teleport.example.com                 # Name of your cluster. Use the FQDN you intend to configure in DNS below
gcp:
  projectId: gcpproj-123456                       # Google Cloud project ID
  backendTable: teleport-helm-backend             # Firestore collection to use for the Teleport backend
  auditLogTable: teleport-helm-events             # Firestore collection to use for the Teleport audit log (must be different to the backend collection)
  auditLogMirrorOnStdout: false                   # Whether to mirror audit log entries to stdout in JSON format (useful for external log collectors)
  sessionRecordingBucket: teleport-helm-sessions  # Google Cloud Storage bucket to use for Teleport session recordings
highAvailability:
  replicaCount: 2                                 # Number of replicas to configure
  certManager:
    enabled: true                                 # Enable cert-manager support to get TLS certificates
    issuerName: letsencrypt-production            # Name of the cert-manager Issuer to use (as configured above)

# If you are running Kubernetes 1.23 or above, disable PodSecurityPolicies
podSecurityPolicy:
  enabled: false
Teleport Enterprise:
chartMode: gcp
clusterName: teleport.example.com                 # Name of your cluster. Use the FQDN you intend to configure in DNS below
gcp:
  projectId: gcpproj-123456                       # Google Cloud project ID
  backendTable: teleport-helm-backend             # Firestore collection to use for the Teleport backend
  auditLogTable: teleport-helm-events             # Firestore collection to use for the Teleport audit log (must be different to the backend collection)
  auditLogMirrorOnStdout: false                   # Whether to mirror audit log entries to stdout in JSON format (useful for external log collectors)
  sessionRecordingBucket: teleport-helm-sessions  # Google Cloud Storage bucket to use for Teleport session recordings
highAvailability:
  replicaCount: 2                                 # Number of replicas to configure
  certManager:
    enabled: true                                 # Enable cert-manager support to get TLS certificates
    issuerName: letsencrypt-production            # Name of the cert-manager Issuer to use (as configured above)
enterprise: true                                  # Indicate that this is a Teleport Enterprise deployment
다음 명령으로 gcp-values.yaml 파일의 값을 사용하여 차트를 설치합니다:
$ helm install teleport teleport/teleport-cluster \
  --create-namespace \
  --namespace teleport \
  -f gcp-values.yaml
참고
클러스터가 구성된 후에는
clusterName을 변경할 수 없으므로 신중하게 선택하세요. Teleport 클러스터에 대한 외부 접근에 사용할 완전한 도메인 이름을 사용하는 것을 권장합니다.
차트가 설치되면 kubectl 명령을 사용하여 배포를 볼 수 있습니다:
$ kubectl --namespace teleport get all

NAME                                 READY   STATUS    RESTARTS   AGE
pod/teleport-auth-57989d4cbd-4q2ds   1/1     Running   0          22h
pod/teleport-auth-57989d4cbd-rtrzn   1/1     Running   0          22h
pod/teleport-proxy-c6bf55cfc-w96d2   1/1     Running   0          22h
pod/teleport-proxy-c6bf55cfc-z256w   1/1     Running   0          22h

NAME                        TYPE           CLUSTER-IP     EXTERNAL-IP     PORT(S)                                                                     AGE
service/teleport            LoadBalancer   10.40.11.180   34.138.177.11   443:30258/TCP,3023:31802/TCP,3026:32182/TCP,3024:30101/TCP,3036:30302/TCP   22h
service/teleport-auth       ClusterIP      10.40.8.251    <none>          3025/TCP,3026/TCP                                                           22h
service/teleport-auth-v11   ClusterIP      None           <none>          <none>                                                                      22h
service/teleport-auth-v12   ClusterIP      None           <none>          <none>                                                                      22h

NAME                             READY   UP-TO-DATE   AVAILABLE   AGE
deployment.apps/teleport-auth    2/2     2            2           22h
deployment.apps/teleport-proxy   2/2     2            2           22h

NAME                                       DESIRED   CURRENT   READY   AGE
replicaset.apps/teleport-auth-57989d4cbd   2         2         2       22h
replicaset.apps/teleport-proxy-c6bf55cfc   2         2         2       22h
5단계/6. DNS 설정#
teleport.example.com에 대한 DNS A 레코드를 설정해야 합니다.
Teleport로 애플리케이션을 등록하시나요?
애플리케이션 접근을 위해서는 와일드카드 DNS 레코드도 필요합니다. 예를 들어 teleport.example.com의 경우 *.teleport.example.com에 대한 와일드카드 레코드도 추가해야 합니다.
Google Cloud DNS를 사용하는 방법:
# Change these parameters if you altered them above
$ NAMESPACE=teleport
$ RELEASE_NAME=teleport

$ MYIP=$(kubectl --namespace ${NAMESPACE?} get service/${RELEASE_NAME?} -o jsonpath='{.status.loadBalancer.ingress[*].ip}')
$ MYZONE="myzone"
$ MYDNS="teleport.example.com"

$ gcloud dns record-sets transaction start --zone="${MYZONE?}"
$ gcloud dns record-sets transaction add ${MYIP?} --name="${MYDNS?}" --ttl="300" --type="A" --zone="${MYZONE?}"
$ gcloud dns record-sets transaction add ${MYIP?} --name="*.${MYDNS?}" --ttl="300" --type="A" --zone="${MYZONE?}"
$ gcloud dns record-sets transaction describe --zone="${MYZONE?}"
$ gcloud dns record-sets transaction execute --zone="${MYZONE?}"
6단계/6. Teleport 사용자 생성#
Teleport에 로그인할 수 있는 사용자를 생성합니다. 이 작업은 Teleport Auth Service에서 수행해야 하므로 kubectl을 사용하여 명령을 실행할 수 있습니다:
Teleport Community Edition:
$ kubectl --namespace teleport exec deploy/teleport-auth -- tctl users add test --roles=access,editor

User "test" has been created but requires a password. Share this URL with the user to complete user setup, link is valid for 1h:
https://teleport.example.com:443/web/invite/91cfbd08bc89122275006e48b516cc68

NOTE: Make sure teleport.example.com:443 points at a Teleport proxy that users can access.
Commercial:
$ kubectl --namespace teleport exec deploy/teleport-auth -- tctl users add test --roles=access,editor,reviewer

User "test" has been created but requires a password. Share this URL with the user to complete user setup, link is valid for 1h:
https://teleport.example.com:443/web/invite/91cfbd08bc89122275006e48b516cc68

NOTE: Make sure teleport.example.com:443 points at a Teleport proxy that users can access.
웹 UI를 통해 사용자 생성 링크를 로드하여 비밀번호를 만들고 Teleport 사용자에 대한 다단계 인증을 설정합니다.
고가용성#
이 가이드에서는 2개의 복제본을 구성했습니다. 이는 아래 helm upgrade 사용으로 highAvailability.replicaCount 값을 변경하여 클러스터 생성 후에도 변경할 수 있습니다.
배포 후 클러스터 업그레이드#
배포 후 Teleport 클러스터를 변경하려면 helm upgrade를 사용할 수 있습니다.
Helm은 기본적으로 리포에서 사용 가능한 최신 버전의 차트를 사용하며, 이는 Teleport의 최신 버전에 해당합니다. helm repo update를 실행하여 리포가 최신 상태인지 확인할 수 있습니다.
다른 버전의 Teleport를 사용하려면 teleportVersionOverride 값을 설정합니다.
다음은 차트를 3개의 복제본을 사용하도록 설정하는 예입니다:
values.yaml 사용:
gcp-values.yaml 파일을 편집하여 적절한 변경을 수행합니다.
다음 명령으로 gcp-values.yaml 파일의 값으로 배포를 업그레이드합니다:
$ helm upgrade teleport teleport/teleport-cluster \
  --namespace teleport \
  -f gcp-values.yaml
CLI에서 --set 사용:
명령줄 매개변수를 적절히 편집하여 이 명령을 실행합니다:
$ helm upgrade teleport teleport/teleport-cluster \
  --namespace teleport \
  --set highAvailability.replicaCount=3
참고
chartMode,clusterName또는gcp설정을 변경하려면 먼저 기존 차트를 제거한 다음 적절한 값으로 새 버전을 설치해야 합니다.
Teleport 제거#
teleport-cluster 차트를 제거하려면 helm uninstall <release-name>을 사용합니다. 예:
$ helm --namespace teleport uninstall teleport
cert-manager 제거#
나중에 cert-manager 설치를 제거하려면 이 명령을 사용할 수 있습니다:
$ helm --namespace cert-manager uninstall cert-manager
다음 단계#
Teleport 클러스터를 배포했으므로 접근 관리 섹션을 읽고 사용자 등록 및 RBAC 설정을 시작합니다.
고가용성에 대한 자세한 내용은 Helm 차트 참조의 고가용성 섹션을 참조하세요.