





InfoGrab Docs

IBM Cloud에서 Teleport 실행

요약

이 가이드는 IBM Cloud에서 Teleport를 설정하는 방법을 설명합니다. IBM Cloud에서 Teleport를 배포하기 위해 다음 서비스를 사용합니다: 이 가이드를 따르려면 다음이 필요합니다: 이 단계에서는 Teleport가 백엔드로 사용할 PostgreSQL 데이터베이스를 생성합니다.

이 가이드는 IBM Cloud에서 Teleport를 설정하는 방법을 설명합니다.

작동 방식#

IBM Cloud에서 Teleport를 배포하기 위해 다음 서비스를 사용합니다:

사전 요구사항#

이 가이드를 따르려면 다음이 필요합니다:

  • IBM Cloud 계정
  • 기능적인 네트워킹이 있는 IBM Kubernetes 클러스터 (노드가 인터넷에 접근하고 공개 이미지를 가져올 수 있어야 합니다)
  • IBM Kubernetes 클러스터에 연결된 kubectlhelm 설치
  • IBM Cloud 사용자로 로그인된 ibmcloud CLI 도구 설치
  • Teleport 클러스터에 사용할 도메인 (이 가이드에서는 teleport.example.com을 사용합니다)
  • 도메인 teleport.example.com에 대한 TLS 인증서 (앱 접근을 사용하려면 *.teleport.example.com도 포함)

1단계/7. Postgres 데이터베이스 생성#

이 단계에서는 Teleport가 백엔드로 사용할 PostgreSQL 데이터베이스를 생성합니다.

Create Resource를 선택하고 PostgreSQL을 검색한 다음 Databases for PostgreSQL을 선택합니다. 다음 설정으로 PostgreSQL 생성 양식을 작성합니다:

  • IBM Cloud 호스팅 PostgreSQL
  • 최소 2 vCPU
  • 최소 4 GiB 메모리
  • 최소 50 GiB 스토리지
  • Postgres 버전 16
  • 엔드포인트: Private
  • 이름: 이 예시에서 데이터베이스 배포 이름은 teleport-backend
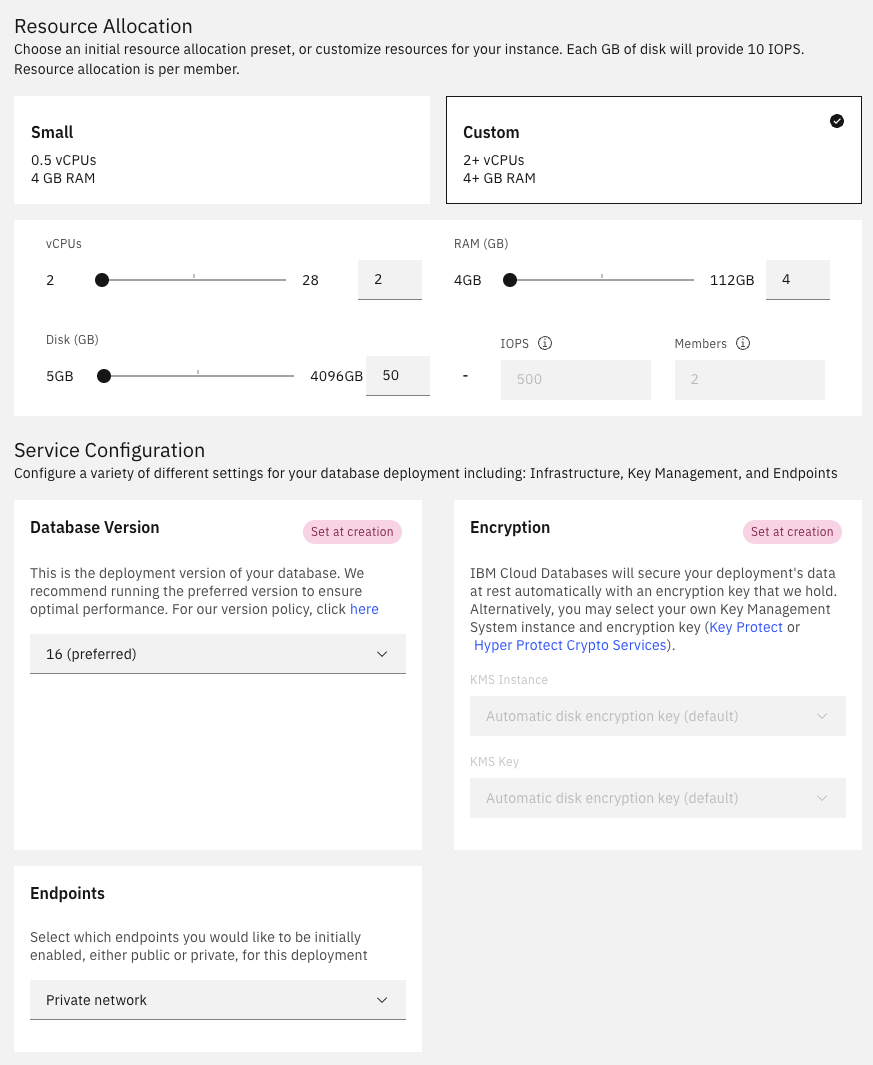
PostgreSQL 생성 UI 스크린샷

프로비저닝이 완료되고 데이터베이스가 준비될 때까지 기다립니다. 몇 분이 걸릴 수 있습니다.

Postgres 리소스 페이지에서:

  • 데이터베이스 TLS 인증서를 다운로드합니다. Teleport가 Postgres에 연결하는 데 사용됩니다.
  • 데이터베이스 호스트 이름과 포트를 복사합니다. Teleport 구성에 필요합니다.
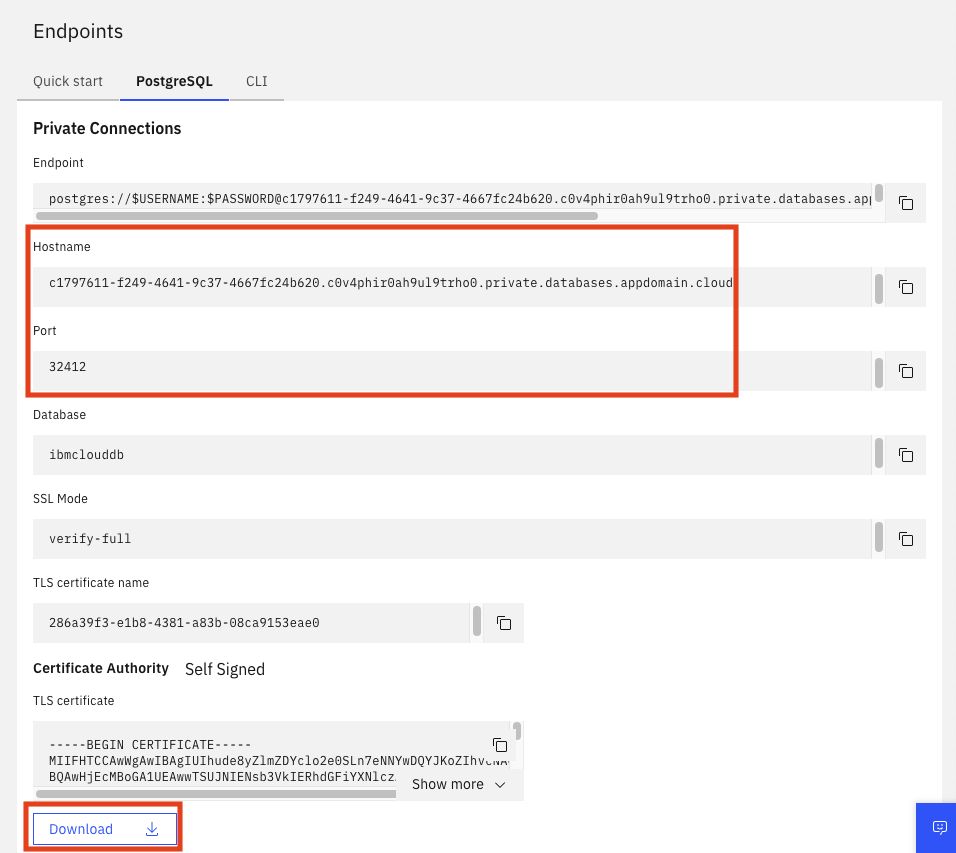
PostgreSQL 엔드포인트 스크린샷

2단계/7. 스토리지 버킷 생성#

이 단계에서는 Teleport가 세션 녹화를 저장하는 데 사용할 오브젝트 스토리지 백엔드를 생성합니다.

Create Resource를 선택하고 object를 검색한 다음 Object Storage를 선택합니다. 다음 설정으로 스토리지 생성 양식을 작성합니다:

  • IBM Cloud 호스팅 스토리지
  • Standard 요금제

그런 다음 Create bucket, Create a Custom Bucket을 선택하고 다음 설정으로 버킷 생성 양식을 작성합니다:

  • Regional Resiliency
  • Smart Tier
  • Object Versioning 비활성화
  • (선택 사항) 보존 정책 구성. 세션 녹화가 보관되는 기간을 구성합니다. 무한 보존을 원하면 비워 두세요.

버킷 Configuration을 열고 직접 엔드포인트를 저장합니다. 이는 버킷을 사용하도록 Teleport를 구성하는 데 사용됩니다.

오브젝트 스토리지 인스턴스를 탐색하고 HMAC가 있는 새 서비스 자격 증명을 생성합니다: Cloud 오브젝트 스토리지 자격 증명 생성 스크린샷
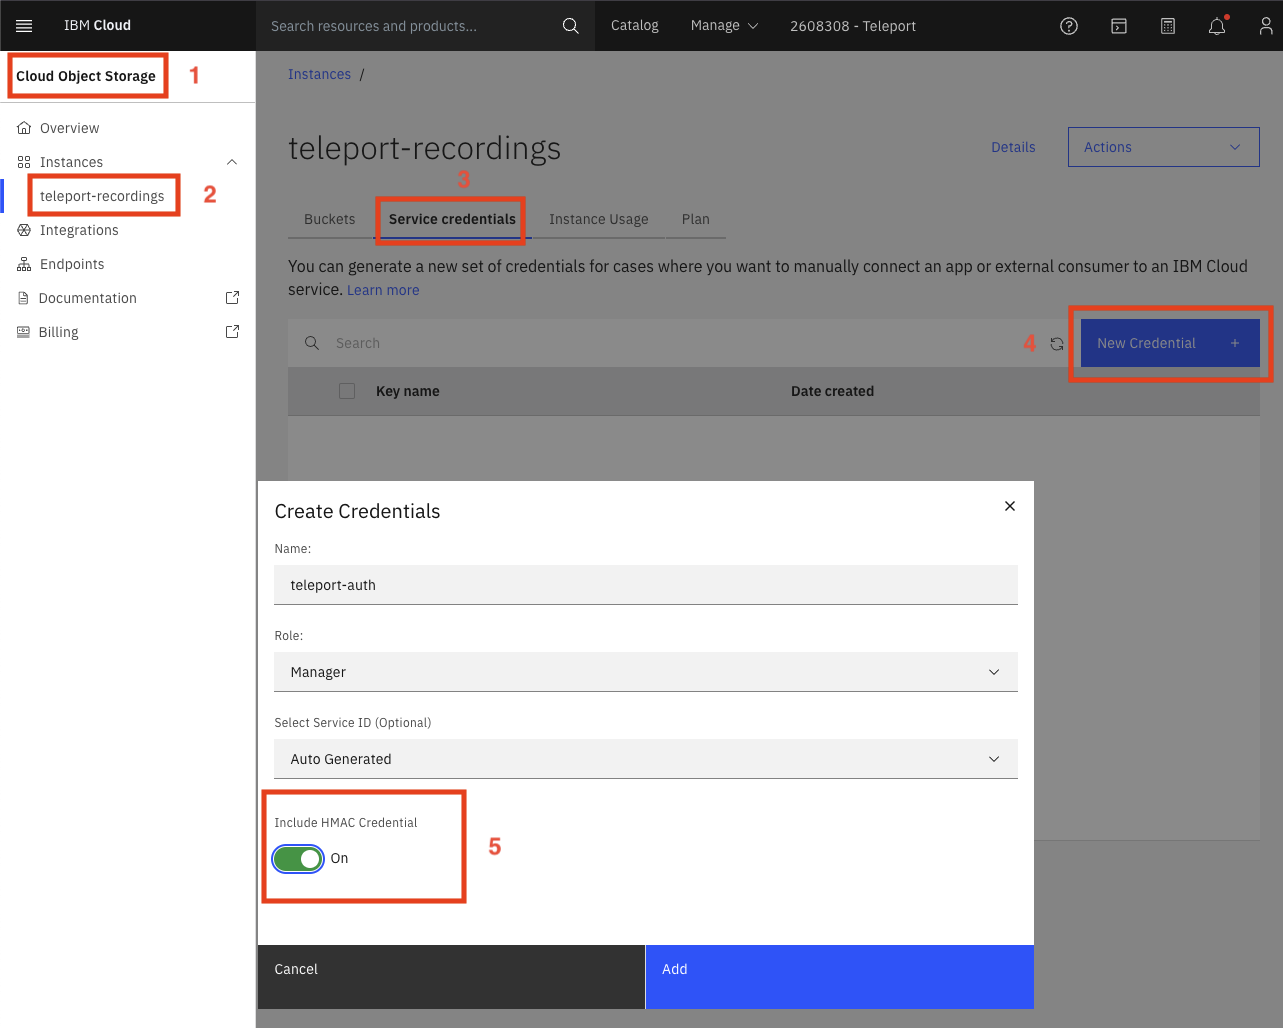
자격 증명을 열고 access_key_idsecret_access_key 필드의 내용을 저장합니다. 이는 나중에 Teleport가 버킷에서 세션 녹화를 읽고 쓸 수 있도록 인증하는 데 필요합니다.

3단계/7. Postgres 데이터베이스 구성#

이 단계에서는 postgres 데이터베이스에 두 명의 사용자를 구성합니다:

  • teleport_backendteleport_audit 데이터베이스를 생성하고 소유하는 teleport 사용자
  • 데이터베이스 변경 스트림을 읽을 수 있는 유일한 사용자인 repl 사용자. Teleport는 이를 사용하여 데이터베이스 변경을 수신하고 여러 Teleport Auth Service 복제본을 동기화합니다.

터미널을 열고:

  • ibmcloud 데이터베이스 플러그인 설치
    $ ibmcloud install plugin cdb
    
  • postgresql 데이터베이스 배포 이름 복구
    $ ibmcloud cdb deployments
    
    Name               Location   State
    teleport-backend   ca-tor     active
    
  • 데이터베이스의 WAL 설정 구성
    $ ibmcloud cdb deployment-configuration teleport-backend '{"wal_level":"logical", "max_replication_slots":30, "max_wal_senders":30}'
    
  • 복제 사용자의 비밀번호 구성
    # generate a random password
    $ export POSTGRES_PASSWORD="$(tr -dc A-Za-z0-9_ < /dev/urandom | head -c 32 )"
    
    # display the password
    echo "$POSTGRES_PASSWORD"
    
    # set the password
    $ ibmcloud cdb deployment-user-password teleport-backend repl "$POSTGRES_PASSWORD"
    
  • teleport 사용자 생성 및 비밀번호 설정
    # set the same password as the replication user
    ibmcloud cdb deployment-user-create teleport-backend teleport "$POSTGRES_PASSWORD"
    

4단계/7. Kubernetes 클러스터 준비#

이 단계에서는 Teleport Helm 차트가 사용할 Kubernetes 리소스를 생성합니다:

  • 네임스페이스 생성
    $ kubectl create ns teleport-cluster
    namespace/teleport-cluster created
    
  • (Enterprise의 경우) Teleport 라이선스 생성
    $ kubectl -n teleport-cluster create secret generic license --from-file=license.pem
    
    secret/license created
    
  • TLS 인증서가 포함된 시크릿 생성
    $ kubectl -n teleport-cluster create secret tls teleport-tls --cert=/path/to/cert/file --key=/path/to/key/file
    
    secret/teleport-tls created
    
  • 버킷 자격 증명이 포함된 시크릿 생성
    $ kubectl -n teleport-cluster create secret generic bucket-creds \
      --from-literal=AWS_ACCESS_KEY_ID=<put the key id> \
      --from-literal=AWS_SECRET_ACCESS_KEY=<put the secret access key here>
    
    secret/bucket-creds created
    
  • PostgreSQL CA 인증서가 포함된 configmap 생성
    $ kubectl -n teleport-cluster create configmap postgres-ca \
      --from-file=cacert.pem=postgres-certs.pem
    
    configmap/postgres-ca created
    
  • PostgreSQL 비밀번호가 포함된 시크릿 생성
    $ kubectl -n teleport-cluster create secret generic postgres-pass \
      --from-literal=password="$POSTGRES_PASSWORD"
    
    secret/postgres-pass created
    

5단계/7. Teleport 구성 및 배포#

이 단계에서는 teleport-cluster Helm 차트로 Teleport 클러스터를 배포합니다.

다음 values.yaml 파일을 생성하고 플레이스홀더를 교체합니다:

chartMode: standalone
clusterName: teleport.example.com # replace this with your cluster domain
persistence:
  enabled: false
proxyListenerMode: multiplex

auth:
  teleportConfig:
    teleport:
      storage:
        type: postgresql
        # replace the database address and port with the values you saved during the PostgreSQL creation
        # the result should look like: "postgres://teleport@60d25e94-edf5-4494-a6cc-5fcae28aa7c2.c0v4ph4r0ah9ul9tr6o0.databases.appdomain.cloud:31766/teleport_backend?sslmode=verify-full&sslrootcert=/var/lib/postgres-ca/cacert.pem"
        conn_string: postgres://teleport@ ADDRESS>: PORT>/teleport_backend?sslmode=verify-full&sslrootcert=/var/lib/postgres-ca/cacert.pem
        # replace the database address and port with the values you saved during the PostgreSQL creation
        change_feed_conn_string: postgresql://repl@ ADDRESS>: PORT>/teleport_backend?sslmode=verify-full&sslrootcert=/var/lib/postgres-ca/cacert.pem
        audit_events_uri:
        # replace the database address and port with the values you saved during the PostgreSQL creation
          - "postgres://teleport@:/teleport_audit?sslmode=verify-full&sslrootcert=/var/lib/postgres-ca/cacert.pem#disable_cleanup=false&retention_period=8766h"
        # replace the bucket name and endpoint with the values you saved during the bucket creation
        audit_sessions_uri: 's3:///readonly/records?endpoint=&region=ibm'

  extraVolumes:
    - name: postgres-ca
      configMap:
        name: postgres-ca
  extraVolumeMounts:
    - name: postgres-ca
      mountPath: /var/lib/postgres-ca
      readOnly: true

  extraEnv:
    - name: AWS_ACCESS_KEY_ID
      valueFrom:
        secretKeyRef:
          name: bucket-creds
          key: AWS_ACCESS_KEY_ID
          optional: false
    - name: AWS_SECRET_ACCESS_KEY
      valueFrom:
        secretKeyRef:
          name: bucket-creds
          key: AWS_SECRET_ACCESS_KEY
          optional: false
    - name: PGPASSWORD
      valueFrom:
        secretKeyRef:
          name: postgres-pass
          key: password
          optional: false

tls:
  existingSecretName: teleport-tls

highAvailability:
  replicaCount: 2

Teleport Helm 리포지토리에서 호스팅되는 차트를 설치할 수 있도록 Helm을 허용합니다:

$ helm repo add teleport https://charts.releases.teleport.dev

"teleport" has been added to your repositories

사용 가능한 모든 릴리즈로 업그레이드할 수 있도록 로컬 차트 캐시를 업데이트합니다:

$ helm repo update

...Successfully got an update from the "teleport" chart repository

차트에서 릴리즈를 생성합니다:

$ helm upgrade --install -n teleport-cluster teleport teleport/teleport-cluster --version "TODO REPLACE ME" -f values.yaml

Release "teleport" does not exist. Installing it now.
NAME: teleport
LAST DEPLOYED: Mon Nov 11 16:09:15 2024
NAMESPACE: teleport-cluster
STATUS: deployed
REVISION: 1
TEST SUITE: None

마지막으로 파드가 실행 중인지 확인합니다:

$ kubectl -n teleport-cluster get pods

6단계/7. DNS 항목 생성#

Teleport 클러스터 IP 주소를 복구합니다:

$ kubectl get -n teleport-cluster services

NAME                TYPE           CLUSTER-IP      EXTERNAL-IP                          PORT(S)             AGE
teleport            LoadBalancer   172.21.130.11   45a6ca70-ca-tor.lb.appdomain.cloud   443:31421/TCP       4d2h
teleport-auth       ClusterIP      172.21.109.96   <none>                               3025/TCP,3026/TCP   4d2h
teleport-auth-v16   ClusterIP      None            <none>                               <none>              4d2h
teleport-auth-v17   ClusterIP      None            <none>                               <none>              4d2h

서비스 로드 밸런서를 가리키는 CNAME DNS 항목을 생성합니다. 이 예시에서 DNS 항목은 다음과 같아야 합니다:

teleport.example.com. 300 IN	CNAME	45a6ca70-ca-tor.lb.appdomain.cloud.

도메인 이름 변경이 전파될 때까지 기다립니다. 몇 분이 걸릴 수 있습니다. 전파 후 도메인을 확인할 수 있어야 합니다:

$ dig teleport.example.com

;; ANSWER SECTION:
teleport.example.com. 300 IN	CNAME	45a6ca70-ca-tor.lb.appdomain.cloud.
45a6ca70-ca-tor.lb.appdomain.cloud. 120	IN A	163.66.86.161
45a6ca70-ca-tor.lb.appdomain.cloud. 120	IN A	163.74.84.35

7단계/7. 모든 것이 작동하는지 확인#

이 단계에서는 새 사용자를 생성하고 웹 UI에 접근합니다:

  • 새 Teleport 사용자 생성:
    $ kubectl exec -it -n teleport-cluster deployment/teleport-auth -- tctl users add myuser --roles=editor,auditor,access
    
    User "myuser" has been created but requires a password. Share this URL with the user to complete user setup, link is valid for 1h:
    https://teleport.example.com:443/web/invite/...
    
  • 등록 링크를 열고 등록 마법사를 따릅니다.
  • Teleport 클러스터가 준비되었습니다.

다음 단계#

다음 단계로:

IBM Cloud에서 Teleport 실행

원문 보기
요약

이 가이드는 IBM Cloud에서 Teleport를 설정하는 방법을 설명합니다. IBM Cloud에서 Teleport를 배포하기 위해 다음 서비스를 사용합니다: 이 가이드를 따르려면 다음이 필요합니다: 이 단계에서는 Teleport가 백엔드로 사용할 PostgreSQL 데이터베이스를 생성합니다.

이 가이드는 IBM Cloud에서 Teleport를 설정하는 방법을 설명합니다.

작동 방식#

IBM Cloud에서 Teleport를 배포하기 위해 다음 서비스를 사용합니다:

사전 요구사항#

이 가이드를 따르려면 다음이 필요합니다:

  • IBM Cloud 계정
  • 기능적인 네트워킹이 있는 IBM Kubernetes 클러스터 (노드가 인터넷에 접근하고 공개 이미지를 가져올 수 있어야 합니다)
  • IBM Kubernetes 클러스터에 연결된 kubectlhelm 설치
  • IBM Cloud 사용자로 로그인된 ibmcloud CLI 도구 설치
  • Teleport 클러스터에 사용할 도메인 (이 가이드에서는 teleport.example.com을 사용합니다)
  • 도메인 teleport.example.com에 대한 TLS 인증서 (앱 접근을 사용하려면 *.teleport.example.com도 포함)

1단계/7. Postgres 데이터베이스 생성#

이 단계에서는 Teleport가 백엔드로 사용할 PostgreSQL 데이터베이스를 생성합니다.

Create Resource를 선택하고 PostgreSQL을 검색한 다음 Databases for PostgreSQL을 선택합니다. 다음 설정으로 PostgreSQL 생성 양식을 작성합니다:

  • IBM Cloud 호스팅 PostgreSQL
  • 최소 2 vCPU
  • 최소 4 GiB 메모리
  • 최소 50 GiB 스토리지
  • Postgres 버전 16
  • 엔드포인트: Private
  • 이름: 이 예시에서 데이터베이스 배포 이름은 teleport-backend

PostgreSQL 생성 UI 스크린샷

프로비저닝이 완료되고 데이터베이스가 준비될 때까지 기다립니다. 몇 분이 걸릴 수 있습니다.

Postgres 리소스 페이지에서:

  • 데이터베이스 TLS 인증서를 다운로드합니다. Teleport가 Postgres에 연결하는 데 사용됩니다.
  • 데이터베이스 호스트 이름과 포트를 복사합니다. Teleport 구성에 필요합니다.

PostgreSQL 엔드포인트 스크린샷

2단계/7. 스토리지 버킷 생성#

이 단계에서는 Teleport가 세션 녹화를 저장하는 데 사용할 오브젝트 스토리지 백엔드를 생성합니다.

Create Resource를 선택하고 object를 검색한 다음 Object Storage를 선택합니다. 다음 설정으로 스토리지 생성 양식을 작성합니다:

  • IBM Cloud 호스팅 스토리지
  • Standard 요금제

그런 다음 Create bucket, Create a Custom Bucket을 선택하고 다음 설정으로 버킷 생성 양식을 작성합니다:

  • Regional Resiliency
  • Smart Tier
  • Object Versioning 비활성화
  • (선택 사항) 보존 정책 구성. 세션 녹화가 보관되는 기간을 구성합니다. 무한 보존을 원하면 비워 두세요.

버킷 Configuration을 열고 직접 엔드포인트를 저장합니다. 이는 버킷을 사용하도록 Teleport를 구성하는 데 사용됩니다.

오브젝트 스토리지 인스턴스를 탐색하고 HMAC가 있는 새 서비스 자격 증명을 생성합니다: Cloud 오브젝트 스토리지 자격 증명 생성 스크린샷

자격 증명을 열고 access_key_idsecret_access_key 필드의 내용을 저장합니다. 이는 나중에 Teleport가 버킷에서 세션 녹화를 읽고 쓸 수 있도록 인증하는 데 필요합니다.

3단계/7. Postgres 데이터베이스 구성#

이 단계에서는 postgres 데이터베이스에 두 명의 사용자를 구성합니다:

  • teleport_backendteleport_audit 데이터베이스를 생성하고 소유하는 teleport 사용자
  • 데이터베이스 변경 스트림을 읽을 수 있는 유일한 사용자인 repl 사용자. Teleport는 이를 사용하여 데이터베이스 변경을 수신하고 여러 Teleport Auth Service 복제본을 동기화합니다.

터미널을 열고:

  • ibmcloud 데이터베이스 플러그인 설치
    $ ibmcloud install plugin cdb
    
  • postgresql 데이터베이스 배포 이름 복구
    $ ibmcloud cdb deployments
    
    Name               Location   State
    teleport-backend   ca-tor     active
    
  • 데이터베이스의 WAL 설정 구성
    $ ibmcloud cdb deployment-configuration teleport-backend '{"wal_level":"logical", "max_replication_slots":30, "max_wal_senders":30}'
    
  • 복제 사용자의 비밀번호 구성
    # generate a random password
    $ export POSTGRES_PASSWORD="$(tr -dc A-Za-z0-9_ < /dev/urandom | head -c 32 )"
    
    # display the password
    echo "$POSTGRES_PASSWORD"
    
    # set the password
    $ ibmcloud cdb deployment-user-password teleport-backend repl "$POSTGRES_PASSWORD"
    
  • teleport 사용자 생성 및 비밀번호 설정
    # set the same password as the replication user
    ibmcloud cdb deployment-user-create teleport-backend teleport "$POSTGRES_PASSWORD"
    

4단계/7. Kubernetes 클러스터 준비#

이 단계에서는 Teleport Helm 차트가 사용할 Kubernetes 리소스를 생성합니다:

  • 네임스페이스 생성
    $ kubectl create ns teleport-cluster
    namespace/teleport-cluster created
    
  • (Enterprise의 경우) Teleport 라이선스 생성
    $ kubectl -n teleport-cluster create secret generic license --from-file=license.pem
    
    secret/license created
    
  • TLS 인증서가 포함된 시크릿 생성
    $ kubectl -n teleport-cluster create secret tls teleport-tls --cert=/path/to/cert/file --key=/path/to/key/file
    
    secret/teleport-tls created
    
  • 버킷 자격 증명이 포함된 시크릿 생성
    $ kubectl -n teleport-cluster create secret generic bucket-creds \
      --from-literal=AWS_ACCESS_KEY_ID=<put the key id> \
      --from-literal=AWS_SECRET_ACCESS_KEY=<put the secret access key here>
    
    secret/bucket-creds created
    
  • PostgreSQL CA 인증서가 포함된 configmap 생성
    $ kubectl -n teleport-cluster create configmap postgres-ca \
      --from-file=cacert.pem=postgres-certs.pem
    
    configmap/postgres-ca created
    
  • PostgreSQL 비밀번호가 포함된 시크릿 생성
    $ kubectl -n teleport-cluster create secret generic postgres-pass \
      --from-literal=password="$POSTGRES_PASSWORD"
    
    secret/postgres-pass created
    

5단계/7. Teleport 구성 및 배포#

이 단계에서는 teleport-cluster Helm 차트로 Teleport 클러스터를 배포합니다.

다음 values.yaml 파일을 생성하고 플레이스홀더를 교체합니다:

chartMode: standalone
clusterName: teleport.example.com # replace this with your cluster domain
persistence:
  enabled: false
proxyListenerMode: multiplex

auth:
  teleportConfig:
    teleport:
      storage:
        type: postgresql
        # replace the database address and port with the values you saved during the PostgreSQL creation
        # the result should look like: "postgres://teleport@60d25e94-edf5-4494-a6cc-5fcae28aa7c2.c0v4ph4r0ah9ul9tr6o0.databases.appdomain.cloud:31766/teleport_backend?sslmode=verify-full&sslrootcert=/var/lib/postgres-ca/cacert.pem"
        conn_string: postgres://teleport@ ADDRESS>: PORT>/teleport_backend?sslmode=verify-full&sslrootcert=/var/lib/postgres-ca/cacert.pem
        # replace the database address and port with the values you saved during the PostgreSQL creation
        change_feed_conn_string: postgresql://repl@ ADDRESS>: PORT>/teleport_backend?sslmode=verify-full&sslrootcert=/var/lib/postgres-ca/cacert.pem
        audit_events_uri:
        # replace the database address and port with the values you saved during the PostgreSQL creation
          - "postgres://teleport@:/teleport_audit?sslmode=verify-full&sslrootcert=/var/lib/postgres-ca/cacert.pem#disable_cleanup=false&retention_period=8766h"
        # replace the bucket name and endpoint with the values you saved during the bucket creation
        audit_sessions_uri: 's3:///readonly/records?endpoint=&region=ibm'

  extraVolumes:
    - name: postgres-ca
      configMap:
        name: postgres-ca
  extraVolumeMounts:
    - name: postgres-ca
      mountPath: /var/lib/postgres-ca
      readOnly: true

  extraEnv:
    - name: AWS_ACCESS_KEY_ID
      valueFrom:
        secretKeyRef:
          name: bucket-creds
          key: AWS_ACCESS_KEY_ID
          optional: false
    - name: AWS_SECRET_ACCESS_KEY
      valueFrom:
        secretKeyRef:
          name: bucket-creds
          key: AWS_SECRET_ACCESS_KEY
          optional: false
    - name: PGPASSWORD
      valueFrom:
        secretKeyRef:
          name: postgres-pass
          key: password
          optional: false

tls:
  existingSecretName: teleport-tls

highAvailability:
  replicaCount: 2

Teleport Helm 리포지토리에서 호스팅되는 차트를 설치할 수 있도록 Helm을 허용합니다:

$ helm repo add teleport https://charts.releases.teleport.dev

"teleport" has been added to your repositories

사용 가능한 모든 릴리즈로 업그레이드할 수 있도록 로컬 차트 캐시를 업데이트합니다:

$ helm repo update

...Successfully got an update from the "teleport" chart repository

차트에서 릴리즈를 생성합니다:

$ helm upgrade --install -n teleport-cluster teleport teleport/teleport-cluster --version "TODO REPLACE ME" -f values.yaml

Release "teleport" does not exist. Installing it now.
NAME: teleport
LAST DEPLOYED: Mon Nov 11 16:09:15 2024
NAMESPACE: teleport-cluster
STATUS: deployed
REVISION: 1
TEST SUITE: None

마지막으로 파드가 실행 중인지 확인합니다:

$ kubectl -n teleport-cluster get pods

6단계/7. DNS 항목 생성#

Teleport 클러스터 IP 주소를 복구합니다:

$ kubectl get -n teleport-cluster services

NAME                TYPE           CLUSTER-IP      EXTERNAL-IP                          PORT(S)             AGE
teleport            LoadBalancer   172.21.130.11   45a6ca70-ca-tor.lb.appdomain.cloud   443:31421/TCP       4d2h
teleport-auth       ClusterIP      172.21.109.96   <none>                               3025/TCP,3026/TCP   4d2h
teleport-auth-v16   ClusterIP      None            <none>                               <none>              4d2h
teleport-auth-v17   ClusterIP      None            <none>                               <none>              4d2h

서비스 로드 밸런서를 가리키는 CNAME DNS 항목을 생성합니다. 이 예시에서 DNS 항목은 다음과 같아야 합니다:

teleport.example.com. 300 IN	CNAME	45a6ca70-ca-tor.lb.appdomain.cloud.

도메인 이름 변경이 전파될 때까지 기다립니다. 몇 분이 걸릴 수 있습니다. 전파 후 도메인을 확인할 수 있어야 합니다:

$ dig teleport.example.com

;; ANSWER SECTION:
teleport.example.com. 300 IN	CNAME	45a6ca70-ca-tor.lb.appdomain.cloud.
45a6ca70-ca-tor.lb.appdomain.cloud. 120	IN A	163.66.86.161
45a6ca70-ca-tor.lb.appdomain.cloud. 120	IN A	163.74.84.35

7단계/7. 모든 것이 작동하는지 확인#

이 단계에서는 새 사용자를 생성하고 웹 UI에 접근합니다:

  • 새 Teleport 사용자 생성:
    $ kubectl exec -it -n teleport-cluster deployment/teleport-auth -- tctl users add myuser --roles=editor,auditor,access
    
    User "myuser" has been created but requires a password. Share this URL with the user to complete user setup, link is valid for 1h:
    https://teleport.example.com:443/web/invite/...
    
  • 등록 링크를 열고 등록 마법사를 따릅니다.
  • Teleport 클러스터가 준비되었습니다.

다음 단계#

다음 단계로: