InfoGrab Docs

Okta를 SSO 프로바이더로 사용한 인증

요약

이 가이드는 Teleport Enterprise 및 Teleport Enterprise Cloud에 싱글 사인온(SSO) 아이덴티티를 제공하도록 Okta를 구성하는 방법을 다룹니다. Teleport Enterprise Cloud 및 셀프 호스팅 Teleport Enterprise에서 Teleport는 Okta 통합 등록의 일부로 SSO 커넥터를 자동으로 구성할 수 있습니다.

이 가이드는 Teleport Enterprise 및 Teleport Enterprise Cloud에 싱글 사인온(SSO) 아이덴티티를 제공하도록 Okta를 구성하는 방법을 다룹니다. 역할 기반 접근 제어(RBAC)와 함께 사용하면 Teleport 관리자가 다음과 같은 정책을 정의할 수 있습니다:

  • "DBA" 그룹의 구성원만 PostgreSQL 데이터베이스에 접근할 수 있습니다.
  • 개발자는 프로덕션 서버에 절대 SSH 접근을 하면 안 됩니다.
  • HR 그룹의 구성원은 감사 로그를 볼 수 있지만 프로덕션 환경은 접근할 수 없습니다.
Okta 통합으로 자동 SSO 연결

Teleport Enterprise Cloud 및 셀프 호스팅 Teleport Enterprise에서 Teleport는 Okta 통합 등록의 일부로 SSO 커넥터를 자동으로 구성할 수 있습니다.

Okta 통합 등록을 시작하려면 Teleport 웹 UI를 방문하고 왼쪽 사이드바에서 Add New를 클릭한 다음 Integration을 클릭합니다:
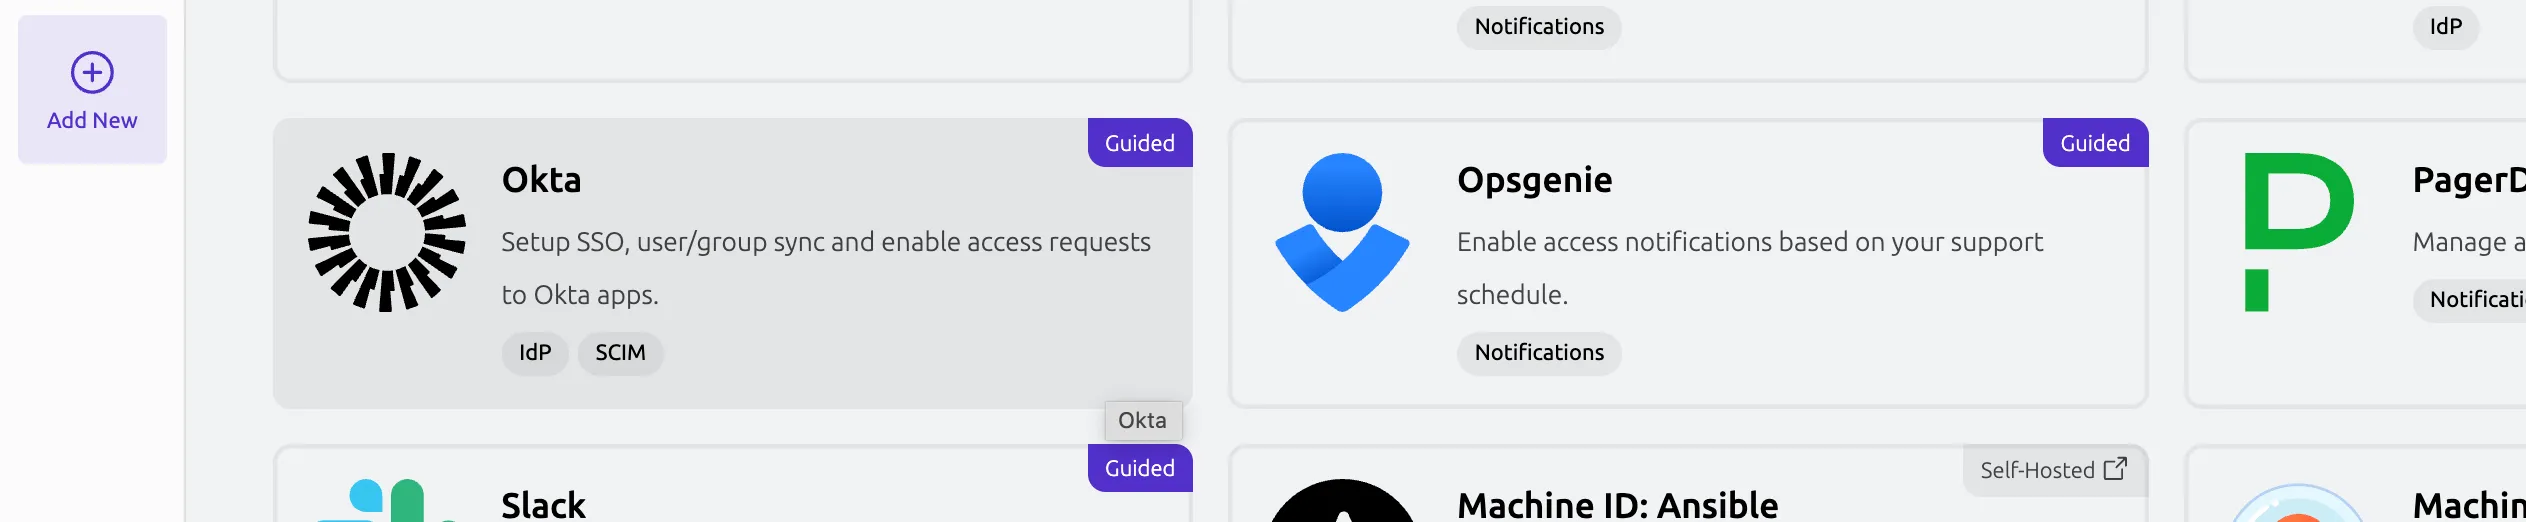
접근 요청 플러그인 등록

그런 다음 안내된 Okta 싱글 사인온 통합 지침을 따릅니다.

작동 방식#

You can register your Teleport cluster as an application with Okta, then create an authentication connector resource that provides Teleport with information about your application. When a user signs in to Teleport, Okta executes its own authentication flow, then sends an HTTP request to your Teleport cluster to indicate that authentication has completed.

Teleport authenticates users to your infrastructure by issuing short-lived certificates. After a user completes an SSO authentication flow, Teleport issues short-lived TLS and SSH certificates to the user. Teleport also creates a temporary user on the Auth Service backend.

Teleport roles are encoded in the user's certificates. To assign Teleport roles to the user, the Auth Service inspects the role mapping within the authentication connector, which associates user data on Okta with the names of one or more Teleport roles.

사전 요구 사항#

  • 관리자 접근 권한이 있는 Okta 계정. 계정에는 사용자와 최소 두 그룹이 포함되어야 합니다. 아직 Teleport 역할에 할당할 Okta 그룹이 없어도 걱정하지 마세요. 아래에서 예시 그룹을 만들겠습니다.
  • A running Teleport Enterprise cluster. If you want to get started with Teleport, sign up for a free trial or set up a demo environment.

  • The tctl and tsh clients.

    Installing `tctl` and `tsh` clients
    1. Determine the version of your Teleport cluster. The tctl and tsh clients must be at most one major version behind your Teleport cluster version. Send a GET request to the Proxy Service at /v1/webapi/find and use a JSON query tool to obtain your cluster version. Replace with the web address of your Teleport Proxy Service:

      $ TELEPORT_DOMAIN=
      $ TELEPORT_VERSION="$(curl -s https://$TELEPORT_DOMAIN/v1/webapi/find | jq -r '.server_version')"
      
    2. Follow the instructions for your platform to install tctl and tsh clients:

  • saml 리소스를 편집하고 유지 관리할 수 있는 접근 권한이 있는 Teleport 역할. 기본 auditoreditor 역할에서 사용 가능합니다.

1/3단계. Okta 구성#

Okta는 SAML 어설션에서 사용자의 그룹 멤버십을 Teleport에 제공하는 데이터로 표시합니다. devs Okta 그룹의 구성원에게 "access" 역할을 할당하고 admins 그룹의 구성원에게 사전 설정된 "auditor" 및 "editor" 역할을 할당하도록 Teleport를 구성합니다.

"access", "auditor", "editor" 역할에 할당하려는 Okta 그룹이 이미 있는 경우 다음 단계로 건너뛸 수 있습니다.

그룹 만들기#

두 그룹을 만듭니다: "devs"와 "admins".

  1. Okta Console에서 Directory -> Groups로 이동한 다음 Add group을 클릭합니다.
  2. 선택적 설명과 함께 그룹 "devs"와 "admins"를 추가합니다.

Okta 앱 만들기 및 구성#

Okta Integration Network 지원은 아직 베타 상태입니다. 확실하지 않은 경우 Custom SAML 2.0 앱으로 진행하세요.

  1. Okta Console에서 Applications로 이동합니다.

  2. Create App Integration을 클릭합니다.

  3. "SAML 2.0"을 선택하고 Next를 클릭합니다.

  4. 앱 이름(예: "Teleport")을 입력하고 선택적으로 로고를 업로드한 다음 Next를 클릭합니다.

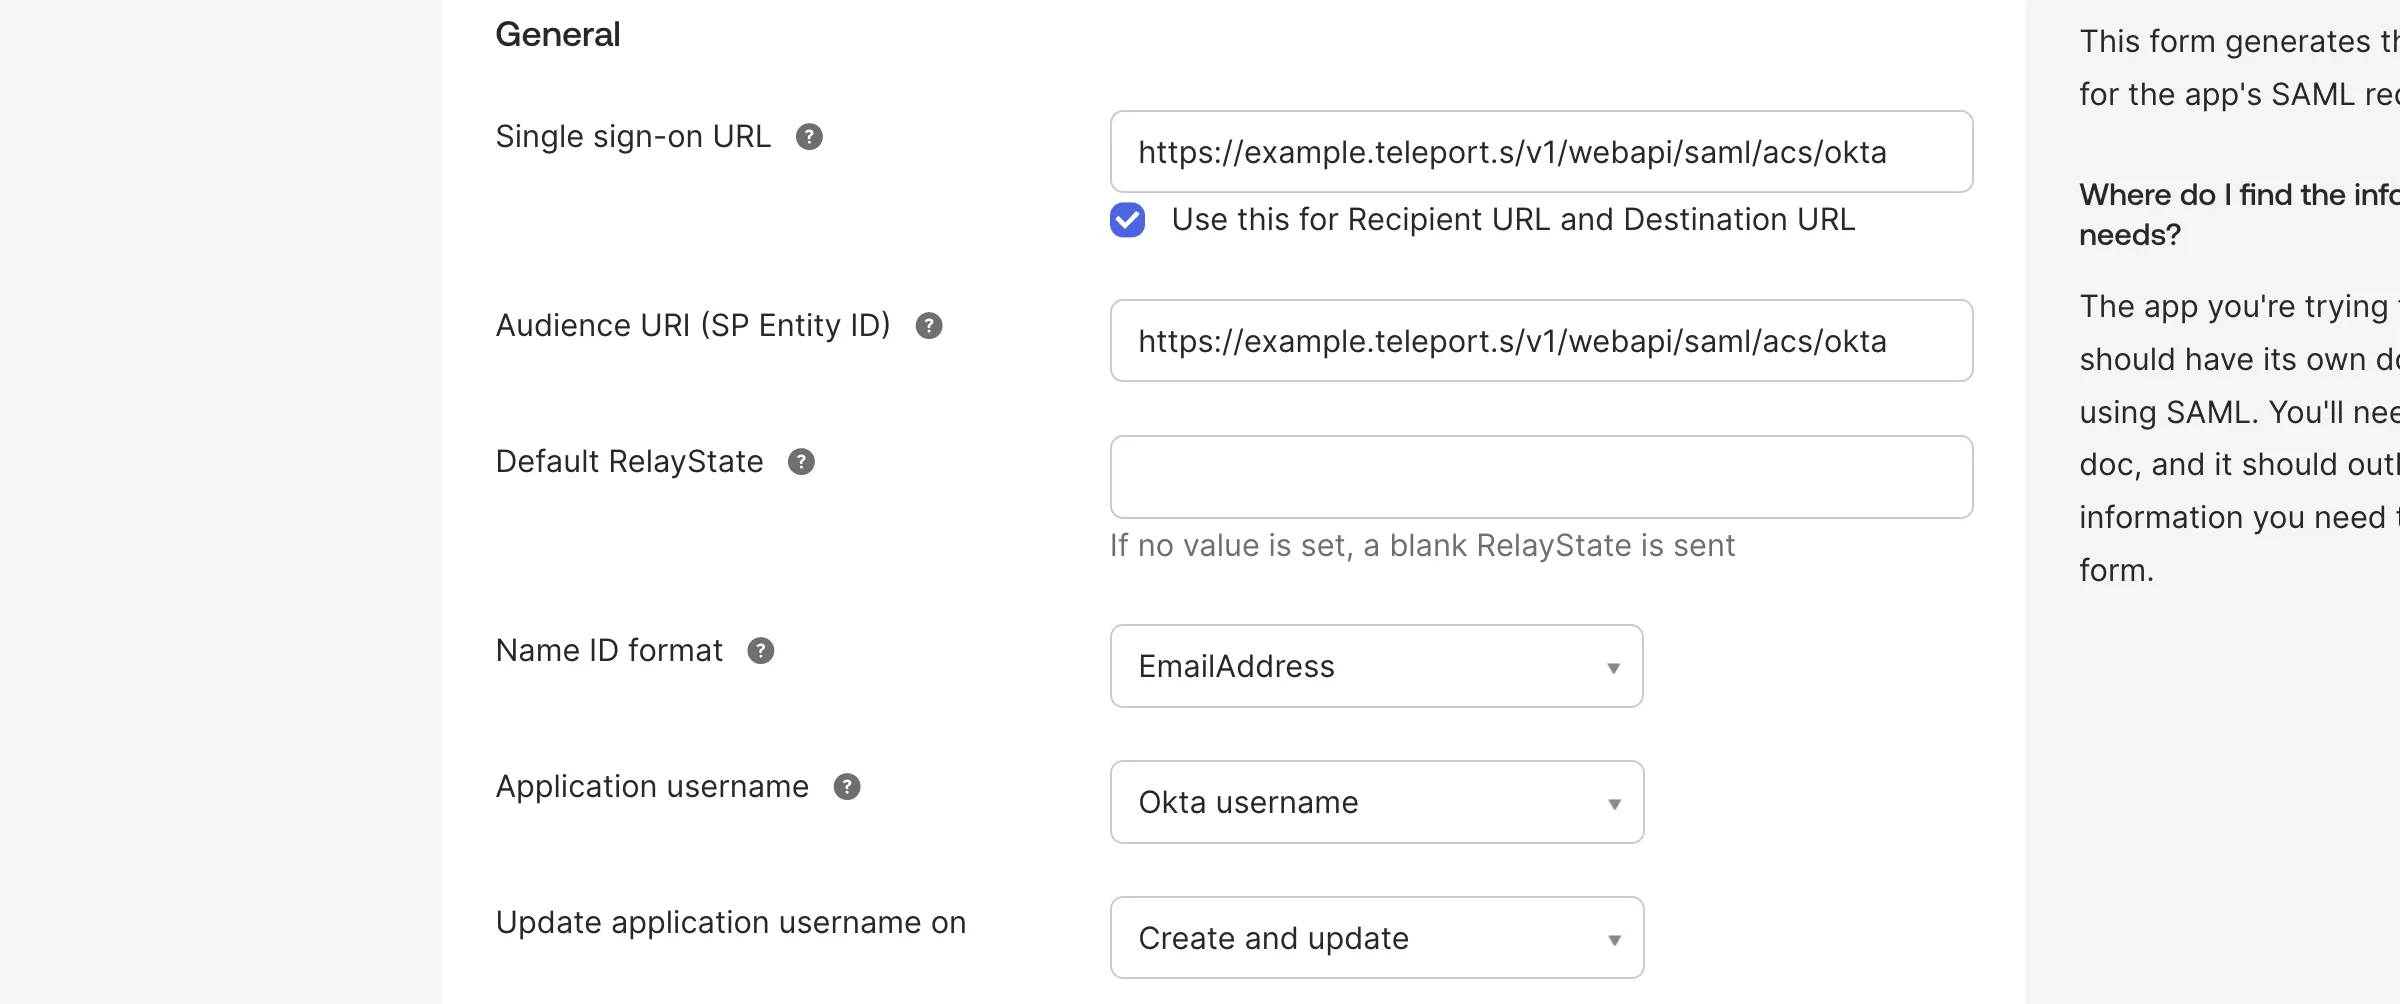
  5. "Configure SAML" 단계로 이동하면 여러 값을 입력해야 합니다:

    • 싱글 사인온 URL:

      https:///v1/webapi/saml/acs/okta
      
    • 대상 URI (SP Entity ID):

      https:///v1/webapi/saml/acs/okta
      
    • Name ID 형식 EmailAddress

    • 애플리케이션 사용자 이름 Okta username

    SAML 일반 설정

  6. Next를 클릭합니다. "Feedback" 단계로 이동하면 Finish를 클릭하면 됩니다.

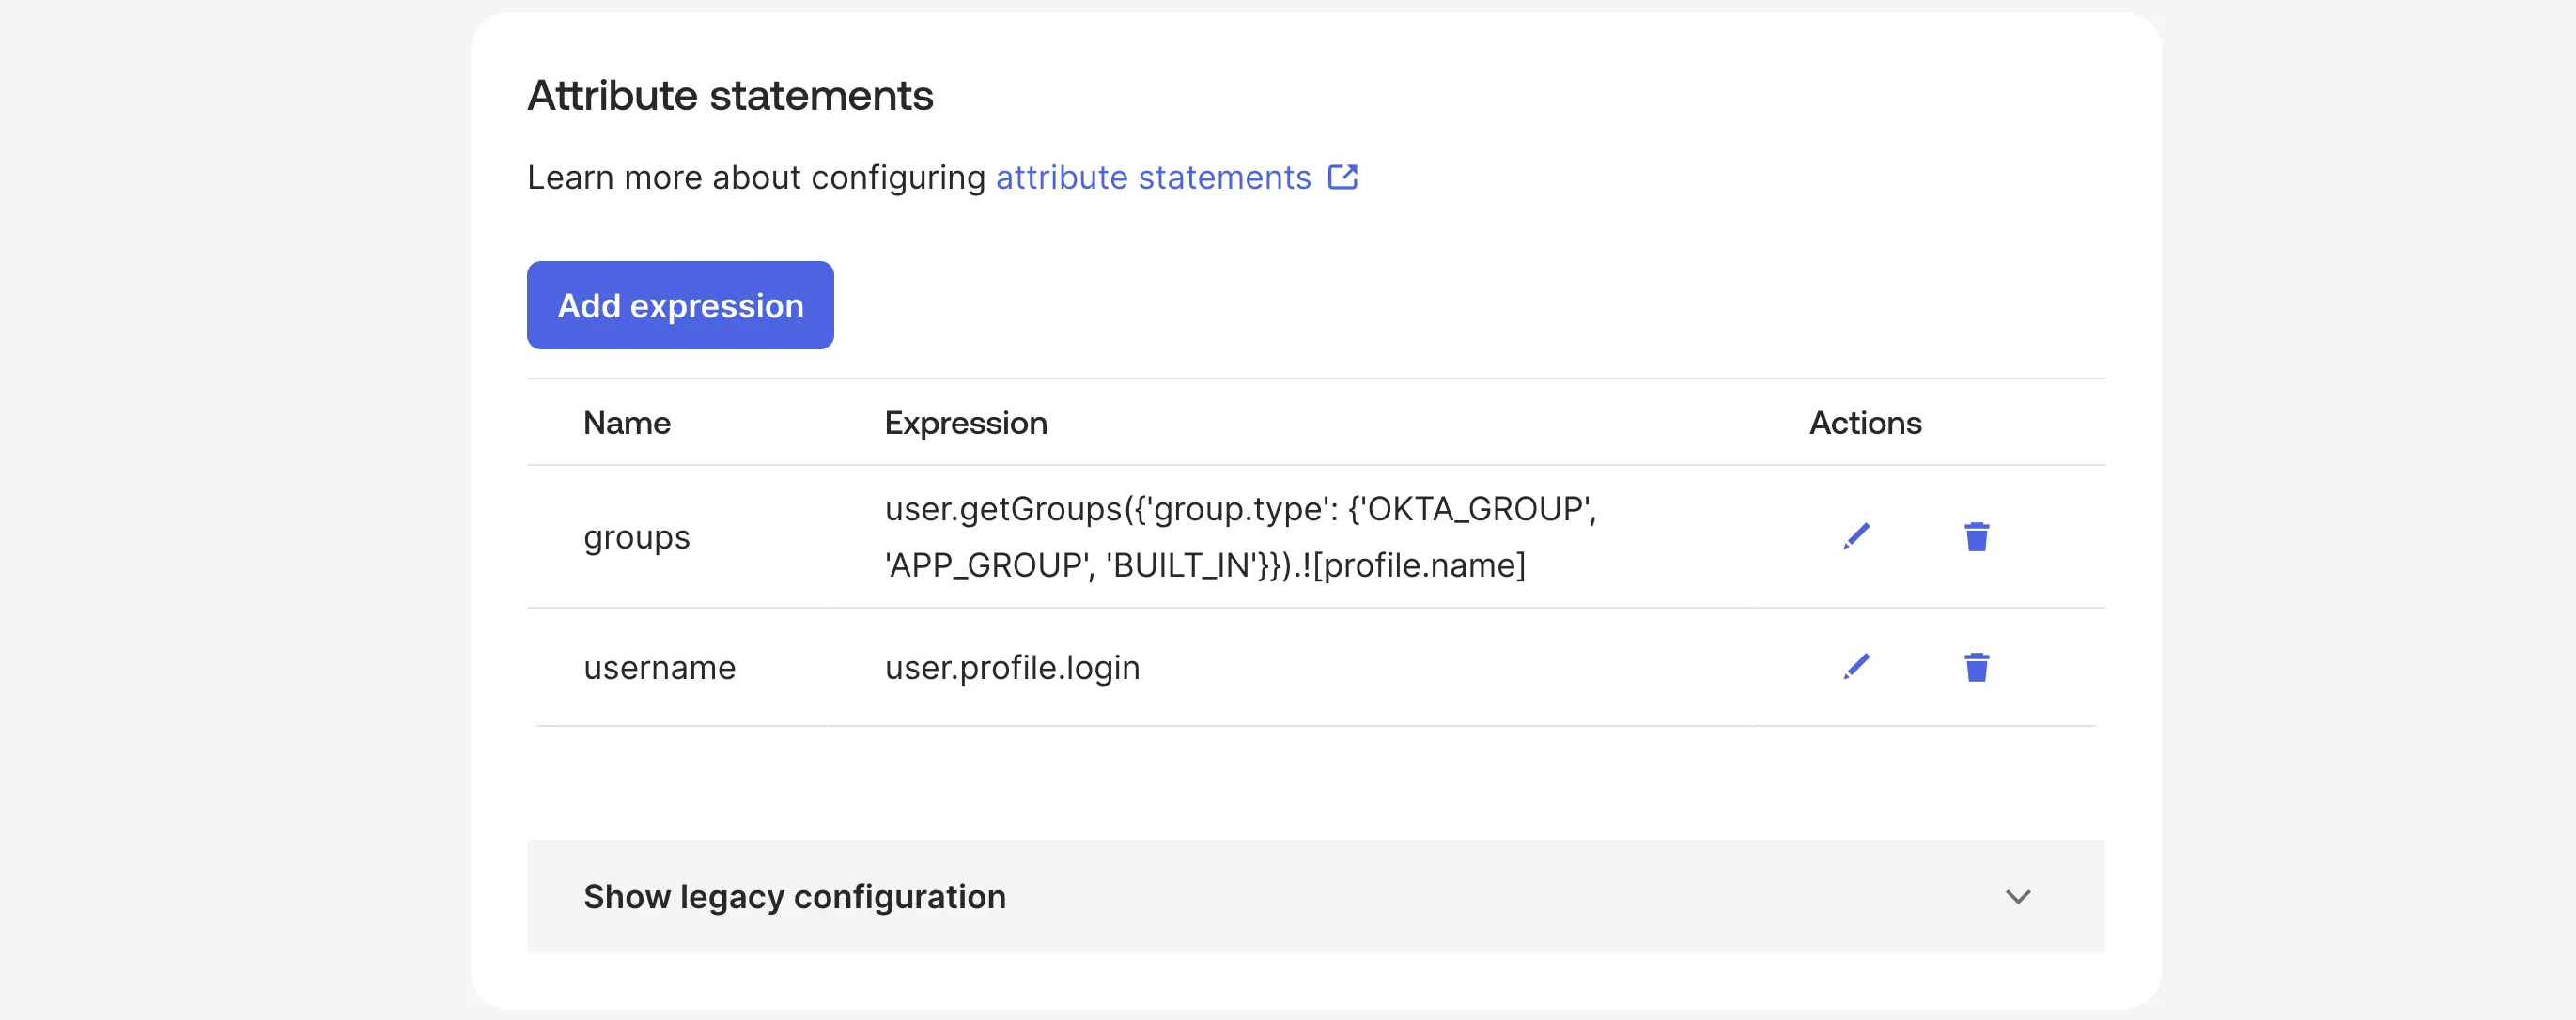
  7. 이제 새로 만든 SAML 앱 구성 화면의 Sign On 탭에 있어야 합니다. Attribute statements로 스크롤하고 Add expression을 클릭합니다. 아래와 같이 값을 입력하고 Save를 클릭합니다.

    • Name: groups
    • Expression: user.getGroups({'group.type': {'OKTA_GROUP', 'APP_GROUP', 'BUILT_IN'}}).![profile.name]
    • Name: username
    • Expression: user.profile.login

    그룹 속성 설정

이메일 형식으로 "NameID"를 설정하고 모든 그룹을 반환하는 표현식으로 그룹을 매핑했습니다. "Audience"와 SSO URL을 동일한 값으로 설정했습니다. 이는 Teleport가 추가 이름 필드에 의존하는 대신 사용자 이름을 Teleport에서 만들기 위해 Okta 사용자의 이메일 주소를 읽고 사용할 수 있도록 하기 위함입니다.

사용자 그룹 할당#

  1. 동일한 Okta Teleport 앱에서 Assignments 탭으로 이동하고 Assign 드롭다운을 클릭합니다.

  2. "Assign to Groups"를 선택하고 이전 단계에서 만든 "devs" 및 "admins" Okta 그룹을 검색합니다.

  3. 선택한 각 그룹 옆의 Assign을 클릭하고 Done을 클릭합니다.

    사용자 그룹 할당

IdP 메타데이터 경로 저장#

  1. Sign On 탭으로 이동하여 "Metadata URL"로 스크롤합니다.

  2. 아래의 Copy 버튼을 사용하여 메타데이터 URL을 복사합니다.

    메타데이터 URL 복사

  3. 나중에 사용하기 위해 메타데이터 파일의 URL을 저장합니다.

2/3단계. Okta를 Teleport에 연결#

이 섹션에서는 Teleport가 Okta와 SAML 메시지를 교환하고 사용자에게 인증서를 발급하는 데 필요한 정보를 제공하는 인증 커넥터를 만듭니다.

역할 매핑 할당#

When a user authenticates to Teleport, the Teleport Auth Service issues SSH and TLS certificates to the user that contain the user's Teleport roles.

For SSO authentication connectors, the Auth Service determines which roles to encode in the certificate by reading the authentication connector's role mapping. The role mapping indicates which Teleport roles to assign based on data that your identity provider stores about the user.

When you configure an authentication connector using the tctl CLI, a role mapping takes the following format:

<attribute_name>,<attribute_value>,<teleport_role_1>,<teleport_role_2>,...,<teleport_role_n>

For example, the following role mapping means that any user with the attribute groups with the value admins receives the Teleport roles auditor and editor:

groups,admins,auditor,editor

For the purpose of this guide, assign two separate role mappings:

  • A more permissive role mapping:
  • A more restrictive role mapping:

SAML 커넥터 구성#

tctl을 사용하여 Okta SAML 커넥터를 정의합니다. 이 예제 명령을 메타데이터 파일의 경로로 업데이트하고 사용자 정의 그룹 할당을 위해 --attributes-to-roles 값을 편집합니다. 이 명령의 전체 플래그 참조는 tctl sso configure saml를 확인하세요:

$ tctl sso configure saml --preset=okta \
--entity-descriptor "https://example.okta.com/app/000000/sso/saml/metadata" \
--attributes-to-roles= \
--attributes-to-roles= > okta-connector.yaml

okta-connector.yaml의 내용은 다음과 유사해야 합니다:

kind: saml
metadata:
  name: okta
spec:
  acs: https://teleport.example.com:443/v1/webapi/saml/acs/okta
  attributes_to_roles:
  - name: groups
    roles:
    - auditor
    - editor
    value: admins
  - name: groups
    roles:
    - access
    value: devs
  audience: https://teleport.example.com:443/v1/webapi/saml/acs/okta
  cert: ""
  display: "Okta"
  entity_descriptor: ""
  entity_descriptor_url: https://example.okta.com/app/000000/sso/saml/metadata
  issuer: ""
  service_provider_issuer: https://teleport.example.com:443/v1/webapi/saml/acs/okta
  sso: ""
version: v2
IdP-initiated SSO Enabling the `spec.allow_idp_initiated` flag in SAML connectors allows users to log in to Teleport with one click from the dashboard provided by the IdP.
This feature is potentially unsafe and should be used with caution.

Enabling IdP-initiated login comes with notable security risks such as:
- Possibility of replay attacks on the SAML payload giving an attacker a secret web session
  • Increased risk of session hijacking and impersonation attacks based on intercepting SAML communications

커넥터 테스트#

클러스터에 적용하기 전에 커넥터를 테스트할 수 있습니다. 활성 클러스터의 중단을 방지하기 위해 강력히 권장됩니다:

$ cat okta-connector.yaml | tctl sso test
If browser window does not open automatically, open it by clicking on the link:
 http://127.0.0.1:52519/0222b1ca...
Success! Logged in as: alice@example.com
--------------------------------------------------------------------------------
Authentication details:
   roles:
   - auditor
   - editor
   - access
   traits:
     groups:
     - Everyone
     - admins
     - devs
     username:
     - alice@example.com
   username: alice@example.com
--------------------------------------------------------------------------------
[SAML] Attributes to roles:
- name: groups
  roles:
  - auditor
  - editor
  value: admins
- name: groups
  roles:
  - access
  value: devs

--------------------------------------------------------------------------------
[SAML] Attributes statements:
groups:
- Everyone
- admins
- devs
username:
- alice@example.com

--------------------------------------------------------------------------------
For more details repeat the command with --debug flag.

tctl을 사용하여 커넥터를 만듭니다:

$ tctl create okta-connector.yaml

3/3단계. 인증 기본 설정 구성#

Edit your cluster authentication preferences so you can make the authentication connector you configured in this guide the default authentication method for your Teleport cluster.

Open the Teleport Web UI. From the left sidebar, navigate to Zero Trust Access > Auth Connectors. Find the connector you would like to make the default and, from its three-dot menu, select Set as default.

If you are managing your Teleport resources as configuration files, you can choose a default authentication connector using a dynamic resource. In this case, use tctl to edit the cluster_auth_preference value:

$ tctl edit cluster_auth_preference

Set the value of spec.type to saml:

kind: cluster_auth_preference
metadata:
  ...
  name: cluster-auth-preference
spec:
  ...
  type: saml
  ...
version: v2

After you save and exit the editor, tctl will update the resource:

cluster auth preference has been updated
Additional ways to edit cluster auth preferences

The cluster auth preference is available as a Teleport Terraform provider resource. Find a list of configuration options in the Cluster Auth Preferences Resource Reference.

If you self-host Teleport, you can edit your Teleport Auth Service configuration file to include the following:

# Snippet from /etc/teleport.yaml
auth_service:
  authentication:
    type: saml

If you need to log in again before configuring your identity provider, use the flag --auth=local.

테스트#

이제 웹 UI의 로그인 화면에 새 "Okta" 버튼이 있습니다. tsh CLI를 통해 인증하려면 Proxy Service 주소를 지정하면 tsh가 자동으로 기본 인증 유형을 사용합니다:

$ tsh login --proxy=proxy.example.com

이 명령은 SSO 로그인 URL을 출력합니다(그리고 브라우저에서 자동으로 열려고 합니다).

Tip

Teleport는 여러 SAML 커넥터를 사용할 수 있습니다. 이 경우 --auth 플래그를 통해 커넥터 이름을 전달할 수 있습니다. 위에서 만든 커넥터의 경우:

$ tsh login --proxy=proxy.example.com --auth=okta

다음 단계#

Now that you have connected Teleport to your identity provider, you can customize the way Teleport includes IdP data in Teleport roles.

With role templates, you can include user data from your IdP directly in Teleport roles. If you use the external template variable in the value of a role field, Teleport passes that value from your IdP. In this example, all of the role options you can use for allowing users to assume certain principals on remote systems come from your IdP:

kind: role
version: v7
metadata:
  name: sso-users
spec:
  allow:
    logins: ['{{external.logins}}']
    aws_role_arns: ['{{external.aws_role_arns}}']
    azure_identities: ['{{external.azure_identities}}']
    db_names: ['{{external.db_names}}']
    db_roles: ['{{external.db_roles}}']
    db_users: ['{{external.db_users}}']
    desktop_groups: ['{{external.desktop_groups}}']
    gcp_service_accounts: ['{{external.gcp_service_accounts}}']
    host_groups: ['{{external.host_groups}}']
    host_sudoers: ['{{external.host_sudoers}}']
    kubernetes_groups: ['{{external.kubernetes_groups}}']
    kubernetes_users: ['{{external.kubernetes_users}}']
    windows_desktop_logins: ['{{external.windows_desktop_logins}}']

For more information on using the external template variable, see Role Templates.

For an explanation of the fields listed above, see the Role Reference.

If you need to transform your IdP user data before you include it in Teleport roles, you can do so using Login Rules. Login Rules allow you to include external traits within Teleport roles even if your IdP provides user data in a different format than the one expected by Teleport. Read more about Login Rules.

문제 해결#

Troubleshooting SSO configuration can be challenging. Usually a Teleport administrator must be able to:

  • Be able to see what SAML/OIDC claims and values are getting exported and passed by the SSO provider to Teleport.
  • Be able to see how Teleport maps the received claims to role mappings as defined in the connector.
  • For self-hosted Teleport Enterprise clusters, ensure that HTTP/TLS certificates are configured properly for both the Teleport Proxy Service and the SSO provider.

If something is not working, we recommend to:

  • Double-check the host names, tokens and TCP ports in a connector definition.

Using the Web UI#

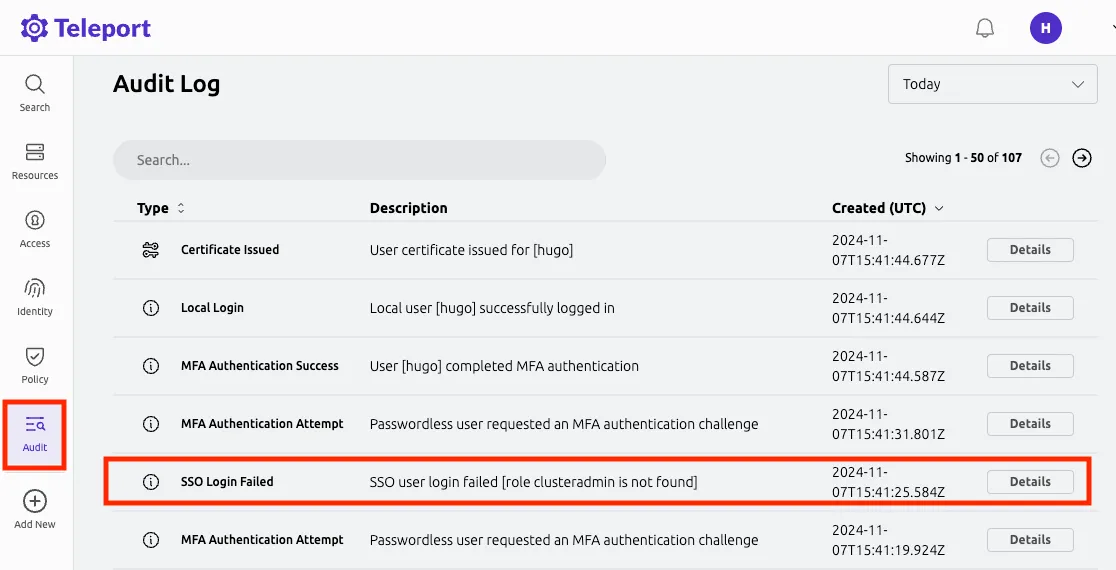
If you get "access denied" or other login errors, the number one place to check is the Audit Log. To view the recording, select Audit in the Teleport Web UI, then click Session Recordings in the menu.

Audit Log Entry for SSO Login error

Example of a user being denied because the role clusteradmin wasn't set up:

{
  "code": "T1001W",
  "error": "role clusteradmin is not found",
  "event": "user.login",
  "message": "Failed to calculate user attributes.\n\trole clusteradmin is not found",
  "method": "oidc",
  "success": false,
  "time": "2024-11-07T15:41:25.584Z",
  "uid": "71e46f17-d611-48bb-bf5e-effd90016c13"
}

Teleport does not show the expected Nodes#

(!docs/pages/includes/node-logins.mdx!)

When configuring SSO, ensure that the identity provider is populating each user's traits correctly. For a user to see a Node in Teleport, the result of populating a template variable in a role's allow.logins must match at least one of a user's traits.logins.

In this example a user will have usernames ubuntu, debian and usernames from the SSO trait logins for Nodes that have a env: dev label. If the SSO trait username is bob then the usernames would include ubuntu, debian, and bob.

kind: role
metadata:
  name: example-role
spec:
  allow:
    logins: ['{{external.logins}}', ubuntu, debian]
    node_labels:
      'env': 'dev'
version: v5

Single sign-on fails with OIDC#

When encountering the error message "Failed to verify JWT: oidc: unable to verify JWT signature: no matching keys", it typically indicates a discrepancy between the algorithm used to sign the JWT token and the algorithm(s) supported by the JSON Web Key Set (JWKS). Specifically, the token might be signed with one algorithm, e.g., HS256, while the JWKS only lists keys for a different algorithm. e.g., RS256. This issue predominantly arises when using identity providers that offer extremely low-level functionality.

Here are some things to check:

  • Verify the JWT header specifies the correct signing algorithm. This should match one of the algorithms listed in the keys section of the JWKS endpoint response.
  • Ensure the JWKS endpoint is returning all relevant public keys. Sometimes key rotation can cause valid keys to be omitted.

To resolve the issue, align the JWT algorithm header with a supported algorithm in the JWKS. Rotate keys if necessary. Verify the JWKS only publishes the active public keys. With proper configuration, the signature should validate successfully.

Okta를 SSO 프로바이더로 사용한 인증

원문 보기
요약

이 가이드는 Teleport Enterprise 및 Teleport Enterprise Cloud에 싱글 사인온(SSO) 아이덴티티를 제공하도록 Okta를 구성하는 방법을 다룹니다. Teleport Enterprise Cloud 및 셀프 호스팅 Teleport Enterprise에서 Teleport는 Okta 통합 등록의 일부로 SSO 커넥터를 자동으로 구성할 수 있습니다.

이 가이드는 Teleport Enterprise 및 Teleport Enterprise Cloud에 싱글 사인온(SSO) 아이덴티티를 제공하도록 Okta를 구성하는 방법을 다룹니다. 역할 기반 접근 제어(RBAC)와 함께 사용하면 Teleport 관리자가 다음과 같은 정책을 정의할 수 있습니다:

  • "DBA" 그룹의 구성원만 PostgreSQL 데이터베이스에 접근할 수 있습니다.
  • 개발자는 프로덕션 서버에 절대 SSH 접근을 하면 안 됩니다.
  • HR 그룹의 구성원은 감사 로그를 볼 수 있지만 프로덕션 환경은 접근할 수 없습니다.
Okta 통합으로 자동 SSO 연결

Teleport Enterprise Cloud 및 셀프 호스팅 Teleport Enterprise에서 Teleport는 Okta 통합 등록의 일부로 SSO 커넥터를 자동으로 구성할 수 있습니다.

Okta 통합 등록을 시작하려면 Teleport 웹 UI를 방문하고 왼쪽 사이드바에서 Add New를 클릭한 다음 Integration을 클릭합니다:

접근 요청 플러그인 등록

그런 다음 안내된 Okta 싱글 사인온 통합 지침을 따릅니다.

작동 방식#

You can register your Teleport cluster as an application with Okta, then create an authentication connector resource that provides Teleport with information about your application. When a user signs in to Teleport, Okta executes its own authentication flow, then sends an HTTP request to your Teleport cluster to indicate that authentication has completed.

Teleport authenticates users to your infrastructure by issuing short-lived certificates. After a user completes an SSO authentication flow, Teleport issues short-lived TLS and SSH certificates to the user. Teleport also creates a temporary user on the Auth Service backend.

Teleport roles are encoded in the user's certificates. To assign Teleport roles to the user, the Auth Service inspects the role mapping within the authentication connector, which associates user data on Okta with the names of one or more Teleport roles.

사전 요구 사항#

  • 관리자 접근 권한이 있는 Okta 계정. 계정에는 사용자와 최소 두 그룹이 포함되어야 합니다. 아직 Teleport 역할에 할당할 Okta 그룹이 없어도 걱정하지 마세요. 아래에서 예시 그룹을 만들겠습니다.
  • A running Teleport Enterprise cluster. If you want to get started with Teleport, sign up for a free trial or set up a demo environment.

  • The tctl and tsh clients.

    Installing `tctl` and `tsh` clients
    1. Determine the version of your Teleport cluster. The tctl and tsh clients must be at most one major version behind your Teleport cluster version. Send a GET request to the Proxy Service at /v1/webapi/find and use a JSON query tool to obtain your cluster version. Replace with the web address of your Teleport Proxy Service:

      $ TELEPORT_DOMAIN=
      $ TELEPORT_VERSION="$(curl -s https://$TELEPORT_DOMAIN/v1/webapi/find | jq -r '.server_version')"
      
    2. Follow the instructions for your platform to install tctl and tsh clients:

  • saml 리소스를 편집하고 유지 관리할 수 있는 접근 권한이 있는 Teleport 역할. 기본 auditoreditor 역할에서 사용 가능합니다.

1/3단계. Okta 구성#

Okta는 SAML 어설션에서 사용자의 그룹 멤버십을 Teleport에 제공하는 데이터로 표시합니다. devs Okta 그룹의 구성원에게 "access" 역할을 할당하고 admins 그룹의 구성원에게 사전 설정된 "auditor" 및 "editor" 역할을 할당하도록 Teleport를 구성합니다.

"access", "auditor", "editor" 역할에 할당하려는 Okta 그룹이 이미 있는 경우 다음 단계로 건너뛸 수 있습니다.

그룹 만들기#

두 그룹을 만듭니다: "devs"와 "admins".

  1. Okta Console에서 Directory -> Groups로 이동한 다음 Add group을 클릭합니다.
  2. 선택적 설명과 함께 그룹 "devs"와 "admins"를 추가합니다.

Okta 앱 만들기 및 구성#

Okta Integration Network 지원은 아직 베타 상태입니다. 확실하지 않은 경우 Custom SAML 2.0 앱으로 진행하세요.

  1. Okta Console에서 Applications로 이동합니다.

  2. Create App Integration을 클릭합니다.

  3. "SAML 2.0"을 선택하고 Next를 클릭합니다.

  4. 앱 이름(예: "Teleport")을 입력하고 선택적으로 로고를 업로드한 다음 Next를 클릭합니다.

  5. "Configure SAML" 단계로 이동하면 여러 값을 입력해야 합니다:

    • 싱글 사인온 URL:

      https:///v1/webapi/saml/acs/okta
      
    • 대상 URI (SP Entity ID):

      https:///v1/webapi/saml/acs/okta
      
    • Name ID 형식 EmailAddress

    • 애플리케이션 사용자 이름 Okta username

    SAML 일반 설정

  6. Next를 클릭합니다. "Feedback" 단계로 이동하면 Finish를 클릭하면 됩니다.

  7. 이제 새로 만든 SAML 앱 구성 화면의 Sign On 탭에 있어야 합니다. Attribute statements로 스크롤하고 Add expression을 클릭합니다. 아래와 같이 값을 입력하고 Save를 클릭합니다.

    • Name: groups
    • Expression: user.getGroups({'group.type': {'OKTA_GROUP', 'APP_GROUP', 'BUILT_IN'}}).![profile.name]
    • Name: username
    • Expression: user.profile.login

    그룹 속성 설정

이메일 형식으로 "NameID"를 설정하고 모든 그룹을 반환하는 표현식으로 그룹을 매핑했습니다. "Audience"와 SSO URL을 동일한 값으로 설정했습니다. 이는 Teleport가 추가 이름 필드에 의존하는 대신 사용자 이름을 Teleport에서 만들기 위해 Okta 사용자의 이메일 주소를 읽고 사용할 수 있도록 하기 위함입니다.

사용자 그룹 할당#

  1. 동일한 Okta Teleport 앱에서 Assignments 탭으로 이동하고 Assign 드롭다운을 클릭합니다.

  2. "Assign to Groups"를 선택하고 이전 단계에서 만든 "devs" 및 "admins" Okta 그룹을 검색합니다.

  3. 선택한 각 그룹 옆의 Assign을 클릭하고 Done을 클릭합니다.

    사용자 그룹 할당

IdP 메타데이터 경로 저장#

  1. Sign On 탭으로 이동하여 "Metadata URL"로 스크롤합니다.

  2. 아래의 Copy 버튼을 사용하여 메타데이터 URL을 복사합니다.

    메타데이터 URL 복사

  3. 나중에 사용하기 위해 메타데이터 파일의 URL을 저장합니다.

2/3단계. Okta를 Teleport에 연결#

이 섹션에서는 Teleport가 Okta와 SAML 메시지를 교환하고 사용자에게 인증서를 발급하는 데 필요한 정보를 제공하는 인증 커넥터를 만듭니다.

역할 매핑 할당#

When a user authenticates to Teleport, the Teleport Auth Service issues SSH and TLS certificates to the user that contain the user's Teleport roles.

For SSO authentication connectors, the Auth Service determines which roles to encode in the certificate by reading the authentication connector's role mapping. The role mapping indicates which Teleport roles to assign based on data that your identity provider stores about the user.

When you configure an authentication connector using the tctl CLI, a role mapping takes the following format:

<attribute_name>,<attribute_value>,<teleport_role_1>,<teleport_role_2>,...,<teleport_role_n>

For example, the following role mapping means that any user with the attribute groups with the value admins receives the Teleport roles auditor and editor:

groups,admins,auditor,editor

For the purpose of this guide, assign two separate role mappings:

  • A more permissive role mapping:
  • A more restrictive role mapping:

SAML 커넥터 구성#

tctl을 사용하여 Okta SAML 커넥터를 정의합니다. 이 예제 명령을 메타데이터 파일의 경로로 업데이트하고 사용자 정의 그룹 할당을 위해 --attributes-to-roles 값을 편집합니다. 이 명령의 전체 플래그 참조는 tctl sso configure saml를 확인하세요:

$ tctl sso configure saml --preset=okta \
--entity-descriptor "https://example.okta.com/app/000000/sso/saml/metadata" \
--attributes-to-roles= \
--attributes-to-roles= > okta-connector.yaml

okta-connector.yaml의 내용은 다음과 유사해야 합니다:

kind: saml
metadata:
  name: okta
spec:
  acs: https://teleport.example.com:443/v1/webapi/saml/acs/okta
  attributes_to_roles:
  - name: groups
    roles:
    - auditor
    - editor
    value: admins
  - name: groups
    roles:
    - access
    value: devs
  audience: https://teleport.example.com:443/v1/webapi/saml/acs/okta
  cert: ""
  display: "Okta"
  entity_descriptor: ""
  entity_descriptor_url: https://example.okta.com/app/000000/sso/saml/metadata
  issuer: ""
  service_provider_issuer: https://teleport.example.com:443/v1/webapi/saml/acs/okta
  sso: ""
version: v2
IdP-initiated SSO Enabling the `spec.allow_idp_initiated` flag in SAML connectors allows users to log in to Teleport with one click from the dashboard provided by the IdP.
This feature is potentially unsafe and should be used with caution.

Enabling IdP-initiated login comes with notable security risks such as:
- Possibility of replay attacks on the SAML payload giving an attacker a secret web session
  • Increased risk of session hijacking and impersonation attacks based on intercepting SAML communications

커넥터 테스트#

클러스터에 적용하기 전에 커넥터를 테스트할 수 있습니다. 활성 클러스터의 중단을 방지하기 위해 강력히 권장됩니다:

$ cat okta-connector.yaml | tctl sso test
If browser window does not open automatically, open it by clicking on the link:
 http://127.0.0.1:52519/0222b1ca...
Success! Logged in as: alice@example.com
--------------------------------------------------------------------------------
Authentication details:
   roles:
   - auditor
   - editor
   - access
   traits:
     groups:
     - Everyone
     - admins
     - devs
     username:
     - alice@example.com
   username: alice@example.com
--------------------------------------------------------------------------------
[SAML] Attributes to roles:
- name: groups
  roles:
  - auditor
  - editor
  value: admins
- name: groups
  roles:
  - access
  value: devs

--------------------------------------------------------------------------------
[SAML] Attributes statements:
groups:
- Everyone
- admins
- devs
username:
- alice@example.com

--------------------------------------------------------------------------------
For more details repeat the command with --debug flag.

tctl을 사용하여 커넥터를 만듭니다:

$ tctl create okta-connector.yaml

3/3단계. 인증 기본 설정 구성#

Edit your cluster authentication preferences so you can make the authentication connector you configured in this guide the default authentication method for your Teleport cluster.

Open the Teleport Web UI. From the left sidebar, navigate to Zero Trust Access > Auth Connectors. Find the connector you would like to make the default and, from its three-dot menu, select Set as default.

If you are managing your Teleport resources as configuration files, you can choose a default authentication connector using a dynamic resource. In this case, use tctl to edit the cluster_auth_preference value:

$ tctl edit cluster_auth_preference

Set the value of spec.type to saml:

kind: cluster_auth_preference
metadata:
  ...
  name: cluster-auth-preference
spec:
  ...
  type: saml
  ...
version: v2

After you save and exit the editor, tctl will update the resource:

cluster auth preference has been updated
Additional ways to edit cluster auth preferences

The cluster auth preference is available as a Teleport Terraform provider resource. Find a list of configuration options in the Cluster Auth Preferences Resource Reference.

If you self-host Teleport, you can edit your Teleport Auth Service configuration file to include the following:

# Snippet from /etc/teleport.yaml
auth_service:
  authentication:
    type: saml

If you need to log in again before configuring your identity provider, use the flag --auth=local.

테스트#

이제 웹 UI의 로그인 화면에 새 "Okta" 버튼이 있습니다. tsh CLI를 통해 인증하려면 Proxy Service 주소를 지정하면 tsh가 자동으로 기본 인증 유형을 사용합니다:

$ tsh login --proxy=proxy.example.com

이 명령은 SSO 로그인 URL을 출력합니다(그리고 브라우저에서 자동으로 열려고 합니다).

Tip

Teleport는 여러 SAML 커넥터를 사용할 수 있습니다. 이 경우 --auth 플래그를 통해 커넥터 이름을 전달할 수 있습니다. 위에서 만든 커넥터의 경우:

$ tsh login --proxy=proxy.example.com --auth=okta

다음 단계#

Now that you have connected Teleport to your identity provider, you can customize the way Teleport includes IdP data in Teleport roles.

With role templates, you can include user data from your IdP directly in Teleport roles. If you use the external template variable in the value of a role field, Teleport passes that value from your IdP. In this example, all of the role options you can use for allowing users to assume certain principals on remote systems come from your IdP:

kind: role
version: v7
metadata:
  name: sso-users
spec:
  allow:
    logins: ['{{external.logins}}']
    aws_role_arns: ['{{external.aws_role_arns}}']
    azure_identities: ['{{external.azure_identities}}']
    db_names: ['{{external.db_names}}']
    db_roles: ['{{external.db_roles}}']
    db_users: ['{{external.db_users}}']
    desktop_groups: ['{{external.desktop_groups}}']
    gcp_service_accounts: ['{{external.gcp_service_accounts}}']
    host_groups: ['{{external.host_groups}}']
    host_sudoers: ['{{external.host_sudoers}}']
    kubernetes_groups: ['{{external.kubernetes_groups}}']
    kubernetes_users: ['{{external.kubernetes_users}}']
    windows_desktop_logins: ['{{external.windows_desktop_logins}}']

For more information on using the external template variable, see Role Templates.

For an explanation of the fields listed above, see the Role Reference.

If you need to transform your IdP user data before you include it in Teleport roles, you can do so using Login Rules. Login Rules allow you to include external traits within Teleport roles even if your IdP provides user data in a different format than the one expected by Teleport. Read more about Login Rules.

문제 해결#

Troubleshooting SSO configuration can be challenging. Usually a Teleport administrator must be able to:

  • Be able to see what SAML/OIDC claims and values are getting exported and passed by the SSO provider to Teleport.
  • Be able to see how Teleport maps the received claims to role mappings as defined in the connector.
  • For self-hosted Teleport Enterprise clusters, ensure that HTTP/TLS certificates are configured properly for both the Teleport Proxy Service and the SSO provider.

If something is not working, we recommend to:

  • Double-check the host names, tokens and TCP ports in a connector definition.

Using the Web UI#

If you get "access denied" or other login errors, the number one place to check is the Audit Log. To view the recording, select Audit in the Teleport Web UI, then click Session Recordings in the menu.

Audit Log Entry for SSO Login error

Example of a user being denied because the role clusteradmin wasn't set up:

{
  "code": "T1001W",
  "error": "role clusteradmin is not found",
  "event": "user.login",
  "message": "Failed to calculate user attributes.\n\trole clusteradmin is not found",
  "method": "oidc",
  "success": false,
  "time": "2024-11-07T15:41:25.584Z",
  "uid": "71e46f17-d611-48bb-bf5e-effd90016c13"
}

Teleport does not show the expected Nodes#

(!docs/pages/includes/node-logins.mdx!)

When configuring SSO, ensure that the identity provider is populating each user's traits correctly. For a user to see a Node in Teleport, the result of populating a template variable in a role's allow.logins must match at least one of a user's traits.logins.

In this example a user will have usernames ubuntu, debian and usernames from the SSO trait logins for Nodes that have a env: dev label. If the SSO trait username is bob then the usernames would include ubuntu, debian, and bob.

kind: role
metadata:
  name: example-role
spec:
  allow:
    logins: ['{{external.logins}}', ubuntu, debian]
    node_labels:
      'env': 'dev'
version: v5

Single sign-on fails with OIDC#

When encountering the error message "Failed to verify JWT: oidc: unable to verify JWT signature: no matching keys", it typically indicates a discrepancy between the algorithm used to sign the JWT token and the algorithm(s) supported by the JSON Web Key Set (JWKS). Specifically, the token might be signed with one algorithm, e.g., HS256, while the JWKS only lists keys for a different algorithm. e.g., RS256. This issue predominantly arises when using identity providers that offer extremely low-level functionality.

Here are some things to check:

  • Verify the JWT header specifies the correct signing algorithm. This should match one of the algorithms listed in the keys section of the JWKS endpoint response.
  • Ensure the JWKS endpoint is returning all relevant public keys. Sometimes key rotation can cause valid keys to be omitted.

To resolve the issue, align the JWT algorithm header with a supported algorithm in the JWKS. Rotate keys if necessary. Verify the JWKS only publishes the active public keys. With proper configuration, the signature should validate successfully.